Page 258 of 442

AM and FM:● Tilt up/down for less than 1.5 seconds to
increase or decrease the preset station.
● Tilt up/down for more than 1.5 seconds to
seek up or down to the next station.
● Press the ENTER button to show the list of
preset stations.
XM/SXM (if so equipped): ● Tilt up/down for less than 1.5 seconds to
increase or decrease the preset station.
● Tilt up/down for more than 1.5 seconds to
go to the next or previous channel.
● Press the ENTER button to show the
XM/SXM Menu.
iPod®: ● Tilt up/down for less than 1.5 seconds to
increase or decrease the track number.
● Press the ENTER button to show the iPod
Menu. CD:
● Tilt up/down for less than 1.5 seconds to
increase or decrease the track number.
● Tilt up/down for more than 1.5 seconds to
increase or decrease the folder number (if
playing compressed audio files) .
● Press the ENTER button to show the CD
Menu.
USB: ● Tilt up/down for less than 1.5 seconds to
increase or decrease the track number.
● Tilt up/down for more than 1.5 seconds to
increase or decrease the folder number.
● Press the ENTER button to show the USB
Menu.
Bluetooth® Audio: ● Tilt up/down for less than 1.5 seconds to
skip ahead or back to the next song.
● Tilt up/down for more than 1.5 seconds to
reverse or fast forward the current song.
AUX: ● Press the ENTER button to show the AUX
Menu.ANTENNA
The antenna cannot be shortened, but can be
removed. When you need to remove the antenna,
turn the antenna rod counterclockwise.
To install the antenna rod, turn the antenna rod
clockwise and hand tighten.
CAUTION
● Always properly tighten the antenna
rod during installation or the antenna
rod may break during vehicle operation.
● Be sure that the antenna is removed
before the vehicle enters an automatic
car wash.
● Be sure to fold down the antenna be-
fore the vehicle enters a garage with a
low ceiling.
Monitor, climate, audio, phone and voice recognition systems4-77
Page 343 of 442
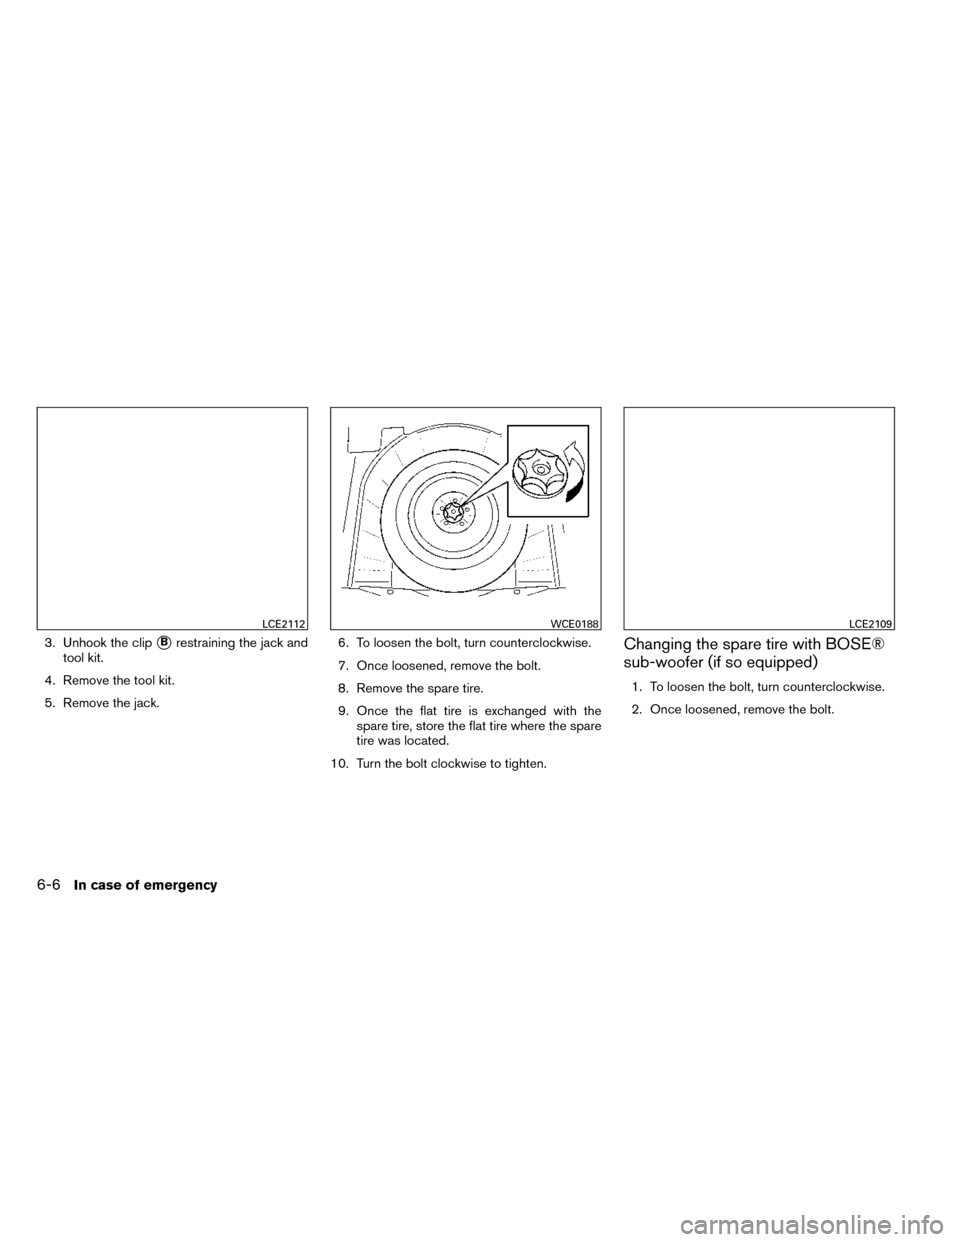
3. Unhook the clip�Brestraining the jack and
tool kit.
4. Remove the tool kit.
5. Remove the jack. 6. To loosen the bolt, turn counterclockwise.
7. Once loosened, remove the bolt.
8. Remove the spare tire.
9. Once the flat tire is exchanged with the
spare tire, store the flat tire where the spare
tire was located.
10. Turn the bolt clockwise to tighten.Changing the spare tire with BOSE®
sub-woofer (if so equipped)
1. To loosen the bolt, turn counterclockwise.
2. Once loosened, remove the bolt.
LCE2112WCE0188LCE2109
6-6In case of emergency
Page 344 of 442
3. Place the sub-woofer in the upper right cor-ner of the trunk, leaning against the 2nd row
passenger side seat.
4. Remove the spare tire.
5. Once the flat tire is exchanged with the spare tire, store the flat tire where the spare
was located.
6. Place the sub-woofer inside the flat tire.
7. Turn the bolt clockwise to tighten.
LCE2110
LCE2106
In case of emergency6-7
Page 345 of 442

Jacking up vehicle and removing the
damaged tire
WARNING
●Never get under the vehicle while it is
supported only by the jack. If it is nec-
essary to work under the vehicle, sup-
port it with safety stands.
● Use only the jack provided with your
vehicle to lift the vehicle. Do not use the
jack provided with your vehicle on other
vehicles. The jack is designed for lifting
only your vehicle during a tire change.
● Use the correct jack-up points. Never
use any other part of the vehicle for jack
support.
● Never jack up the vehicle more than
necessary.
● Never use blocks on or under the jack.
●
Do not start or run the engine while ve-
hicle is on the jack. It may cause the
vehicle to move. This is especially true for
vehicles with limited slip differentials.
● Do not allow passengers to stay in the
vehicle while it is on the jack.
● Never run the engine with a wheel(s) off
the ground. It may cause the vehicle to
move. Always refer to the proper illustrations for the
correct placement and jack-up points for your
specific vehicle model and jack type.
Carefully read the caution label attached to
the jack body and the following instruc-
tions.
1. Loosen each wheel nut one or two turns by turning counterclockwise with the wheel nut
wrench. Do not remove the wheel nuts
until the tire is off the ground. 2. Place the jack directly under the jack-up
point as illustrated so the top of the jack
contacts the vehicle at the jack-up point.
Align the jack head between the two
notches in the front or the rear as shown.
Also fit the groove of the jack head between
the notches as shown.
The jack should be used on firm and
level ground.
3. To lift the vehicle, securely hold the jack lever and rod with both hands. Carefully raise the
vehicle until the tire clears the ground. Re-
move the wheel nuts, and then remove the
tire.
SCE0002
6-8In case of emergency
Page 369 of 442

CHANGING ENGINE OIL
1. Park the vehicle on a level surface and applythe parking brake.
2. Start the engine and let it idle until it reaches operating temperature, then turn it off. 3. Remove the oil filler cap
�Bby turning it
counterclockwise.
4. Place a large drain pan under the drain plug
�A.
5. Remove the drain plug
�Awith a wrench by
turning it counterclockwise and completely
drain the oil.
If the oil filter is to be changed, remove and
replace it at this time. See “Changing engine
oil filter” in this section.
● Waste oil must be disposed of prop-
erly.
● Check your local regulations.
WARNING
●Prolonged and repeated contact with
used engine oil may cause skin cancer.
● Try to avoid direct skin contact with
used oil. If skin contact is made, wash
thoroughly with soap or hand cleaner as
soon as possible.
● Keep used engine oil out of reach of
children.
CAUTION
Be careful not to burn yourself. The engine
oil may be hot.
6. Clean and reinstall the drain plug and a new washer. Securely tighten the drain plug with
a wrench. Do not use excessive force.
Drain plug tightening torque: 22 - 29 ft-lb (29 - 39 N·m)
7. Refill engine with recommended oil through the oil filler opening, then install the oil filler
cap securely.
See “Recommended fluids/lubricants and
capacities” in the “Technical and consumer
information” section of this manual for drain
and refill capacity.
The drain and refill capacity depends on the
oil temperature and drain time. Use these
specifications for reference only. Always use
the dipstick to determine when the proper
amount of oil is in the engine.
8. Start the engine. Check for leakage around the drain plug and oil filter. Correct as re-
quired.
9. Turn the engine off and wait more than 10 minutes. Check the oil level with the
dipstick. Add engine oil if necessary.
LDI2338
8-10Maintenance and do-it-yourself
Page 370 of 442

CHANGING ENGINE OIL FILTER
1. Park the vehicle on a level surface and applythe parking brake.
2. Turn the engine off.
3. Place a large drain pan under the oil filter
�B. 4. Remove pins
�Cfrom the right engine pro-
tector located inside right wheel well, re-
move protector. Remove oil filter
�Bwith an
oil filter wrench by turning it counterclock-
wise. Then remove the oil filter by turning it
by hand.
CAUTION
Be careful not to burn yourself. The engine
oil may be hot.
5. Wipe the engine oil filter sealing surface with a clean rag.
CAUTION
●Be sure to remove any old gasket
material remaining on the sealing
surface of the engine. Failure to do
so could lead to an oil leak and en-
gine damage.
● The dipstick must be inserted in
place to prevent oil spillage from the
dipstick hole when filling the engine
with oil.
6. Coat the gasket on the new filter with clean engine oil.
7. Screw on the oil filter until a slight resistance is felt, then tighten an additional 2/3 turn. 8. Start the engine and check for leakage
around the oil filter. Correct as required.
9. Turn the engine off and wait more than 10 minutes. Check the oil level. Add engine
oil if necessary.
LDI2342
Maintenance and do-it-yourself8-11