2014 NISSAN QUEST steering
[x] Cancel search: steeringPage 2 of 32
*See your Owner’s Manual for information.
01
03
04
02
20
2122
23
05
08
06
13
24
151807
1619
17
12
25
11
24
14
09
10
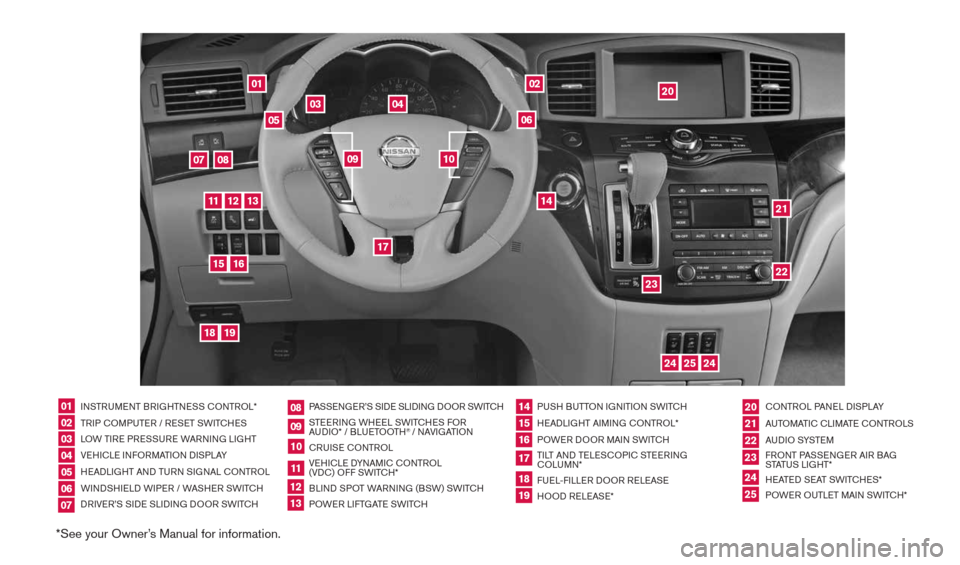
INSTRUMENT BRIGHTNESS cONTROL*
TRIP c OMPUTER / RESET SWIT cHES
LOW TIRE PRESSURE WARNING LIGHT
VEHIcLE INFORMATION DISPLAY
HEADLIGHT AND TURN SIGNAL c ONTROL
WINDSHIELD WIPER / WASHER SWIT cH
DRIVER’S SIDE SLIDING DOOR SWIT cH PASSENGER’S SIDE SLIDING DOOR SWIT
cH
STEERING WHEEL SWIT cHES FOR
AUDIO* / BLUETOOTH
® / NAVIGATION
cRUISE cONTROL
VEHI cLE DYNAMI c cONTROL
(VD c) OFF SWIT cH*
BLIND SPOT WARNING (BSW) SWIT cH
POWER LIFTGATE SWIT cH PUSH BUTTON IGNITION SWIT
cH
HEADLIGHT AIMING c ONTROL*
POWER DOOR MAIN SWIT cH
TILT AND TELES cOPI c STEERING
c OLUMN*
FUEL-FILLER DOOR RELEASE
HOOD RELEASE* cONTROL PANEL DISPLAY
AUTOMATI c cLIMATE c ONTROLS
AU D I O SYSTE M
FRONT PASSENGER AIR BAG
STATUS LIGHT*
HEATED SEAT SWIT cHES*
POWER OUTLET MAIN SWIT cH*
0102030405
0910
2124
18
06
11
2225
07
141916
08
15
2023
17
1213
1490690_14_Quest_QRG_072513.indd 47/25/13 9:23 AM
Page 5 of 32
3
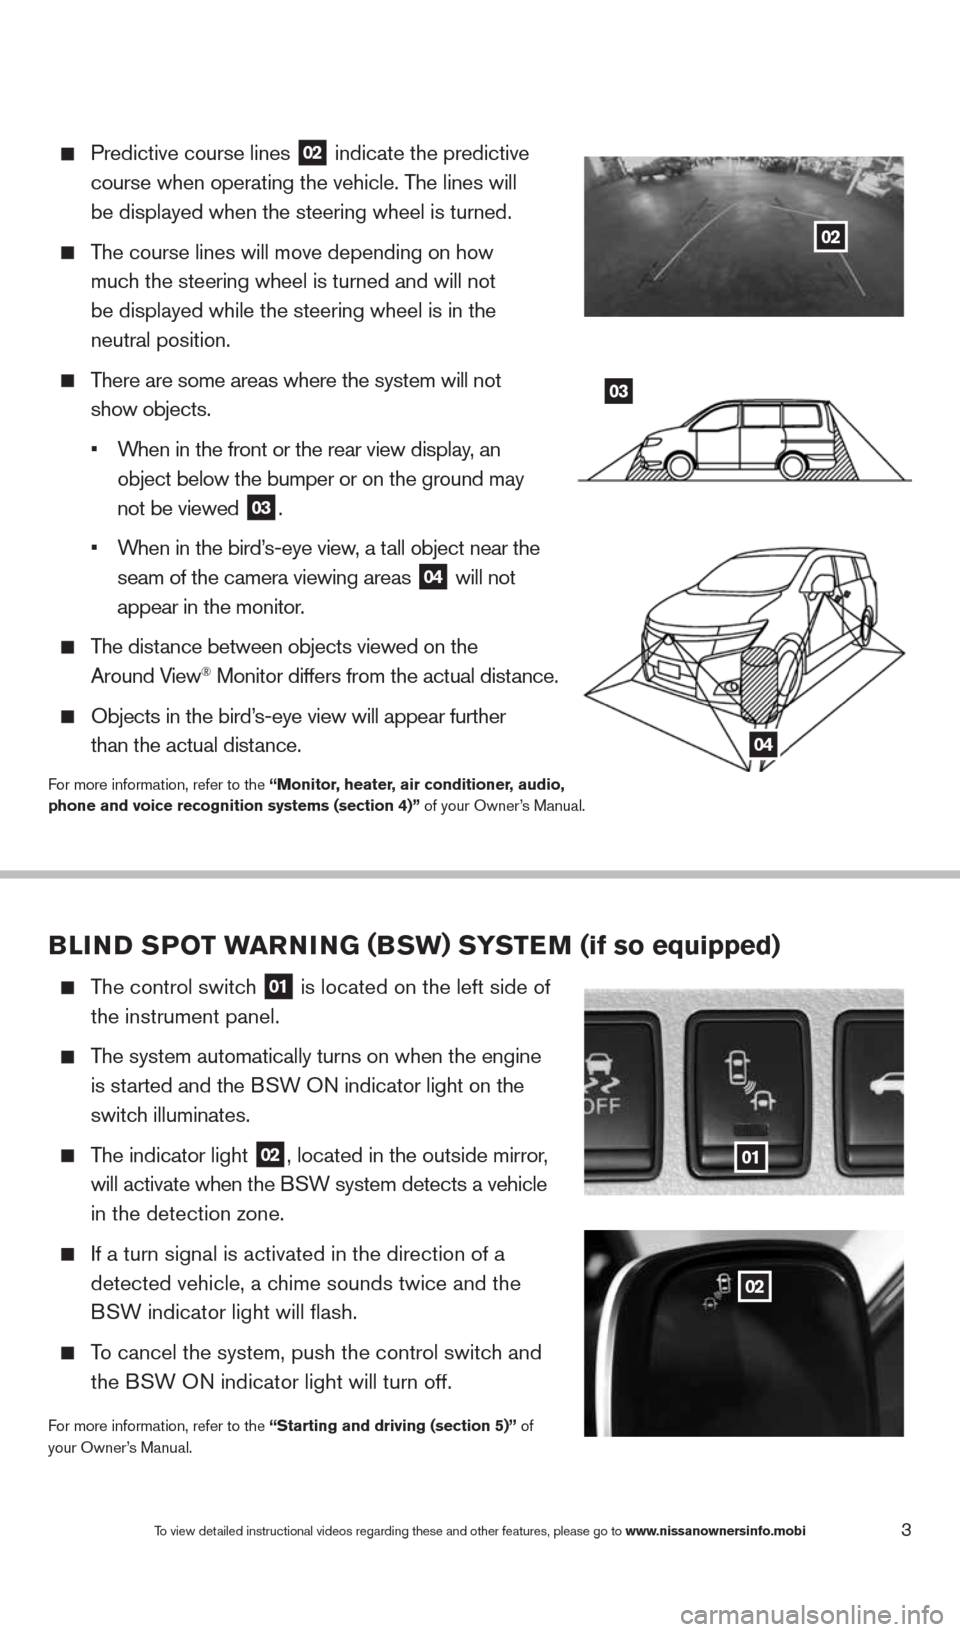
Predictive course lines
02 indicate the predictive
course when operating the vehicle. The lines will
be displayed when the steering wheel is turned.
The course lines will move depending on how
much the steering wheel is turned and will not
be displayed while the steering wheel is in the
neutral position.
There are some areas where the system will not
show objects.
•
When in the front or the rear view display, an
object below the bumper or on the ground may
not be viewed
03.
•
When in the bird’s-eye view, a tall object near the
seam of the camera viewing areas
04 will not
appear in the monitor.
The distance between objects viewed on the
Around View® Monitor differs from the actual distance.
Objects in the bird’s-eye view will appear further
than the actual distance.
For more information, refer to the “Monitor, heater, air conditioner, audio,
phone and voice recognition systems (section 4)” of your Owner’s Manual.
03
04
BLIND SPOT warNING (BSw) S YST eM (if so equipped)
The control switch
01 is located on the left side of
the instrument panel.
The system automatically turns on when the engine
is started and the BSW ON indicator light
on the
switch illuminates.
The indicator light
02, located in the outside mirror,
will activate when the BSW system detects a vehicle
in the detection zone.
If a turn signal is activated in the direction of a
detected vehicle, a chime sounds twice and the
BSW indicator light will flash.
To cancel the system, push the control switch and
the BSW ON indicator light will turn off.
For more information, refer to the “Starting and driving (section 5)” of
your Owner’s Manual.
01
02
To view detailed instructional videos regarding these and other features, please go\
to www.nissanownersinfo.mobi
02
1490690_14_Quest_QRG_072513.indd 37/25/13 9:23 AM
Page 8 of 32
6To view detailed instructional videos regarding these and other features, please go\
to www.nissanownersinfo.mobi
esseNtial i Nfor matio N
LOOSe Fue L CaP
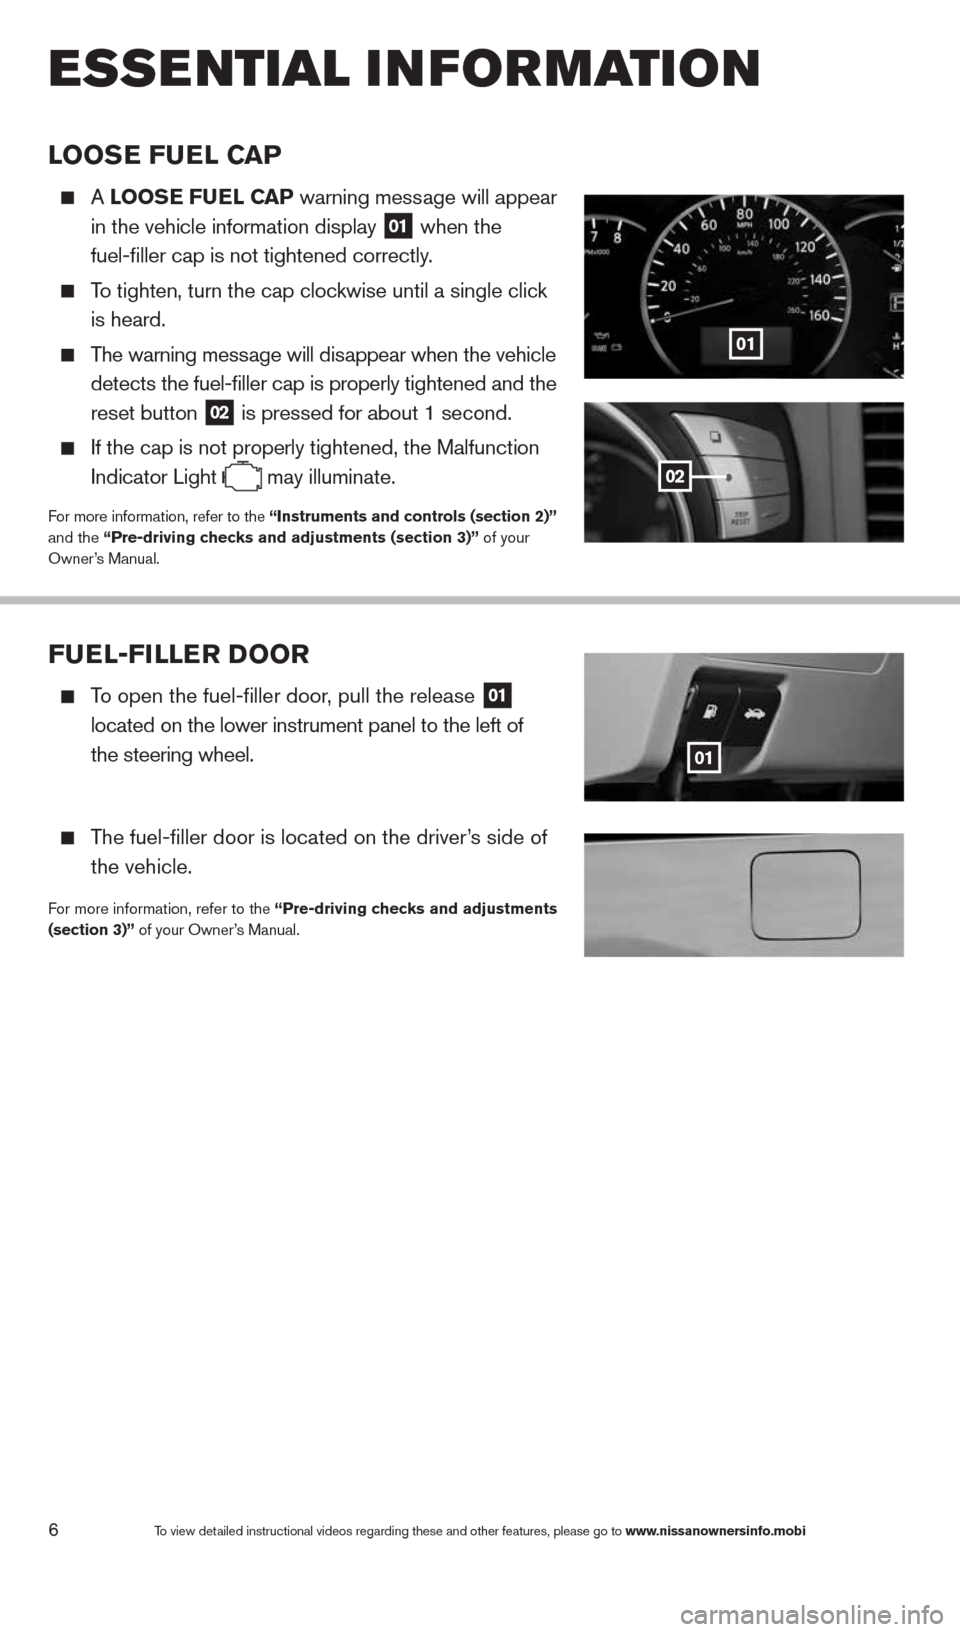
A LOOS e Fue L CaP warning message will appear
in the vehicle information display
01 when the
fuel-filler cap is not tightened correctly.
To tighten, turn the cap clockwise until a single click
is heard.
The warning message will disappear when the vehicle
detects the fuel-filler cap is properly tightened and the
reset button
02 is pressed for about 1 second.
If the cap is not properly tightened, the Malfunction
Indicator Light
may illuminate.For more information, refer to the “Instruments and controls (section 2)”
and the “Pre-driving checks and adjustments (section 3)” of your
Owner’s Manual.
01
02
Fue
L-FILLer DOOr
To open the fuel-filler door, pull the release 01
located on the lower instrument panel to the left of
the steering wheel.
The fuel-filler door is located on the driver’s side of
the vehicle.
For more information, refer to the “Pre-driving checks and adjustments
(section 3)” of your Owner’s Manual.
01
1490690_14_Quest_QRG_072513.indd 67/25/13 9:23 AM
Page 11 of 32
9
FrONT PO wer SeaT aDJ uSTM eNTS (if so equipped)
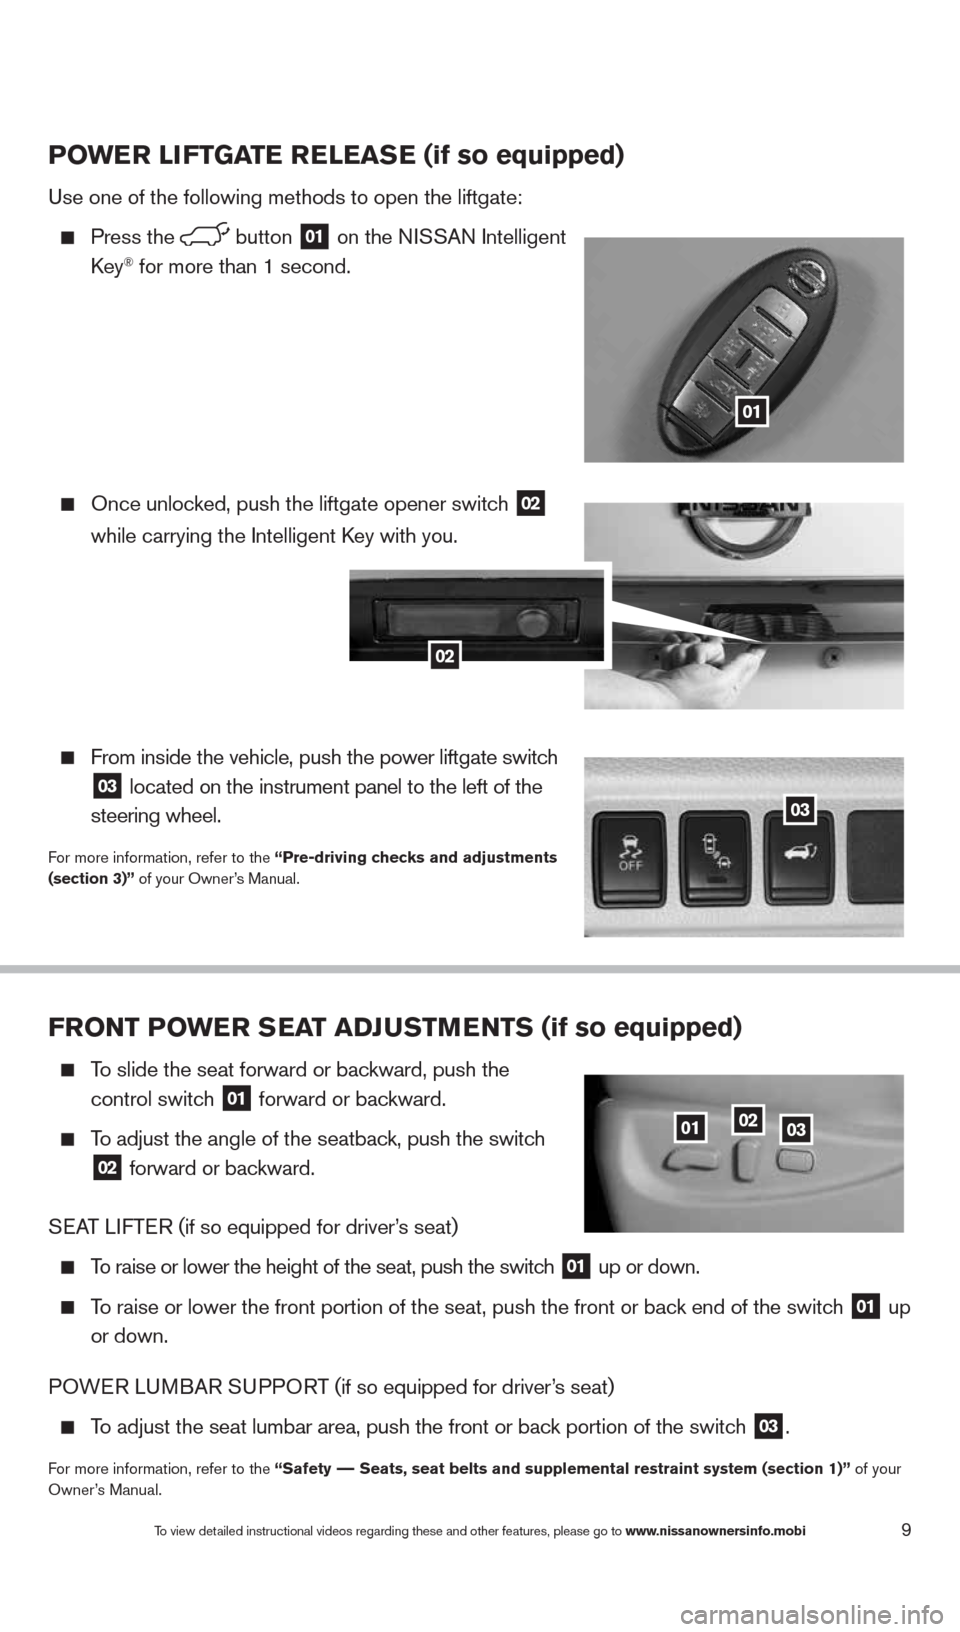
To slide the seat forward or backward, push the
control switch
01 forward or backward.
To adjust the angle of the seatback, push the switch
02 forward or backward.
S EAT LIFTER (if so equipped for driver’s seat)
To raise or lower the height of the seat, push the switch 01 up or down.
To raise or lower the front portion of the seat, push the front or back end of the switch 01 up
or down.
POWER L UMBAR SUPPORT (if so equipped for driver’s seat)
To adjust the seat lumbar area, push the front or back portion of the switch 03.
For more information, refer to the “Safety –– Seats, seat belts and supplemental restraint system (section 1)” of your
Owner’s Manual.
010203
PO wer LIFTGa Te reLeaSe (if so equipped)
Use one of the following methods to open the liftgate:
Press the button 01 on the NISSAN Intelligent
key® for more than 1 second.
Once unlocked, push the liftgate opener switch 02
while
carrying the Intelligent k ey with you.
From inside the vehicle, push the power liftgate switch
03 located on the instrument panel to the left of the
steering wheel.
For more information, refer to the “Pre-driving checks and adjustments
(section 3)” of your Owner’s Manual.
01
03
02
To view detailed instructional videos regarding these and other features, please go\
to www.nissanownersinfo.mobi
1490690_14_Quest_QRG_072513.indd 97/25/13 9:23 AM
Page 23 of 32
21
When speaking Phonebook names, please be aware some phones require the la\
st name
to be spoken before the first name. For example, “Michael Smith” may be spoken as
“Smith Michael”.
To cancel a voice recognition session, say “Exit” or press and hold the
or
button.
To decrease or increase the volume of the voice prompts, push the volume \
control switches
or
on the steering wheel or turn the VOL/ON•OFF control knob on the audio system
while the system is responding.
Voice commands can be used to operate various Bluetooth System features u\
sing the
NISSAN Voice Recognition system. See your Owner’s Manual for detailed information.
If the Voice Recognition system does not recognize your voice commands, train th\
e system
using the Speaker Adaptation Mode.
For more detailed information and instructions, refer to your cellular phone’s Owner’s Manual
and visit www.nissanusa.com/bluetooth.
Bluetooth® System with Navigation* (if so equipped)
Bluetooth Streaming Audio (available with Navigation System only) allo\
ws you to use a
compatible Bluetooth phone to play audio files on your device. Your compatible cellular
phone can be connected to the vehicle’s audio system, allowing audio files to play through
the vehicle’s speakers.
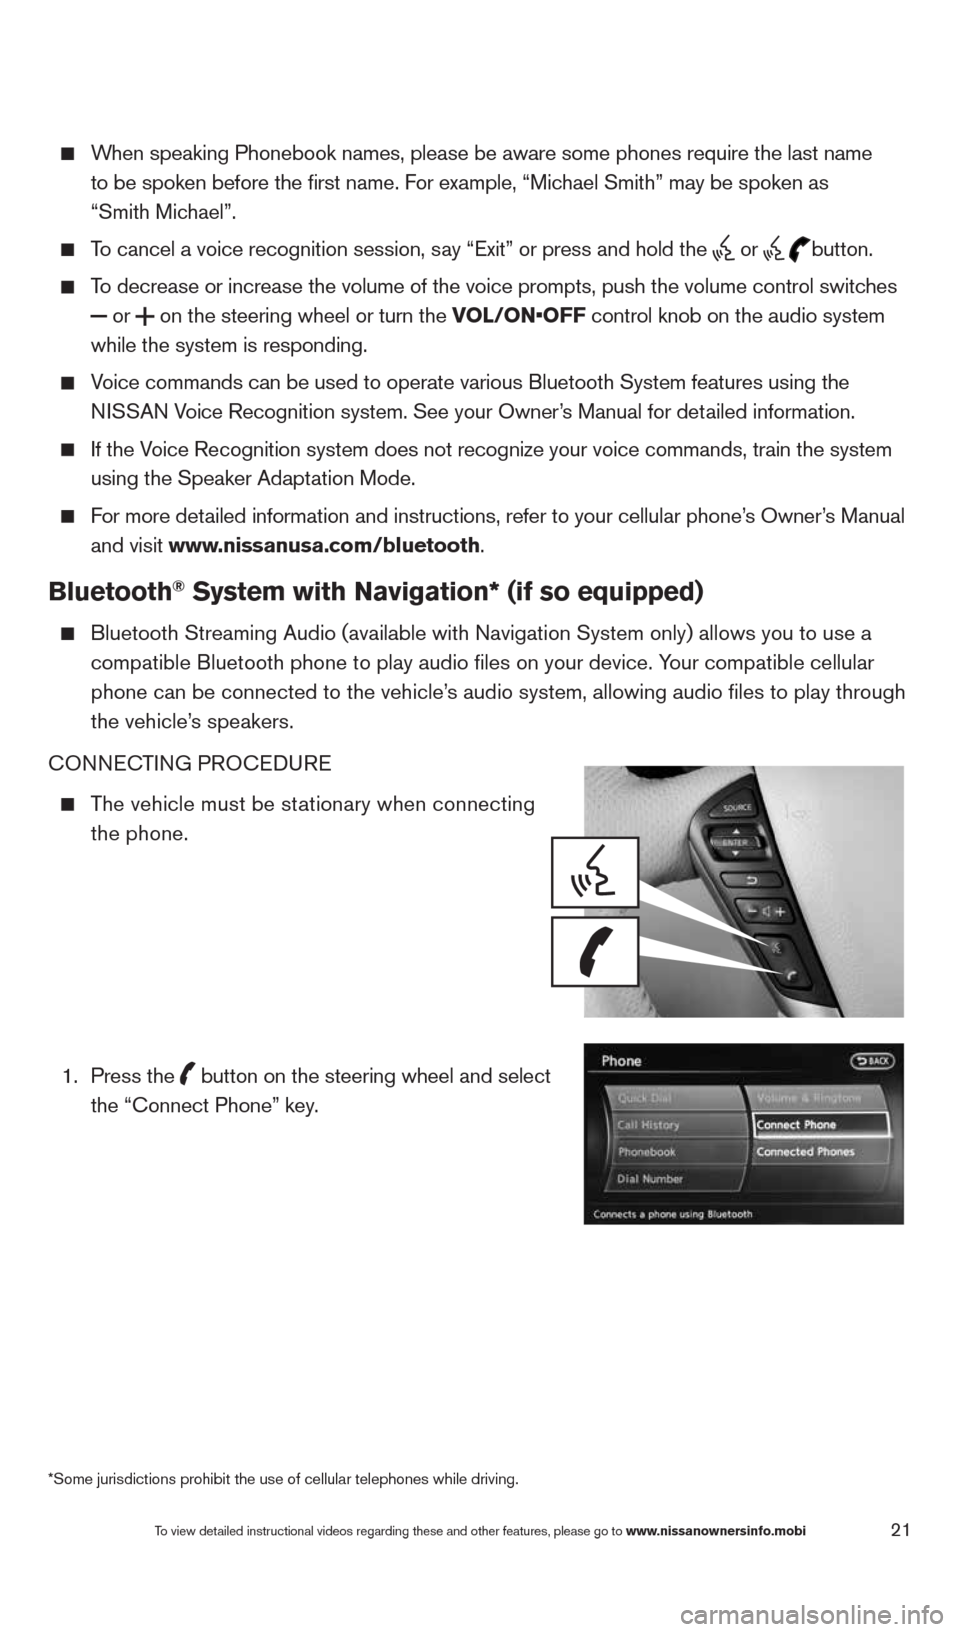
cONNEc TING PROcEDURE
The vehicle must be stationary when connecting
the phone.
1.
Press the
button on the steering wheel and select
the “connect Phone” key.
*Some jurisdictions prohibit the use of cellular telephones while drivin\
g.
To view detailed instructional videos regarding these and other features, please go\
to www.nissanownersinfo.mobi
1490690_14_Quest_QRG_072513.indd 217/25/13 9:24 AM
Page 24 of 32
22
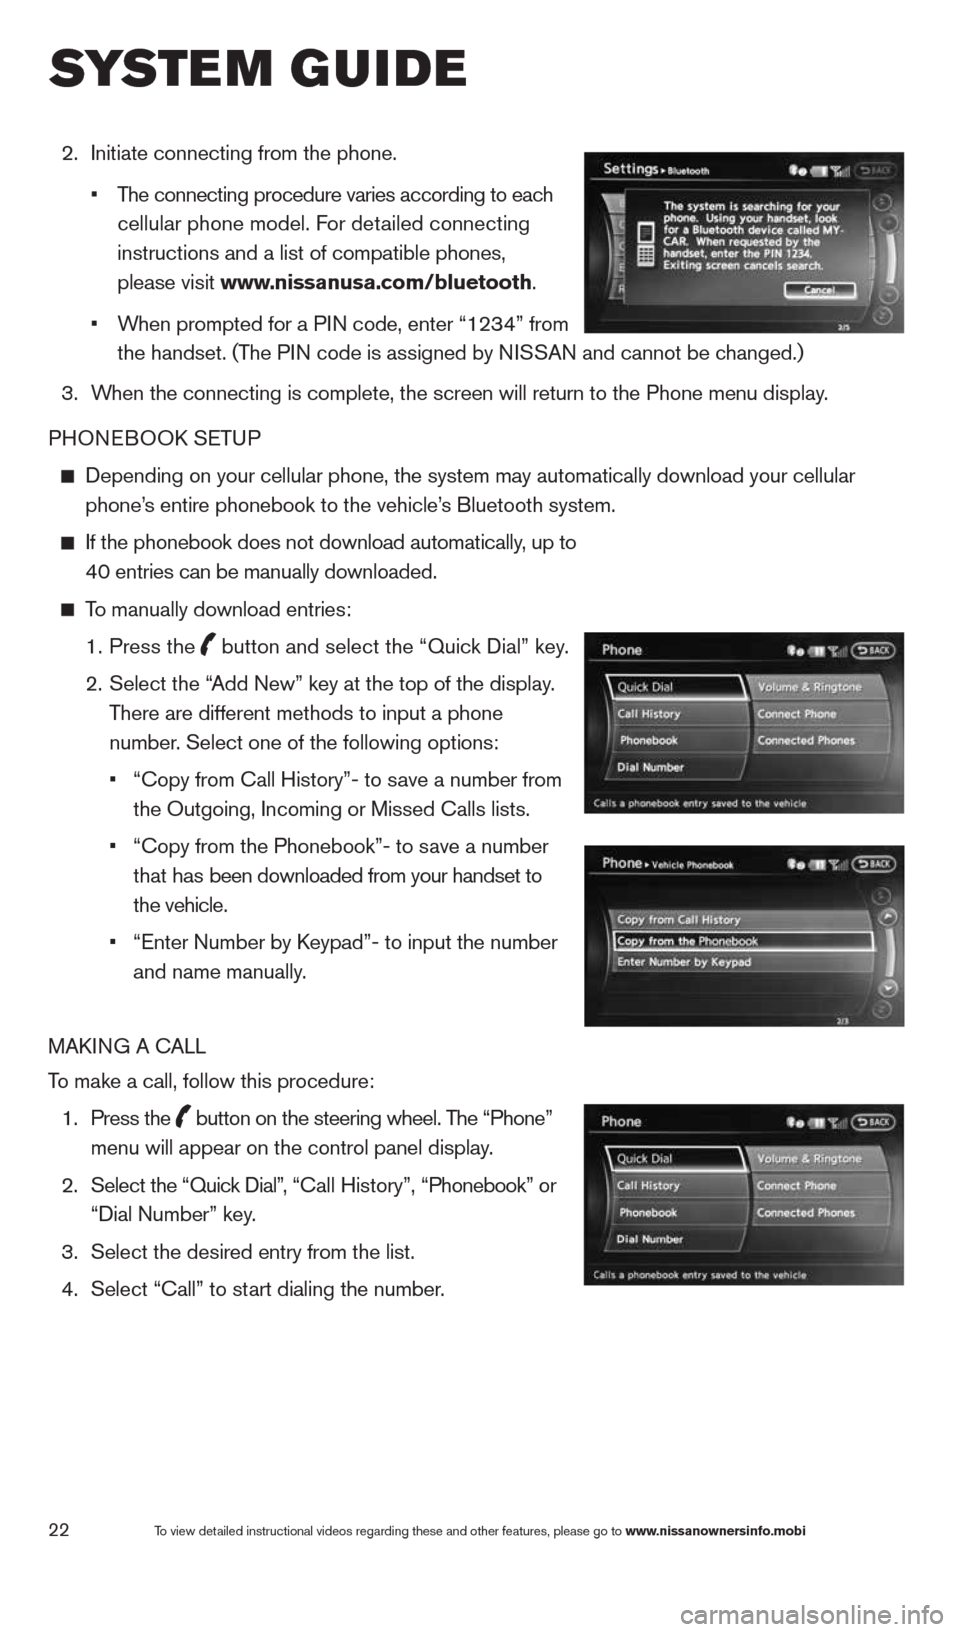
2. Initiate connecting from the phone.
• The connecting procedure varies according to each
cellular phone model. For detailed connecting
instructions and a list of compatible phones,
please visit www.nissanusa.com/bluetooth.
• When prompted for a PIN code, enter “1234” from
the handset. (The PIN code is assigned by NISSAN and cannot be changed.)
3. When the connecting is complete, the screen will return to the Phone menu display.
PHONEBOOk SETUP
Depending on your cellular phone, the system may automatically download \
your cellular
phone’s entire phonebook to the vehicle’s Bluetooth system.
If the phonebook does not download automatically, up to
40 entries can be manually downloaded.
To manually download entries:
1. Press the
button and select the “Quick Dial” key.
2.
Select the “Add New” key at the top of the display.
There are different methods to input a phone
number. Select one of the following options:
•
“copy from call History”- to save a number from
the Outgoing, Incoming or Missed calls lists.
• “copy from the Phonebook”- to save a number
that has been downloaded from your handset to
the vehicle.
• “Enter Number by k eypad”- to input the number
and name manually.
MAk ING A c ALL
To make a call, follow this procedure:
1. Press the
button on the steering wheel. The “Phone”
menu will appear on the control panel display.
2. Select the “Quick Dial”, “ call History”, “Phonebook” or
“Dial Number” key.
3. Select the desired entry from the list.
4. Select “call” to start dialing the number.
To view detailed instructional videos regarding these and other features, please go\
to www.nissanownersinfo.mobi
system guide
1490690_14_Quest_QRG_072513.indd 227/25/13 9:24 AM
Page 25 of 32
23
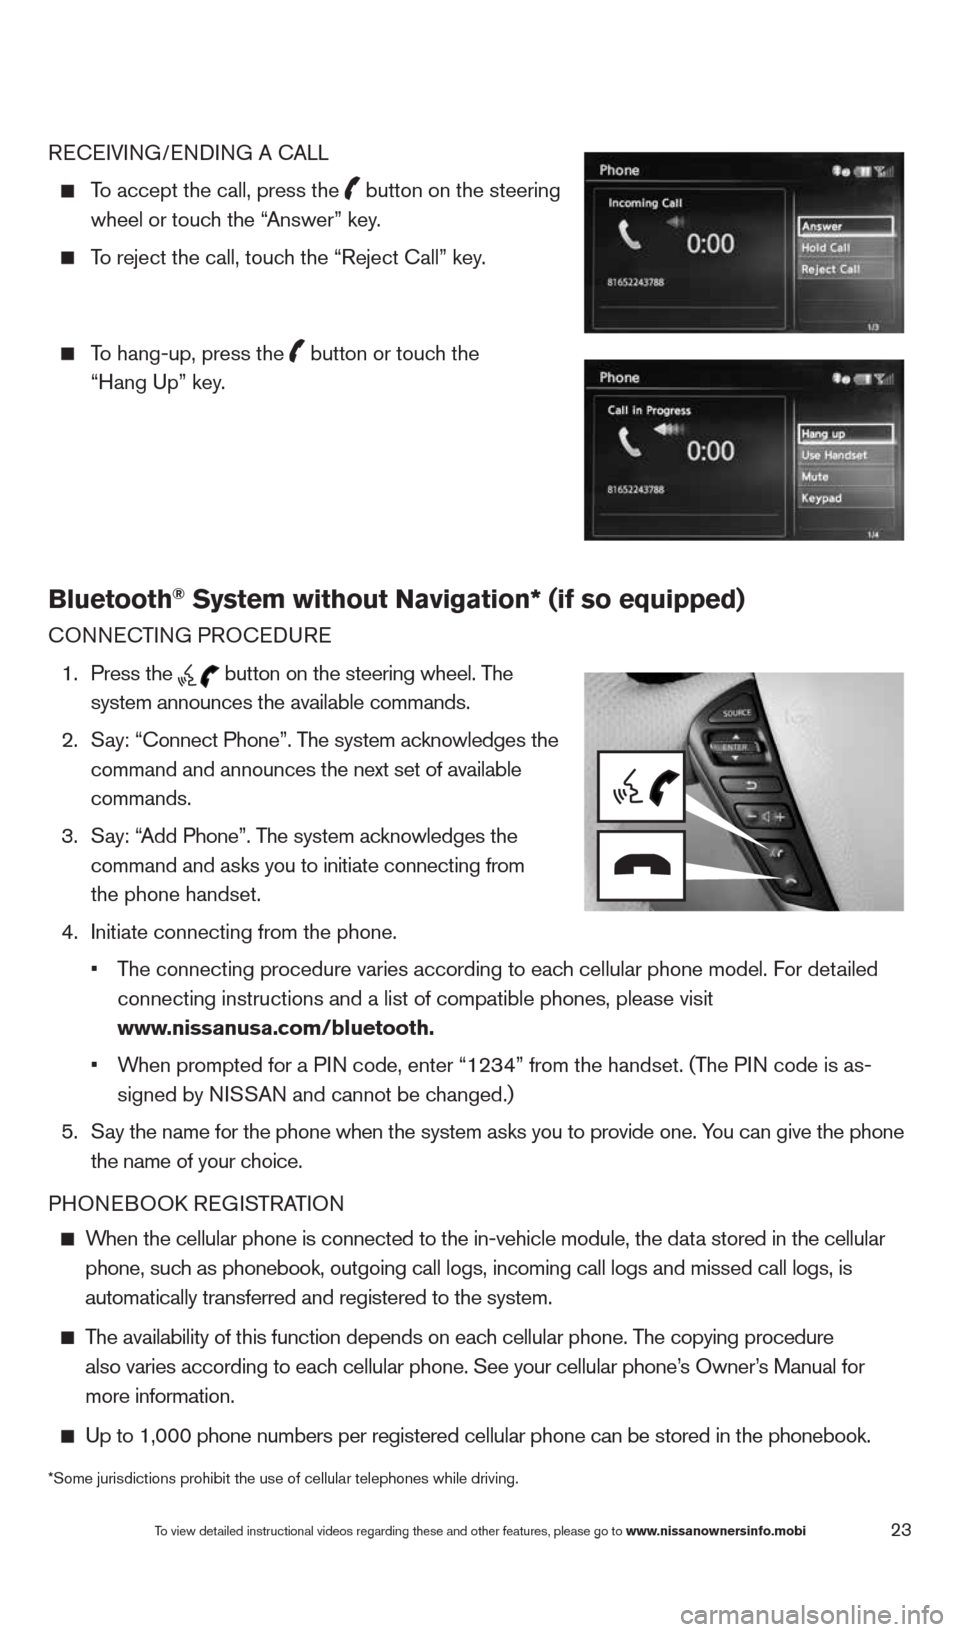
REcEIVING/ENDING A c ALL
To accept the call, press the
button on the steering
wheel or touch the “Answer” key.
To reject the call, touch the “Reject call” key.
To hang-up, press the
button or touch the
“Hang Up” key.
Bluetooth® System without Navigation* (if so equipped)
cONNEc TING PROcEDURE
1. Press the
button on the steering wheel. The
system announces the available commands.
2. Say: “connect Phone”. The system acknowledges the
command and announces the next set of available
commands.
3. Say: “Add Phone”. The system acknowledges the
command and asks you to initiate connecting from
the phone handset.
4. Initiate connecting from the phone.
• The connecting procedure varies according to each cellular phone model. For detailed
connecting instructions and a list of compatible phones, please visit
www.nissanusa.com/bluetooth.
• When prompted for a PIN code, enter “1234” from the handset. (The PIN code is as-
signed by NISSAN and cannot be changed.)
5. Say the name for the phone when the system asks you to provide one. You can give the phone
the name of your choice.
PHONEBOOk REGISTRATION
When the cellular phone is connected to the in-vehicle module, the data stored in the cellular
phone, such as phonebook, outgoing call logs, incoming call logs and missed call l\
ogs, is
automatically transferred and registered to the system.
The availability of this function depends on each cellular phone. The copying procedure
also varies according to each cellular phone. See your cellular phone’s Owner’s Manual for
more information.
Up to 1,000 phone numbers per registered cellular phone can be stored in\
the phonebook.
To view detailed instructional videos regarding these and other features, please go\
to www.nissanownersinfo.mobi
*Some jurisdictions prohibit the use of cellular telephones while drivin\
g.
1490690_14_Quest_QRG_072513.indd 237/25/13 9:24 AM
Page 26 of 32
24To view detailed instructional videos regarding these and other features, please go\
to www.nissanownersinfo.mobi
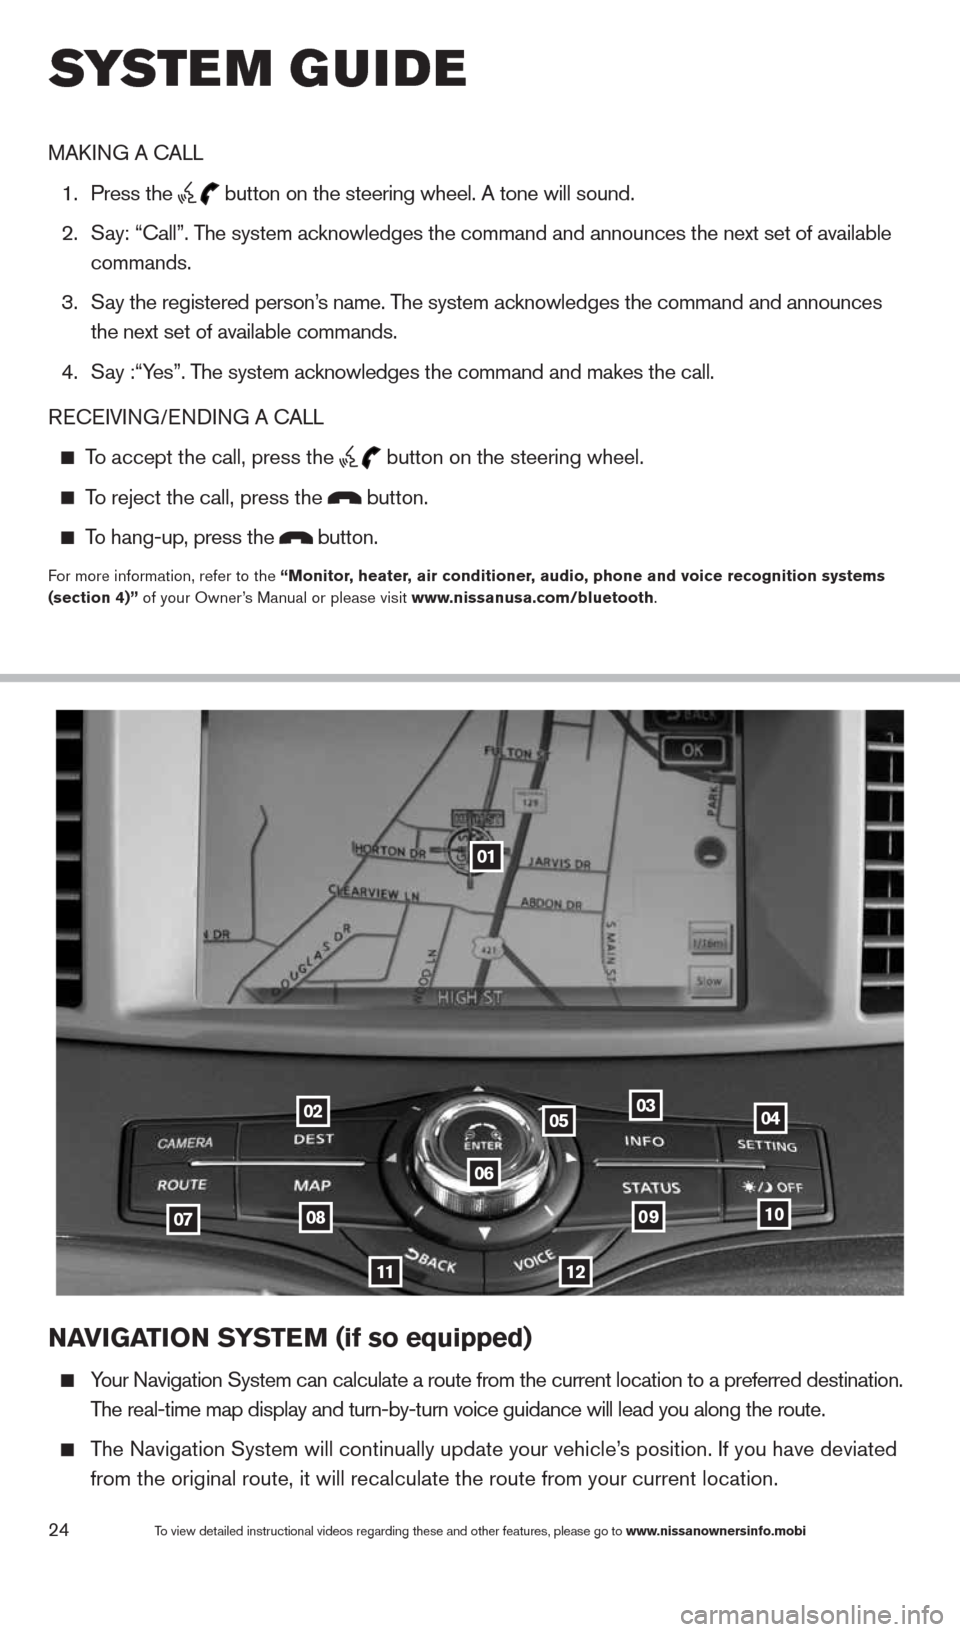
NaVIGa TION SYSTe M (if so equipped)
Your Navigation System can calculate a route from the current location to\
a preferred destination.
The real-time map display and turn-by-turn voice guidance will lead you a\
long the route.
The Navigation System will continually update your vehicle’s position. If you have deviated
from the original route, it will recalculate the route from your current\
location.
01
02
0708
11
0910
040305
06
12
MAk ING A c ALL
1. Press the
button on the steering wheel. A tone will sound.
2. Say: “call”. The system acknowledges the command and announces the next set of available
commands.
3. Say the registered person’s name. The system acknowledges the command and announces
the next set of available commands.
4. Say :“Yes”. The system acknowledges the command and makes the call.
RE cEIVING/ENDING A c ALL
To accept the call, press the
button on the steering wheel.
To reject the call, press the button.
To hang-up, press the button.
For more information, refer to the “Monitor, heater, air conditioner, audio, phone and voice recognition systems
(section 4)” of your Owner’s Manual or please visit www.nissanusa.com/bluetooth.
system guide
1490690_14_Quest_QRG_072513.indd 247/25/13 9:24 AM