2014 NISSAN QUEST transmission
[x] Cancel search: transmissionPage 138 of 482
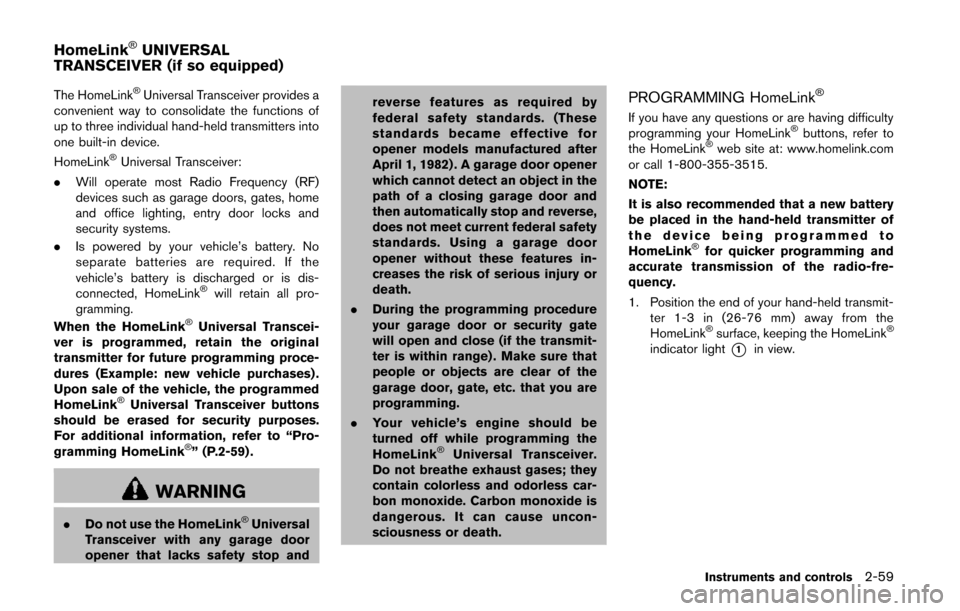
The HomeLink®Universal Transceiver provides a
convenient way to consolidate the functions of
up to three individual hand-held transmitters into
one built-in device.
HomeLink
®Universal Transceiver:
. Will operate most Radio Frequency (RF)
devices such as garage doors, gates, home
and office lighting, entry door locks and
security systems.
. Is powered by your vehicle’s battery. No
separate batteries are required. If the
vehicle’s battery is discharged or is dis-
connected, HomeLink
®will retain all pro-
gramming.
When the HomeLink
®Universal Transcei-
ver is programmed, retain the original
transmitter for future programming proce-
dures (Example: new vehicle purchases) .
Upon sale of the vehicle, the programmed
HomeLink
®Universal Transceiver buttons
should be erased for security purposes.
For additional information, refer to “Pro-
gramming HomeLink
®” (P.2-59) .
WARNING
. Do not use the HomeLink®Universal
Transceiver with any garage door
opener that lacks safety stop and reverse features as required by
federal safety standards. (These
standards became effective for
opener models manufactured after
April 1, 1982) . A garage door opener
which cannot detect an object in the
path of a closing garage door and
then automatically stop and reverse,
does not meet current federal safety
standards. Using a garage door
opener without these features in-
creases the risk of serious injury or
death.
. During the programming procedure
your garage door or security gate
will open and close (if the transmit-
ter is within range) . Make sure that
people or objects are clear of the
garage door, gate, etc. that you are
programming.
. Your vehicle’s engine should be
turned off while programming the
HomeLink
®Universal Transceiver.
Do not breathe exhaust gases; they
contain colorless and odorless car-
bon monoxide. Carbon monoxide is
dangerous. It can cause uncon-
sciousness or death.
PROGRAMMING HomeLink®
If you have any questions or are having difficulty
programming your HomeLink®buttons, refer to
the HomeLink®web site at: www.homelink.com
or call 1-800-355-3515.
NOTE:
It is also recommended that a new battery
be placed in the hand-held transmitter of
the device being programmed to
HomeLink
®for quicker programming and
accurate transmission of the radio-fre-
quency.
1. Position the end of your hand-held transmit- ter 1-3 in (26-76 mm) away from the
HomeLink
®surface, keeping the HomeLink®
indicator light*1in view.
Instruments and controls2-59
HomeLink®UNIVERSAL
TRANSCEIVER (if so equipped)
Page 140 of 482
PROGRAMMING HomeLink®FOR CA-
NADIAN CUSTOMERS AND GATE
OPENERS
Canadian radio-frequency laws require trans-
mitter signals to “time-out” (or quit) after several
seconds of transmission – which may not be
long enough for HomeLink
®to pick up the signal
during programming. Similar to this Canadian
law, some U.S. gate operators are designed to
“time-out” in the same manner.
If you live in Canada or you are having difficulties
programming a gate operator or garage door
opener by using the “Programming HomeLink
®”
procedures, replace “Programming HomeLink®”
Step 2 with the following:
NOTE:
When programming a garage door opener,
etc., unplug the device during the “cycling”
process to prevent possible damage to the
garage door opener components.
Step 2: Using both hands, simultaneously press
and hold the desired HomeLink
®button and the
hand-held transmitter button. During program-
ming, your hand-held transmitter may automati-
cally stop transmitting. Continue to press and
hold the desired HomeLink
®button while you
press and re-press (“cycle”) your hand-held
transmitter every two seconds until the fre-
quency signal has been learned. The HomeLink
®
indicator light will flash slowly and then rapidly
after several seconds upon successful program-
ming. DO NOT release until the HomeLink
®
indicator light flashes slowly and then rapidly.
When the indicator light flashes rapidly, both
buttons may be released. The rapid flashing
indicates successful programming.
Proceed with “Programming HomeLink
®” step 3
to complete.
Remember to plug the device back in when
programming is completed.
OPERATING THE HomeLink®UNIVER-
SAL TRANSCEIVER
The HomeLink®Universal Transceiver, after it is
programmed, can be used to activate the
programmed device. To operate, simply press
and release the appropriate programmed
HomeLink
®Universal Transceiver button. The
amber indicator light will illuminate while the
signal is being transmitted.
For convenience, the hand-held transmitter of
the device may also be used at any time.
PROGRAMMING TROUBLESHOOT-
ING
If the HomeLink®does not quickly learn the
hand-held transmitter information:
. replace the hand-held transmitter batteries
with new batteries.
. position the hand-held transmitter with its
battery area facing away from the
HomeLink
®surface.
. press and hold both the HomeLink®and
hand-held transmitter buttons without inter-
ruption.
. position the hand-held transmitter 1-3 in
(26-76 mm) away from the HomeLink
®
surface. Hold the transmitter in that position
for up to 15 seconds. If HomeLink®is not
programmed within that time, try holding the
transmitter in another position - keeping the
indicator light in view at all times.
If you have any questions or are having difficulty
programming your HomeLink
®buttons, refer to
the HomeLink®web site at: www.homelink.com
or 1-800-355-3515.
Instruments and controls2-61
Page 317 of 482
4-134Monitor, heater, air conditioner, audio, phone and voice recognition systems
Training procedure
1. Position the vehicle in a reasonably quietoutdoor location.
2. Sit in the driver’s seat with the engine running, the parking brake on, and the
transmission in Park.
3. Press and hold the
button for more than
5 seconds.
4. The system announces: “Press the PHONE SEND (
) button for the hands-free
phone system to enter the speaker adapta-
tion mode or press the PHONE END (
)
button to select a different language.”
5. Press the
button.
For information on selecting a different
language, see “Choosing a language” (P.4-
128).
6. If the connected phone is already in use, the system will prompt you to overwrite. Follow
the instructions provided by the system.
7. When preparation is complete and you are ready to begin, press the
button.
8. The SA mode will be explained. Follow the instructions provided by the system.
9. When training is finished, the system will tell you an adequate number of phrases have
been recorded. 10. The system will announce that speaker
adaptation has been completed and the
system is ready.
The SA mode will stop if:
. The
button is pressed for more than 5
seconds in SA mode.
. The vehicle is driven during SA mode.
. The ignition switch is turned to the OFF or
LOCK position.
Training phrases
During the SA mode, the system instructs you to
say the following phrases.
(The system will prompt you for each phrase.)
.phonebook transfer entry
. dial 30429
. delete call back number
. Incoming
. Transfer entry
. 8 pause 9 3 2 pause 7
. delete all entries
. call 7 2409
. phonebook delete entry
. next entry
. dial star 2170
. yes .
no
. select
. Missed
. dial 85692
. Bluetooth on
. Outgoing
. call 3 1902
. 9 7 pause pause 3 0 8
. cancel
. call back number
. call star 2095
. delete phone
. dial 83051
. Record Name
. 4 3 pause 2 9 pause 0
. delete redial number
. phonebook list names
. call 8 0541
. correction
. connect phone
. dial 74018
. previous entry
. delete
. dial 97266
. call 7 6301
Page 344 of 482
5 Starting and driving
Precautions when starting and driving ................................ 5-2Exhaust gas (carbon monoxide) ...................................... 5-2
Three-way catalyst .............................................................. 5-3
Tire Pressure Monitoring System (TPMS) .................... 5-3
Avoiding collision and rollover ......................................... 5-6
Off-road recovery ................................................................ 5-7
Rapid air pressure loss ...................................................... 5-7
Drinking alcohol/drugs and driving ................................. 5-8
Push-button ignition switch .................................................... 5-8 Intelligent Key system ......................................................... 5-8
Push-button ignition switch operation ........................ 5-10
Push-button ignition switch positions ......................... 5-10
Emergency engine shut off ............................................ 5-11
Intelligent Key battery discharge .................................. 5-11
Before starting the engine ................................................... 5-12
Starting the engine ................................................................ 5-12
Driving the vehicle ................................................................. 5-13 Continuously Variable Transmission (CVT) ................ 5-13
Parking brake ........................................................................\
.. 5-17
Blind Spot Warning (BSW) system (if so equipped) ..... 5-17
BSW system operation .................................................. 5-19
BSW driving situations ................................................... 5-20
BSW malfunction ............................................................. 5-23
System maintenance ....................................................... 5-24 Cruise control ........................................................................\
. 5-24
Precautions on cruise control ..................................... 5-24
Cruise control operations ............................................ 5-25
Break-in schedule ................................................................. 5-26
Fuel efficient driving tips ..................................................... 5-26
Increasing fuel economy ...................................................... 5-27
Parking/parking on hills ........................................................ 5-28
Hydraulic pump electric power steering system ........... 5-29
Brake system ........................................................................\
.. 5-29 Braking precautions ...................................................... 5-29
Parking brake break-in .................................................. 5-30
Anti-lock Braking System (ABS) ............................... 5-30
Vehicle Dynamic Control (VDC) system ......................... 5-31
Cold weather driving ............................................................ 5-33 Freeing a frozen door lock ........................................... 5-33
Anti-freeze ........................................................................\
5-33
Battery ........................................................................\
....... 5-33
Draining of coolant water ............................................. 5-33
Tire equipment ................................................................ 5-33
Special winter equipment ............................................ 5-33
Driving on snow or ice ................................................. 5-34
Engine block heater (if so equipped) ....................... 5-34
Page 356 of 482
NOTE:
Care should be taken to avoid situations
that can lead to potential battery discharge
and potential no-start conditions such as:
1.Installation or extended use of electro-
nic accessories that consume battery
power when the engine is not running
(Phone chargers, GPS, DVD players,
etc.)
2. Vehicle is not driven regularly and/or
only driven short distances.
In these cases, the battery may need to be
charged to maintain battery health.CONTINUOUSLY VARIABLE TRANS-
MISSION (CVT)
The Continuously Variable Transmission (CVT)
in your vehicle is electronically controlled to
produce maximum power and smooth operation.
The recommended operating procedures for this
transmission are shown on the following pages.
Follow these procedures for maximum vehicle
performance and driving enjoyment.
Engine power may be automatically re-
duced to protect the CVT if the engine
speed increases quickly when driving on
slippery roads or while being tested on
some dynamometers.
Starting the vehicle
1. After starting the engine, fully depress the foot brake pedal before moving the shift
lever out of the P (Park) position.
This CVT is designed so that the foot
brake pedal must be depressed before
shifting from P (Park) to any driving
position while the ignition switch is in
the ON position.
The shift lever cannot be moved out of
the P (Park) position and into any of
the other positions if the ignition
switch is pushed to the LOCK, OFF or
ACC position. 2. Keep the foot brake pedal depressed and
move the shift lever to a driving position.
3. Release the parking brake and foot brake pedal, and then gradually start the vehicle in
motion.
WARNING
. Do not depress the accelerator
pedal while shifting from P (Park)
or N (Neutral) to R (Reverse) , D
(Drive) or L (Low) position. Always
depress the brake pedal until shift-
ing is completed. Failure to do so
could cause you to lose control and
have an accident.
. Cold engine idle speed is high, so
use caution when shifting into a
forward or reverse gear before the
engine has warmed up.
. Never shift to P (Park) or R (Re-
verse) while vehicle is moving. Fail-
ure to do so could cause you to lose
control and have an accident.
Starting and driving5-13
DRIVING THE VEHICLE
Page 358 of 482
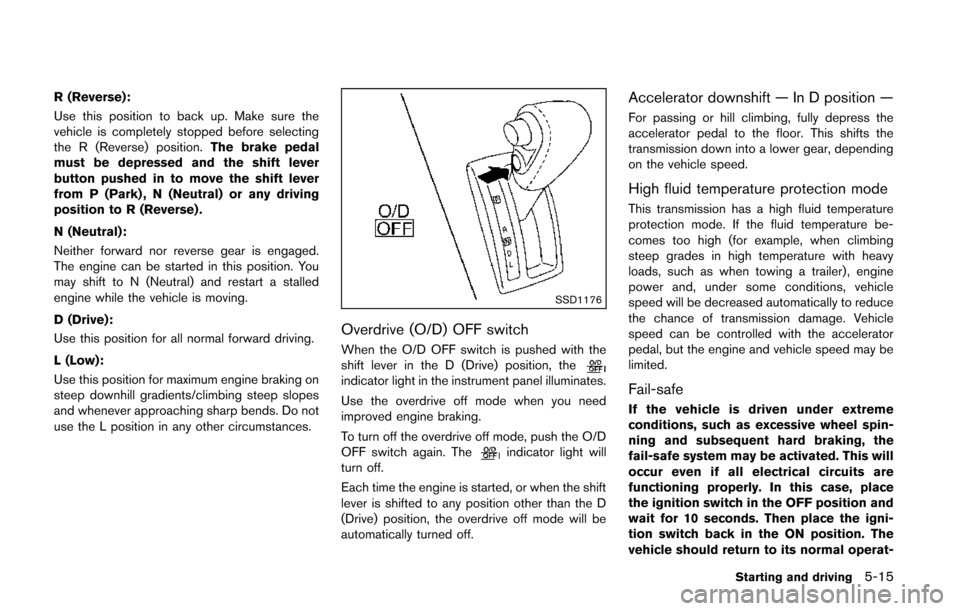
R (Reverse):
Use this position to back up. Make sure the
vehicle is completely stopped before selecting
the R (Reverse) position.The brake pedal
must be depressed and the shift lever
button pushed in to move the shift lever
from P (Park) , N (Neutral) or any driving
position to R (Reverse) .
N (Neutral):
Neither forward nor reverse gear is engaged.
The engine can be started in this position. You
may shift to N (Neutral) and restart a stalled
engine while the vehicle is moving.
D (Drive):
Use this position for all normal forward driving.
L (Low):
Use this position for maximum engine braking on
steep downhill gradients/climbing steep slopes
and whenever approaching sharp bends. Do not
use the L position in any other circumstances.
SSD1176
Overdrive (O/D) OFF switch
When the O/D OFF switch is pushed with the
shift lever in the D (Drive) position, the
indicator light in the instrument panel illuminates.
Use the overdrive off mode when you need
improved engine braking.
To turn off the overdrive off mode, push the O/D
OFF switch again. The
indicator light will
turn off.
Each time the engine is started, or when the shift
lever is shifted to any position other than the D
(Drive) position, the overdrive off mode will be
automatically turned off.
Accelerator downshift — In D position —
For passing or hill climbing, fully depress the
accelerator pedal to the floor. This shifts the
transmission down into a lower gear, depending
on the vehicle speed.
High fluid temperature protection mode
This transmission has a high fluid temperature
protection mode. If the fluid temperature be-
comes too high (for example, when climbing
steep grades in high temperature with heavy
loads, such as when towing a trailer), engine
power and, under some conditions, vehicle
speed will be decreased automatically to reduce
the chance of transmission damage. Vehicle
speed can be controlled with the accelerator
pedal, but the engine and vehicle speed may be
limited.
Fail-safe
If the vehicle is driven under extreme
conditions, such as excessive wheel spin-
ning and subsequent hard braking, the
fail-safe system may be activated. This will
occur even if all electrical circuits are
functioning properly. In this case, place
the ignition switch in the OFF position and
wait for 10 seconds. Then place the igni-
tion switch back in the ON position. The
vehicle should return to its normal operat-
Starting and driving5-15
Page 359 of 482
5-16Starting and driving
ing condition. If it does not return to its
normal operating condition, have a
NISSAN dealer check the transmission
and repair if necessary.
WARNING
When the high fluid temperature pro-
tection mode or fail-safe operation
occurs, vehicle speed may be gradually
reduced. The reduced speed may be
lower than other traffic, which could
increase the chance of a collision. Be
especially careful when driving. If ne-
cessary, pull to the side of the road at a
safe place and allow the transmission
to return to normal operation, or have it
repaired if necessary.
SSD1177
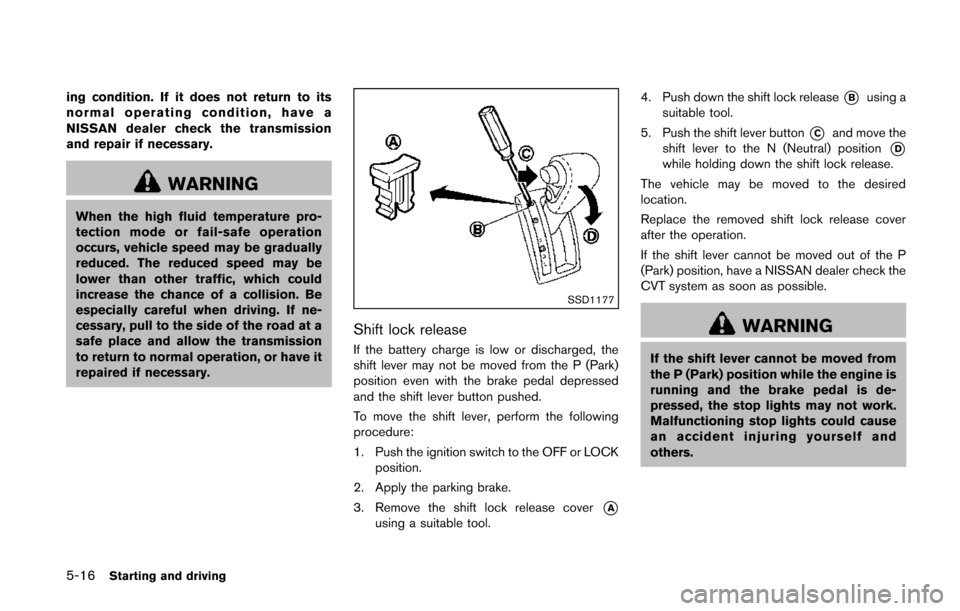
Shift lock release
If the battery charge is low or discharged, the
shift lever may not be moved from the P (Park)
position even with the brake pedal depressed
and the shift lever button pushed.
To move the shift lever, perform the following
procedure:
1. Push the ignition switch to the OFF or LOCKposition.
2. Apply the parking brake.
3. Remove the shift lock release cover
*Ausing a suitable tool. 4. Push down the shift lock release
*Busing a
suitable tool.
5. Push the shift lever button
*Cand move the
shift lever to the N (Neutral) position
*Dwhile holding down the shift lock release.
The vehicle may be moved to the desired
location.
Replace the removed shift lock release cover
after the operation.
If the shift lever cannot be moved out of the P
(Park) position, have a NISSAN dealer check the
CVT system as soon as possible.
WARNING
If the shift lever cannot be moved from
the P (Park) position while the engine is
running and the brake pedal is de-
pressed, the stop lights may not work.
Malfunctioning stop lights could cause
an accident injuring yourself and
others.
Page 371 of 482
5-28Starting and driving
SSD0488
WARNING
.Do not stop or park the vehicle over
flammable materials such as dry
grass, waste paper or rags. They
may ignite and cause a fire.
. Safe parking procedures require
that both the parking brake be set
and the transmission placed into P
(Park) . Failure to do so could cause
the vehicle to move unexpectedly or
roll away and result in an accident.
Make sure the shift lever has been
pushed as far forward as it can go and cannot be moved without de-
pressing the foot brake pedal.
. Never leave the engine running
while the vehicle is unattended.
. Do not leave children unattended
inside the vehicle. They could un-
knowingly activate switches or con-
trols. Unattended children could
become involved in serious acci-
dents.
1. Firmly apply the parking brake.
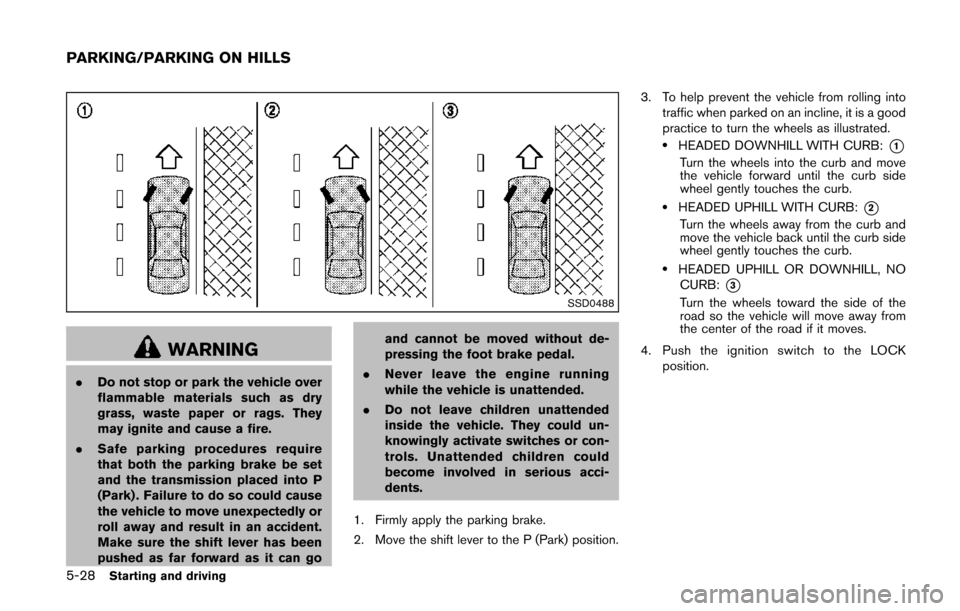
2. Move the shift lever to the P (Park) position. 3. To help prevent the vehicle from rolling into
traffic when parked on an incline, it is a good
practice to turn the wheels as illustrated.
.HEADED DOWNHILL WITH CURB:*1
Turn the wheels into the curb and move
the vehicle forward until the curb side
wheel gently touches the curb.
.HEADED UPHILL WITH CURB:*2
Turn the wheels away from the curb and
move the vehicle back until the curb side
wheel gently touches the curb.
.HEADED UPHILL OR DOWNHILL, NOCURB:
*3
Turn the wheels toward the side of the
road so the vehicle will move away from
the center of the road if it moves.
4. Push the ignition switch to the LOCK position.
PARKING/PARKING ON HILLS