2014 NISSAN QASHQAI ECU
[x] Cancel search: ECUPage 62 of 338

Anti-lock Braking System (ABS) warn-
ing lightSeat belt (driver and front passenger)
warning lightFront fog light indicator light
Brake warning light (red)Supplemental Restraint System
(SRS) air bag warning lightGlow plug indicator light* (Diesel
engine)
Charge warning lightWater in fuel filter warning light*High beam assist indicator light*
Forward Emergency Braking system
warning light*
Front passenger air bag status light*
High beam indicator light
Low tyre pressure warning light*Rear fog light indicator light*
Malfunction warning light (red)*
Malfunction indicator light (orange)4WD mode indicator light (AUTO)*Side light and headlight indicator
light
Master warning light4WD mode indicator light (LOCK)*Slip indicator light
NATS security warning lightDipped beam indicator lightTrailer direction indicator light
Parking brake warning lightDoor lock indicator light*Turn signal/hazard indicator lights
Power steering warning lightElectronic Stability Programme (ESP)
OFF indicator light*: where fitted
CHECKING BULBS
With all doors closed, apply the parking brake, fas-
ten the seat belts and turn the ignition switch to the
ON position without starting the engine.The following lights (where fitted) come on briefly
and then go off:,,,,,,,
,,,,,,
If any light fails to come on, it may indicate a burned-
out bulb or an open circuit in the electrical system.Have the system checked, and repaired promptly by
a NISSAN dealer or qualified workshop.
Some indicators and warnings are also displayed in
the vehicle informational display between the speed-
ometer and tachometer see “Vehicle information
display” later in this section.
WARNING/INDICATOR LIGHTS AND AUDIBLE REMINDERS
2-4Instruments and controls
Page 66 of 338

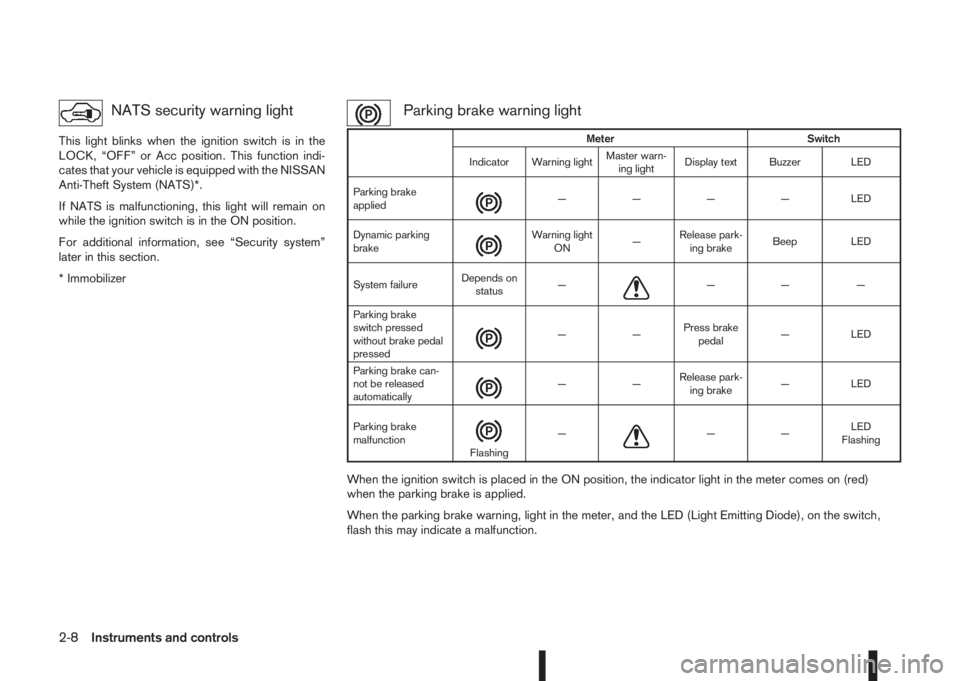
NATS security warning light
This light blinks when the ignition switch is in the
LOCK, “OFF” or Acc position. This function indi-
cates that your vehicle is equipped with the NISSAN
Anti-Theft System (NATS)*.
If NATS is malfunctioning, this light will remain on
while the ignition switch is in the ON position.
For additional information, see “Security system”
later in this section.
* Immobilizer
Parking brake warning light
When the ignition switch is placed in the ON position, the indicator light in the meter comes on (red)
when the parking brake is applied.
When the parking brake warning, light in the meter, and the LED (Light Emitting Diode), on the switch,
flash this may indicate a malfunction.
Meter Switch
Indicator Warning lightMaster warn-
ing lightDisplay text Buzzer LED
Parking brake
applied
m— — — — LED
Dynamic parking
brake
m
Warning light
ON—Release park-
ing brakeBeep LED
System failureDepends on
status—
m—— —
Parking brake
switch pressed
without brake pedal
pressed
m——Press brake
pedal— LED
Parking brake can-
not be released
automatically
m——Release park-
ing brake— LED
Parking brake
malfunction
mFlashing—m——LED
Flashing
2-8Instruments and controls
Page 67 of 338

Low brake fluid warning light:
When the ignition switch is in the ON position, the
light warns of a low brake fluid level. If this warning
light illuminates, the Electronic Stability Programme
(ESP) warning light and the brake system warning
light (yellow) also illuminate. If the light illuminates
while the ignition switch is in the ON position with
the parking brake not applied, stop the vehicle and
perform the following steps:
1. Check the brake fluid level. If brake fluid level is
low, add fluid and have the system checked by a
NISSAN dealer or qualified workshop. See
“Brake and clutch fluid” in the “8. Maintenance
and do-it-yourself” section.
2. If the brake fluid level is correct, have the warn-
ing system checked by a NISSAN dealer or quali-
fied workshop.
WARNING
•Your brake system may not be working prop-
erly if the warning light is on. Driving could be
dangerous. If you judge the brake system to
be safe, drive carefully to the nearest service
station for repairs. Otherwise, have your ve-
hicle towed because driving it could be dan-
gerous.
•Pressing the brake pedal when the ignition
switch is not in the ON position and/or when
the brake fluid level is low may increase the
stopping distance and braking will require
greater pedal effort as well as pedal travel.
•If the brake fluid level is below the minimum
or MIN mark on the brake fluid reservoir, do
not drive until the brake system has been
checked at a NISSAN dealer or qualified work-
shop.
For further parking brake operation information see
“Parking brake switch” in the “8. Pre-driving checks
and adjustments” section.
Power steering warning light
WARNING
•If the engine is not running or is turned off
while driving, the power assist for the steer-
ing will not work. Steering will be harder to
operate.
•When the power steering warning light illumi-
nates with the engine running, there will be
no power assist for the steering. You will still
have control of the vehicle but the steering
will be harder to operate. Have the power
steering system checked by a NISSAN dealer
or qualified workshop.
When the ignition switch is placed in the ON posi-
tion, the power steering warning light illuminates.
After starting the engine, the power steering warn-
ing light turns off. This indicates that the electric
power steering system is operational.
If the power steering warning light illuminates while
the engine is running, it may indicate the power
steering system is not functioning properly and mayneed servicing. Have the electric power steering
system checked by a NISSAN dealer or qualified
workshop. See “Electric power steering system” in
the “5. Starting and driving” section.
Seat belt (driver and front
passenger) warning light
The seat belt warning light reminds you to fasten
your seat belts. The light illuminates whenever the
ignition switch is placed in the ON or START posi-
tion and remains illuminated until the driver’s and/or
front passenger’s seat belt is fastened. At the same
time, the chime sounds for about 6 seconds unless
the driver’s and/or front passenger’s seat belt is
securely fastened see “Seat belt reminder chime”
later in this section. The seat belt warning light may
also illuminate if the front passenger’s seat belt is
not fastened when the front passenger’s seat is oc-
cupied. For 7 seconds after the ignition switch is
placed in the ON position, the system does not acti-
vate the warning light for the front passenger. See
“Seat belts” in the “1. Safety — Seats, Seat belts
and Supplemental Restraint System” section for
precautions on seat belt usage.
Supplemental Restraint System
(SRS) air bag warning light
WARNING
If the supplemental air bag warning light is on, it
could mean that the front air bag, side air bag
(where fitted), curtain air bag (where fitted) and/
or pre-tensioner systems will not operate in an
Instruments and controls2-9
Page 71 of 338

Seat belt reminder chime
A chime will sound for approximately 90 seconds if
the vehicle’s speed exceeds 15 km/h (9 MPH) and
the driver’s seat belt or front passenger’s seat belt,
if occupied (where fitted) is not securely fastened.
See “Seat belt warnings” in the “1. Safety — Seats,
Seat belts and Supplemental Restraint System” sec-
tion.
Key reminder buzzer (Intelligent Key
models)
The external buzzer will beep 3 times if:
•The Intelligent Key is removed from the vehicle
while the ignition is not in the LOCK position.
•The vehicle is being locked remotely or using an
outside door lock switch and the Intelligent Key
has been left inside the vehicle.
Park reminder chime (where fitted)
A chime will sound if the ignition switch is placed in
the LOCK position and the shift lever is not in the P
(Park) position.
Stop/Start System reminder buzzer
(where fitted)
The engine will shift to the normal stopped state if
any of the following operations is made during Stop/
Start System activation, and the Stop/Start System
buzzer will sound if:
– The driver’s seat belt is unfastened and the driv-
er’s door is open (MT models)– The vehicle engine bonnet is open.
When any of the above conditions continues for
over 3 minutes the Stop/Start System buzzer will
sound in 5-minute intervals as a reminder to prevent
the possibility of a dead battery. Use the ignition
switch to turn off the engine.
Close the bonnet or the driver’s door, or fasten the
seat belt then restart the engine using the ignition
switch.
For more information, see “[Stop/Start]” in the “5. In-
struments and controls” section and “Stop/Start
System (where fitted)” in the “5. Starting and driving”
section.The vehicle information display
j1 is located be-
tween the tachometer and the speedometer, and it
displays such items as:
•Vehicle settings
•Trip computer information
•Drive system warnings and settings (where fit-
ted)
•Cruise control system information
•NISSAN Intelligent Key operation information
•Chassis Control
•Indicators and warnings (where fitted)
•Tyre Pressure information
NIC2203
VEHICLE INFORMATION DISPLAY
Instruments and controls2-13
Page 81 of 338

If this warning appears while the engine is stopped,
the engine cannot be started. If this warning ap-
pears while the engine is running, the vehicle can be
driven. However, contact a NISSAN dealer or quali-
fied workshop for repair as soon as possible.
5. [Key battery low] indicator
This indicator appears when the Intelligent Key bat-
tery is running out of power.
If this indicator appears, replace the battery with a
new one. (See “Integrated keyfob/Intelligent Key
battery replacement” in the “8. Maintenance and
do-it-yourself” section.)
6. [Key ID Incorrect] warning
This warning appears when the ignition switch is
pushed from the LOCK position and the Intelligent
Key cannot be recognised by the system. You can-
not start the engine with an unregistered key. Use
the registered Intelligent Key. See “Intelligent Key
system (where fitted)” in the “3. Pre-driving checks
and adjustments” section.
7. Engine start operation for Intelligent
Key system indicator
This indicator appears when the Intelligent Key bat-
tery is running out of power and the Intelligent Key
system and vehicle are not communicating normally.
If this indicator appears, touch the ignition switch
with the Intelligent Key while depressing the brake
pedal. (See “Push-button ignition switch (where
fitted)” in the “5. Starting and driving” section.)
8. [Release parking brake] warning
This warning appears when the vehicle speed is
above 7 km/h (4 MPH) and the parking brake is
applied. Stop the vehicle and release the parking
brake. This warning may a occur if the driver has
attempted to release the parking brake automati-
cally, but did not succeed.
9. Low fuel ([Range]) warning
This warning appears when the fuel level in the tank
is getting low. Refuel as soon as it is convenient,
preferably before the fuel gauge reaches the empty
(0) position.
There is a small reserve of fuel remaining in the
tank when the fuel gauge reaches the empty (0)
position.
10. [Low washer fluid] warning
This warning appears when the washer tank fluid is
at a low level. Add washer fluid as necessary. (See
“Window washer fluid/headlight cleaner fluid (where
fitted)” in the “8. Maintenance and do-it-yourself”
section.)
11. Door/boot open warning
This warning appears if any of the doors and/or the
boot lid are open or not closed securely. The vehicle
icon indicates which door or whether the boot lid is
open on the display.
12. [SHIFT to Park] warning (XTRONIC
transmission models)
This warning appears when the ignition switch is
pushed to stop the engine with the shift lever in any
position except the P (Park) position.
If this warning appears, move the shift lever to the P
(Park) position or place the ignition switch in the ON
position.
An inside warning chime will also sound. (See
“Push-button ignition switch (where fitted)” in the
“5. Starting and driving” section.)
13. [Loose Fuel Cap] warning
This warning appears when the fuel-filler cap is not
tightened correctly after the vehicle has been refu-
elled. See “Fuel filler lid” in the “3. Pre-driving
checks and adjustments” section section of this
manual.
14. [Battery Voltage Low Charge
Battery] warning
This warning appears when the battery voltage is
low and the battery needs to be charged.
15. [Press Brake Pedal] warning
This warning appears to remind you that you must
press the brake pedal before you can release the
parking brake. This warning may also be displayed
if the parking brake is activated, but the vehicle is
still rolling back.
Instruments and controls2-23
Page 103 of 338

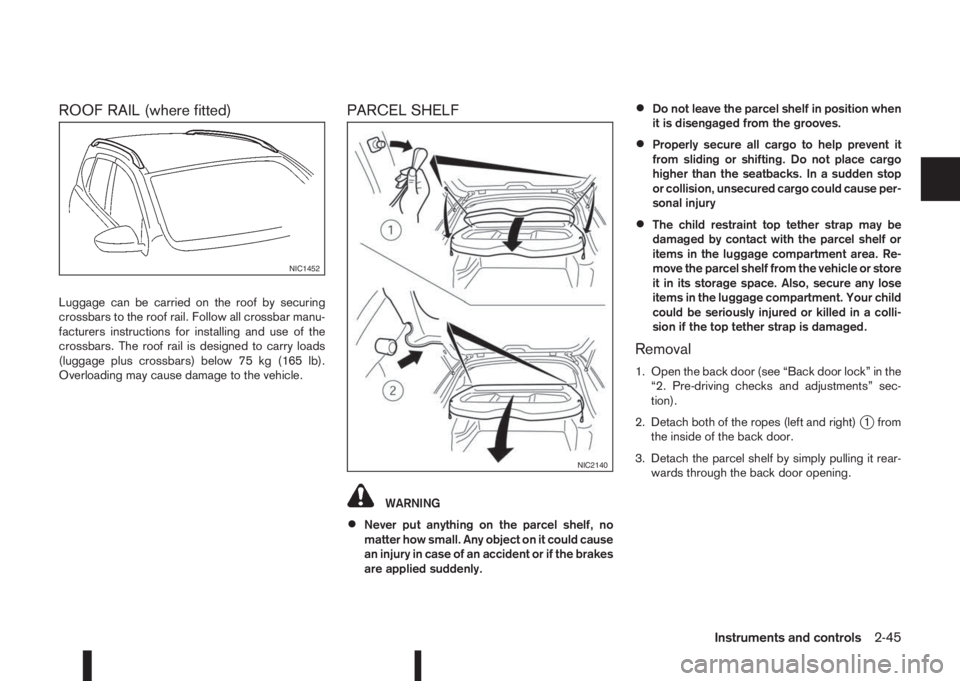
ROOF RAIL (where fitted)
Luggage can be carried on the roof by securing
crossbars to the roof rail. Follow all crossbar manu-
facturers instructions for installing and use of the
crossbars. The roof rail is designed to carry loads
(luggage plus crossbars) below 75 kg (165 lb).
Overloading may cause damage to the vehicle.
PARCEL SHELF
WARNING
•Never put anything on the parcel shelf, no
matter how small. Any object on it could cause
an injury in case of an accident or if the brakes
are applied suddenly.
•Do not leave the parcel shelf in position when
it is disengaged from the grooves.
•Properly secure all cargo to help prevent it
from sliding or shifting. Do not place cargo
higher than the seatbacks. In a sudden stop
or collision, unsecured cargo could cause per-
sonal injury
•The child restraint top tether strap may be
damaged by contact with the parcel shelf or
items in the luggage compartment area. Re-
move the parcel shelf from the vehicle or store
it in its storage space. Also, secure any lose
items in the luggage compartment. Your child
could be seriously injured or killed in a colli-
sion if the top tether strap is damaged.
Removal
1. Open the back door (see “Back door lock” in the
“2. Pre-driving checks and adjustments” sec-
tion).
2. Detach both of the ropes (left and right)
j1 from
the inside of the back door.
3. Detach the parcel shelf by simply pulling it rear-
wards through the back door opening.
NIC1452
NIC2140
Instruments and controls2-45
Page 104 of 338

CAUTION
Make sure the parcel shelf is carefully stored
when not in use in order to prevent any damage.
NOTE
The parcel shelf can be securely stored under
the luggage compartment floor boards (see
“Installation” later in this section).
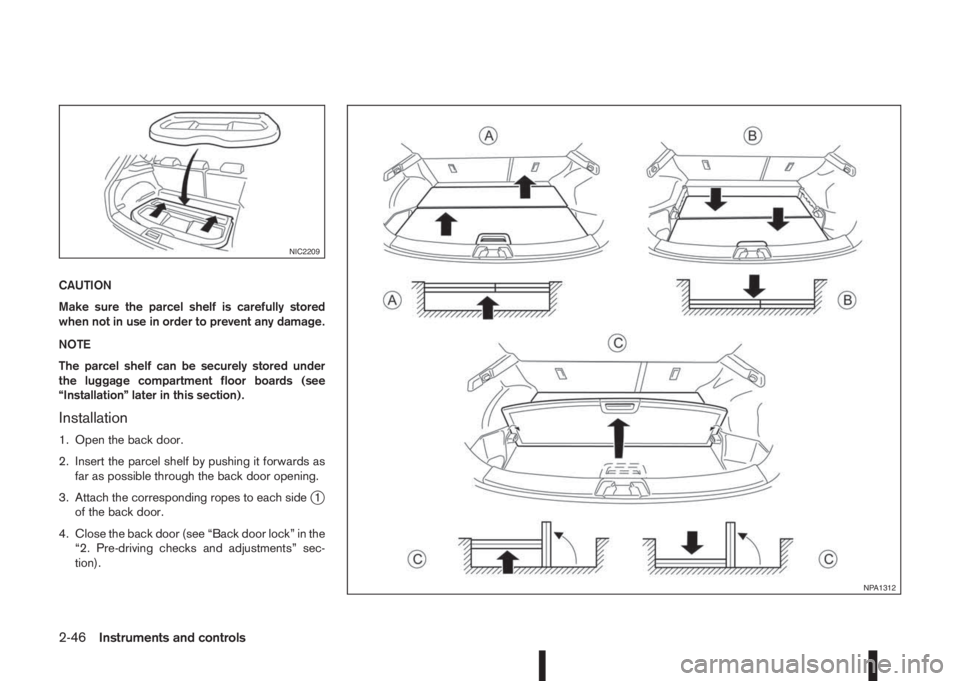
Installation
1. Open the back door.
2. Insert the parcel shelf by pushing it forwards as
far as possible through the back door opening.
3. Attach the corresponding ropes to each side
j1
of the back door.
4. Close the back door (see “Back door lock” in the
“2. Pre-driving checks and adjustments” sec-
tion).
NIC2209
NPA1312
2-46Instruments and controls
Page 105 of 338

LUGGAGE COMPARTMENT/BOOT
FLOOR (where fitted)
WARNING
•Properly secure all cargo with ropes or straps
to help prevent it from sliding or shifting. Do
not place cargo higher than the seatbacks. In
a sudden stop or collision, unsecured cargo
could cause personal injury.
•Do not put objects heavier than 50 kg (110
lbs) on the load floor.
•Never allow anyone to ride in the luggage
area. It is extremely dangerous to ride in a
luggage area inside of a vehicle. In a collision,
people riding in these areas are more likely to
be seriously injured or killed.
•Only two anchorage points identified by the
top tether labels can be used for top tether
strap anchorage. Under no circumstances
should the luggage hooks be used for top
tether strap anchorage.
The luggage (cargo) compartment or boot floor has
a dual surface (wet and dry), or dual position system
with loose floorboards that allow different luggage
compartment arrangements.
CAUTION
•The carpet finish should face up for all dry use
applications.
•The smooth surface should be used only when
loading wet objects.
•The load should be distributed evenly and
should not exceed 50 kg (110 lb) on any of the
boards/panels.
•To avoid any damage, the panels/boards
should be placed in the lower positionjB for
heavy loads and securely held with ropes or
straps to prevent any load shift.
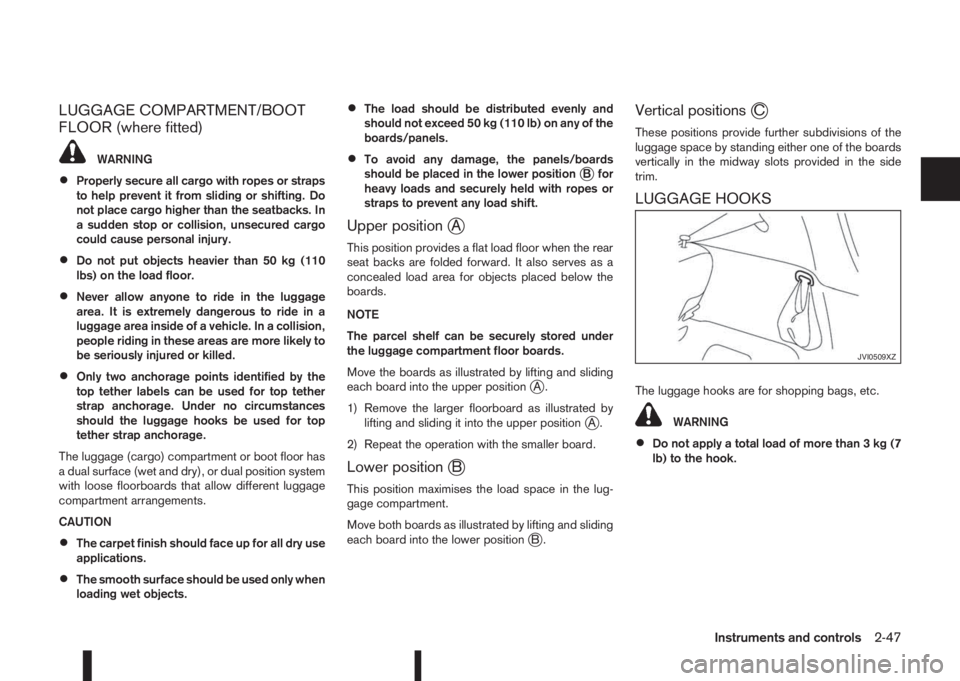
Upper positionjA
This position provides a flat load floor when the rear
seat backs are folded forward. It also serves as a
concealed load area for objects placed below the
boards.
NOTE
The parcel shelf can be securely stored under
the luggage compartment floor boards.
Move the boards as illustrated by lifting and sliding
each board into the upper position
jA.
1) Remove the larger floorboard as illustrated by
lifting and sliding it into the upper position
jA.
2) Repeat the operation with the smaller board.
Lower positionjB
This position maximises the load space in the lug-
gage compartment.
Move both boards as illustrated by lifting and sliding
each board into the lower position
jB.
Vertical positionsjC
These positions provide further subdivisions of the
luggage space by standing either one of the boards
vertically in the midway slots provided in the side
trim.
LUGGAGE HOOKS
The luggage hooks are for shopping bags, etc.
WARNING
•Do not apply a total load of more than 3 kg (7
lb) to the hook.
JVI0509XZ
Instruments and controls2-47