2014 NISSAN QASHQAI window
[x] Cancel search: windowPage 51 of 338

Side and curtain air bags (where fitted):
WARNING
•The front seat-mounted side-impact supple-
mental air bags and roof-mounted curtain
side-impact supplemental air bags ordinarily
will not inflate in the event of a front impact,
rear impact, rollover, or lower severity side
collision. Always wear the seat belts to help
reduce the risk or severity of injury in acci-
dents.
•The seat belts, the front seat-mounted side-
impact supplemental air bags and roof-
mounted curtain side-impact supplemental
air bags are most effective when you are sit-
ting well back and upright in the seat. The
front seat-mounted side-impact supplemen-
tal air bags and roof-mounted curtain side-im-
pact supplemental air bags inflate with great
force. If you and your passengers are unre-
strained, leaning forward, sitting sideways, or
out of position in any way, you and your pas-
sengers are at greater risk of injury or death in
an accident.
•Do not allow anyone to place their hands, legs,
or face near the front seat-mounted side-im-
pact supplemental air bags and roof-mounted
curtain side-impact supplemental air bags on
the sides of the seatback of the front seats or
near the side roof rails. Do not allow anyone
sitting in the front seats or rear outer seats to
extend their hands out of the windows or lean
against the doors.
•When sitting in the rear seats, do not hold
onto the seatback of the front seats. If the
front seat-mounted side impact supplemental
air bags and roof-mounted curtain side-im-
pact supplemental air bags inflate, you may
be seriously injured. Be especially careful with
children, who should always be properly re-
strained.
•Do not use seat covers on the front seatbacks.
They may interfere with the front seat-
mounted side-impact supplemental air bag in-
flations.
NOTE
For an overview see “Seat belts and supplemen-
tal restraint system” in the “0. Illustrated table of
contents” section.
Pre-tensioner seat belt system
The pre-tensioner seat belt system may activate with
the supplemental air bag system in certain types of
collisions.
Working with the seat belt retractor and anchor, it
helps tighten the seat belt the instant the vehicle
becomes involved in certain types of collisions, help-
ing to restrain front seat occupants. See “Pre-ten-
sioner seat belt system” earlier in this section.
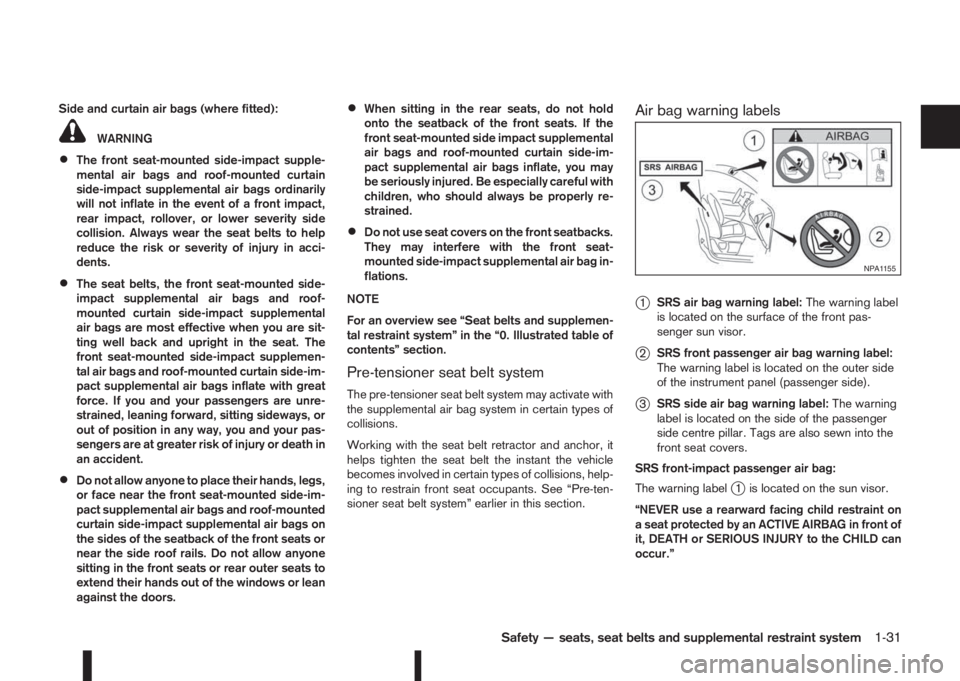
Air bag warning labels
j
1SRS air bag warning label:The warning label
is located on the surface of the front pas-
senger sun visor.
j2SRS front passenger air bag warning label:
The warning label is located on the outer side
of the instrument panel (passenger side).
j3SRS side air bag warning label:The warning
label is located on the side of the passenger
side centre pillar. Tags are also sewn into the
front seat covers.
SRS front-impact passenger air bag:
The warning label
j1 is located on the sun visor.
“NEVER use a rearward facing child restraint on
a seat protected by an ACTIVE AIRBAG in front of
it, DEATH or SERIOUS INJURY to the CHILD can
occur.”
NPA1155
Safety — seats, seat belts and supplemental restraint system1-31
Page 58 of 338

2Instruments and controlsInstruments and controls
Meters and gauges .................................................. 2-2
Speedometer...................................................... 2-2
Fuel gauge ......................................................... 2-2
Tachometer ........................................................ 2-2
Engine coolant temperature gauge ...................... 2-3
Instrument panel brightness control..................... 2-3
Warning/indicator lights and audible reminders ........ 2-4
Checking bulbs .................................................. 2-4
Warning lights .................................................... 2-5
Indicator lights .................................................... 2-10
Audible reminders............................................... 2-12
Vehicle information display ....................................... 2-13
How to use the Vehicle Information Display ......... 2-14
Startup display.................................................... 2-14
Settings .............................................................. 2-14
Vehicle information display warnings and
indicators............................................................ 2-21
Trip computer ..................................................... 2-27
[Clock] and [outside air temperature] .................. 2-29
Traffic sign recognition (where fitted) .................. 2-30
Wiper and washer switch ........................................ 2-32
Windscreen ........................................................ 2-32
Rear window ...................................................... 2-33
ThermaClear Heated Windscreen button ................. 2-34
ThermaClear Heated Windscreen (where
fitted).................................................................. 2-34
Defogger switch ...................................................... 2-35
Rear window defogger ....................................... 2-35
Outside mirror defogger (where fitted) ................ 2-35
Headlight and turn signal switch............................... 2-36Headlight switch ................................................. 2-36
Turn signal switch ............................................... 2-38
Fog light switch ....................................................... 2-38
Front fog light (where fitted)................................ 2-38
Rear fog light (where fitted)................................. 2-39
Headlight aiming control .......................................... 2-39
Headlight aiming control switch (where fitted) ..... 2-39
Automatic aiming control (LED headlights) .......... 2-40
Headlight cleaner (where fitted) ............................... 2-40
Headlight cleaner switch (where fitted) ............... 2-40
Horn ........................................................................ 2-41
Seat heating (where fitted) ....................................... 2-41
Power outlet ............................................................ 2-42
Storage ................................................................... 2-42
Storage trays ...................................................... 2-42
Glove box ........................................................... 2-42
Console box ....................................................... 2-43
Cup holders ....................................................... 2-44
Bottle holder ....................................................... 2-44
Coat hooks ......................................................... 2-44
Map pocket (where fitted) ................................... 2-44
Seat pocket (where fitted)................................... 2-44
Roof rail (where fitted) ........................................ 2-45
Parcel shelf ........................................................ 2-45
Luggage compartment/boot floor (where
fitted).................................................................. 2-47
Luggage hooks ................................................... 2-47
Windows ................................................................. 2-48
Power windows .................................................. 2-48
Fixed glass roof (where fitted) .................................. 2-49
Page 81 of 338

If this warning appears while the engine is stopped,
the engine cannot be started. If this warning ap-
pears while the engine is running, the vehicle can be
driven. However, contact a NISSAN dealer or quali-
fied workshop for repair as soon as possible.
5. [Key battery low] indicator
This indicator appears when the Intelligent Key bat-
tery is running out of power.
If this indicator appears, replace the battery with a
new one. (See “Integrated keyfob/Intelligent Key
battery replacement” in the “8. Maintenance and
do-it-yourself” section.)
6. [Key ID Incorrect] warning
This warning appears when the ignition switch is
pushed from the LOCK position and the Intelligent
Key cannot be recognised by the system. You can-
not start the engine with an unregistered key. Use
the registered Intelligent Key. See “Intelligent Key
system (where fitted)” in the “3. Pre-driving checks
and adjustments” section.
7. Engine start operation for Intelligent
Key system indicator
This indicator appears when the Intelligent Key bat-
tery is running out of power and the Intelligent Key
system and vehicle are not communicating normally.
If this indicator appears, touch the ignition switch
with the Intelligent Key while depressing the brake
pedal. (See “Push-button ignition switch (where
fitted)” in the “5. Starting and driving” section.)
8. [Release parking brake] warning
This warning appears when the vehicle speed is
above 7 km/h (4 MPH) and the parking brake is
applied. Stop the vehicle and release the parking
brake. This warning may a occur if the driver has
attempted to release the parking brake automati-
cally, but did not succeed.
9. Low fuel ([Range]) warning
This warning appears when the fuel level in the tank
is getting low. Refuel as soon as it is convenient,
preferably before the fuel gauge reaches the empty
(0) position.
There is a small reserve of fuel remaining in the
tank when the fuel gauge reaches the empty (0)
position.
10. [Low washer fluid] warning
This warning appears when the washer tank fluid is
at a low level. Add washer fluid as necessary. (See
“Window washer fluid/headlight cleaner fluid (where
fitted)” in the “8. Maintenance and do-it-yourself”
section.)
11. Door/boot open warning
This warning appears if any of the doors and/or the
boot lid are open or not closed securely. The vehicle
icon indicates which door or whether the boot lid is
open on the display.
12. [SHIFT to Park] warning (XTRONIC
transmission models)
This warning appears when the ignition switch is
pushed to stop the engine with the shift lever in any
position except the P (Park) position.
If this warning appears, move the shift lever to the P
(Park) position or place the ignition switch in the ON
position.
An inside warning chime will also sound. (See
“Push-button ignition switch (where fitted)” in the
“5. Starting and driving” section.)
13. [Loose Fuel Cap] warning
This warning appears when the fuel-filler cap is not
tightened correctly after the vehicle has been refu-
elled. See “Fuel filler lid” in the “3. Pre-driving
checks and adjustments” section section of this
manual.
14. [Battery Voltage Low Charge
Battery] warning
This warning appears when the battery voltage is
low and the battery needs to be charged.
15. [Press Brake Pedal] warning
This warning appears to remind you that you must
press the brake pedal before you can release the
parking brake. This warning may also be displayed
if the parking brake is activated, but the vehicle is
still rolling back.
Instruments and controls2-23
Page 91 of 338

Wiper drip wipe system (where fitted):
The wiper will also operate once about 3 seconds
after using the washer. This operation is to wipe
washer fluid that has dripped on the windscreen.
Rain sensor (where fitted)
The sensor of the rain-sensing auto wiper system
located on the upper part of the windscreen, in front
of the rear view mirror, can automatically turn on the
wipers and adjust the wiper speed depending on
the rainfall intensity and the vehicle speed when the
lever in the AUTO position
j1.
The sensitivity can be adjusted by rotating the ring
of the wiper switch forward
jA — less sensitive, or
backwardjB — more sensitive.
NOTE
•Be sure to turn off the rain-sensing auto wiper
system when the car is in the car wash.
•Leaving the lever in AUTO position will not
harm the rain sensor system, although occa-
sional unexpected activation of the wipers
may occur.
•If the switch is left in the AUTO position, the
wipers may operate unexpectedly when dirt,
fingerprints, oil film or insects are covering
the windscreen of the rain sensor location.
The wipers may also operate when exhaust
gas or moisture affects the rain sensor.
•Do not touch or cover the windscreen where
the rain sensor is located. The wipers may
operate unexpectedly when the wiper switchis in the AUTO position and the ignition switch
is in the ON position. This can cause an injury
or a wiper damage.
REAR WINDOW
WARNING
In freezing temperatures the washer solution
may freeze on the rear window and obscure your
vision. Warm the rear window with the rear win-
dow defogger before using the rear wipers.
CAUTION
•Do not operate the washer continuously for
more than 15 seconds.
•Do not operate the washer if the reservoir
tank is empty or frozen.
The rear window wiper and washer operates when
the ignition switch is in the ON position.
Wiper operation
Turn the switch clockwise to the intermittent (,j1 ) position or continuous (,j2 ) position for
wiper operation.
To stop the wiper operation, turn the switch back to
the OFF position.
Washer operation:
To operate the washer, push the lever towards the
front of the vehicle
j3 until the desired amount of
washer fluid is spread on the rear window. The wiper
will automatically operate several times.
Wiper drip wipe system (where fitted):
The wiper will also operate once about 3 seconds
after using the washer. This operation is to wipe
washer fluid that has dripped on the windscreen.
The mode can be turned off. For details, see “Ve-
hicle information display” later in this section.
Reverse synchronisation function
(where fitted)
When the windscreen wiper switch is in either the
intermittent or AUTO (where fitted), low or high
speed position, placing the shift lever in the R (Re-
verse) position will operate the rear window wiper.
The mode can be turned off. For details, see “Ve-
hicle information display” later in this section.
NIC2174
Instruments and controls2-33
Page 93 of 338

REAR WINDOW DEFOGGER
j
AThermaClear system On/Off. See
“ThermaClear Heated Windscreen button”
earlier in this section.
jBRear window defogger On/Off
To defog/defrost the rear window glass, start the
engine and push the rear window defogger switch
jB . The indicator light will come on. Push the switch
again to turn the defogger off.
The defogger will turn off automatically after ap-
proximately 15 minutes — if the rear window clears
before this time, push the switch again to turn the
defogger off.
For more information, see “Heater and air condi-
tioner operation” in the “4. Display screen, heater
and air conditioner, and audio system” section.
CAUTION
When cleaning the inner side of the rear window,
be careful not to scratch or damage the electri-
cal conductors.NOTE
When the ThermaClear system is turned on the
Stop/Start System (where fitted) will not be acti-
vated.
OUTSIDE MIRROR DEFOGGER
(where fitted)
The outside rear-view mirrors will be defogged when
the rear defogger switch is activated.
NIC2214Models with manual air conditioning (where fitted)
NIC2183Models with automatic air conditioning and ThermaClear
system (where fitted)
NIC2184Models with automatic air conditioning and without
ThermaClear system
DEFOGGER SWITCH
Instruments and controls2-35
Page 98 of 338

lowered using the switch located on the driver’s
side of the instrument panel, next to the steering
wheel.
The higher the number designated on the switch,
the lower the axis.
When travelling with no heavy load on a flat road,
select position 0.
AUTOMATIC AIMING CONTROL (LED
headlights)
Vehicles with LED headlights are equipped with an
automatic levelling system. The headlight axis is con-
trolled automatically.
NISSAN recommends consulting local regulations
on the use of lights.To clean the headlights, pull the windscreen washer
switch towards you while the headlight switch is in
the
position and the ignition switch is in the ON
position.
NOTE
The headlight cleaner will automatically operate
every fifth operation of the wiper and washer
switch.
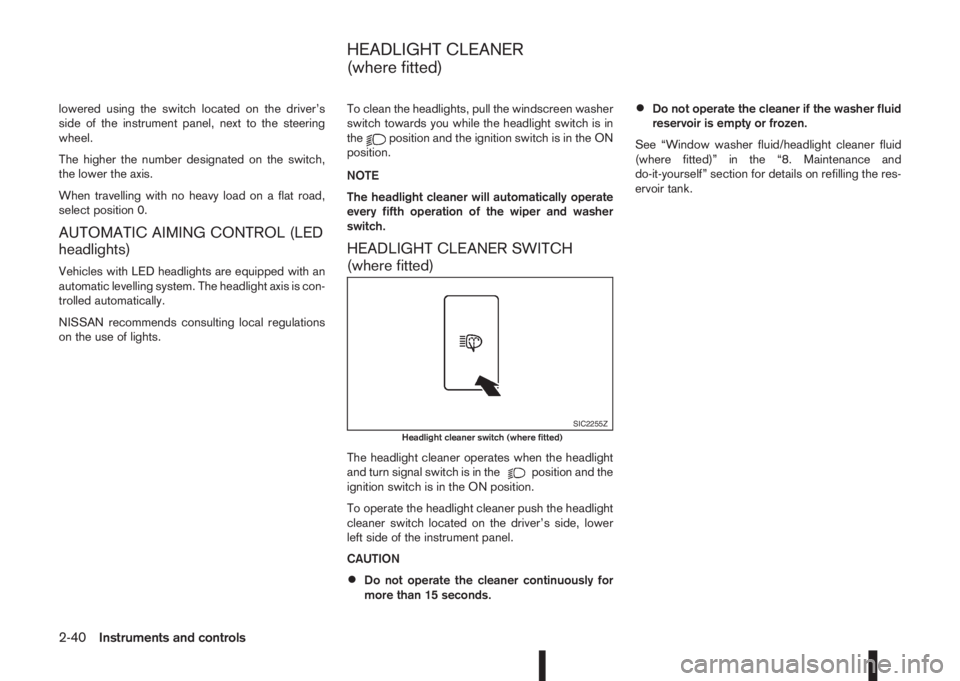
HEADLIGHT CLEANER SWITCH
(where fitted)
The headlight cleaner operates when the headlight
and turn signal switch is in theposition and the
ignition switch is in the ON position.
To operate the headlight cleaner push the headlight
cleaner switch located on the driver’s side, lower
left side of the instrument panel.
CAUTION
•Do not operate the cleaner continuously for
more than 15 seconds.
•Do not operate the cleaner if the washer fluid
reservoir is empty or frozen.
See “Window washer fluid/headlight cleaner fluid
(where fitted)” in the “8. Maintenance and
do-it-yourself” section for details on refilling the res-
ervoir tank.
SIC2255ZHeadlight cleaner switch (where fitted)
HEADLIGHT CLEANER
(where fitted)
2-40Instruments and controls
Page 100 of 338

WARNING
Take care as the power outlet and plug may be
hot during or immediately after use.
CAUTION
•This power outlet is not designed for use with
a cigarette lighter unit.
•Do not use with accessories that exceed a 12
volt, 120 W (10 A) power draw. Do not use
double adaptors or more than one electrical
accessory.
•Use this power outlet with the engine running
(do not use for extended periods of time with
the engine stopped or idling).
•Avoid using when the air conditioner, head-
lights or rear window defogger are on.
•When not in use, be sure that the cap is
closed. Do not allow water to come into con-
tact with the outlet.
•Before inserting or disconnecting a plug, be
sure to turn off the power switch of the elec-
trical accessory being used or remove the key
from the ignition to turn the Acc power of the
vehicle off.
•Fully push the plug in sufficiently. If sufficient
contact is not made, the plug may overheat or
the internal temperature fuse may blow.
STORAGE TRAYS
WARNING
To help prevent injury in an accident or sudden
stop, do not place sharp objects in the trays.
GLOVE BOX
WARNING
Keep the glove box lid closed while driving to
help prevent injury in an accident or a sudden
stop.
To open the glove box, lift the latch and lower the lid.
Towards the rear of the glove box an elastic strap
can be used to hold the Owner’s Manual pack.
NIC2177Centre console
NIC2135Front armrest
NIC2136
POWER OUTLET STORAGE
2-42Instruments and controls
Page 106 of 338

POWER WINDOWS
The power window switches are located on the door
panels and will only operate when the ignition switch
is in the ON position.
WARNING
•Make sure that all passengers have their
hands, etc. inside the vehicle before operat-
ing the power windows.
•Never leave children or adults who would nor-
mally require the support of others alone in
the vehicle. They could unknowingly activate
switches or controls and inadvertently
become involved in an accident.
•It is recommended to instruct all occupants in
the safe operation of power windows with par-
ticular emphasis given to the safety and su-
pervision of children.
The power windows only operate when the ignition
switch is in the “ON” position.
To open a window, push down the power window
switch.
To close a window, pull up the power window
switch.
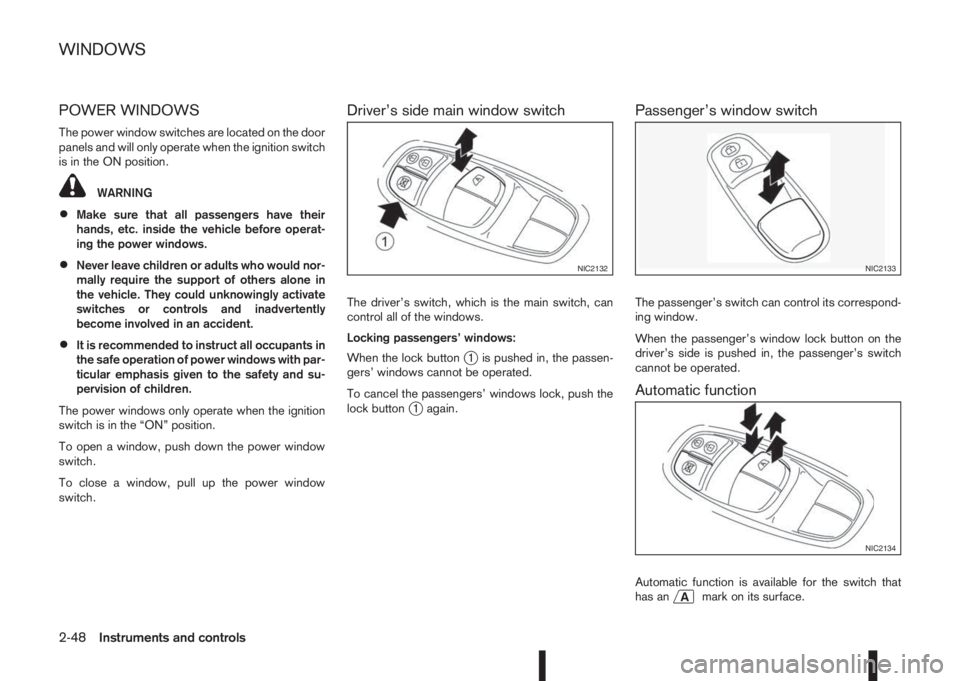
Driver’s side main window switch
The driver’s switch, which is the main switch, can
control all of the windows.
Locking passengers’ windows:
When the lock button
j1 is pushed in, the passen-
gers’ windows cannot be operated.
To cancel the passengers’ windows lock, push the
lock button
j1 again.
Passenger’s window switch
The passenger’s switch can control its correspond-
ing window.
When the passenger’s window lock button on the
driver’s side is pushed in, the passenger’s switch
cannot be operated.
Automatic function
Automatic function is available for the switch that
has anmark on its surface.
NIC2132NIC2133
NIC2134
WINDOWS
2-48Instruments and controls