2014 NISSAN PATHFINDER Cond
[x] Cancel search: CondPage 374 of 492
CAUTION
During the first 1,200 miles (2,000 km),
follow these recommendations to obtain
maximum engine performance and en-
sure the future reliability and economy of
your new vehicle. Failure to follow these
recommendations may result in short-
ened engine life and reduced engine
performance.● Avoid driving for long periods at constant
speed, either fast or slow, and do not run the
engine over 4,000 rpm.
● Do not accelerate at full throttle in any gear.
● Avoid quick starts.
● Avoid hard braking as much as possible.
● Do not tow a trailer for the first 500 miles
(800 km) . Your engine, axle or other parts
could be damaged. Follow these easy-to-use Fuel Efficient Driving
Tips to help you achieve the most fuel economy
from your vehicle.
1. Use Smooth Accelerator and Brake
Pedal Application
● Avoid rapid starts and stops
● Use smooth, gentle accelerator and
brake application whenever possible
● Maintain constant speed while commut-
ing and coast whenever possible
2. Maintain Constant Speed
● Look ahead to try and anticipate and mini-
mize stops
● Synchronizing your speed with traffic
lights allows you to reduce your number
of stops
● Maintaining a steady speed can minimize
red light stops and improve fuel efficiency
3. Use Air Conditioning (A/C) at Higher
Vehicle Speeds
● Below 40 MPH (64 km/h), it is more
efficient to open windows to cool the
vehicle due to reduced engine load ●
Above 40 MPH (64 km/h), it is more
efficient to use A/C to cool the vehicle
due to increased aerodynamic drag
● Recirculating the cool air in the cabin
when the A/C is on reduces cooling load
4. Drive at Economical Speeds and Dis-
tances
● Observing the speed limit and not ex-
ceeding 60 MPH (97 km/h) (where le-
gally allowed) can improve fuel efficiency
due to reduced aerodynamic drag
● Maintaining a safe following distance be-
hind other vehicles reduces unnecessary
braking
● Safely monitoring traffic to anticipate
changes in speed permits reduced brak-
ing and smooth acceleration changes
● Select a gear range suitable to road con-
ditions.
5. Use Cruise Control
● Using cruise control during highway driv-
ing helps maintain a steady speed
● Cruise control is particularly effective in
providing fuel savings when driving on flat
terrains
BREAK-IN SCHEDULE FUEL EFFICIENT DRIVING TIPS
Starting and driving5-21
Page 375 of 492
6.Plan for the Shortest Route
● Utilize a map or navigation system to de-
termine the best route to save time
7. Avoid Idling
● Shutting off your engine when safe for
stops exceeding 30–60 seconds saves
fuel and reduces emissions
8. Buy an Automated Pass for Toll Roads
● Automated passes permit drivers to use
special lanes to maintain cruising speed
through the toll and avoid stopping and
starting
9. Winter Warm Up
● Limit idling time to minimize impact to fuel
economy
● Vehicles typically need no more than
30 seconds of idling at start-up to effec-
tively circulate the engine oil before driv-
ing
● Your vehicle will reach its ideal operating
temperature more quickly while driving
versus idling 10.
Keeping your Vehicle Cool
● Park your vehicle in a covered parking
area or in the shade whenever possible
● When entering a hot vehicle, opening the
windows will help to reduce the inside
temperature faster, resulting in reduced
demand on your A/C system ●
Keep your engine tuned up.
● Follow the recommended scheduled main-
tenance.
● Keep the tires inflated to the correct pres-
sure. Low tire pressure increases tire wear
and lowers fuel economy.
● Keep the wheels in correct alignment. Im-
proper alignment increases tire wear and
lowers fuel economy.
● Use the recommended viscosity engine oil.
See “Engine oil and oil filter recommenda-
tions” in “Technical and consumer informa-
tion” later in this manual.
INCREASING FUEL ECONOMY
5-22Starting and driving
Page 376 of 492
4X4I SYSTEM OPERATION4WD shift switch
The Four-Wheel Drive (4WD) system is used to
select the 2WD (Two-Wheel Drive) , AUTO or
LOCK mode depending on the driving condi-
tions.
Turn the 4WD mode switch, located on the cen-
ter console, to select 2WD, AUTO, or LOCK.● 2WD – Turn the 4WD mode switch to the
2WD position. The Two-Wheel Drive (2WD)
indicator light in the vehicle information dis-
play illuminates. ●
AUTO – Turn the 4WD mode switch to the
neutral (AUTO) position. The Four-Wheel
Drive (4WD) AUTO indicator light in the
vehicle information display illuminates.
● LOCK – To engage the LOCK mode, turn
the 4WD mode switch to the LOCK posi-
tion. The switch will return to the AUTO
position automatically and the Four-Wheel
Drive (4WD) LOCK indicator light in the
vehicle information display illuminates. To
disengage the LOCK mode, turn the switch
to the LOCK position again. The switch will
return to the AUTO position automatically,
and the Four-Wheel Drive (4WD) LOCK
indicator light turns into the AUTO indicator
light. The LOCK mode will automatically be
cancelled when the ignition switch is turned
to the “OFF” position.
LIC2399
INTELLIGENT 4WD (if so equipped)
Starting and driving5-23
Page 377 of 492
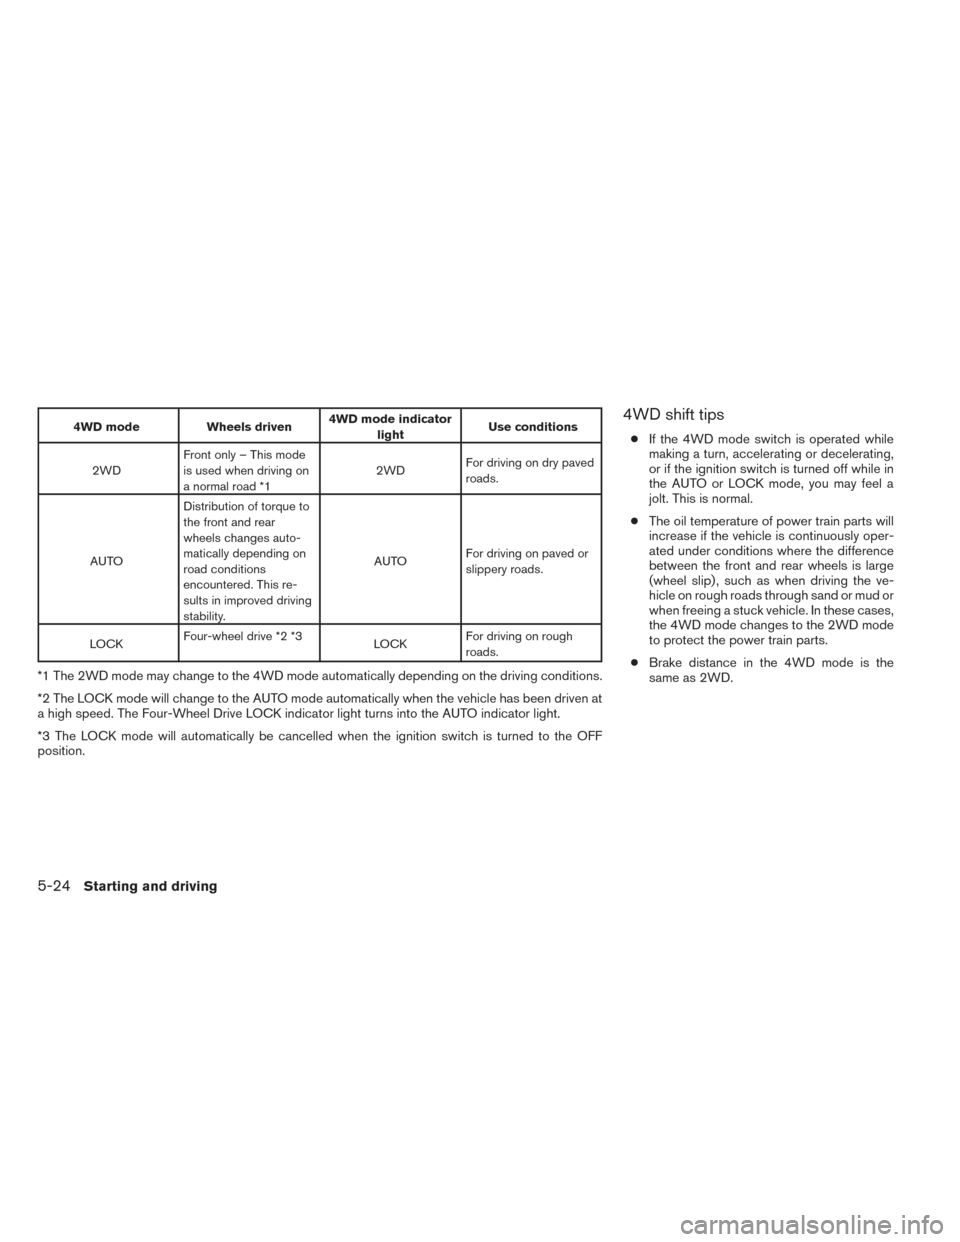
4WD modeWheels driven4WD mode indicator
light Use conditions
2WD Front only – This mode
is used when driving on
a normal road *1 2WD
For driving on dry paved
roads.
AUTO Distribution of torque to
the front and rear
wheels changes auto-
matically depending on
road conditions
encountered. This re-
sults in improved driving
stability. AUTO
For driving on paved or
slippery roads.
LOCK Four-wheel drive *2 *3
LOCKFor driving on rough
roads.
*1 The 2WD mode may change to the 4WD mode automatically depending on the driving conditions.
*2 The LOCK mode will change to the AUTO mode automatically when the vehicle has been driven at
a high speed. The Four-Wheel Drive LOCK indicator light turns into the AUTO indicator light.
*3 The LOCK mode will automatically be cancelled when the ignition switch is turned to the OFF
position.
4WD shift tips
●
If the 4WD mode switch is operated while
making a turn, accelerating or decelerating,
or if the ignition switch is turned off while in
the AUTO or LOCK mode, you may feel a
jolt. This is normal.
● The oil temperature of power train parts will
increase if the vehicle is continuously oper-
ated under conditions where the difference
between the front and rear wheels is large
(wheel slip) , such as when driving the ve-
hicle on rough roads through sand or mud or
when freeing a stuck vehicle. In these cases,
the 4WD mode changes to the 2WD mode
to protect the power train parts.
● Brake distance in the 4WD mode is the
same as 2WD.
5-24Starting and driving
Page 378 of 492
CAUTION
●Depending on the driving condition, the
4WD mode may automatically change
from 2WD to 4WD even when the 2WD
mode is selected. If this occurs while
driving, the 4WD mode indicator light
will not illuminate.
● Do not start the engine with the 4WD
mode switch in any mode in the follow-
ing cases:
– when the vehicle is placed on a fre- eroller or jacking up the vehicle with
the front tires raised and the rear
tires on the ground.
– when towing the vehicle with the rear tires raised from the ground.
● Operate the 4WD mode switch only
when driving straight. Do not operate
the 4WD mode switch when making a
turn or backing up.
● Do not operate the 4WD mode switch
with the front wheel spinning.
● Engine idling speed is high while warm-
ing up the engine. Be especially careful
when starting or driving on slippery sur-
faces with the 4WD mode switch set in
the AUTO mode.
4WD mode indicator lights
The 2WD, 4WD AUTO and LOCK mode indica-
tor lights are located in the vehicle information
display.
The 4WD mode indicator lights will display the
mode selected by the 4WD mode switch while
the engine is running.
The 4WD AUTO indicator light illuminates when
selecting the AUTO mode.
The 2WD and 4WD LOCK indicator light illumi-
nates when selecting the LOCK mode.
Starting and driving5-25
Page 381 of 492
WARNING
●While driving on a slippery surface, be
careful when braking, accelerating or
downshifting. Abrupt braking or accel-
erating could cause the wheels to skid
and result in an accident.
● If the engine is not running or is turned
off while driving, the power assist for
the brakes will not work. Braking will be
harder.
Wet brakes
When the vehicle is washed or driven through
water, the brakes may get wet. As a result, your
braking distance will be longer and the vehicle
may pull to one side during braking.
To dry the brakes, drive the vehicle at a safe
speed while lightly pressing the brake pedal to
heat up the brakes. Do this until the brakes return
to normal. Avoid driving the vehicle at high
speeds until the brakes function correctly.
Parking brake break-in
Break-in the parking brake shoes whenever the
effect of the parking brake is weakened or when-
ever the parking brake shoes and/or drum/rotors
are replaced, in order to assure the best brake
performance. This procedure is described in the vehicle service
manual and can be performed by a NISSAN
dealer.
ANTI-LOCK BRAKING SYSTEM
(ABS)
WARNING
●
The Anti-lock Braking System (ABS) is a
sophisticated device, but it cannot pre-
vent accidents resulting from careless
or dangerous driving techniques. It can
help maintain vehicle control during
braking on slippery surfaces. Remem-
ber that stopping distances on slippery
surfaces will be longer than on normal
surfaces even with ABS. Stopping dis-
tances may also be longer on rough,
gravel or snow covered roads, or if you
are using tire chains. Always maintain a
safe distance from the vehicle in front
of you. Ultimately, the driver is respon-
sible for safety.
● Tire type and condition may also affect
braking effectiveness.
– When replacing tires, install the specified size of tires on all four
wheels. – When installing a spare tire, make
sure that it is the proper size and type
as specified on the Tire and Loading
Information label. See “Tire and
Loading Information label” in the
“Technical and consumer informa-
tion” section of this manual.
– For detailed information, see “Wheels and tires” in the “Mainte-
nance and do-it-yourself” section of
this manual.
The Anti-lock Braking System (ABS) controls the
brakes so the wheels do not lock during hard
braking or when braking on slippery surfaces.
The system detects the rotation speed at each
wheel and varies the brake fluid pressure to pre-
vent each wheel from locking and sliding. By
preventing each wheel from locking, the system
helps the driver maintain steering control and
helps to minimize swerving and spinning on slip-
pery surfaces.
Using the system
Depress the brake pedal and hold it down. De-
press the brake pedal with firm steady pressure,
but do not pump the brakes. The ABS will oper-
ate to prevent the wheels from locking up. Steer
the vehicle to avoid obstacles.
5-28Starting and driving
Page 382 of 492
WARNING
Do not pump the brake pedal. Doing so
may result in increased stopping
distances.
Self-test feature
The ABS includes electronic sensors, electric
pumps, hydraulic solenoids and a computer. The
computer has a built-in diagnostic feature that
tests the system each time you start the engine
and move the vehicle at a low speed in forward or
reverse. When the self-test occurs, you may hear
a “clunk” noise and/or feel a pulsation in the brake
pedal. This is normal and does not indicate a
malfunction. If the computer senses a malfunc-
tion, it switches the ABS off and illuminates the
ABS warning light on the instrument panel. The
brake system then operates normally, but without
anti-lock assistance.
If the ABS warning light illuminates during the
self-test or while driving, have the vehicle
checked by a NISSAN dealer.
Normal operation
The ABS operates at speeds above3-6MPH(5
- 10 km/h). The speed varies according to road
conditions.
When the ABS senses that 1 or more wheels are
close to locking up, the actuator rapidly applies
and releases hydraulic pressure. This action is
similar to pumping the brakes very quickly. You
may feel a pulsation in the brake pedal and hear a
noise from under the hood or feel a vibration from
the actuator when it is operating. This is normal
and indicates that the ABS is operating properly.
However, the pulsation may indicate that road
conditions are hazardous and extra care is re-
quired while driving.The Vehicle Dynamic Control (VDC) system uses
various sensors to monitor driver inputs and ve-
hicle motion. Under certain driving conditions,
the VDC System helps to perform the following
functions:
● Controls brake pressure to reduce wheel
slip on one slipping drive wheel so power is
transferred to a non slipping drive wheel on
the same axle.
● Controls brake pressure and engine output
to reduce drive wheel slip based on vehicle
speed (traction control function) .
● Controls brake pressure at individual wheels
and engine output to help the driver maintain
control of the vehicle in the following condi-
tions:
– understeer (vehicle tends to not follow the steered path despite increased steer-
ing input)
– oversteer (vehicle tends to spin due to certain road or driving conditions)
The VDC system can help the driver to maintain
control of the vehicle, but it can not prevent loss
of vehicle control in all driving situations.
VEHICLE DYNAMIC CONTROL (VDC)
SYSTEM
Starting and driving5-29
Page 383 of 492
When the VDC system operates, theindi-
cator in the instrument panel flashes so note the
following:
● The road may be slippery or the system may
determine some action is required to help
keep the vehicle on the steered path.
● You may feel a pulsation in the brake pedal
and hear a noise or vibration from under the
hood. This is normal and indicates that the
VDC system is working properly.
● Adjust your speed and driving to the road
conditions.
See “Slip indicator light” and ”Vehicle Dynamic
Control (VDC) OFF indicator light” in the ”Instru-
ments and controls” section.
If a malfunction occurs in the system, the
andindicator lights come on in the instru-
ment panel. The VDC system automatically turns
off when these indicator lights are on.
The VDC OFF switch is used to turn off the VDC
system. The
indicator illuminates to indi-
cate the VDC system is off.
When the VDC switch is used to turn off the
system, the VDC system still operates to prevent
one drive wheel from slipping by transferring
power to a non slipping drive wheel. The
indicator flashes if this occurs. All other VDC
functions are off and the
indicator will not
flash.
The VDC system is automatically reset to on
when the ignition switch is placed in the off
position then back to the on position.
The computer has a built in diagnostic feature
that tests the system each time you start the
engine and move the vehicle forward or in reverse
at a slow speed. When the self-test occurs, you
may hear a clunk noise and/or feel a pulsation in
the brake pedal. This is normal and is not an
indication of a malfunction.
WARNING
● The VDC system is designed to help the
driver maintain stability but does not
prevent accidents due to abrupt steer-
ing operation at high speeds or by care-
less or dangerous driving techniques.
Reduce vehicle speed and be especially
careful when driving and cornering on
slippery surfaces and always drive
carefully. ●
Do not modify the vehicle’s suspension.
If suspension parts such as shock ab-
sorbers, struts, springs, stabilizer bars,
bushings and wheels are not NISSAN
recommended for your vehicle or are
extremely deteriorated, the VDC system
may not operate properly. This could
adversely affect vehicle handling per-
formance, and the
indicator may
flash or both the
andindi-
cator lights may illuminate.
● If brake related parts such as brake
pads, rotors and calipers are not
NISSAN recommended or are extremely
deteriorated, the VDC system may not
operate properly and both the
and theindicator lights may
illuminate.
● If engine control related parts are not
NISSAN recommended or are extremely
deteriorated, both the
andindicator lights may illuminate.
5-30Starting and driving