2014 NISSAN PATHFINDER HYBRID key
[x] Cancel search: keyPage 7 of 32
5
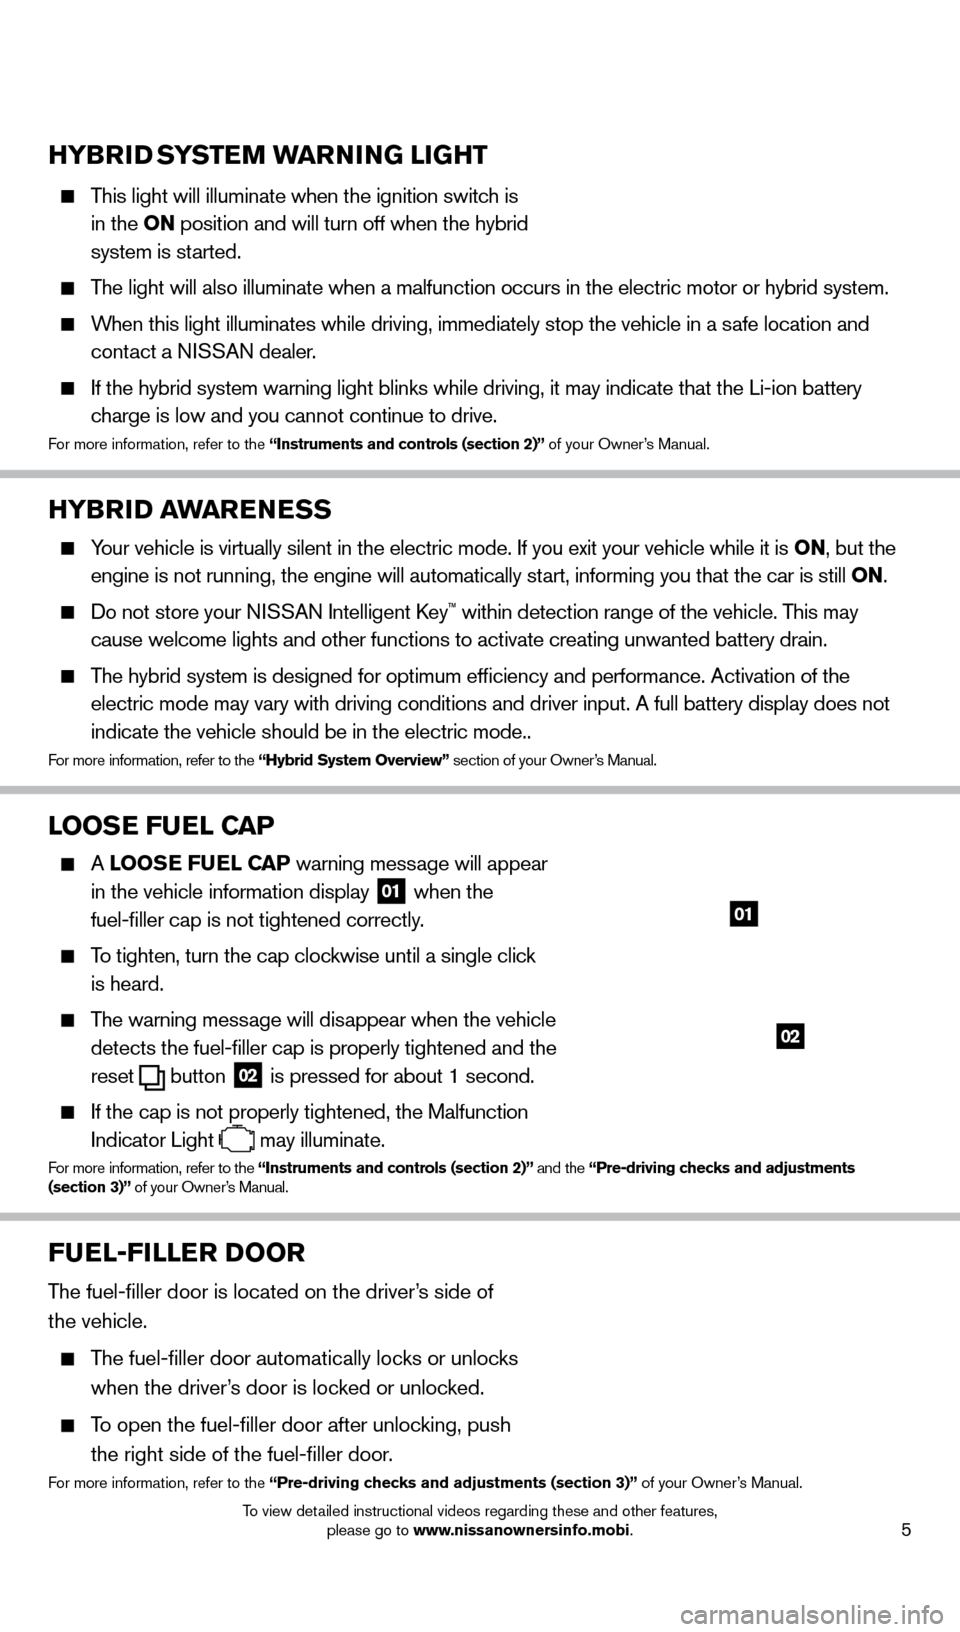
HYBRiD SYSTEM WARNiNG liG HT
This light will illuminate when the ignition switch is
in the o N position and will turn off when the hybrid
system is started.
The light will also illuminate when a malfunction occurs in the electric \
motor or hybrid system.
When this light illuminates while driving, immediately stop the vehicle i\
n a safe location and contact a NISSAN dealer.
If the hybrid system warning light blinks while driving, it may indicate\
that the Li-ion battery
charge is low and you cannot continue to drive.
For more information, refer to the “instruments and controls (section 2)” of your Owner’s Manual.
HYBRiD AWARENESS
Your vehicle is virtually silent in the electric mode. If you exit your v\
ehicle while it is o N, but the
engine is not running, the engine will automatically start, informing you that the car is still o N.
Do not store your NISSAN Intelligent key™ within detection range of the vehicle. This may
cause welcome lights and other functions to activate creating unwanted b\
attery drain.
The hybrid system is designed for optimum efficiency and performance. A\
ctivation of the electric mode may vary with driving conditions and driver input. A full \
battery display does not
indicate the vehicle should be in the electric mode..
For more information, refer to the “Hybrid System overview” section of your Owner’s Manual.
looSE FUEl CAP
A looSE FUEl CAP warning message will appear
in the vehicle information display
01 when the
fuel-filler cap is not tightened correctly.
To tighten, turn the cap clockwise until a single click
is heard.
The warning message will disappear when the vehicle detects the fuel-filler cap is properly tightened and the
reset
button 02 is pressed for about 1 second.
If the cap is not properly tightened, the Malfunction
Indicator Light
may illuminate.
For more information, refer to the “instruments and controls (section 2)” and the “Pre-driving checks and adjustments
(section 3)” of your Owner’s Manual.
02
01
FUEl-F ill ER Doo R
The fuel-filler door is located on the driver’s side of
the vehicle.
The fuel-filler door automatically locks or unlocks when the driver’s door is locked or unlocked.
To open the fuel-filler door after unlocking, push
the right side of the fuel-filler door.
For more information, refer to the “Pre-driving checks and adjustments (section 3)” of your Owner’s Manual.
1562941_14b_Pathfinder_HEV_QRG_091913.indd 59/19/13 11:11 AM
To view detailed instructional videos regarding these and other features, please go to www.nissanownersinfo.mobi.
Page 8 of 32

6
esse ntial in for mation
CloCK SET/ADUSTMENT
To adjust the time and the appearance of the clock
on the display:
1. Press the
SETT i
N
G button on the control panel.
2. T
ouch the o thers key.
3. T
ouch the Clock key.
The following settings can be adjusted:
•
o n-screen Clock: The clock in the upper right corner of the display can be turned
ON or OFF.
•
Clock Format (24h): The clock can be set to 12 hours or 24 hours.
•
o ffset (hour): The time can be adjusted by increasing or decreasing per hour.
•
o ffset (min): The time can be adjusted by increasing or decreasing per minute.
•
Daylight Savings Time: The application of daylight savings time can be turned
o
N or o FF.
•
Time Zone: Adjust the time zone. c hoose a time zone from the available list.
Press the BACK button to return to the previous screen.
For more information, refer to the “Monitor, climate, audio, phone and voice recognition systems (section 4)” of
your Owner’s Manual.
1562941_14b_Pathfinder_HEV_QRG_091913.indd 69/19/13 11:11 AM
To view detailed instructional videos regarding these and other features, please go to www.nissanownersinfo.mobi.
Page 9 of 32
7
NiSSAN iNTElliG ENT KEY® SYSTE M
(if so equipped)
The NISSAN Intelligent key® system allows you to lock or
unlock your vehicle, open your liftgate and remotely start
the engine. It is important to make sure the Intelligent
k
ey
is with you (that is, in your pocket or purse).
R
eM
OT
e
e
N
GIN
e
START* (if so equipped)
The remote start operating range is approximately 200 ft (60 m) from the vehicle. The effective operating range may be shorter if there are walls or other obstructions \
between the key and
the vehicle.
For remote start to function the car must be in P (PARK) with the ignition off and all doors must be closed and locked. Please see your Owner’s Manual for additional information.
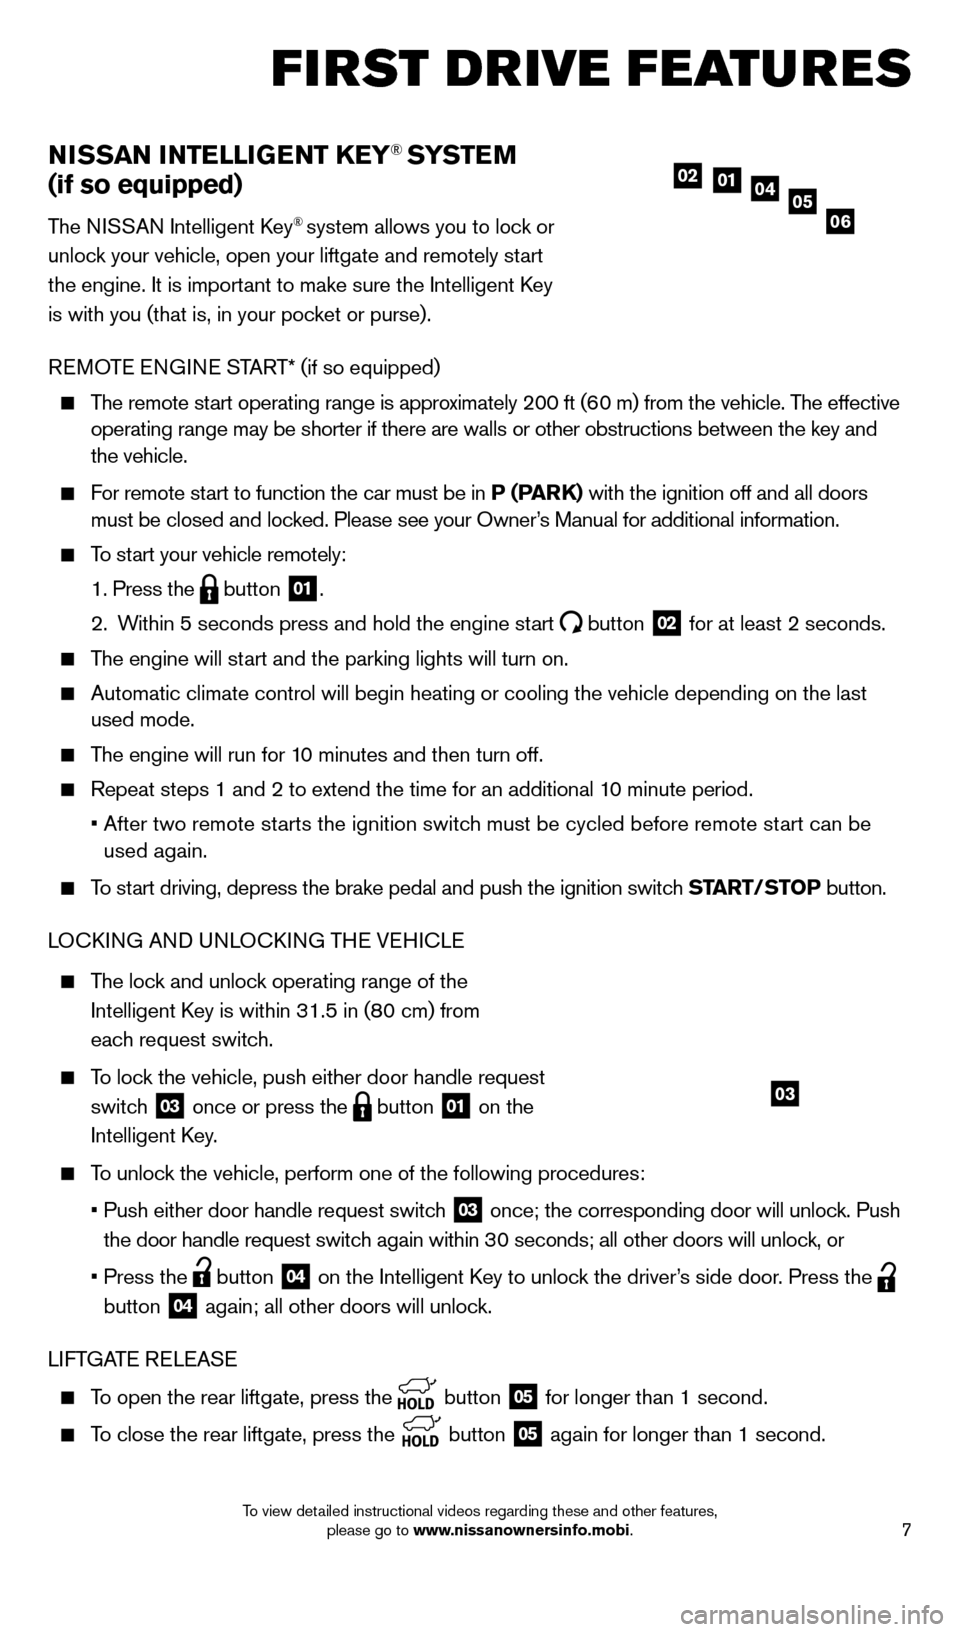
To start your vehicle remotely:
1. Press the button 01.
2.
W
ithin 5 seconds press and hold the engine start
button 02 for at least 2 seconds.
The engine will start and the parking lights will turn on.
Automatic climate control will begin heating or cooling the vehicle depe\
nding on the last
used mode.
The engine will run for 10 minutes and then turn off.
Repeat steps 1 and 2 to extend the time for an additional 1 0 minute period.
•
After two remote st
arts the ignition switch must be cycled before remote start can be
used again.
To start driving, depress the brake pedal and push the ignition switch START/STo P button.
LO ck ING AND UNLO ck ING TH
e VeH
I c L
e
The lock and unlock operating range of the
Intelligent k
ey is within 31.5 in (8
0 cm) from
each request switch.
To lock the vehicle, push either door handle request switch
03 once or press the button 01 on the
Intelligent
k
ey
.
To unlock the vehicle, perform one of the following procedures:
•
Push either door handle request switc
h
03 once; the corresponding door will unlock. Push
the door handle request switch again within 30 seconds; all other doors will unlock, or
•
Press the button 04 on the Intelligent key to unloc k the driver’s side door. Press the
button
04 again; all other doors will unlock.
LIFTGAT
e
R
eL
e
AS
e
To open the rear liftgate, press the button 05 for longer than 1 second.
To close the rear liftgate, press the
button 05 again for longer than 1 second.
05010204
06
first drive features
03
1562941_14b_Pathfinder_HEV_QRG_091913.indd 79/19/13 11:11 AM
To view detailed instructional videos regarding these and other features, please go to www.nissanownersinfo.mobi.
Page 10 of 32
8
PANIc ALARM
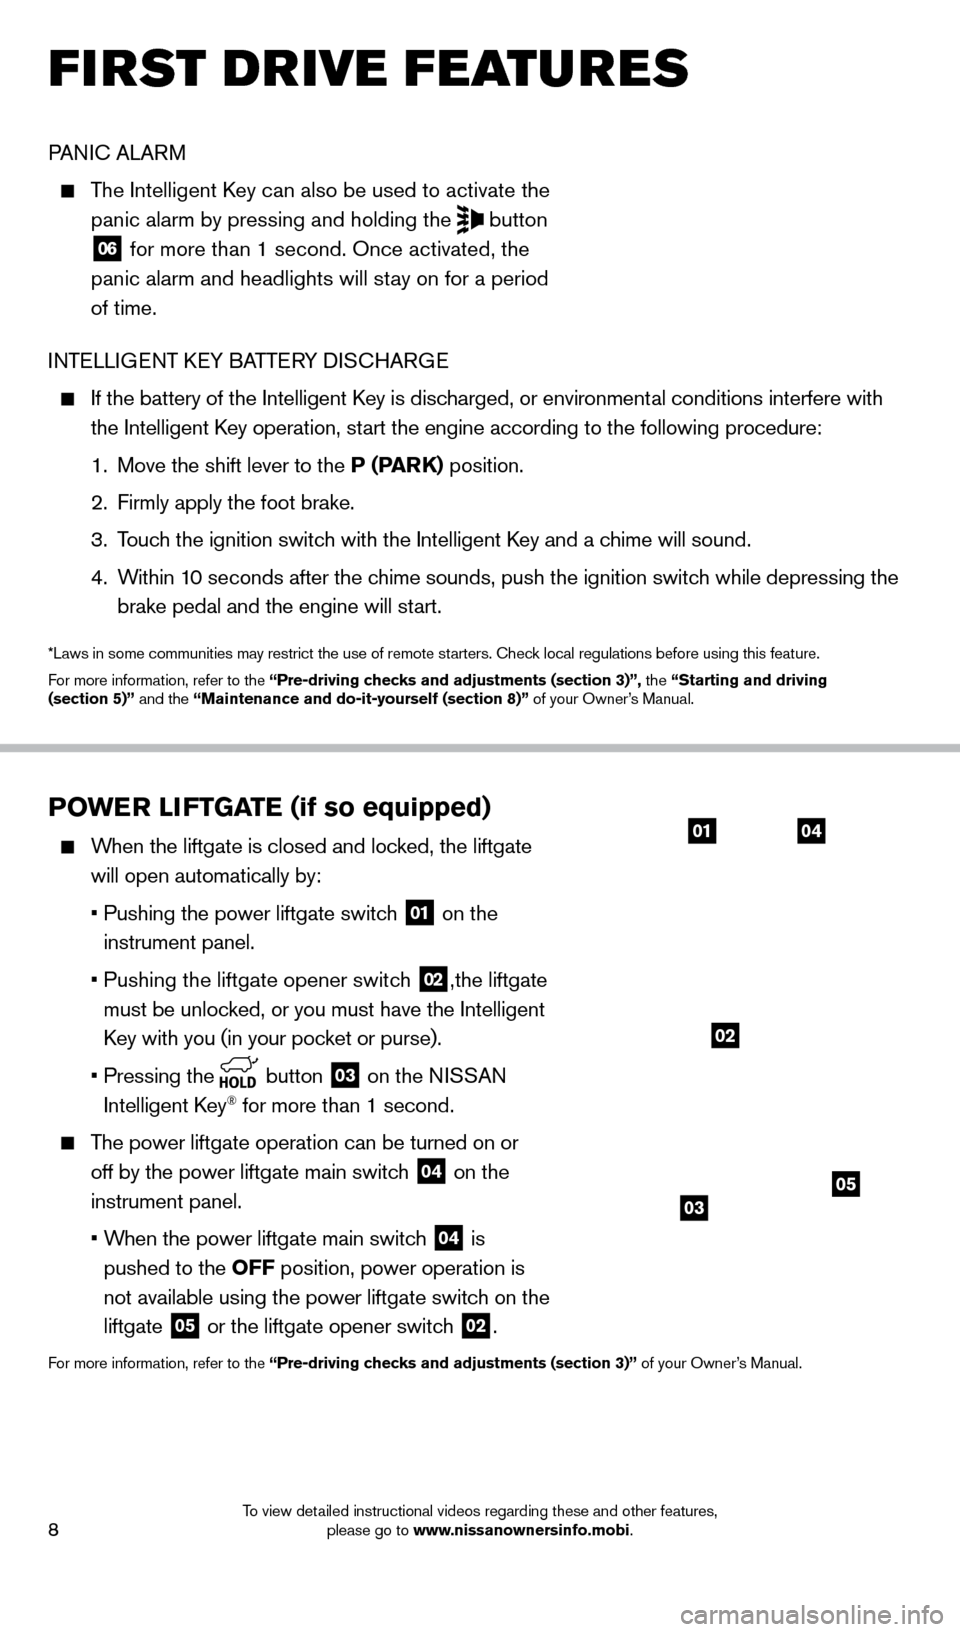
The Intelligent key can also be used to activate the
panic alarm by pressing and holding the
button
06 for more than 1 second. Once activated, the
panic alarm and headlights will stay on for a period
of time.
INT
e
LLI
G
eNT
ke Y BATT e
R
Y DIS
cHAR
G
e
If the battery of the Intelligent key is disc harged, or environmental conditions interfere with
the Intelligent k
ey operation, st
art the engine according to the following procedure:
1.
Move the shift lever to the
P (PARK) position.
2.
Firmly apply the foot brake.
3.
T
ouch the ignition switch with the Intelligent k
ey and a c
hime will sound.
4.
W
ithin 10 seconds after the chime sounds, push the ignition switch while depressing the
brake pedal and the engine will start.
*Laws in some communities may restrict the use of remote starters. check local regulations before using this feature.
F or more information, refer to the “Pre-driving checks and adjustments (section 3)”, the “Starting and driving
(section 5)” and the “Maintenance and do-it-yourself (section 8)” of your Owner’s Manual.
PoWER liFT GATE (if so equipped)
When the liftgate is closed and locked, the liftgate
will open automatically by:
•
Pushing the power liftgate switc
h
01 on the
instrument panel.
•
Pushing the liftgate opener switc
h
02,the liftgate
must be unlocked, or you must have the Intelligent
key with you (in your poc
ket or purse).
•
Pressing the button 03 on the NISSAN
Intelligent
k
ey® for more than 1 second.
The power liftgate operation can be turned on or off by the power liftgate main switch
04 on the
instrument panel.
•
W
hen the power liftgate main switch
04 is
pushed to the
o
FF position, power operation is
not available using the power liftgate switch on the
liftgate
05 or the liftgate opener switch 02.
For more information, refer to the “Pre-driving checks and adjustments (section 3)” of your Owner’s Manual.
0104
0503
02
first drive features
1562941_14b_Pathfinder_HEV_QRG_091913.indd 89/19/13 11:11 AM
To view detailed instructional videos regarding these and other features, please go to www.nissanownersinfo.mobi.
Page 12 of 32

10
3RD RoW SEATS
To recline the seatback, pull up on the latch 01
located on the outside corner of each seatback. Lean
back until the desired angle is obtained.
To bring the seatback forward again, pull up on the latch
01 and move your body forward. The seatback
will move forward.
For more information, refer to the “Safety—seats, seat belts and supplemental restraint system (sect\
ion 1)” of your
Owner’s Manual.
01
AUTo MAT iC D Riv E Po Si T io NER
(if so equipped)
Two positions for the driver’s seat, steering column
and outside mirrors can be stored in the automatic
drive positioner
01 memory.
Follow these procedures to set the memory positions:
•
Confirm the shift lever is in the
P (PARK) position.
•
Push the ignition switc
h to the o N position.
•
Adjust the driver
’s seat, steering column and outside mirrors to the desired positions using
the adjusting switches for each feature.
•
Push the
SET switch and within 5 seconds, push the memory switch (1 or 2) for at
least 1 second.
•
T
he indicator light on the memory switch you select will illuminate for approximately
5 seconds, and a chime will sound (if so equipped) when memory is stored correctly.
•
T
he driver’s seat, steering column and outside mirror positions are now set to
your preference.
These memorized positions can also be linked to your NISSAN Intelligent key®.
For more information, refer to the “Pre-driving checks and adjustments (section 3)” of your Owner’s Manual.
01
first drive features
1562941_14b_Pathfinder_HEV_QRG_091913.indd 109/19/13 11:11 AM
To view detailed instructional videos regarding these and other features, please go to www.nissanownersinfo.mobi.
Page 13 of 32
11
oUTSiDE MiRRo R C o NTRol SW i TCH
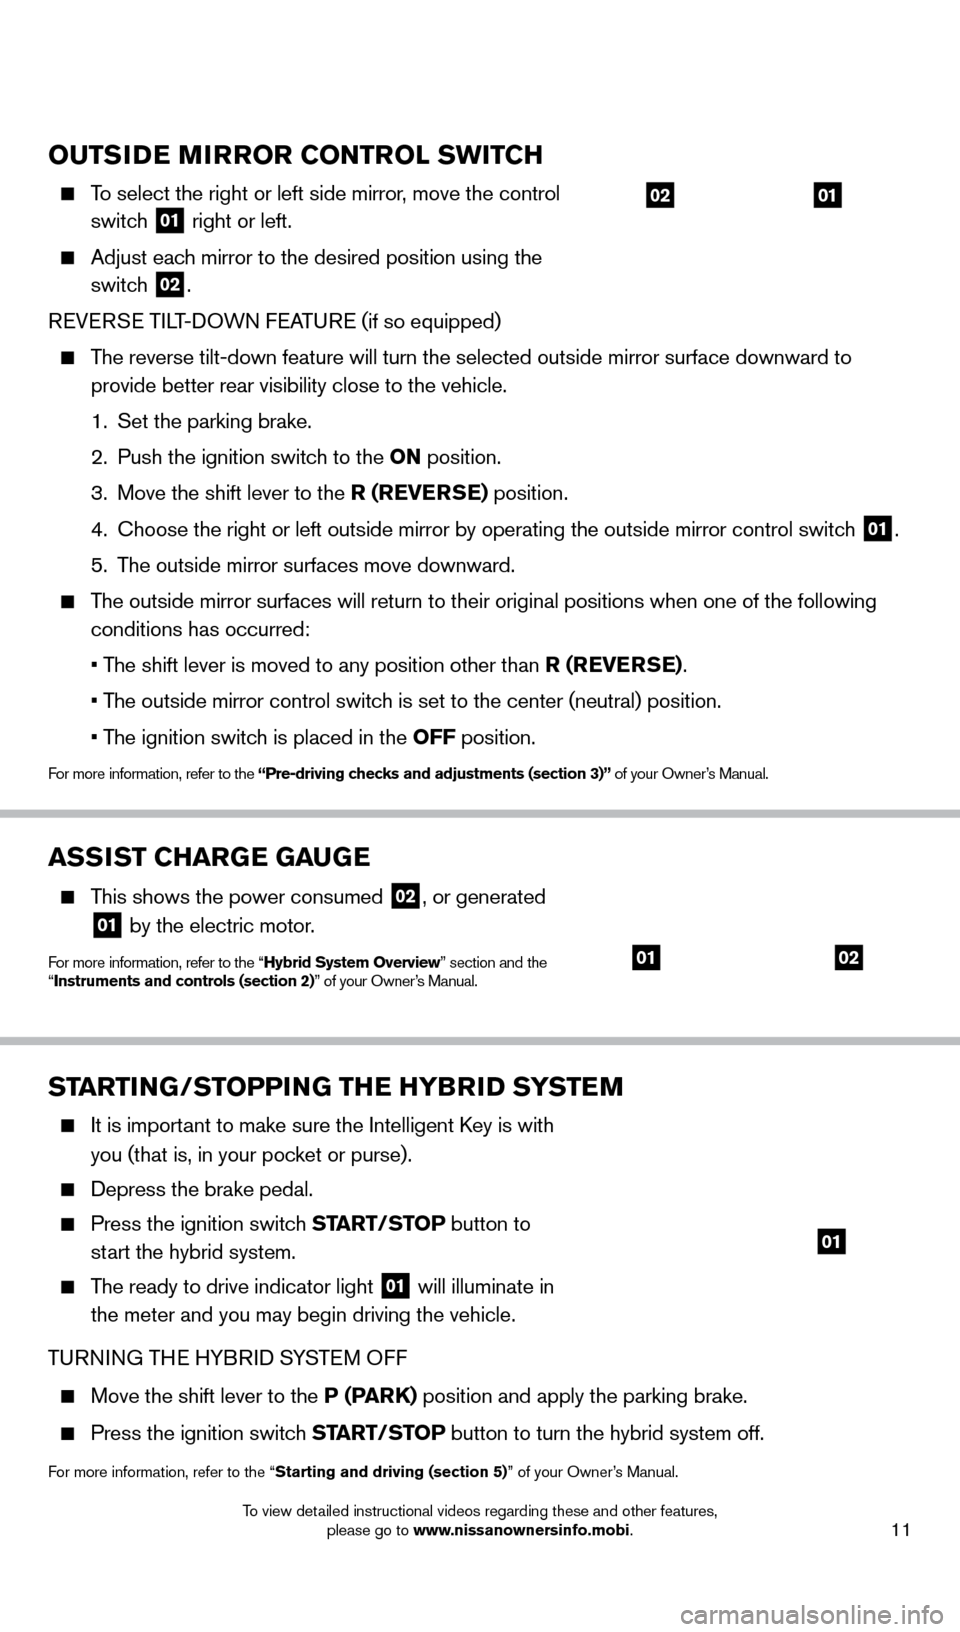
To select the right or left side mirror, move the control
switch
01 right or left.
Adjust eac h mirror to the desired position using the
switch
02.
R
e
V
e
R
S
e
TILT-DOWN F
e
ATUR
e
(if so equipped)
The reverse tilt-down feature will turn the selected outside mirror surfa\
ce downward to provide better rear visibility close to the vehicle.
1.
Set the parking brake.
2.
Push the ignition switc
h to the o N position.
3.
Move the shift lever to the
R (RE v ERSE) position.
4.
c hoose the right or left outside mirror by operating the outside mirror c\
ontrol switch
01.
5.
T
he outside mirror surfaces move downward.
The outside mirror surfaces will return to their original positions when \
one of the following conditions has occurred:
•
T
he shift lever is moved to any position other than R (RE v ERSE).
•
T
he outside mirror control switch is set to the center (neutral) position.
•
T
he ignition switch is placed in the o FF position.
For more information, refer to the “Pre-driving checks and adjustments (section 3)” of your Owner’s Manual.
0102
STARTiNG/SToPP iN G THE HYBRiD S YSTEM
It is important to make sure the Intelligent key is with
you (that is, in your pocket or purse).
Depress the brake pedal.
Press the ignition switc h START/STo P button to
start the hybrid system.
The ready to drive indicator light 01 will illuminate in
the meter and you may begin driving the vehicle.
TURNING TH
e
HYBRID SYST
e
M O
FF
Move the shift lever to the P (PARK) position and apply the parking brake.
Press the ignition switch START/STo P button to turn the hybrid system off.
For more information, refer to the “Starting and driving (section 5)” of your Owner’s Manual.
ASSiST CHARGE GAUGE
This shows the power consumed 02, or generated
01 by the electric motor.
For more information, refer to the “Hybrid System overview” section and the
“i nstruments and controls (section 2)” of your Owner’s Manual.0102
01
1562941_14b_Pathfinder_HEV_QRG_091913.indd 119/19/13 11:11 AM
To view detailed instructional videos regarding these and other features, please go to www.nissanownersinfo.mobi.
Page 21 of 32
19
vEHiCl E iN Fo RMAT io N DiS P l AY
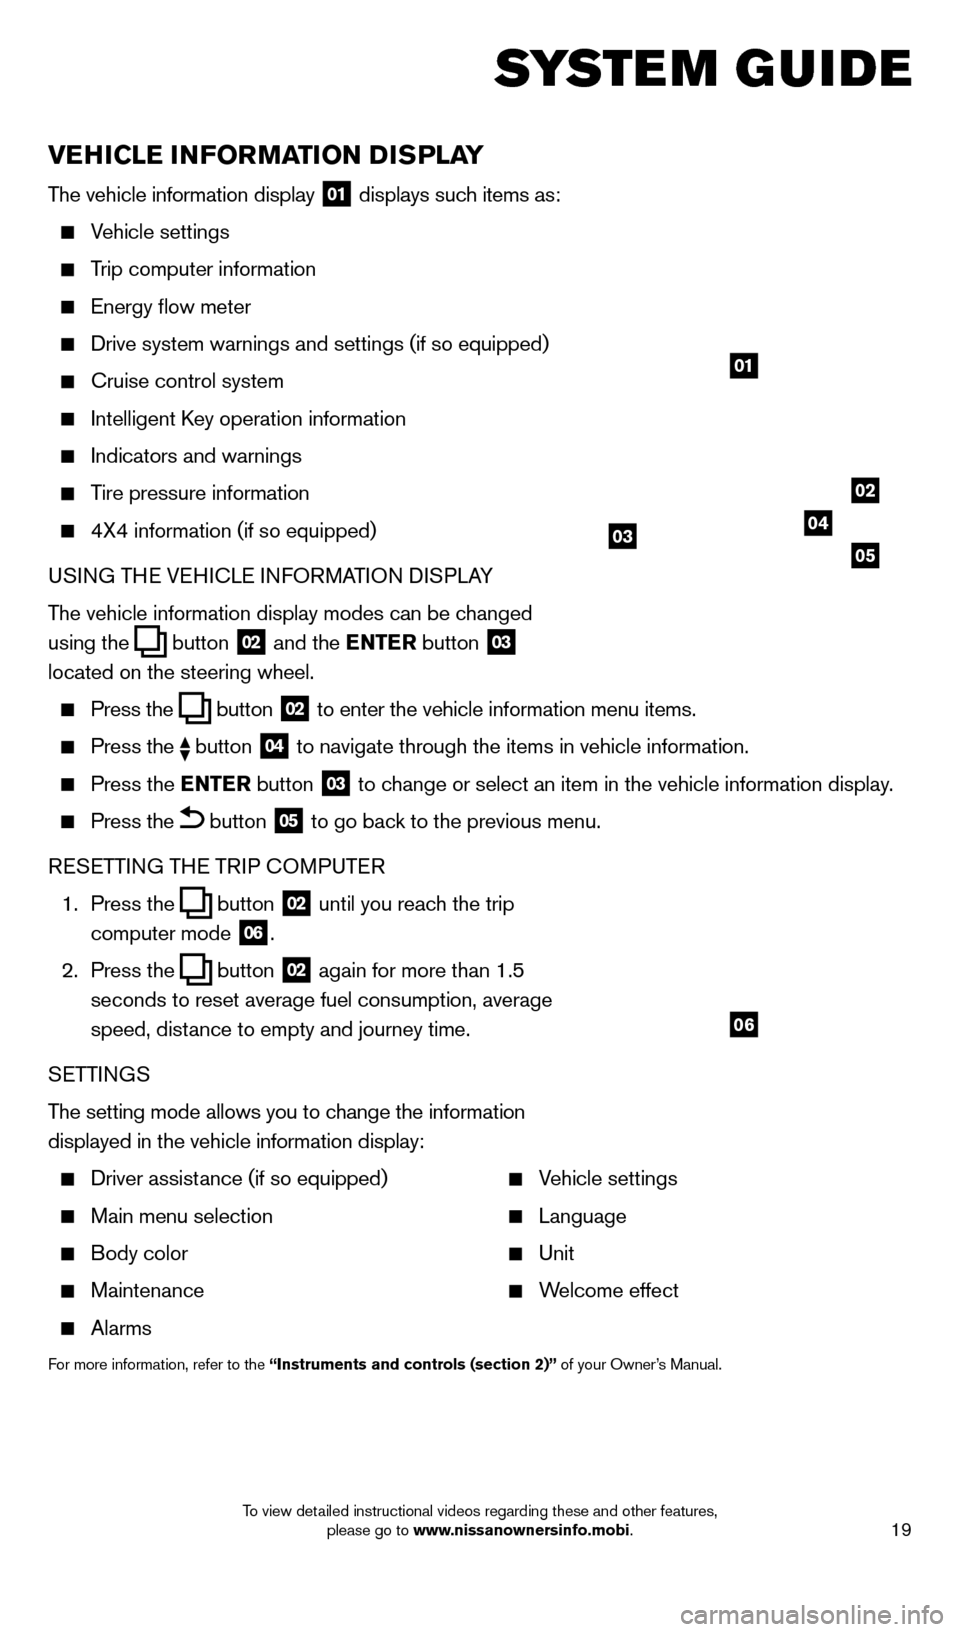
The vehicle information display 01 displays such items as:
Vehicle settings
Trip computer information
energy flow meter
Drive system warnings and settings (if so equipped)
cruise control system
Intelligent key operation information
Indicators and warnings
Tire pressure information
4X4 information (if so equipped)
USI NG TH
e VeH
I c L
e I
NFORMATION DISPLAY
The vehicle information display modes can be changed
using the
button 02 and the ENTER button 03
located on the steering wheel.
Press the button 02 to enter the vehicle information menu items.
Press
the button 04 to navigate through the items in vehicle information.
Press the
E NTER button 03 to change or select an item in the vehicle information display.
Press the button 05 to go back to the previous menu.
R
eSe
TTING TH
e
TRIP
c
O
MPUT e
R
1.
Press the
button 02 until you reach the trip
computer mode 06.
2.
Press the
button 02 again for more than 1.5
seconds to reset average fuel consumption, average
speed, distance to empty and journey time.
S
e
TTINGS
The setting mode allows you to change the information
displayed in the vehicle information display:
Driver assist ance (if so equipped)
Main menu selection
Body color
Maintenance
Alarms
Vehicle settings
Language
Unit
Welcome effect
For more information, refer to the “instruments and controls (section 2)” of your Owner’s Manual.
system guide
01
02
040305
06
1562941_14b_Pathfinder_HEV_QRG_091913.indd 199/19/13 11:12 AM
To view detailed instructional videos regarding these and other features, please go to www.nissanownersinfo.mobi.
Page 23 of 32

21
BlUETooTH® SYSTE M
W
i
TH NA
viGA
T io N (if so equipped)
cONNecTING PRO ceDU Re
The vehicle must be stationary when connecting
the phone.
1.
Press the SETT
i
N
G button on the control panel and
select the “Bluetooth” key on the display.
2.
Select the ‘
c onnect Bluetooth” key.
3.
A popup bo
x will appear on the screen, prompting you
to confirm that the connection is for the phone system.
Select the “Yes” key.
4.
Initiate connecting from the phone.
•
T
he connecting procedure varies according to
each cellular phone model. For detailed connecting
instructions and a list of compatible phones,
please visit www.nissanusa.com/bluetooth.
•
W
hen prompted for a PIN code, enter “1234”
from the handset. (The PIN code is assigned by
NISSAN and cannot be changed.)
5.
W
hen connecting is complete, the screen will return
to the Bluetooth
® setting screen.
1562941_14b_Pathfinder_HEV_QRG_091913.indd 219/19/13 11:12 AM
To view detailed instructional videos regarding these and other features, please go to www.nissanownersinfo.mobi.