Page 187 of 432
 position. 3.")
1. Visually check that the parking space is safebefore parking your vehicle.
2. The rear view of the vehicle is displayed on the screen
�Awhen the shift lever is moved
to the R (Reverse) position. 3. Slowly back up the vehicle adjusting the
steering wheel so that the predicted course
lines
�Benter the parking space�C. 4. Maneuver the steering wheel to make the
vehicle width guide lines
�Dparallel to the
parking space
�Cwhile referring to the pre-
dicted course lines.
5. When the vehicle is parked in the space completely, move the shift lever to the P
(Park) position and apply the parking brake.
DIFFERENCE BETWEEN
PREDICTED AND ACTUAL
DISTANCES
The distance guide line and the vehicle width
guide line should be used as a reference only
when the vehicle is on a level, paved surface. The
distance viewed on the monitor is for reference
only and may be different than the actual distance
between the vehicle and displayed objects.
LHA1197LHA1198
4-24Monitor, climate, audio, phone and voice recognition systems
Page 188 of 432
Backing up on a steep uphill
When backing up the vehicle up a hill, the dis-
tance guide lines and the vehicle width guide
lines are shown closer than the actual distance.
For example, the display shows 3 ft (1.0 m) to the
place
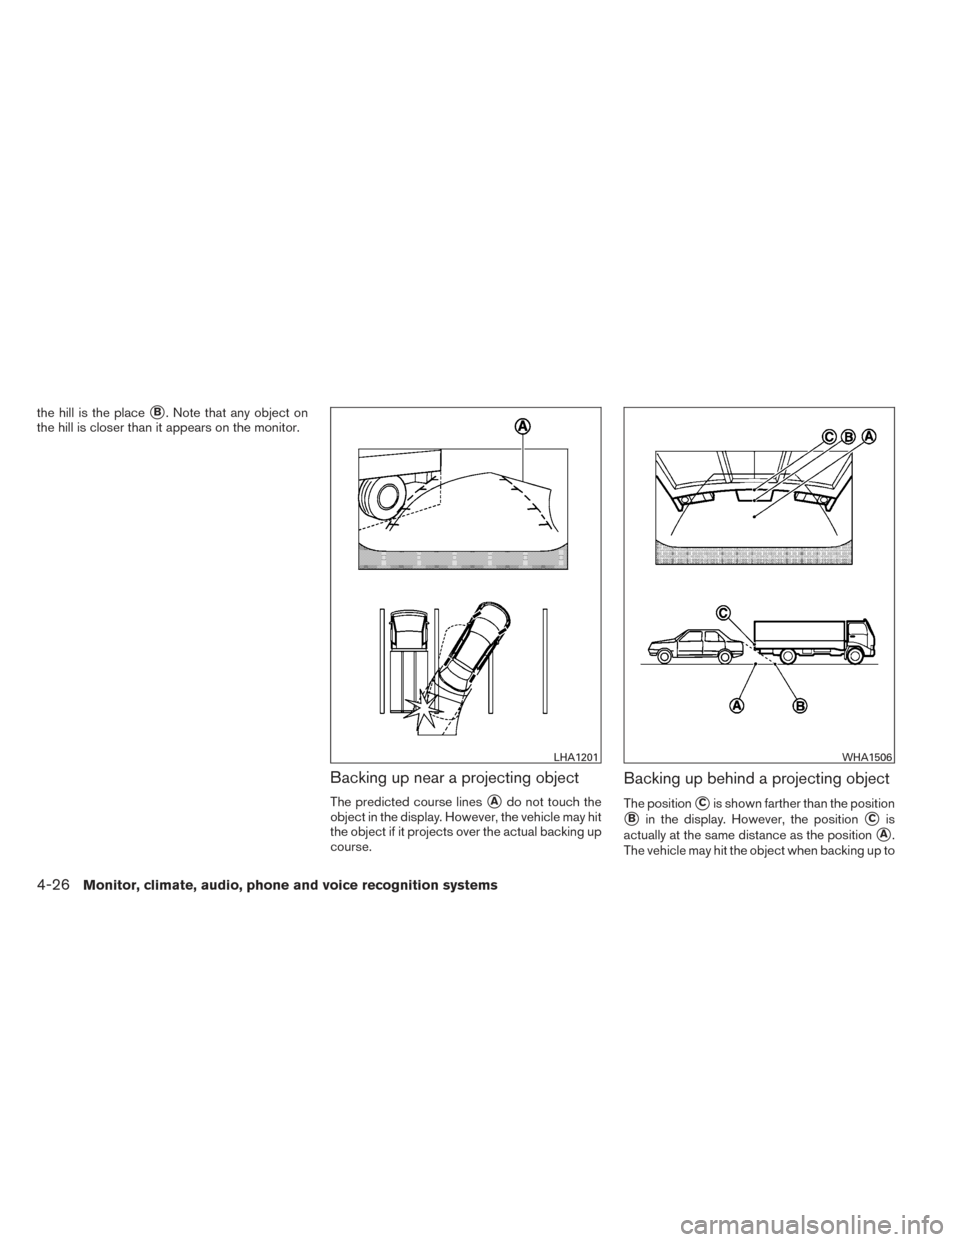
�A, but the actual 3 ft (1.0 m) distance onthe hill is the place
�B. Note that any object on
the hill is further than it appears on the monitor.
Backing up on a steep downhill
When backing up the vehicle down a hill, the
distance guide lines and the vehicle width guide
lines are shown farther than the actual distance.
For example, the display shows 3 ft (1.0 m) to the
place
�A, but the actual 3 ft (1.0 m) distance on
WHA1504WHA1505
Monitor, climate, audio, phone and voice recognition systems4-25
Page 189 of 432
the hill is the place�B. Note that any object on
the hill is closer than it appears on the monitor.
Backing up near a projecting object
The predicted course lines�Ado not touch the
object in the display. However, the vehicle may hit
the object if it projects over the actual backing up
course.
Backing up behind a projecting object
The position�Cis shown farther than the position
�Bin the display. However, the position�Cis
actually at the same distance as the position
�A.
The vehicle may hit the object when backing up to
LHA1201WHA1506
4-26Monitor, climate, audio, phone and voice recognition systems
Page 190 of 432

the position�Aif the object projects over the
actual backing up course.
HOW TO ADJUST THE SCREEN
To adjust the Display ON/OFF, Brightness, Tint,
Color, Contrast and Black Level of the RearView
Monitor, press the SETTING button with the
RearView Monitor on and select the “Display”
key. Select one of the items and change the value
by touching the “+” or “-” key or by turning the
NISSAN controller.
Do not adjust the Brightness, Tint, Color, Con-
trast and Black Level of the RearView Monitor
while the vehicle is moving. Make sure the park-
ing brake is firmly applied.
OPERATING TIPS
CAUTION
● Do not use alcohol, benzine or thinner
to clean the camera. This will cause
discoloration. To clean the camera,
wipe with a cloth dampened with di-
luted mild cleaning agent and then wipe
with a dry cloth.
● Do not damage the camera as the moni-
tor screen may be adversely affected. ●
When the shift lever is shifted to the R (Re-
verse) position, the display screen automati-
cally changes to the RearView Monitor
mode. However, the radio can be heard.
● It may take some time until the RearView
Monitor or the normal screen is displayed
after the shift lever has been shifted to R
(Reverse) from another position or to an-
other position from R (Reverse) . Objects
may be distorted momentarily until the Rear-
View Monitor screen is displayed com-
pletely.
● When the temperature is extremely high or
low, the screen may not clearly display ob-
jects. This is not a malfunction.
● When strong light directly enters the cam-
era, objects may not be displayed clearly.
This is not a malfunction.
● Vertical lines may be seen in objects on the
screen. This is due to strong reflected light
from the bumper. This is not a malfunction.
● The screen may flicker under fluorescent
light. This is not a malfunction.
● The colors of objects on the RearView Moni-
tor may differ somewhat from those of the
actual object. ●
Objects on the monitor may not be clear in a
dark place or at night. This is not a malfunc-
tion.
● If dirt, rain or snow attaches to the camera,
the RearView Monitor may not clearly display
objects. Clean the camera.
● Do not use wax on the camera window.
Wipe off any wax with a clean cloth damp-
ened with mild detergent diluted with water.
Monitor, climate, audio, phone and voice recognition systems4-27
Page 191 of 432
Adjust air flow direction by moving the vent
slides.
Open or close the vents by using the dial. Move
the dial toward the
to open the vents or
toward the
to close them.
Center
LHA1132
Side
LHA1133
Rear
LHA1134
VENTS
4-28Monitor, climate, audio, phone and voice recognition systems
Page 192 of 432

2. AUTO climate control ON button
3.
(front defroster) button
4.
Air recirculation button
5. MODE (manual air flow control) button
6. Temperature contro")
1. Temperature control buttons (driver’sside)
2. AUTO climate control ON button
3.
(front defroster) button
4.
Air recirculation button
5. MODE (manual air flow control) button
6. Temperature control buttons (passen-
ger’s side)
7. DUAL (passenger side temperature
control) ON/OFF button
8.
Fresh air intake button 9.
(fan speed control) dial/ON/OFF
button
10.
(rear window defroster) button
11. A/C (air conditioner) ON/OFF button
WARNING
● The air conditioner cooling function op-
erates only when the engine is running.
● Do not leave children or adults who
would normally require the assistance
of others alone in your vehicle. Pets
should also not be left alone. They
could accidentally injure themselves or
others through inadvertent operation of
the vehicle. Also, on hot, sunny days,
temperatures in a closed vehicle could
quickly become high enough to cause
severe or possibly fatal injuries to
people or animals.
● Do not use the recirculation mode for
long periods as it may cause the interior
air to become stale and the windows to
fog up.
Start the engine and operate the controls to
activate the air conditioner.
Type A
LHA1139
HEATER AND AIR CONDITIONER
(automatic) (Type A)
Monitor, climate, audio, phone and voice recognition systems4-29
Page 193 of 432

NOTE:● Odors from inside and outside the vehicle
can build up in the air conditioner unit. Odor
can enter the passenger compartment
through the vent.
● When parking, set the heater and air condi-
tioner controls to turn off air recirculation to
allow fresh air into the passenger compart-
ment. This should help reduce odors inside
the vehicle.
AUTOMATIC OPERATION
Cooling and/or dehumidified heating
(AUTO)
This mode may be used all year round as the
system automatically works to keep a constant
temperature. Air flow distribution and fan speed
are also controlled automatically.
1. Press the AUTO button on. (The indicator on the button will illuminate and AUTO will be
displayed.)
2. Operate the driver’s side temperature con- trol buttons.
● Adjust the temperature display to about
75°F (24°C) for normal operation. ●
The temperature of the passenger compart-
ment will be maintained automatically. Air
flow distribution and fan speed are also con-
trolled automatically.
● A visible mist may be seen coming from the
ventilators in hot, humid conditions as the air
is cooled rapidly. This does not indicate a
malfunction.
3. You can individually set driver’s and front passenger’s side temperature using each
temperature control button. When the DUAL
button or passenger’s side temperature but-
ton is pressed, the DUAL indicator will come
on. To turn off the passenger’s side tempera-
ture control, press the DUAL button.Heating (A/C OFF)
The air conditioner does not activate. When you
need to heat only, use this mode.
1. Press the A/C button. (A/C OFF will be displayed and A/C indicator will turn off.)
2. Operate the temperature control buttons to set the desired temperature.
● The temperature of the passenger compart-
ment will be maintained automatically. Air
flow distribution and fan speed are also con-
trolled automatically. ●
Do not set the temperature lower than the
outside air temperature. Otherwise the sys-
tem may not work properly.
● Not recommended if windows fog up.
Dehumidified defrosting or defogging
1. Press thefront defroster button on.
(The indicator light on the button will come
on.)
2. Operate the temperature control buttons to set the desired temperature.
● To quickly remove ice from the outside of the
windows, use the fan speed control dial to
set the fan speed to maximum.
● As soon as possible after the windshield is
clean, press the AUTO button to return to
the automatic mode.
● When the
front defroster button is
pressed, the air conditioner will automati-
cally be turned on at outside temperatures
above 36°F (2°C) . The air recirculate mode
automatically turns off, allowing outside air
to be drawn into the passenger compart-
ment to further improve the defogging per-
formance.
4-30Monitor, climate, audio, phone and voice recognition systems
Page 194 of 432

MANUAL OPERATION
Fan speed control
Turn thefan speed control dial to manually
control the fan speed.
Press the AUTO button to return to automatic
control of the fan speed.
Air recirculation
Press theair recirculation button to recir-
culate interior air inside the vehicle. The
indicator light on the button will come on.
The air recirculation cannot be activated when
the air conditioner is in the
front defrosting
mode or the
front defrosting and foot out-
let mode.
Fresh air intake
Press thefresh air intake button to draw
outside air into the passenger compartment.
The
indicator light on the button will come
on.
Automatic intake air control
In the AUTO mode, the intake air will be con-
trolled automatically. To manually control the in-
take air, press the
air recirculation button.
To return to the automatic control mode, press and hold the
air recirculation button or
press and hold the
fresh air intake button
for about 2 seconds. The indicator lights (both air
recirculation and fresh air intake buttons) will
flash twice, and then the intake air will be con-
trolled automatically.
Air flow control
Pressing the MODE button manually controls air
flow and selects the air outlet:
— Air flows from center and side
vents.
— Air flows from center and sidevents and foot outlets.
— Air flows mainly from foot outlets.
— Air flows from defroster and footoutlets.
To turn system off
Press the OFF button.
OPERATING TIPS
●When the engine coolant temperature and
outside air temperature are low, the air flow
from the foot outlets may not operate for a
maximum of 150 seconds. However, this is
not a malfunction. After the coolant tempera-
ture warms up, air flow from the foot outlets
will operate normally. The sunload sensor, located on the top driver’s
side of the instrument panel, helps the system
maintain a constant temperature. Do not put any-
thing on or around this sensor.
LHA1136
Monitor, climate, audio, phone and voice recognition systems4-31