Page 247 of 432

Interface:
The interface for iPod® operation shown on the
vehicle center display is similar to the iPod®
interface. Use the NISSAN controller and the
BACK button to play the iPod® with your favorite
settings. The touchscreen can also be used to
control your favorite settings.
The following items can be chosen from the menu
list screen. For further information about each
item, see the iPod® Owner’s Manual.● Now Playing
● Playlists
● Artists ●
Albums
● Songs
● Podcasts
● Genres
● Composers
● Audiobooks
● Shuffle Songs
● Play Mode
The following keys shown on the screen are also
available: ● MENU: returns to the previous screen.
●: plays/pauses the music selected. Play mode:
While the iPod® is playing, touch the “Menu” key
to display the iPod® menu. Touch the “Play
Mode” key to display the Play Mode screen and
adjust the settings for Shuffle, Repeat and Audio-
books. For further information about each item,
see the iPod® Owner’s Manual.
SEEK/CAT and TRACK buttons:
When the
SEEK/CAT button orTRACK button is pressed for less than 1.5 sec-
onds while the iPod® is playing, the next track or
the beginning of the current track on the iPod®
will be played.
LHA1398LHA1315
4-84Monitor, climate, audio, phone and voice recognition systems
Page 250 of 432
Audio main operation
To switch to the Bluetooth® audio mode, press
the DISC•AUX button repeatedly until the
Bluetooth® audio mode is displayed on the
screen.
The controls for the Bluetooth® audio are dis-
played on the screen.
Bluetooth® audio settings
To adjust the Bluetooth® audio settings, follow
the procedure below:1. Press the SETTING button on the control panel.
2. Select the “Bluetooth” key.
3. Select the “Connected Devices” key. 4. Select the “Audio Player” key.
SAA2510LHA1316LHA1296
Monitor, climate, audio, phone and voice recognition systems4-87
Page 251 of 432
5. A list of the connected Bluetooth® audioplayers is displayed. Select the name of the
device you wish to edit. 6. The Device Name and Device Address are
displayed on the screen. Select the “Select”
key to make this device the active
Bluetooth® audio player. Select the “Edit”
key to edit the details of the player, such as
Device Name. Select the “Delete” key to
delete the device.CD CARE AND CLEANING
●Handle a CD by its edges. Do not bend the
disc. Never touch the surface of the disc.
● Always place the discs in the storage case
when they are not being used.
● To clean a disc, wipe the surface from the
center to the outer edge using a clean, soft
cloth. Do not wipe the disc using a circular
motion.
● Do not use a conventional record cleaner or
alcohol intended for industrial use.
LHA1297LHA1298LHA0049
4-88Monitor, climate, audio, phone and voice recognition systems
Page 253 of 432

SOURCE select switch
Push the source select switch to change the
mode in the following sequence:
Models without Navigation System:
AM→FM1 →FM2 →XM1 →XM2 →XM3
(satellite radio, if so equipped) →USB/iPod®* (if
so equipped) →CD/DVD* →AUX* →AM.
Models with Navigation System:
AM →FM1 →FM2 →XM1 →XM2 →XM3
(satellite radio, if so equipped) →CD/DVD* →
USB/iPod®* →Bluetooth® Audio* →AUX* →
AM.
* These modes are only available when compat-
ible media storage is inserted into the device.
Volume control switch
Push the volume control switch to increase or
decrease the volume.
Menu control
switch/ENTER button
While the display is showing a MAP, STATUS or
Audio screen, tilt the Menu Control switch up-
ward or downward to select a station, track, CD
or folder. For most audio sources, tilting the
switch up/down for more than 1.5 seconds pro- vides a different function than a tilting up/down
for less than 1.5 seconds.
AM and FM:
● Tilt up/down for less than 1.5 seconds to
increase or decrease the preset station.
● Tilt up/down for more than 1.5 seconds to
seek up or down to the next station.
● Press the ENTER button to show the list of
preset stations.
XM (if so equipped): ● Tilt up/down for less than 1.5 seconds to
increase or decrease the preset station.
● Tilt up/down for more than 1.5 seconds to
go to the next or previous category.
● Press the ENTER button to show the XM
Menu.
iPod® (if so equipped): ● Tilt up/down for less than 1.5 seconds to
increase or decrease the track number.
● Press the ENTER button to show the iPod
Menu.
CD: ● Tilt up/down for less than 1.5 seconds to
increase or decrease the track number. ●
Tilt up/down for more than 1.5 seconds to
increase or decrease the folder number (if
playing compressed audio files) .
● Press the ENTER button to show the CD
Menu.
DVD (if so equipped): ● Tilt up/down for less than 1.5 seconds to
increase or decrease the track number.
● Tilt up/down for more than 1.5 seconds to
increase or decrease the title number.
● Press the ENTER button to select an item
from the DVD display.
● When the transparent operation menu ap-
pears, the switch will control the menu.
USB (if so equipped): ● Tilt up/down for less than 1.5 seconds to
increase or decrease the track number.
● Tilt up/down for more than 1.5 seconds to
increase or decrease the folder number.
● Press the ENTER button to show the USB
Menu.
Bluetooth® Audio (if so equipped): ● Tilt up/down for less than 1.5 seconds to
increase or decrease the track number.
4-90Monitor, climate, audio, phone and voice recognition systems
Page 267 of 432
Operating tips
●To enter manual control mode, start the
voice recognition system and tilt the tuning
(
) switch up or down. The system will
speak �Showing Manual Options� when
manual controls are initially activated.
● To browse the menu options, tilt the tuning
(
) switch up or down. The system will
always speak the current menu option. De-
pending on the audio display, it will also
show the current menu option.
● To select the current menu option, press the
PHONE/SEND (
) button.
● To go back to the previous menu, press the
PHONE/END (
) button. If the current
menu is the Main Menu, pressing the
PHONE/END (
) button will exit the
Phone system.
● To exit the manual control mode, press and
hold the PHONE/END (
) button for
5 seconds.
4-104Monitor, climate, audio, phone and voice recognition systems
Page 270 of 432

phone module when the ignition switch is placed
in the ON position with the connected cellular
phone turned on and carried in the vehicle.
You can register up to 5 different Bluetooth®
cellular phones to the in-vehicle phone module.
However, you can talk on only one cellular phone
at a time.
NISSAN Voice Recognition system supports the
phone commands, so dialing a phone number
using your voice is possible. For more details, see
“NISSAN Voice Recognition System” in this sec-
tion.
Before using the Bluetooth® Hands-Free Phone
System, refer to the following notes.● Set up the wireless connection between a
cellular phone and the in-vehicle phone
module before using the hands-free phone
system.
● Some Bluetooth® enabled cellular phones
may not be recognized by the in-vehicle
phone module. Please visit
www.nissanusa.com/bluetooth for a recom-
mended phone list and connecting.
● You will not be able to use a hands-free
phone under the following conditions:
– Your vehicle is outside of the cellular ser- vice area. – Your vehicle is in an area where it is
difficult to receive cellular signal; such as
in a tunnel, in an underground parking
garage, near a tall building or in a moun-
tainous area.
– Your cellular phone is locked to prevent it from being dialed.
● When the radio wave condition is not ideal
or ambient sound is too loud, it may be
difficult to hear the other person’s voice dur-
ing a call.
● Immediately after the ignition switch is
placed in the ON position, it may be impos-
sible to receive a call for a short period of
time.
● Do not place the cellular phone in an area
surrounded by metal or far away from the
in-vehicle phone module to prevent tone
quality degradation and wireless connection
disruption.
● While a cellular phone is connected through
the Bluetooth® wireless connection, the
battery power of the cellular phone may dis-
charge quicker than usual. The Bluetooth®
Hands-Free Phone System cannot charge
cellular phones. ●
If the hands-free phone system seems to be
malfunctioning, see “Troubleshooting guide”
in this section. You can also visit
www.nissanusa.com/bluetooth for trouble-
shooting help.
● Some cellular phones or other devices may
cause interference or a buzzing noise to
come from the audio system speakers. Stor-
ing the device in a different location may
reduce or eliminate the noise.
● Refer to the cellular phone owner’s manual
regarding the telephone charges, cellular
phone antenna and body, etc.
● The signal strength display on the monitor
will not coincide with the signal strength
display of some cellular phones.
● If reception between callers is unclear, ad-
justing the incoming or outgoing call volume
may improve the clarity. See “Call volume” in
this section.
Monitor, climate, audio, phone and voice recognition systems4-107
Page 272 of 432

CONNECTING PROCEDURE
To connect a Bluetooth® device, use one of the
following methods:● Press the “Phone” button on the control
panel or the
button on the steering
wheel, then select the “Connect Phone” key
on the display.
● Press the SETTING button on the control
panel, then select the “Bluetooth” key on the
display.
Menu Item Result
Bluetooth ON/OFF Allows user to switch Bluetooth on and off. Bluetooth must be on in order to connect device.
On Turns Bluetooth on
Off Turns Bluetooth off
Connect Bluetooth Upon pressing this button, a popup box will appear on the screen, prompting you to confirm that the connection is for the phone system. Select the
�Ye s �key.
Yes Confirms that you are connecting a Bluetooth device. Upon pressing this button, the following message will appear on screen. �The system is
searching for your phone. Using your handset, look for a Bluetooth device called MY-CAR. When requested by the handset, enter the PIN 1234. Ex-
iting screen cancels search. �The connecting procedure phone varies by phone. See phone Owner’s Manual for details. When the connecting is
complete, the screen will return to the Bluetooth settings screen.
Cancel Cancels operation
No Indicates to the system that you are connecting a Bluetooth enabled audio device
Cancel Cancels operation
LHA1236
Monitor, climate, audio, phone and voice recognition systems4-109
Page 274 of 432
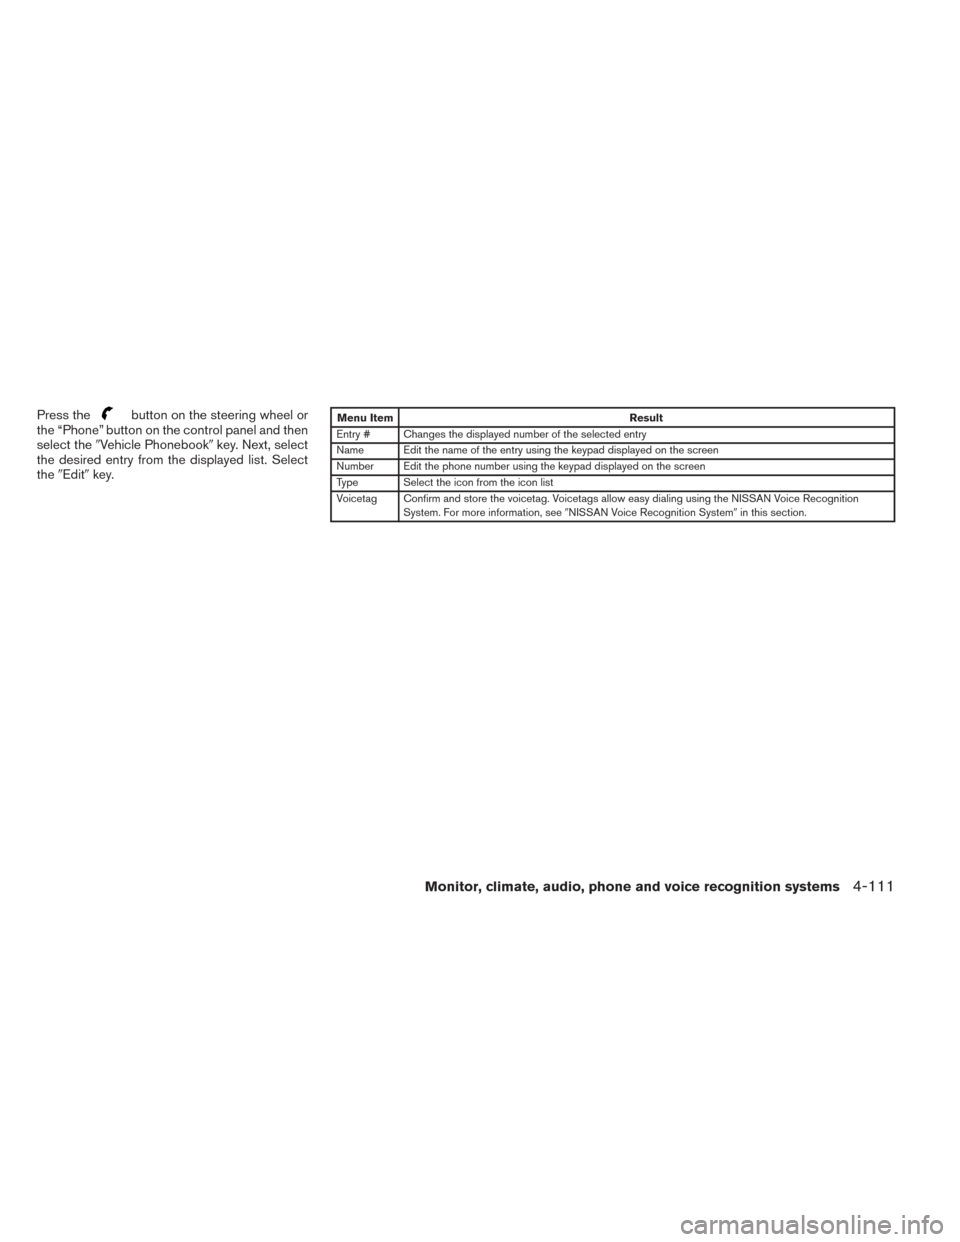
Press thebutton on the steering wheel or
the “Phone” button on the control panel and then
select the �Vehicle Phonebook� key. Next, select
the desired entry from the displayed list. Select
the �Edit� key.Menu Item Result
Entry # Changes the displayed number of the selected entry
Name Edit the name of the entry using the keypad displayed on the screen
Number Edit the phone number using the keypad displayed on the screen
Type Select the icon from the icon list
Voicetag Confirm and store the voicetag. Voicetags allow easy dialing using the NISSAN Voice Recognition System. For more information, see �NISSAN Voice Recognition System �in this section.
Monitor, climate, audio, phone and voice recognition systems4-111