2014 NISSAN LEAF belt
[x] Cancel search: beltPage 290 of 397
NISSAN INTELLIGENT KEY®
BATTERY DISCHARGE
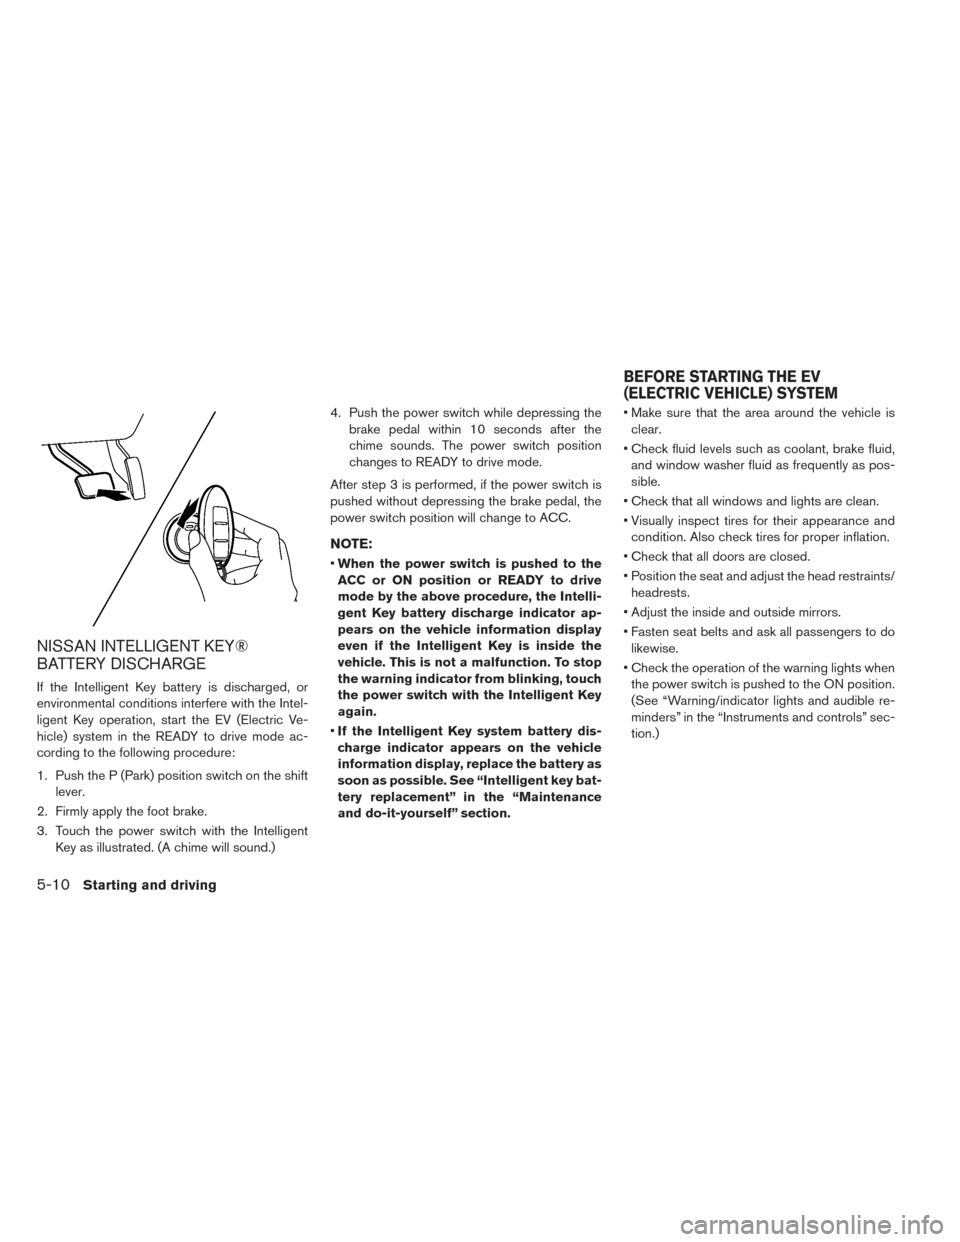
If the Intelligent Key battery is discharged, or
environmental conditions interfere with the Intel-
ligent Key operation, start the EV (Electric Ve-
hicle) system in the READY to drive mode ac-
cording to the following procedure:
1. Push the P (Park) position switch on the shift
lever.
2. Firmly apply the foot brake.
3. Touch the power switch with the Intelligent
Key as illustrated. (A chime will sound.)4. Push the power switch while depressing the
brake pedal within 10 seconds after the
chime sounds. The power switch position
changes to READY to drive mode.
After step 3 is performed, if the power switch is
pushed without depressing the brake pedal, the
power switch position will change to ACC.
NOTE:
•When the power switch is pushed to the
ACC or ON position or READY to drive
mode by the above procedure, the Intelli-
gent Key battery discharge indicator ap-
pears on the vehicle information display
even if the Intelligent Key is inside the
vehicle. This is not a malfunction. To stop
the warning indicator from blinking, touch
the power switch with the Intelligent Key
again.
•If the Intelligent Key system battery dis-
charge indicator appears on the vehicle
information display, replace the battery as
soon as possible. See “Intelligent key bat-
tery replacement” in the “Maintenance
and do-it-yourself” section.• Make sure that the area around the vehicle is
clear.
• Check fluid levels such as coolant, brake fluid,
and window washer fluid as frequently as pos-
sible.
• Check that all windows and lights are clean.
• Visually inspect tires for their appearance and
condition. Also check tires for proper inflation.
• Check that all doors are closed.
• Position the seat and adjust the head restraints/
headrests.
• Adjust the inside and outside mirrors.
• Fasten seat belts and ask all passengers to do
likewise.
• Check the operation of the warning lights when
the power switch is pushed to the ON position.
(See “Warning/indicator lights and audible re-
minders” in the “Instruments and controls” sec-
tion.)
BEFORE STARTING THE EV
(ELECTRIC VEHICLE) SYSTEM
5-10Starting and driving
Page 325 of 397
7 Appearance and care
Cleaning exterior.......................7-2
Washing..........................7-2
Waxing...........................7-2
Removing spots......................7-3
Underbody.........................7-3
Glass............................7-3
Solar cell module (if so equipped)...........7-3
Wheels...........................7-3
Chrome parts.......................7-4
Tire dressing........................7-4
Cleaning interior........................7-4Air fresheners.......................7-4
Floor mats.........................7-5
Seat belts.........................7-6
Electric Vehicle Supply Equipment (EVSE)......7-6
Corrosion protection.....................7-6
Most common factors contributing to vehicle
corrosion..........................7-6
Environmental factors influence the rate of
corrosion..........................7-6
To protect your vehicle from corrosion.........7-6
Page 330 of 397
SEAT BELTS
The seat belts can be cleaned by wiping them
with a sponge dampened in a mild soap solution.
Allow the belts to dry completely in the shade
before using them.
See “Seat belts” in the “Safety-Seats seat belts
and supplemental restraint system” section.
WARNING
Do not allow wet seat belts to roll up in
the retractor. NEVER use bleach, dye, or
chemical solvents to clean the seat belts,
since these materials may severely
weaken the seat belt webbing.
ELECTRIC VEHICLE SUPPLY
EQUIPMENT (EVSE)
The Electric Vehicle Supply Equipment (EVSE)
can be cleaned by wiping gently with a soft cloth
dampened in a 3% mild soap solution. Wipe and
rinse the soap solution off with a cloth dampened
with water and allow the EVSE to dry in a shady
and well-ventilated place.
MOST COMMON FACTORS
CONTRIBUTING TO VEHICLE
CORROSION
• The accumulation of moisture-retaining dirt and
debris in body panel sections, cavities, and
other areas.
• Damage to paint and other protective coatings
caused by gravel and stone chips or minor
traffic accidents.
ENVIRONMENTAL FACTORS
INFLUENCE THE RATE OF
CORROSION
Moisture
Accumulation of sand, dirt and water on the ve-
hicle body underside can accelerate corrosion.
Wet floor coverings will not dry completely inside
the vehicle, and should be removed for drying to
avoid floor panel corrosion.
Relative humidity
Corrosion will be accelerated in areas of high
relative humidity, especially those areas where
the temperatures stay above freezing, where at-
mospheric pollution exists, or where road salt is
used.
Temperature
A temperature increase will accelerate the rate of
corrosion to those parts which are not well ven-
tilated.
Air pollution
Industrial pollution, the presence of salt in the air
in coastal areas, or heavy road salt use will accel-
erate the corrosion process. Road salt will also
accelerate the disintegration of paint surfaces.
TO PROTECT YOUR VEHICLE FROM
CORROSION
• Wash and wax your vehicle often to keep the
vehicle clean.
• Always check for minor damage to the paint and
repair it as soon as possible.
• Keep drain holes at the bottom of the doors
open to avoid water accumulation.
• Check the underbody for accumulation of sand,
dirt or salt. If present, wash with water as soon
as possible.
CORROSION PROTECTION
7-6Appearance and care
Page 336 of 397
Seat belts:Check that all parts of the seat belt
system (for example, buckles, anchors, adjusters
and retractors) operate properly and smoothly,
and are installed securely. Check the belt web-
bing for cuts, fraying, wear or damage.
Steering wheel:Check for changes in the
steering conditions, such as excessive free play,
hard steering or strange noises.
Warning lights and chimes:Make sure that all
warning lights and chimes are operating properly.
Windshield defroster:Check that the air emits
from the defroster outlets properly and in suffi-
cient quantity when operating the heater or air
conditioner.
Windshield wiper and washer*:Check that
the wipers and washers operate properly and
that the wipers do not streak.
Under hood and vehicle
The maintenance items listed here should be
checked periodically.
12-volt battery (for serviceable battery)*:
Check the fluid level in each cell.
It should be between the MAX and MIN lines.
Vehicles operated in high temperatures or undersevere conditions require frequent checks of the
12-volt battery fluid level.
NOTE:
Care should be taken to avoid situations
that can lead to potential battery discharge
and potential no-start conditions such as:
1. Installation or extended use of electronic ac-
cessories that consume battery power when
the engine is not running (Phone chargers,
GPS, DVD players, etc.)
2. Vehicle is not driven regularly and/or only
driven short distances.
In these cases, the battery may need to be
charged to maintain battery health.
Brake fluid level*:Make sure that the brake
fluid level is between the MAX and MIN lines on
the reservoir.
Coolant level*:Check the coolant level when
the motor compartment is cold.
Fluid leaks:Check under the vehicle for water
or other fluid leaks after the vehicle has been
parked for a short period of time. Water dripping
from the air conditioner after use is normal. If you
notice any leaks, check for the cause and have it
corrected immediately.Radiator and hoses:Check the front of the
radiator and clean off any dirt, insects, leaves,
etc., that may have accumulated. Make sure that
the hoses have no cracks, deformation, rot or
loose connections.
Underbody:The underbody is frequently ex-
posed to corrosive substances such as those
used on icy roads or to control dust. It is very
important to remove these substances, other-
wise rust will form on the floor pan and frame. At
the end of winter, the underbody should be thor-
oughly flushed with plain water, being careful to
clean those areas where mud and dirt may accu-
mulate. For additional information, see “Cleaning
exterior” in the “Appearance and care” section.
Windshield washer fluid*:Check that there is
an adequate amount of fluid in the reservoir.
8-4Maintenance and do-it yourself
Page 365 of 397
• The original tires have built-in tread
wear indicators. When wear indicators
are visible, the tire(s) should be re-
placed.
• Tires degrade with age and use. Have
tires, over 6 years old checked by a
qualified technician, because some
tire damage may not be obvious. Re-
place the tires as necessary to prevent
tire failure and possible personal in-
jury.
• For additional information regarding
tires, refer to “Important Tire Safety
Information” (US) or “Tire Safety Infor-
mation” (Canada) in the Warranty In-
formation Booklet.
Replacing wheels and tires
When replacing a tire, use the same size, tread
design, speed rating and load carrying capacity
as originally equipped. See “Specifications” in
the “Technical and consumer information” sec-
tion for recommended types and sizes of tires
and wheels.
WARNING
• The use of tires other than those rec-
ommended or the mixed use of tires of
different brands, construction (bias,
bias-belted or radial) , or tread patterns
can adversely affect the ride, braking,
handling, ground clearance, body-to-
tire clearance, tire chain clearance,
speedometer calibration, headlight
aim and bumper height. Some of these
effects may lead to accidents and
could result in serious personal injury.
• If your vehicle was originally equipped
with 4 tires that were the same size
and you are only replacing 2 of the 4
tires, install the new tires on the rear
axle. Placing new tires on the front
axle may cause loss of vehicle control
in some driving conditions and cause
an accident and personal injury.• If the wheels are changed for any rea-
son, always replace with wheels which
have the same off-set dimension.
Wheels of a different off-set could
cause premature tire wear, degrade
vehicle handling characteristics
and/or interference with the brake
discs. Such interference can lead to
decreased braking efficiency and/or
early brake pad/shoe wear. See
“Wheels and tires” in the “Technical
and consumer information” section of
this manual for wheel off-set dimen-
sions.
• When a wheel is replaced, the TPMS
will not function and the low tire pres-
sure warning light will flash for ap-
proximately 1 minute. The light will re-
main on after 1 minute. Contact your
NISSAN certified LEAF dealer as soon
as possible for tire replacement
and/or system resetting.
• Replacing tires with those not origi-
nally specified by NISSAN could affect
the proper operation of the TPMS.
• Do not install a damaged or deformed
wheel or tire even if it has been re-
paired. Such wheels or tires could have
structural damage and could fail with-
out warning.
Maintenance and do-it yourself8-33
Page 376 of 397
3. Remove the license plate bracket and con-
nect the arcs from the ovals. Mark the point in
the center of each oval. These are pilot drilling
locations.
Use a 0.49 in (12.5 mm) drill bit for the license
plate screw holes and carefully open holes in
the places marked. (Make sure that the drill
only goes through the fascia.)
4. Install the license plate with two 0.23 in (6
mm) screws.
WARNING
• It is extremely dangerous to ride in the
cargo area inside the vehicle. In a col-
lision, people riding in these areas are
more likely to be seriously injured or
killed.
• Do not allow people to ride in any area
of your vehicle that is not equipped
with seats and seat belts.
• Be sure everyone in your vehicle is in a
seat and using a seat belt properly.
TERMS
It is important to familiarize yourself with the fol-
lowing terms before loading your vehicle:
• Curb Weight (actual weight of your vehicle) -
vehicle weight including: standard and optional
equipment, fluids, emergency tools, and spare
tire assembly. This weightdoes notinclude
passengers and cargo.
• GVW (Gross Vehicle Weight) - curb weight
plus the combined weight of passengers and
cargo.
• GVWR (Gross Vehicle Weight Rating) - maxi-
mum total combined weight of the unloaded
vehicle, passengers, luggage, hitch, trailer
tongue load and any other optional equipment.This information is located on the F.M.V.S.S./
C.M.V.S.S. label.
• GAWR (Gross Axle Weight Rating) - maximum
weight (load) limit specified for the front or rear
axle. This information is located on the
F.M.V.S.S./C.M.V.S.S. label.
• GCWR (Gross Combined Weight Rating) - The
maximum total weight rating of the vehicle, pas-
sengers, cargo, and trailer.
• Vehicle Capacity Weight, Load limit, Total load
capacity - maximum total weight limit specified
of the load (passengers and cargo) for the ve-
hicle. This is the maximum combined weight of
occupants and cargo that can be loaded into
the vehicle. If the vehicle is used to tow a trailer,
the trailer tongue weight must be included as
part of the cargo load. This information is lo-
cated on the Tire and Loading Information label.
• Cargo capacity - permissible weight of cargo,
the subtracted weight of occupants from the
load limit.
VEHICLE LOAD CAPACITY
Do not exceed the load limit of your vehicle
shown as “The combined weight of occupants
and cargo” on the Tire and Loading Information
label. Do not exceed the number of occupants
VEHICLE LOADING INFORMATION
9-10Technical and consumer information
Page 383 of 397
interruption of data transmission and, as a result,
certain features may be temporarily unavailable.
Even if areas with good signal reception, cellular
connectivity can be adversely affected by things
such as tall buildings, apartments, tunnels, un-
derground parking, mountainous areas, etc. Even
if the signal strength bar of the in-vehicle data
communication module indicates good recep-
tion, connectivity may be disrupted. This does not
indicate a malfunction. Operate the system again
after a few minutes to restore connectivity. CAR-
WINGS™ telematics features are offered as a
convenience to the vehicle owner. NISSAN is not
responsible for, and owner assumes all risk of,
interruptions in service or errors based on incom-
plete or inaccurate data. CARWINGS™ commu-
nications may be received at a verified e-mail
address or by SMS/text messaging-enabled mo-
bile phone. Standard text rates and/or data usage
may apply depending on your carrier.If your vehicle’s telematics account is active, and
you are not the original owner, please contact
NISSAN at the website or phone number above
as soon as possible to update the telematics
enrollment information. Upon sale of the vehicle,
please contact NISSAN at the website or phone
number above so that NISSAN’s records may be
updated. CARWINGS™ subscription services
will automatically terminate at the end of the initial
free term if you do not wish to renew your sub-
scription agreement at the prices then in effect.This vehicle is equipped with an Event Data Re-
corder (EDR) . The main purpose of an EDR is to
record, in certain crash or near crash-like situa-
tions, such as an air bag deployment or hitting a
road obstacle, data that will assist in understand-
ing how a vehicle’s systems performed. The EDR
is designed to record data related to vehicle
dynamics and safety systems for a short period of
time, typically 30 seconds or less. The EDR in this
vehicle is designed to record such data as:
• How various systems in your vehicle were oper-
ating;
• Whether or not the driver and passenger safety
belts were buckled/fastened;
• How far (if at all) the driver was depressing the
accelerator and/or brake pedal; and,
• How fast the vehicle was traveling.
• Sounds are not recorded.
These data can help provide a better understand-
ing of the circumstances in which crashes and
injuries occur.
EVENT DATA RECORDER (EDR)
Technical and consumer information9-17
Page 392 of 397
Airbagwarninglight.............1-48
Bulb replacement...............8-21
Ceiling light..................2-58
Foglightswitch................2-45
Headlights bulb replacement........8-22
Headlightswitch...............2-43
Indicatorlights................2-20
Interior lights.................2-58
Maplights...................2-58
Replacement.................8-21
Warninglights ................2-14
Light reminder warning.............2-26
Lights, Exterior and interior light
replacement...................8-23
Li-ion battery...................EV-2
Li-ion battery available charge gauge......2-9
Li-ion battery capacity level gauge.......2-10
Li-ion battery status check..........CH-26
Li-ion battery temperature gauge........2-7
Li-ion battery warmer..............EV-5
Limited power..................2-34
Loading information (See vehicle loading
information)....................9-10
Lock........................3-5
Automatic door locks.............3-5
Door locks...................3-3
Power door lock................3-3
Rearhatchlock................3-17Low tire pressure warning light.........2-17
Low tire pressure warning system (See tire
pressure monitoring system (TPMS))......5-2
Luggage side hook...............2-55
M
Maintenance...................8-12
12-volt battery................8-12
General maintenance.............8-2
Indicators for maintenance..........2-35
Insidevehicle..................8-3
Maintenanceprecautions...........8-5
Maintenance requirements..........8-2
Outside vehicle.................8-2
Seat belt maintenance............1-15
Manual front seat adjustment...........1-3
Maplights ....................2-58
Mechanical key (Intelligent Key system).....3-3
Meters and gauges................2-5
Mirror.......................3-21
Inside rearview mirror............3-21
Outside mirrors................3-23
Vanity mirror..................3-21
Motor....................5-11,9-6
Before starting system............5-10
Motor compartment................8-7
N
NISSAN Intelligent Key® system......3-6,5-7
Key operating range of the door lock/unlock
function.....................3-8
Key operation..................3-9
NISSAN Vehicle Immobilizer System......2-38
Normal charge.................CH-9
Home charge................CH-9
Occasional charge.............CH-9
Publiccharge ................CH-9
O
Odometer.....................2-6
Off-road recovery.................5-5
Oil .........................9-2
Capacities and recommended lubricants . .9-2
Opening rear hatch...............3-10
Outside air temperature.............2-10
Outside mirrors.................3-23
Owner’s Manual/Service Manual order
information....................9-18
P
Panic alarm....................3-14