Page 350 of 397
PASSENGER COMPARTMENT
CAUTION
Never use a fuse of a higher or lower
amperage rating than that specified on
the fuse box cover. This could damage
the electrical system or cause a fire.
If any electrical equipment does not operate,
check for an open fuse.
1. Make sure that the power switch and the
headlight switch are turned off.2. Insert a screwdriver wrapped with the cloth
�Cinto the slit�1.
Use a cloth
�Cto protect the fuse box cover.
3. Then pull to remove the fuse box cover
�2.
4. Remove the fuse with the fuse puller
�3.5. If the fuse is open
�A, replace it with a new
fuse
�B.
6. If a new fuse also opens, have the electrical
system checked, and if necessary repaired,
by a NISSAN certified LEAF dealer.
8-18Maintenance and do-it yourself
Page 351 of 397

CAUTION
• Be careful not to allow children to
swallow the battery and removed
parts.
• An improperly disposed battery can
harm the environment. Always confirm
local regulations for battery disposal.
• When changing batteries, do not let
dust or oil get on the components.
• There is danger of explosion if the
lithium battery is incorrectly replaced.
Replace only with the same or equiva-
lent type.
Replace the battery in the Intelligent Key as fol-
lows:
1. Remove the mechanical key from the Intelli-
gent Key.2. Insert a small screwdriver into the slit of the
corner and twist it to separate the upper part
from the lower part. Use a cloth to protect the
casing.
3. Replace the battery with a new one.
Recommended battery:
CR2025 or equivalent
• Do not touch the internal circuit and electric
terminals as doing so could cause a malfunc-
tion.
• Hold the battery by the edges. Holding the
battery across the contact points will seri-
ously deplete the storage capacity.
• Make sure that the�side faces the bottom
of the case.
NISSAN INTELLIGENT KEY®
BATTERY REPLACEMENT
Maintenance and do-it yourself8-19
Page 352 of 397

4. Align the tips of the upper and lower parts�1,
and then push them together
�2until it is
securely closed.
5. Operate the buttons to check that it is func-
tioning properly.
See a NISSAN certified LEAF dealer if you need
any assistance for replacement.FCC Notice:
For USA:
This device complies with Part 15 of the
FCC Rules. Operation is subject to the fol-
lowing two conditions: (1) This device may
not cause harmful interference, and (2) this
device must accept any interference re-
ceived, including interference that may
cause undesired operation.
NOTE:
Changes or modifications not expressly ap-
proved by the party responsible for compli-
ance could void the user’s authority to op-
erate the equipment.
For Canada:
This device complies with RSS-210 of In-
dustry Canada. Operation is subject to the
following two conditions: (1) this device
may not cause interference, and (2) this
device must accept any interference, in-
cluding interference that may cause unde-
sired operation of the device.
8-20Maintenance and do-it yourself
Page 353 of 397
1. Front parking light
2. Headlight (low-beam)
3. Front turn signal light
4. Map light
5. Ceiling light
6. Front fog light (if so equipped)
7. Headlight (high-beam)
8. High-mounted stop light
9. Rear combination light (stop/tail/turn signal/
back-up light/rear side marker)
10. License plate light
11. Cargo light
Fog may temporarily form inside the lens of the
exterior lights in the rain or in a car wash. A
temperature difference between the inside and
the outside of the lens causes the fog. This is not
a malfunction. If large drops of water collect
inside the lens, contact a NISSAN certified LEAF
dealer.
LIGHTS
Maintenance and do-it yourself8-21
Page 354 of 397
:
The headlight high-beam is a semi-sealed beam
type that uses a replaceable headlight (halogen)
bulb.
CAUTION
• Do not leave the bulb out of the he")
HEADLIGHTS
Replacing
Halogen headlight (high-beam):
The headlight high-beam is a semi-sealed beam
type that uses a replaceable headlight (halogen)
bulb.
CAUTION
• Do not leave the bulb out of the head-
light reflector for a long period of time.
Dust, moisture, smoke, etc. entering
the headlight body may affect bulb
performance.
• High-pressure halogen gas is sealed
inside the halogen bulb. The bulb may
break if the glass envelope is
scratched or the bulb is dropped.
• Only touch the base when handling the
bulb. Never touch the glass envelope.
Touching the glass envelope could sig-
nificantly affect bulb life and/or head-
light performance.
• Aiming is not necessary after replacing
the bulb. When aiming adjustment is
necessary, contact a NISSAN certified
LEAF dealer.Use the same number and wattage as originally
installed as shown in the chart.
Disconnect the battery negative cable before
replacing bulbs.
1. Remove the connector
�1.
2. Turn the headlight bulb, and then remove the
bulb
�2.Disconnect the battery negative cable before
replacing bulbs.
1. Remove the connector
�1.
2. Turn the headlight bulb, and then remove the
bulb
�2.
Type AType B
8-22Maintenance and do-it yourself
Page 355 of 397
EXTERIOR AND INTERIOR LIGHTS
Item Wattage
(W)Bulb No.
Headlight low beams
(Type A)*LED —
Headlight high beams
(Halogen) (Type A)65 H9
Headlight (Type B) 60/55 H13
Front turn signal light 27 3457NAK
Front fog light (if so
equipped)*55 H11
Front park light 5 W5W
Rear combination light
Turn signal 21 WY21W
Stop/tail* LED —
Back-up 16 W16W
License plate light* 5 W5W
Map light* LED —
High-mounted stop
light*LED —
Ceiling light 8 —
Cargo light 5 —
*: Contact a NISSAN certified LEAF dealer for
replacement.NOTE: Always check with the Parts Department
at a NISSAN certified LEAF dealer for the latest
information about parts.
Replacement procedures
All other lights are either type A, B, C, D or E.
When replacing a bulb, first remove the lens
and/or cover.
: REMOVE
: INSTALL
Maintenance and do-it yourself8-23
Page 356 of 397
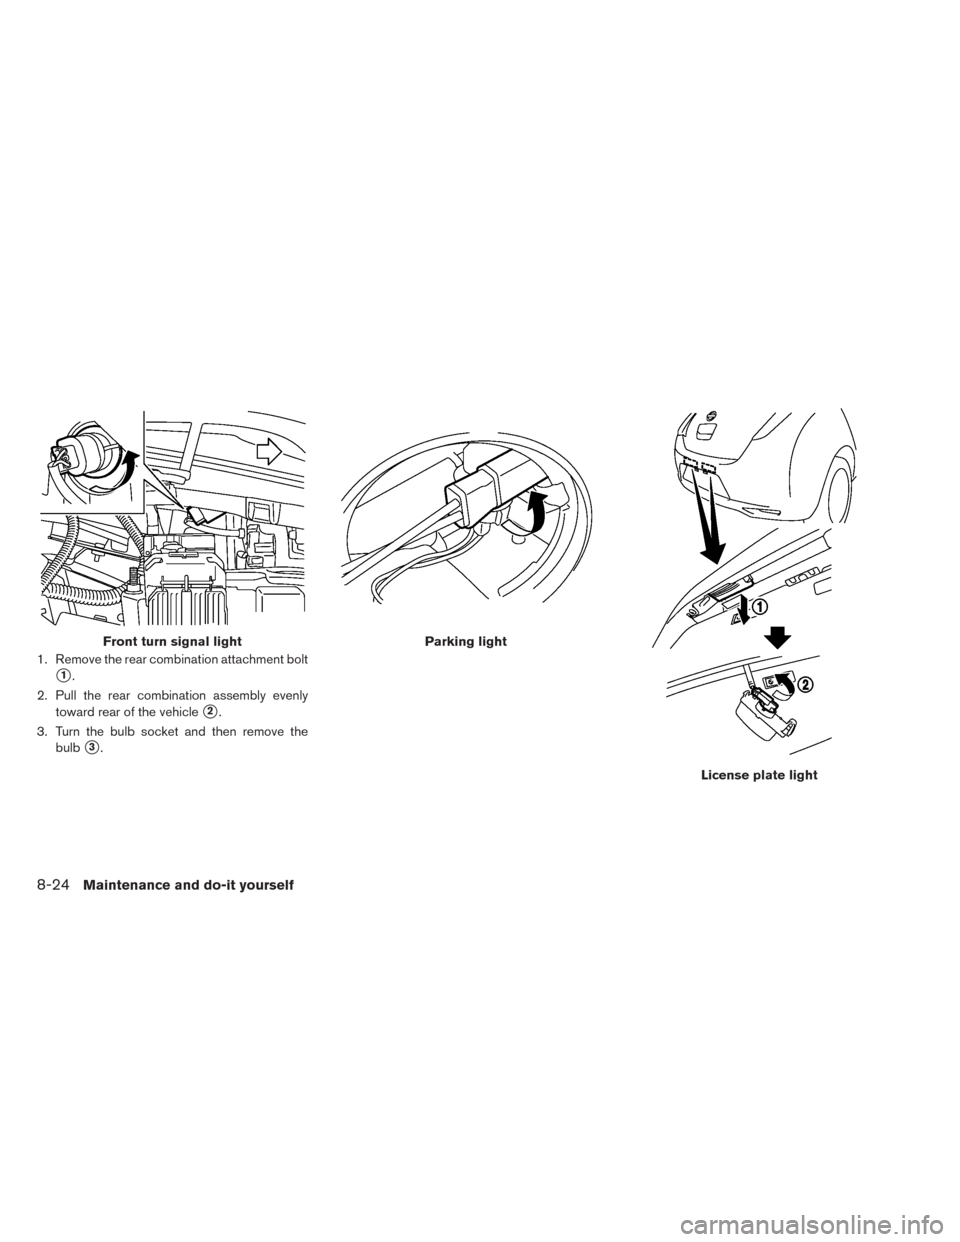
1. Remove the rear combination attachment bolt
�1.
2. Pull the rear combination assembly evenly
toward rear of the vehicle
�2.
3. Turn the bulb socket and then remove the
bulb
�3.
Front turn signal lightParking light
License plate light
8-24Maintenance and do-it yourself
Page 357 of 397
Rear combination light
Cargo light
Ceiling light
Maintenance and do-it yourself8-25


3. Front turn signal light
4. Map light
5. Ceiling light
6. Front fog light (if so equipped)
7. Headlight (high-beam)
8. High-mounted stop light
9. Rear")
Bulb No.
Headlight low beams
(Type A)*LED —
Headlight high beams
(Halogen) (Type A)65 H9
Headlight (Type B) 60/55 H13
Front turn signal light 27 3457NAK")