Page 17 of 402
0-8Illustrated table of contents
JVC0607X
1. Meters and gauges (P.2-5)
2. Center ventilator (P.4-19)
3. Audio system* or Navigation system** (P.4-28)— Clock* (P.2-41)
4. Hazard warning flasher switch (P.6-2)
5. Integrated Control System* (P.2-21) — Drive mode (P.5-25) — Heater and air conditioner control (P.4-20)
— Defroster switch (P.2-35)
5. Heater and air conditioner control (models without Integrated Control System) (P.4-20)
— Defroster switch (P.2-35)
6. Front passenger supplemental air bag (P.1-38)
7. Side ventilator (P.4-19) 8. Fuel-filler door release handle (P.3-21)
9. Hood release handle (P.3-19)
10. Push-button ignition switch (models with Intel-
ligent Key system) (P.5-12)
11. AUX/USB connector* (P.4-31)
12. Parking brake (P.5-29)
13. Cup holder (P.2-42)
14. Power outlet (P.2-42)
15. Glove box (P.2-44)
*: if so equipped
**: Refer to the separate Navigation System Own- er’s Manual.
INSTRUMENT PANEL
Page 19 of 402
0-10Illustrated table of contents
SDI2639
MR16DDT ENGINE1. Engine oil filler cap (P.8-8)
2. Radiator filler cap (P.8-8)— Vehicle overheat (P.6-10)
3. Brake and clutch* fluid reservoir (P.8-11)
4. Air cleaner (P.8-16)
5. Window washer fluid reservoir (P.8-12) 6. Engine drive belt location (P.8-15)
7. Engine oil dipstick (P.8-8)
8. Engine coolant reservoir (P.8-8)
9. Fuse/fusible link holder (P.8-19)
10. Battery (P.8-13)
— Jump starting (P.6-8)
*: for Manual Transmission (MT) models
ENGINE COMPARTMENT
Page 20 of 402
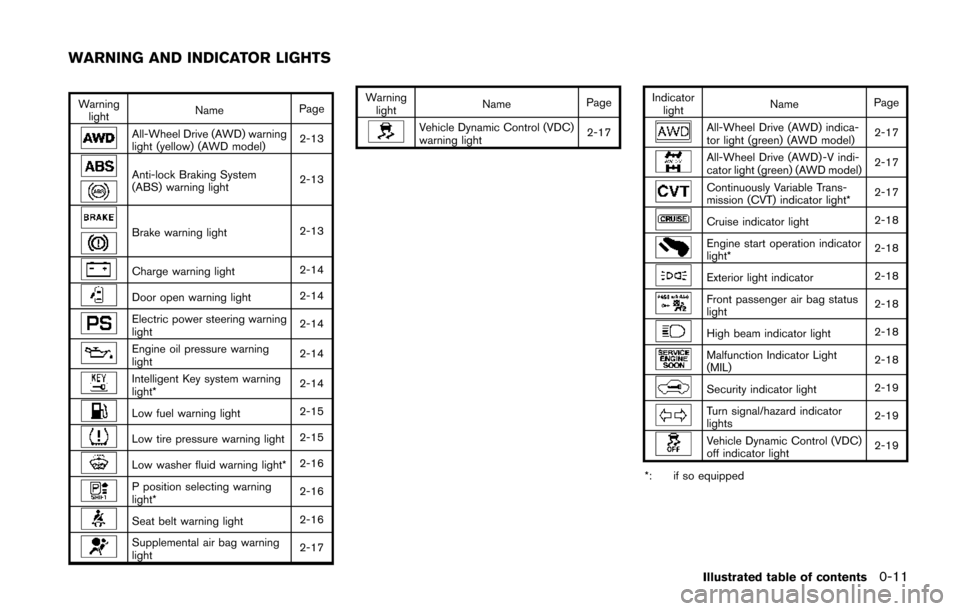
Warninglight Name
Page
All-Wheel Drive (AWD) warning
light (yellow) (AWD model) 2-13
Anti-lock Braking System
(ABS) warning light2-13
Brake warning light
2-13
Charge warning light2-14
Door open warning light2-14
Electric power steering warning
light2-14
Engine oil pressure warning
light2-14
Intelligent Key system warning
light*
2-14
Low fuel warning light
2-15
Low tire pressure warning light2-15
Low washer fluid warning light*2-16
P position selecting warning
light*2-16
Seat belt warning light
2-16
Supplemental air bag warning
light2-17Warning
light Name
Page
Vehicle Dynamic Control (VDC)
warning light 2-17Indicator
light Name
PageAll-Wheel Drive (AWD) indica-
tor light (green) (AWD model) 2-17
All-Wheel Drive (AWD) -V indi-
cator light (green) (AWD model)
2-17
Continuously Variable Trans-
mission (CVT) indicator light*2-17
Cruise indicator light
2-18
Engine start operation indicator
light*2-18
Exterior light indicator
2-18
Front passenger air bag status
light2-18
High beam indicator light
2-18
Malfunction Indicator Light
(MIL)2-18
Security indicator light
2-19
Turn signal/hazard indicator
lights2-19
Vehicle Dynamic Control (VDC)
off indicator light2-19
*: if so equipped
Illustrated table of contents0-11
WARNING AND INDICATOR LIGHTS
Page 24 of 402
SSS0792Type A
JVR0342XType B
FRONT SEATS
Front manual seat adjustment
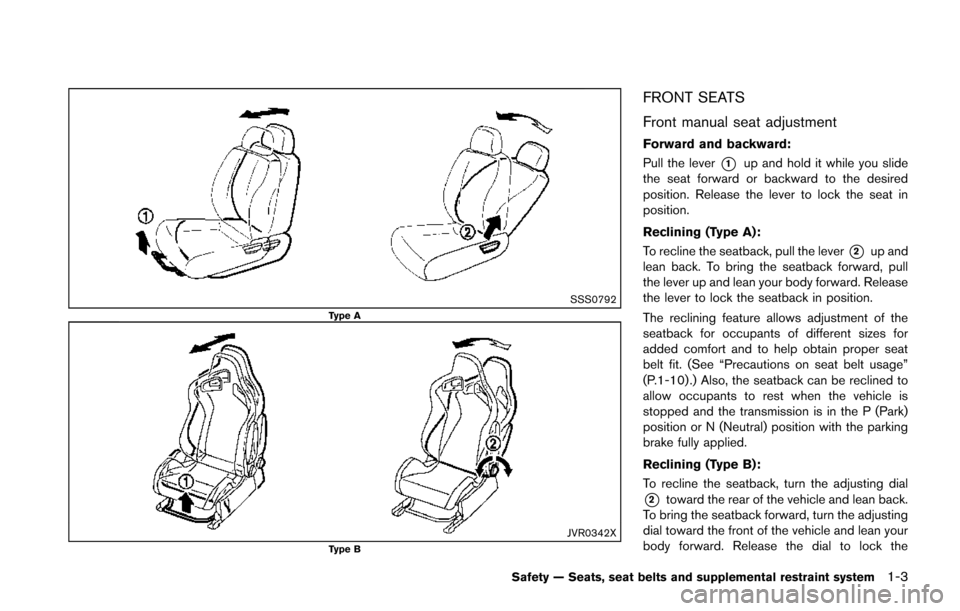
Forward and backward:
Pull the lever
*1up and hold it while you slide
the seat forward or backward to the desired
position. Release the lever to lock the seat in
position.
Reclining (Type A):
To recline the seatback, pull the lever
*2up and
lean back. To bring the seatback forward, pull
the lever up and lean your body forward. Release
the lever to lock the seatback in position.
The reclining feature allows adjustment of the
seatback for occupants of different sizes for
added comfort and to help obtain proper seat
belt fit. (See “Precautions on seat belt usage”
(P.1-10) .) Also, the seatback can be reclined to
allow occupants to rest when the vehicle is
stopped and the transmission is in the P (Park)
position or N (Neutral) position with the parking
brake fully applied.
Reclining (Type B):
To recline the seatback, turn the adjusting dial
*2toward the rear of the vehicle and lean back.
To bring the seatback forward, turn the adjusting
dial toward the front of the vehicle and lean your
body forward. Release the dial to lock the
Safety — Seats, seat belts and supplemental restraint system1-3
Page 25 of 402
1-4Safety — Seats, seat belts and supplemental restraint system
seatback in position.
The reclining feature allows adjustment of the
seatback for occupants of different sizes for
added comfort and to help obtain proper seat
belt fit. (See “Precautions on seat belt usage”
(P.1-10) .) Also, the seatback can be reclined to
allow occupants to rest when the vehicle is
stopped and the transmission is in the P (Park)
position or N (Neutral) position with the parking
brake fully applied.
NOTE:
.Depending on the passenger’s seat
sliding position when the passenger
seat is unoccupied while driving, a
noise may be heard as the side part
of the passenger’s seat contacts the
seat belt tongue. In this case, move the
seat to the rearmost position to avoid
interference.
. If you are having difficulty turning the
adjusting dial, park the vehicle and
then open the door or get out of the
vehicle to operate the dial.
SSS1129
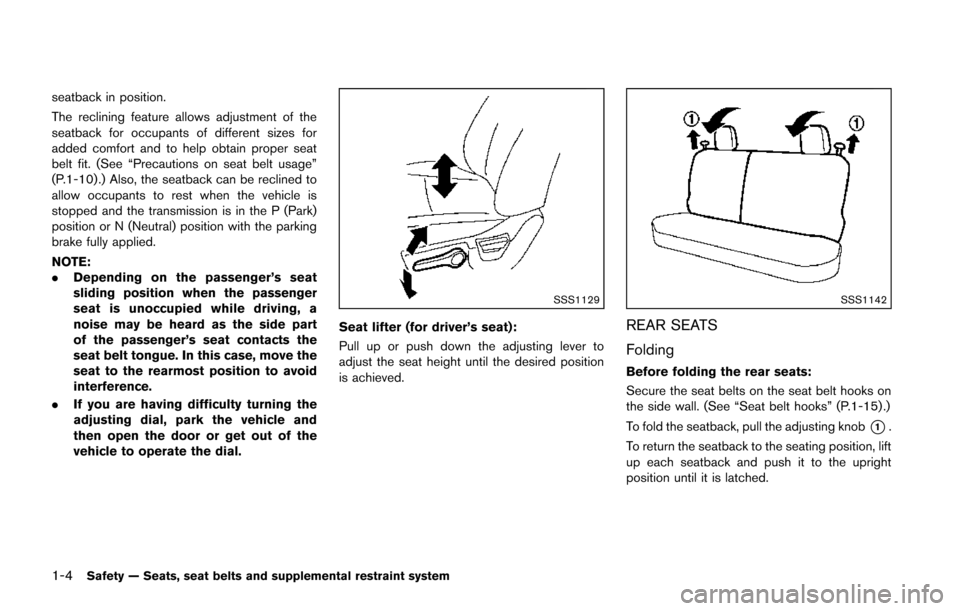
Seat lifter (for driver’s seat):
Pull up or push down the adjusting lever to
adjust the seat height until the desired position
is achieved.
SSS1142
REAR SEATS
Folding
Before folding the rear seats:
Secure the seat belts on the seat belt hooks on
the side wall. (See “Seat belt hooks” (P.1-15) .)
To fold the seatback, pull the adjusting knob
*1.
To return the seatback to the seating position, lift
up each seatback and push it to the upright
position until it is latched.
Page 79 of 402
2-4Instruments and controls
JVC0607X
1. Meters and gauges
2. Center ventilator
3. Audio system* or Navigation system**— Clock*
4. Hazard warning flasher switch
5. Integrated Control System* — Drive mode — Heater and air conditioner control
— Defroster switch
5. Heater and air conditioner control (models without Integrated Control System)
— Defroster switch
6. Front passenger supplemental air bag
7. Side ventilator 8. Fuel-filler door release handle
9. Hood release handle
10. Push-button ignition switch (models with Intel-
ligent Key system)
11. AUX/USB connector*
12. Parking brake
13. Cup holder
14. Power outlet
15. Glove box
*: if so equipped
**: Refer to the separate Navigation System Own- er’s Manual.
INSTRUMENT PANEL
Page 87 of 402
2-12Instruments and controls
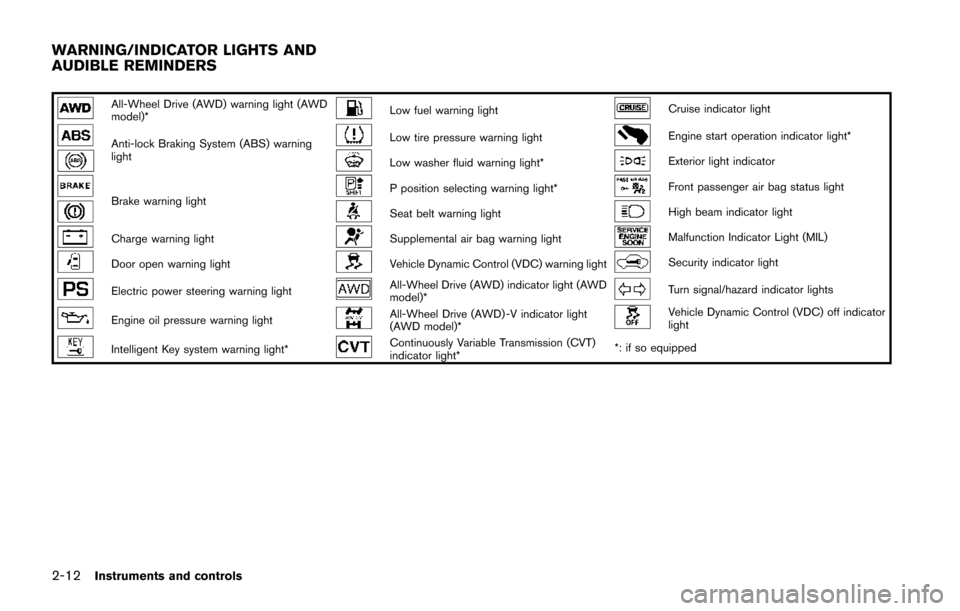
All-Wheel Drive (AWD) warning light (AWD
model)*Low fuel warning lightCruise indicator light
Anti-lock Braking System (ABS) warning
lightLow tire pressure warning lightEngine start operation indicator light*
Low washer fluid warning light*Exterior light indicator
Brake warning lightP position selecting warning light*Front passenger air bag status light
Seat belt warning lightHigh beam indicator light
Charge warning lightSupplemental air bag warning lightMalfunction Indicator Light (MIL)
Door open warning lightVehicle Dynamic Control (VDC) warning lightSecurity indicator light
Electric power steering warning lightAll-Wheel Drive (AWD) indicator light (AWD
model)*Turn signal/hazard indicator lights
Engine oil pressure warning lightAll-Wheel Drive (AWD) -V indicator light
(AWD model)*Vehicle Dynamic Control (VDC) off indicator
light
Intelligent Key system warning light*Continuously Variable Transmission (CVT)
indicator light**: if so equipped
WARNING/INDICATOR LIGHTS AND
AUDIBLE REMINDERS
Page 88 of 402
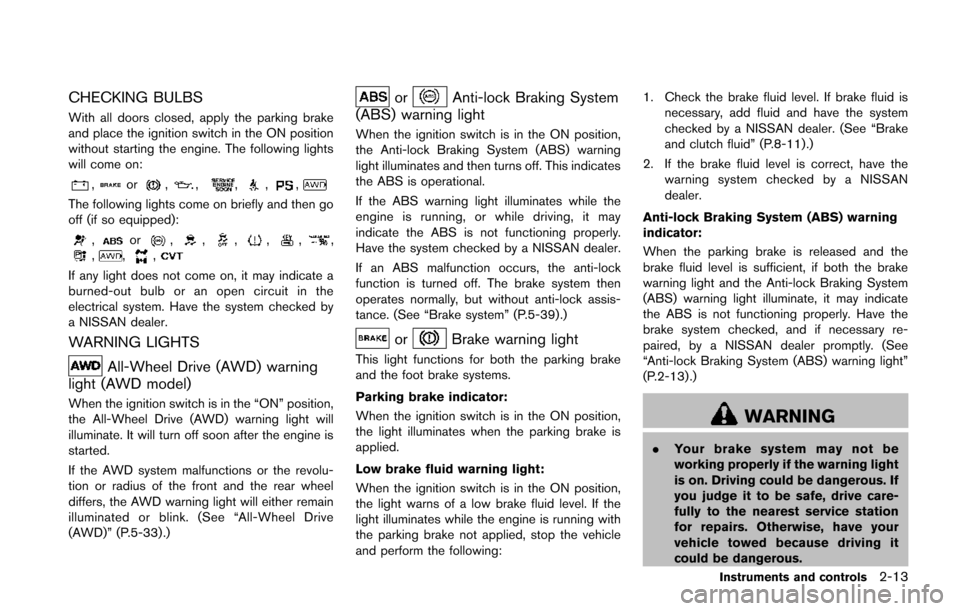
CHECKING BULBS
With all doors closed, apply the parking brake
and place the ignition switch in the ON position
without starting the engine. The following lights
will come on:
,or,,,,,
The following lights come on briefly and then go
off (if so equipped):
,or,,,,,,,,,
If any light does not come on, it may indicate a
burned-out bulb or an open circuit in the
electrical system. Have the system checked by
a NISSAN dealer.
WARNING LIGHTS
All-Wheel Drive (AWD) warning
light (AWD model)
When the ignition switch is in the “ON” position,
the All-Wheel Drive (AWD) warning light will
illuminate. It will turn off soon after the engine is
started.
If the AWD system malfunctions or the revolu-
tion or radius of the front and the rear wheel
differs, the AWD warning light will either remain
illuminated or blink. (See “All-Wheel Drive
(AWD)” (P.5-33) .)
orAnti-lock Braking System
(ABS) warning light
When the ignition switch is in the ON position,
the Anti-lock Braking System (ABS) warning
light illuminates and then turns off. This indicates
the ABS is operational.
If the ABS warning light illuminates while the
engine is running, or while driving, it may
indicate the ABS is not functioning properly.
Have the system checked by a NISSAN dealer.
If an ABS malfunction occurs, the anti-lock
function is turned off. The brake system then
operates normally, but without anti-lock assis-
tance. (See “Brake system” (P.5-39).)
orBrake warning light
This light functions for both the parking brake
and the foot brake systems.
Parking brake indicator:
When the ignition switch is in the ON position,
the light illuminates when the parking brake is
applied.
Low brake fluid warning light:
When the ignition switch is in the ON position,
the light warns of a low brake fluid level. If the
light illuminates while the engine is running with
the parking brake not applied, stop the vehicle
and perform the following: 1. Check the brake fluid level. If brake fluid is
necessary, add fluid and have the system
checked by a NISSAN dealer. (See “Brake
and clutch fluid” (P.8-11).)
2. If the brake fluid level is correct, have the warning system checked by a NISSAN
dealer.
Anti-lock Braking System (ABS) warning
indicator:
When the parking brake is released and the
brake fluid level is sufficient, if both the brake
warning light and the Anti-lock Braking System
(ABS) warning light illuminate, it may indicate
the ABS is not functioning properly. Have the
brake system checked, and if necessary re-
paired, by a NISSAN dealer promptly. (See
“Anti-lock Braking System (ABS) warning light”
(P.2-13) .)
WARNING
. Your brake system may not be
working properly if the warning light
is on. Driving could be dangerous. If
you judge it to be safe, drive care-
fully to the nearest service station
for repairs. Otherwise, have your
vehicle towed because driving it
could be dangerous.
Instruments and controls2-13