2014 NISSAN GT-R door lock
[x] Cancel search: door lockPage 199 of 354
Brake assist ........................................................................\
.... 5-48Anti-lock Braking System (ABS) ................................ 5-48
Vehicle Dynamic Control (VDC) system ......................... 5-49
Cold weather driving ............................................................ 5-51
Freeing a frozen door lock ............................................ 5-51
Anti-freeze ........................................................................\
. 5-51 Battery ........................................................................\
...... 5-51
Draining of coolant water ............................................ 5-51
Tire equipment ............................................................... 5-52
Special winter equipment ........................................... 5-52
Driving on snow or ice ................................................ 5-52
Engine block heater (if so equipped) ...................... 5-53
Page 207 of 354
5-10Starting and driving
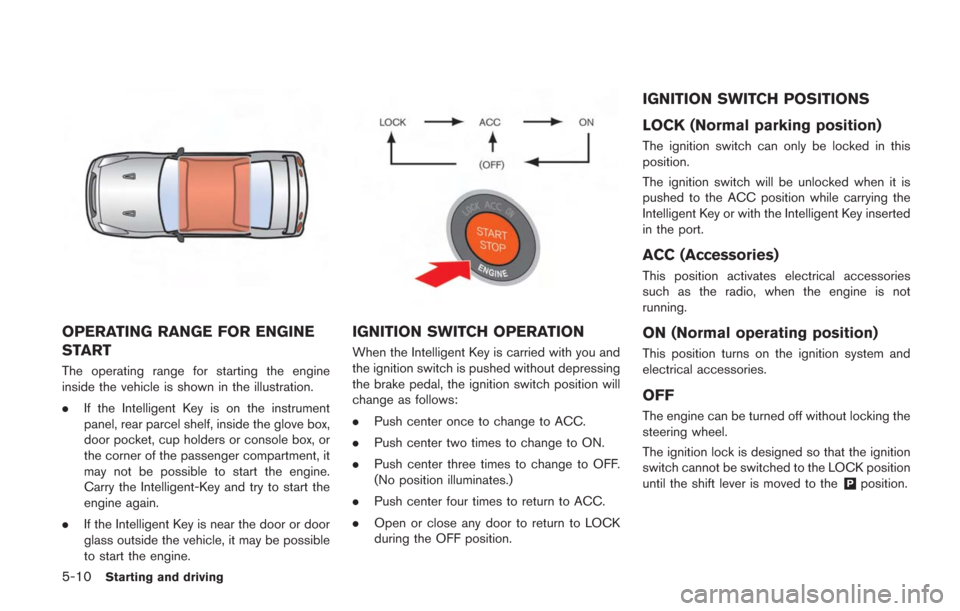
OPERATING RANGE FOR ENGINE
START
The operating range for starting the engine
inside the vehicle is shown in the illustration.
.If the Intelligent Key is on the instrument
panel, rear parcel shelf, inside the glove box,
door pocket, cup holders or console box, or
the corner of the passenger compartment, it
may not be possible to start the engine.
Carry the Intelligent-Key and try to start the
engine again.
. If the Intelligent Key is near the door or door
glass outside the vehicle, it may be possible
to start the engine.
IGNITION SWITCH OPERATION
When the Intelligent Key is carried with you and
the ignition switch is pushed without depressing
the brake pedal, the ignition switch position will
change as follows:
.Push center once to change to ACC.
. Push center two times to change to ON.
. Push center three times to change to OFF.
(No position illuminates.)
. Push center four times to return to ACC.
. Open or close any door to return to LOCK
during the OFF position.
IGNITION SWITCH POSITIONS
LOCK (Normal parking position)
The ignition switch can only be locked in this
position.
The ignition switch will be unlocked when it is
pushed to the ACC position while carrying the
Intelligent Key or with the Intelligent Key inserted
in the port.
ACC (Accessories)
This position activates electrical accessories
such as the radio, when the engine is not
running.
ON (Normal operating position)
This position turns on the ignition system and
electrical accessories.
OFF
The engine can be turned off without locking the
steering wheel.
The ignition lock is designed so that the ignition
switch cannot be switched to the LOCK position
until the shift lever is moved to the
&Pposition.
Page 208 of 354
NOTE:
.If the steering lock release malfunction
indicator appears on the vehicle infor-
mation display when the ignition
switch is pressed, press the ignition
switch again while gently turning the
steering wheel left and right.
(
“Steering lock release malfunc-
tion indicator” page 2-43)
. If the shift
&Pwarning appears on the
vehicle information display when the
ignition switch is pushed, the shift lever
is in any position except the
&Pposi-
tion. Move the shift lever to the&P
position. (“Shift “P” warning”
page 2-43)
. If the Intelligent Key battery discharge
indicator appears on the vehicle infor-
mation display, the Intelligent Key
battery is discharged and the ignition
switch will not operate. Insert the
Intelligent Key into the key port to
operate the ignition switch.
(
“Intelligent Key battery discharge
indicator” page 2-44)
. When all of the following conditions
are met for 60 minutes, the battery
saver system will cut off the power
supply to prevent battery discharge. —
The ignition switch is in the ACC
position, and
— All doors are closed, and
— The shift lever is in the
&Pposition.
. Do not leave the vehicle with the
ignition switch in the ACC or ON
position when the engine is not run-
ning for an extended period of time.
This can discharge the battery.
EMERGENCY ENGINE SHUT OFF
To shut off the engine in an emergency situation
while driving, perform the following procedure:
.Rapidly push the push-button ignition switch
3 consecutive times in less than 1.5
seconds, or
. Push and hold the push button ignition
switch for more than 2 seconds.
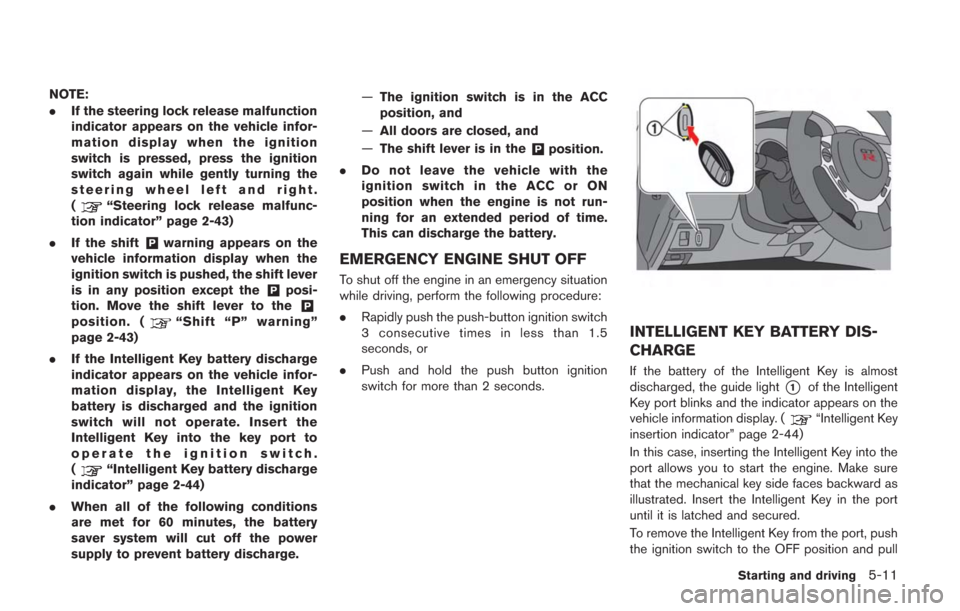
INTELLIGENT KEY BATTERY DIS-
CHARGE
If the battery of the Intelligent Key is almost
discharged, the guide light
*1of the Intelligent
Key port blinks and the indicator appears on the
vehicle information display. (
“Intelligent Key
insertion indicator” page 2-44)
In this case, inserting the Intelligent Key into the
port allows you to start the engine. Make sure
that the mechanical key side faces backward as
illustrated. Insert the Intelligent Key in the port
until it is latched and secured.
To remove the Intelligent Key from the port, push
the ignition switch to the OFF position and pull
Starting and driving5-11
Page 210 of 354
.Make sure the area around the vehicle is
clear.
. Check fluid levels such as engine oil, cool-
ant, brake fluid and window washer fluid as
frequently as possible, or at least whenever
you refuel.
. Check that all windows and lights are clean.
. Visually inspect tires for their appearance
and condition. Also check tires for proper
inflation.
. Lock all doors.
. Position seat.
. Adjust inside and outside mirrors.
. Fasten seat belts and ask all passengers to
do likewise.
. Check the operation of warning lights when
the ignition switch is pushed to the ON
position. (
“Warning/indicator lights
and audible reminders” page 2-25)
NOTE:
. This vehicle includes spark plugs that
are designed for maximum perfor-
mance. If the start time becomes long-
er, the plugs may be fouled, making the
engine difficult to start. If this occurs,
start the engine using the procedure
described in this section.
. A click sound may be heard when the
brake pedal is depressed and released.
This is normal.
. A low rattling operating sound may
occur when the engine is started or
stopped. This is because of the trans-
mission gear design, light flywheel and
dry sump lubrication system used in
this transmission. This does not indi-
cate that there is a malfunction. This
sound is likely to occur in particular if
the engine is stopped when the tem-
perature of the transmission oil is high.
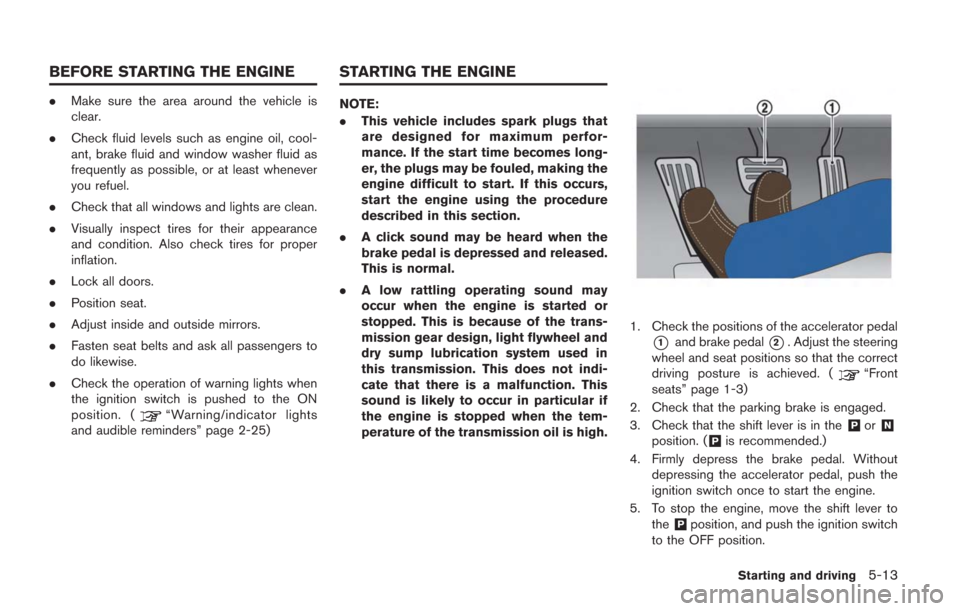
1. Check the positions of the accelerator pedal
*1and brake pedal*2. Adjust the steering
wheel and seat positions so that the correct
driving posture is achieved. (
“Front
seats” page 1-3)
2. Check that the parking brake is engaged.
3. Check that the shift lever is in the
&Por&N
position. (&Pis recommended.)
4. Firmly depress the brake pedal. Without depressing the accelerator pedal, push the
ignition switch once to start the engine.
5. To stop the engine, move the shift lever to the
&Pposition, and push the ignition switch
to the OFF position.
Starting and driving5-13
BEFORE STARTING THE ENGINE STARTING THE ENGINE
Page 248 of 354
See your 2014 Warranty Information Booklet for
important related information and warranty
coverage exclusions. See also section 2 (page
“Transmission warning light” page 2-30)
and section 5 (page“Vehicle Dynamic
Control (VDC) system” page 5-49) of this
Owner’s Manual, “Transmission Clutch Tem-
perature High” and “Vehicle Dynamic Control
(VDC) System” for important additional related
information.
. Except for the emergency cases above,
any issues related to driving stability
(e.g., steering maneuvers and maneu-
vers during acceleration and decelera-
tion) and any damages to drivetrain
components (e.g., transfer, clutch, a
sort of gear, transaxle case) will not
be covered by warranty if there is a
record in the Vehicle Status Data
Recorder (VSDR) that the vehicle was
driven with VDC off.
. When attempting to free the vehicle
from mud or fresh snow, the VDC will
detect the tire slipping, and the engine
speed may not increase even when the
accelerator pedal is depressed. To raise
the engine speed, use the VDC set up
switch to turn the VDC system OFF and
select SAVE mode with the transmis- sion switch. (
“VDC, transmission
and suspension setup switches” page
5-24)
. When the VDC system is turned OFF,
all VDC functions (including traction
control) , except for the ABS functions,
are deactivated.FREEING A FROZEN DOOR LOCK
To prevent a door lock from freezing, apply
deicer through the key hole. If the lock becomes
frozen, heat the key before inserting it into the
key hole or use the Intelligent Key system.
ANTI-FREEZE
In the winter when it is anticipated that the
outside temperature will drop below 328F(0 8C) ,
check antifreeze to assure proper winter protec-
tion. (
“Engine cooling system” page 8-10)
BATTERY
If the battery is not fully charged during
extremely cold weather conditions, the battery
fluid may freeze and damage the battery. To
maintain maximum efficiency, the battery should
be checked regularly. (
“Battery” page 8-
17)
DRAINING OF COOLANT WATER
If the vehicle is to be left outside without
antifreeze, drain the cooling system, including
the engine block. Refill before operating the
vehicle. For details, contact a GT-R certified
NISSAN dealer.
Starting and driving5-51
COLD WEATHER DRIVING
Page 275 of 354
8-4Maintenance and do-it-yourself
During the normal day-to-day operation of the
vehicle, general maintenance should be per-
formed regularly as prescribed in this section. If
you detect any unusual sounds, vibrations or
smell, be sure to check for the cause or have a
GT-R certified NISSAN dealer do it promptly. In
addition, you should notify a GT-R certified
NISSAN dealer if you think that repairs are
required. (
“Maintenance precautions”
page 8-6)
EXPLANATION OF MAINTENANCE
ITEMS
Additional information on the following
items with “*” is found later in this section.
Outside the vehicle
The maintenance items listed here should be
performed from time to time, unless otherwise
specified.
Doors and engine hood: Check that all doors
and the engine hood, operate properly. Also
ensure that all latches lock securely. Lubricate
hinges, latches, latch pins, rollers and links if
necessary. Make sure that the secondary latch
keeps the hood from opening when the primary
latch is released.
When driving in areas using road salt or other
corrosive materials, check lubrication frequently. Lights*:
Clean the headlights on a regular basis.
Make sure that the headlights, stop lights, tail
lights, turn signal lights, and other lights are all
operating properly and installed securely. Also
check headlight aim.
Road wheel nuts (lug nuts)*: When checking
the tires, make sure no wheel nuts are missing,
and check for any loose wheel nuts. Tighten if
necessary.
Tire rotation*: Tires cannot be rotated because
your vehicle is equipped with different sized tires
in the front and rear.
Tires*: Check the pressure with a gauge often
and always prior to long distance trips. If
necessary, adjust the pressure in all tires to the
pressure specified. Check carefully for damage,
cuts or excessive wear.
NOTE:
. You can check the pressure of all four
tires on the multi function display. See
the separate Multi Function Display
Owner’s Manual.
. The tires of this vehicle are filled with
nitrogen gas. When the tire pressure is
low, fill the tires with nitrogen. Contact
a GT-R certified NISSAN dealer for
information on filling the tires with
nitrogen. .
If nitrogen is not available, compressed
air may be safely used under normal
driving conditions. However, NISSAN
recommends refilling with nitrogen for
maximum tire performance.
Tire Pressure Monitoring System (TPMS)
transmitter components: Replace grommet
seal of transmitter in TPMS, when replacing
each tire by reaching the wear limit.
Tire, wheel alignment and balance: If the
vehicle should pull to either side while driving on
a straight and level road, or if you detect uneven
or abnormal tire wear, there may be a need for
wheel alignment.
If the steering wheel or seat vibrates at normal
highway speeds, wheel balancing may be
needed.
For additional information regarding tires, refer
to “Important Tire Safety Information” (US) or
“Tire Safety Information” (Canada) in the War-
ranty Information Booklet.
Windshield: Clean the windshield on a regular
basis. Check the windshield at least every six
months for cracks or other damage. Have a
damaged windshield repaired by a qualified
repair facility.
Windshield wiper blades*: Check for cracks
or wear if they do not wipe properly.
GENERAL MAINTENANCE
Page 288 of 354
.Keep the battery surface clean and dry.
Clean the battery with a solution of baking
soda and water.
. Make certain the terminal connections are
clean and securely tightened.
. If the vehicle is not to be used for 30 days or
longer, disconnect the negative (−) battery
terminal cable to prevent discharging it.
NOTE:
Care should be taken to avoid situations
that can lead to potential battery discharge
and potential no-start conditions such as:
1. Installation or extended use of electro-
nic accessories that consume battery
power when the engine is not running
(Phone chargers, GPS, DVD players,
etc.)
2. Vehicle is not driven regularly and/or
only driven short distances.
In these cases, the battery may need to be
charged to maintain battery health.PRECAUTIONS
NOTICE
When the battery cable is removed from
the battery terminal, do not close either
of the front doors. The automatic win-
dow adjusting function will not work,
and the side roof panel may be da-
maged.
To disconnect the negative (−) battery terminal,
perform the procedure in the following order.
Otherwise, the window and the side roof panel
may contact and be damaged.
1. Close the windows.
2. Open the hood.
3. Close and lock all the doors.
4. Disconnect the negative (−) battery terminal.
5. Securely close the hood.
To connect the negative (−) battery terminal,
perform the procedure in the following order.
Otherwise, the window and the side roof panel
may contact and be damaged.
1. Unlock and open the driver side door. Do not close the door.
2. Open the hood. 3. Connect the negative (−) battery terminal.
Then close the hood.
4. Fully open the driver side door window.
5. Close the driver side door and the window.
FLUID LEVEL CHECK
WARNING
. Do not expose the battery to flames
or electrical sparks. Hydrogen gas
generated by the battery is explo-
sive. Do not allow battery fluid to
contact your skin, eyes, fabrics, or
painted surfaces. After touching a
battery or battery cap, do not touch
or rub your eyes. Thoroughly wash
your hands. If the acid contacts your
eyes, skin or clothing, immediately
flush with water for at least 15
minutes and seek medical attention.
. Do not operate the vehicle if the
fluid in the battery is low. Low
battery fluid can cause a higher load
on the battery which can generate
heat, reduce battery life, and in
some cases lead to an explosion.
. When working on or near a battery,
always wear suitable eye protection
Maintenance and do-it-yourself8-17
BATTERY
Page 344 of 354
10 Index
A
Additional maintenance items............................ GTR-13
Air cleaner..................................................................... 8-20
Air conditionerAir conditioner specification label.................... 9-13
Air conditioning system refrigerant and
lubricant recommendations......................................... 9-7
Air fresheners................................................................. 7-6
All-season tires...................................................... GTR-11
All-Wheel Drive............................................................ 5-40
All-Wheel Drive driving safety precautions ............ 5-9
Anti-freeze..................................................................... 5-51
Anti-lock Braking System.......................................... 5-48
Anti-lock Braking System warning.......................... 2-37
Audible reminders....................................................... 2-32
Automatic Automatic door lock system................................. 3-5
Average fuel consumption and speed................... 2-16
Avoiding body damage........................................ GTR-11
Avoiding collision and rollover ................................... 5-7
AWD clutch high temperature warning................. 2-37
AWD system characteristics.................................... 5-43
AWD system warning ................................................ 2-38
AWD warning light ..................................................... 5-40
B
Battery................................................................ 5-51, 8-17 Intelligent Key battery discharge...................... 5-11
Intelligent Key battery discharge indicator..... 2-44
Intelligent Key battery replacement ................. 8-27 Before starting the engine........................................ 5-13
Body repair ............................................................. GTR-12
Booster seats............................................................... 1-31
Brake
Brake assist........................................................... 5-48
Brake fluid............................................... GTR-5, 8-15
Brake pad wear warning.................................... 8-23
Brake system......................................................... 5-47
Brakes..................................................................... 8-23
High performance brake system ...................... 8-23
Low brake fluid warning ..................................... 2-36
Parking brake ........................................................ 5-32
Parking brake break-in........................................ 5-47
Parking brake release warning ......................... 2-36
Replacing the brake pads.................................. 8-23
Self-adjusting brakes .......................................... 8-23
Brake dust............................................................... GTR-27
Brake pad................................................................ GTR-16
Brake pad and disc rotor...................................... GTR-6
Brake pad break-in procedure........................... GTR-16
Brake system information.................................... GTR-27
Brakes.................................................... GTR-19, GTR-23
Braking precautions.................................................... 5-47
Break-in schedule ........................................ GTR-9, 5-38
C
Capacities and recommended fuel/lubricants ....... 9-2
Changing Changing engine coolant................................... 8-12
Changing engine oil and filter........................... 8-13 Changing wheels and tires................................ 8-40
Checking Checking bulbs..................................................... 2-25
Checking engine coolant level.......................... 8-11
Checking engine oil level................................... 8-12
Checking the tire pressure................................ 8-35
Checking the exhaust finisher and rear
bumper clearance ................................................... GTR-9
Child restraints............................................................. 1-15
Child safety................................................................... 1-13
Chrome parts ................................................................. 7-4
Cleaning ........................................................................ 8-21
Cleaning exterior ........................................................... 7-2
Cleaning interior ............................................................ 7-5
Clearing the programmed information................... 2-66
Closing the fuel-filler door ........................................ 3-25
Closing the hood......................................................... 3-19
Coat hooks ................................................................... 2-59
Cockpit ............................................................................ 2-3
Cold weather driving.................................................. 5-51
Console box ................................................................. 2-58
Cool down .............................................................. GTR-13
Coolant Changing engine coolant................................... 8-12
Checking engine coolant level.......................... 8-11
Draining of coolant water................................... 5-51
Engine coolant temperature gauge .................... 2-7
Coolant level and mixture ratio.......................... GTR-15
Corrosion protection .................................................... 7-8
Cracks on brake pad ........................................... GTR-27
Cracks on the disc rotors................................... GTR-27