2014 NISSAN GT-R Prox
[x] Cancel search: ProxPage 229 of 354
5-32Starting and driving
abled, the warning light illuminates.
When the warning light illuminates,
perform cool down driving.
(
“Cool down” page GTR-13)
When the warning light turns off,
the function can be used again.
. The performance of start may vary
depending on the amount of wheel
spin ,or increase and decrease of
the engine output in response to the
outside temperature. (This vehicle
was set up according to the road
surface conditions of the straight
sections of the Sendai Highland
Raceway course in Japan at 598F
(158C) .)
. For safety reasons, VDC control may
activate automatically when driving
on a slippery road surface, such as a
wet road, in order to apply the
brakes or limit the engine output.
. Frequent use of the R mode start
function increases the load on the
powertrain related parts such as the
clutch and transmission compared
to normal driving. In particular, the
clutch will wear out more quickly.
HOW TO USE R MODE START
FUNCTION
1. Move the shift lever to the&Aor&Mposition.
2. Select the R mode with the transmission setup switch. (
“VDC, transmission and
suspension setup switches” page 5-24)
3. Select the R mode with the VDC setup switch.
4. Depress the brake pedal firmly with your left foot and keep depressing the brake pedal.
5. Depress the accelerator pedal quickly to the floor with your right foot while the brake
pedal is depressed. The engine speed will
increase to approximately 4,000 rpm and
will be maintained.
6. Within 3 seconds after depressing the accelerator pedal, release the brake pedal.
WARNING
.Be sure the parking brake is fully
released before driving. Failure to
do so can cause brake failure and
lead to an accident.
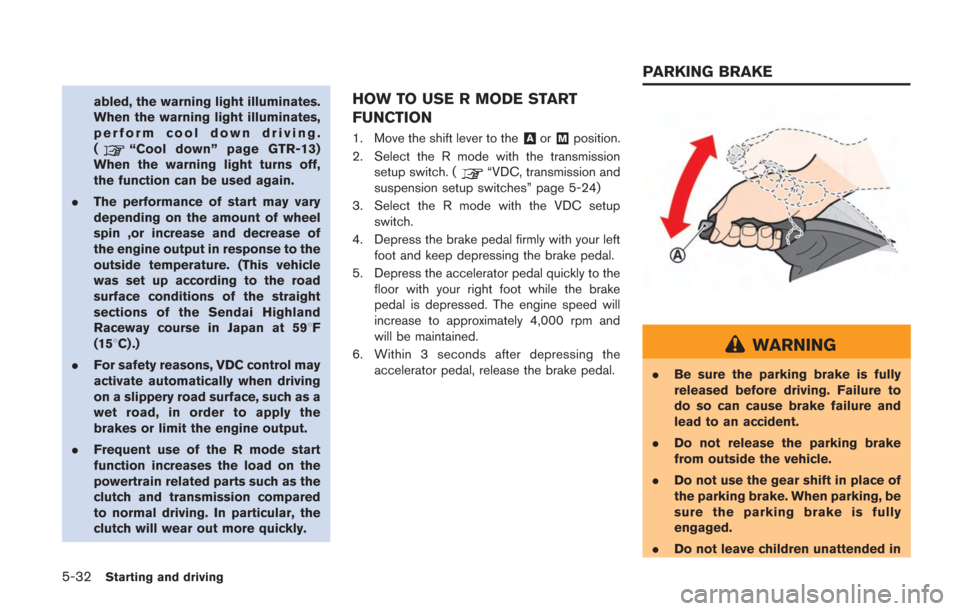
. Do not release the parking brake
from outside the vehicle.
. Do not use the gear shift in place of
the parking brake. When parking, be
sure the parking brake is fully
engaged.
. Do not leave children unattended in
PARKING BRAKE
Page 232 of 354
INDICATORS AND DISPLAY
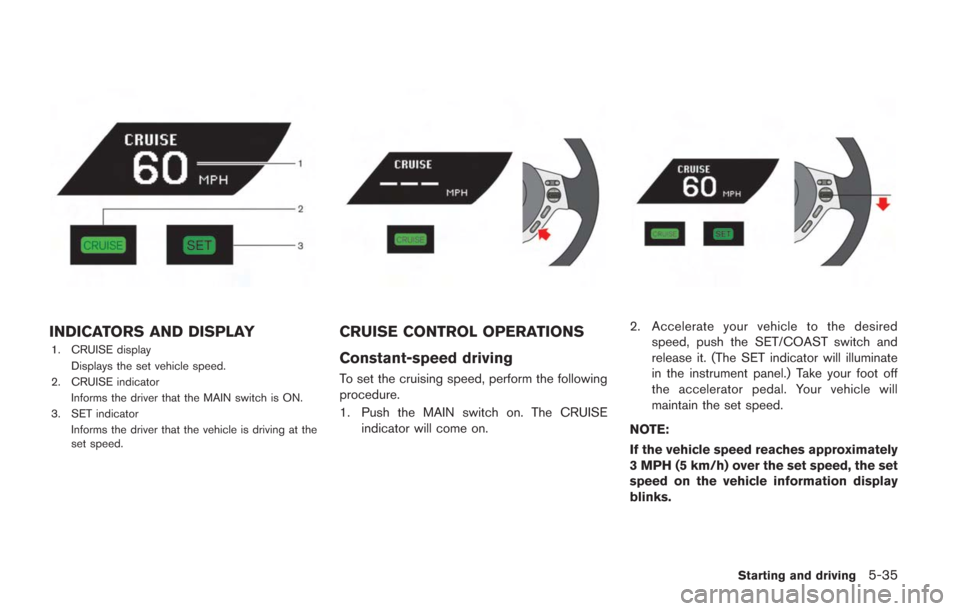
1. CRUISE displayDisplays the set vehicle speed.
2. CRUISE indicator
Informs the driver that the MAIN switch is ON.
3. SET indicator Informs the driver that the vehicle is driving at the
set speed.
CRUISE CONTROL OPERATIONS
Constant-speed driving
To set the cruising speed, perform the following
procedure.
1. Push the MAIN switch on. The CRUISEindicator will come on.
2. Accelerate your vehicle to the desiredspeed, push the SET/COAST switch and
release it. (The SET indicator will illuminate
in the instrument panel.) Take your foot off
the accelerator pedal. Your vehicle will
maintain the set speed.
NOTE:
If the vehicle speed reaches approximately
3 MPH (5 km/h) over the set speed, the set
speed on the vehicle information display
blinks.
Starting and driving5-35
Page 234 of 354
NOTE:
.If cruise control was canceled by press-
ing the cancel switch or by depressing
the brake pedal, the system changes to
standby status.
. If you depress the brake pedal while
pushing the RESUME/ACCELERATE or
SET/COAST switch and reset at the
cruising speed, the cruise control will
be deactivated. Turn the MAIN switch
off once and then turn it on again.
Under the following conditions, cruise control
will be automatically canceled.
. Vehicle speed drops to below approximately
19 MPH (30 km/h) .
. Vehicle speed drops to more than approxi-
mately 8 MPH (13 km/h) below the set
vehicle speed.
. The shift lever is moved to a position other
than
&A↔&M.
. VDC operates.
. A tire is spinning.
. There is a malfunction in the cruise control
system.
WARNING
.Never rely solely on the hill start
assist system to prevent the vehicle
from moving backward on a hill.
Always drive carefully and atten-
tively. Depress the brake pedal
when the vehicle is stopped on a
steep hill. Be especially careful
when stopped on a hill on frozen
or muddy roads. Failure to prevent
the vehicle from rolling backwards
may result in a loss of control of the
vehicle and possible serious injury
or death.
. The hill start assist system is not
designed to hold the vehicle at a
standstill on a hill. Depress the
brake pedal when the vehicle is
stopped on a steep hill. Failure to
do so may cause the vehicle to roll
backwards and may result in a
collision or serious personal injury.
. The hill start assist may not prevent
the vehicle from rolling backwards
on a hill under all load or road
conditions. Always be prepared to
depress the brake pedal to prevent the vehicle from rolling backwards.
Failure to do so may result in a
collision or serious personal injury.
NOTICE
When the vehicle is stopped on a hill,
do not hold the vehicle in place by
depressing the accelerator pedal. Doing
so may cause the clutch to overheat and
result in transmission damage. Use the
brakes to prevent the vehicle from
moving.
The hill start assist system automatically keeps
the brakes applied to help prevent the vehicle
from rolling backwards in the time it takes the
driver to release the brake pedal and apply the
accelerator when the vehicle is stopped on a hill.
Hill start assist will operate automatically under
the following conditions:
. The shift lever is moved to a forward or
reverse position.
. The vehicle is stopped completely on a hill
by applying the brake.
The maximum holding time is 2 seconds. After 2
seconds the vehicle will begin to roll back and
Starting and driving5-37
HILL START ASSIST
Page 239 of 354
5-42Starting and driving
TIGHT CORNER BRAKING PHE-
NOMENON
If the steering wheel is turned more than half a
turn when the vehicle is started when it is cold, it
may be harder to move the vehicle forward and
backward. This phenomenon is known as the
“tight corner braking phenomenon”.
This phenomenon is unique to AWD vehicles,
and occurs due to a difference in speeds
between the front and rear wheels while the
vehicle is turning. This does not indicate that
there is a malfunction.
NOTE:
If the tight corner braking phenomenon
occurs, a slipping sound may be heard
from the tires, or a squeaking sound may
be heard from the drive system.
Reducing tight corner braking phe-
nomenon
The tight corner braking phenomenon can be
temporarily reduced.
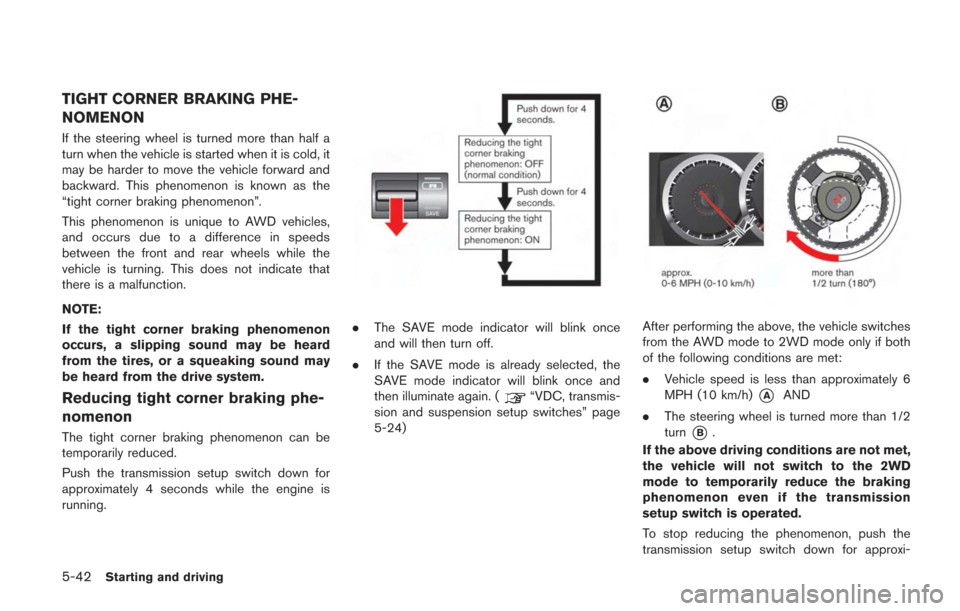
Push the transmission setup switch down for
approximately 4 seconds while the engine is
running.
.The SAVE mode indicator will blink once
and will then turn off.
. If the SAVE mode is already selected, the
SAVE mode indicator will blink once and
then illuminate again. (
“VDC, transmis-
sion and suspension setup switches” page
5-24)
After performing the above, the vehicle switches
from the AWD mode to 2WD mode only if both
of the following conditions are met:
. Vehicle speed is less than approximately 6
MPH (10 km/h)
*AAND
. The steering wheel is turned more than 1/2
turn
*B.
If the above driving conditions are not met,
the vehicle will not switch to the 2WD
mode to temporarily reduce the braking
phenomenon even if the transmission
setup switch is operated.
To stop reducing the phenomenon, push the
transmission setup switch down for approxi-
Page 254 of 354
To shut off the engine in an emergency situation
while driving, perform the following procedure:
.Rapidly push the push-button ignition switch
3 consecutive times in less than 1.5
seconds, or
. Push and hold the push-button ignition
switch for more than 2 seconds.TIRE PRESSURE MONITORING
SYSTEM (TPMS)
This vehicle is equipped with the Tire Pressure
Monitoring System (TPMS) . It monitors tire
pressure of all tires. When the low tire pressure
warning light is lit, one or more of your tires is
significantly under-inflated. If the vehicle is being
driven with low tire pressure, the TPMS will
activate and warn you of it by the low tire
pressure warning light (in the instrument panel)
or the LOW PRESSURE information screen (on
the display) . This system will activate only when
the vehicle is driven at speeds above 16 MPH
(25 km/h). (
“Low tire pressure warning
light” page 2-27) (“Tire Pressure Monitor-
ing System (TPMS)” page 5-4)
WARNING
. If the low tire pressure warning light
illuminates or LOW PRESSURE in-
formation is displayed on the moni-
tor screen while driving, avoid
sudden steering maneuvers or
abrupt braking, reduce vehicle
speed, pull off the road to a safe
location and stop the vehicle as
soon as possible. Driving with un-
der-inflated tires may permanently damage the tires and increase the
likelihood of tire failure. Serious
vehicle damage could occur and
may lead to an accident and could
result in serious personal injury.
Check the tire pressure for all four
tires. Adjust the tire pressure to the
recommended COLD tire pressure
shown on the Tire and Loading
Information label to turn the low
tire pressure warning light off. If the
light still illuminates while driving
after adjusting the tire pressure, a
tire may be flat.
. When a wheel is replaced, the TPMS
will not function and the low tire
pressure warning light will flash for
approximately 1 minute. The light
will remain on after 1 minute. Con-
tact a GT-R certified NISSAN dealer
as soon as possible for tire replace-
ment and/or system resetting.
. Replacing tires with those not ori-
ginally specified by NISSAN could
affect the proper operation of the
TPMS.
. Do not inject any tire liquid or
aerosol tire sealant into the tires,
In case of emergency6-3
EMERGENCY ENGINE SHUT OFF FLAT TIRE
Page 257 of 354
6-6In case of emergency
remove rings, metal bands, or any
other jewelry. Do not lean over the
battery when jump starting.
. Do not attempt to jump start a
frozen battery. It could explode
and cause serious injury.
. Your vehicle has an automatic en-
gine cooling fan. It could come on at
any time. Keep hands and other
objects away from it.
WARNING
Always follow the instructions below.
Failure to do so could result in damage
to the charging system and cause
personal injury. 1. If the booster battery is in another vehicle
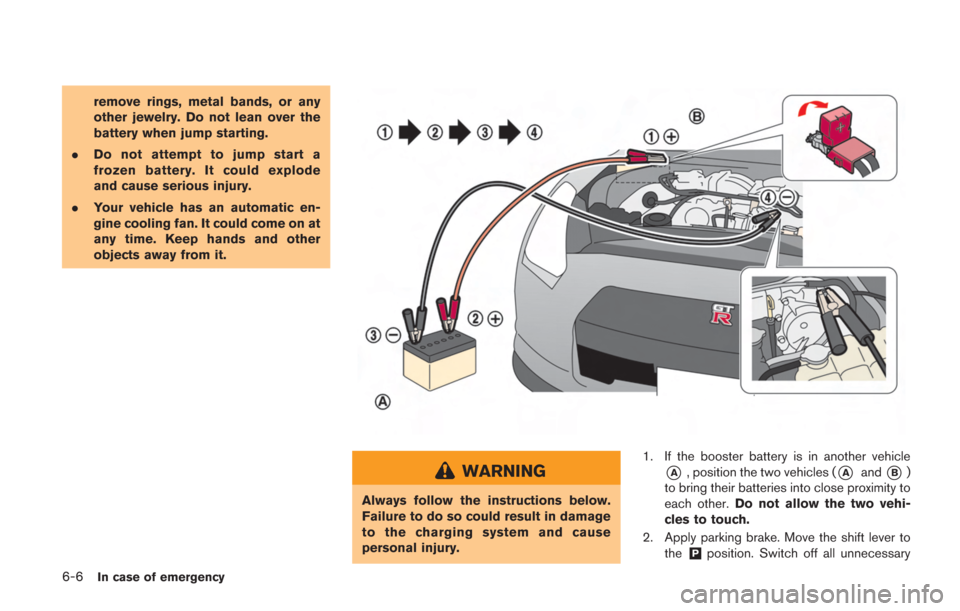
*A, position the two vehicles (*Aand*B)
to bring their batteries into close proximity to
each other. Do not allow the two vehi-
cles to touch.
2. Apply parking brake. Move the shift lever to the
&Pposition. Switch off all unnecessary
Page 259 of 354
6-8In case of emergency
WARNING
.Do not continue to drive if your
vehicle overheats. Doing so could
cause engine damage or a vehicle
fire.
. To avoid the danger of being
scalded, never remove the radiator
filler cap and the coolant reservoir
cap while the engine is still hot.
When the cap is removed, pressur-
ized hot water will spurt out, possi-
bly causing serious injury.
. Do not open the hood if steam is
coming out.
If your vehicle is overheating (indicated by an
extremely high temperature gauge reading) , or if
you feel a lack of engine power, detect unusual
noise, etc., take the following steps:
1. Move the vehicle safely off the road, apply the parking brake and move the shift lever to
the
&Pposition.
Do not stop the engine.
2. Turn off the air conditioner. Open all the windows, move the temperature control to
maximum hot and fan control to high speed. 3. If engine overheating is caused by climbing
a long hill on a hot day, run the engine at a
fast idle (approximately 1,500 rpm) until the
temperature gauge indication returns to
normal.
4. Get out of the vehicle. Look and listen for steam or coolant escaping from the radiator
before opening the hood. (If steam or
coolant is escaping, turn off the engine.)
Do not open the hood further until no steam
or coolant can be seen.
5. Open the engine hood.
WARNING
If steam or water is coming from the
engine, stand clear to prevent getting
burned.
6. Visually check drive belts for damage or looseness. Also check if the cooling fan is
running. The radiator hoses and radiator
should not leak water. If coolant is leaking,
the drive belts are missing or loose, or the
cooling fan does not run, stop the engine.
WARNING
Be careful not to allow your hands, hair,
jewelry or clothing to come into contact
with, or get caught in, engine belts or
the engine cooling fan. The engine
cooling fan can start at any time.
7. When the coolant temperature gauge goes down to the midpoint, stop the engine and
wait until the gauge goes down further to
“C” (cold).
8. After the engine cools down, check the coolant level in the reservoir tank. Add
coolant to the reservoir, if necessary, after
opening the coolant reservoir cap with a
heavy cloth covering it. (
“Engine cool-
ing system” page 8-10)
9. Have your vehicle repaired at the nearest GT-R certified NISSAN dealer.
IF YOUR VEHICLE OVERHEATS
Page 313 of 354
8-42Maintenance and do-it-yourself
changer, cracks and deformation
may occur on the bead portion of
the tires meaning that the tires
cannot be reused.
. Make sure the tire valve stem cap is
installed and that the valve stem is
tight. When installing the cap, make
sure to tighten the cap by hand. If a
tool is used to tighten the cap, the
cap may be damaged.
WARNING
.The use of tires other than those
specified or the mixed use of tires of
different brands, construction (bias,
bias-belted, radial or run-flat) , or
tread patterns can adversely affect
the ride, braking, VDC system, hand-
ling, ground clearance, body-to-tire
clearance, tire chain clearance,
speedometer calibration, headlight
aim and bumper height. Some of
these effects may lead to accidents
and could result in serious personal
injury.
. If the wheels are changed for any
reason, always replace with wheels which have the same off-set dimen-
sion. Wheels of a different off-set
could cause premature tire wear,
degrade vehicle handling character-
istics, affect the VDC system and/or
cause interference with the brake
discs. Such interference can lead to
decreased braking efficiency and/or
early brake pad wear. (
“Wheels
and tires” page 9-9)
. When a wheel is replaced, tire
pressure will not be indicated, the
TPMS will not function and the low
tire pressure warning light will flash
for approximately 1 minute and
remain on after the 1 minute. Con-
tact a GT-R certified NISSAN dealer
as soon as possible for tire replace-
ment and/or system resetting.
. Replacing tires with those not ori-
ginally specified by NISSAN could
affect the proper operation of the
TPMS.
. Do not install a damaged or de-
formed wheel or tire even if it has
been repaired. Such wheels or tires
could have structural damage and
could fail without warning. .
Never use retread tires.
. For additional information regard-
ing tires, refer to “Important Tire
Safety Information” (US) or “Tire
Safety Information” (Canada) in the
Warranty Information Booklet.
. Always use tires of the specified
type, size, brand, construction (bias,
bias-belted, radial or run-flat) , and
tread pattern on all four wheels.
Failure to do so may result in a
circumference difference between
tires on the front and rear axles
which will cause excessive tire wear
and may damage the transmission,
transfer case and differential gears.
Wheel balance
Unbalanced wheels may affect vehicle handling
and tire life. Even with regular use, wheels can
get out of balance. Therefore, they should be
balanced as required.
Wheel balance service should be performed
with the wheels off the vehicle. Spin balancing
the rear wheels on the vehicle could lead to
mechanical damage.
For additional information regarding tires, refer