2014 NISSAN GT-R steering wheel
[x] Cancel search: steering wheelPage 208 of 354
NOTE:
.If the steering lock release malfunction
indicator appears on the vehicle infor-
mation display when the ignition
switch is pressed, press the ignition
switch again while gently turning the
steering wheel left and right.
(
“Steering lock release malfunc-
tion indicator” page 2-43)
. If the shift
&Pwarning appears on the
vehicle information display when the
ignition switch is pushed, the shift lever
is in any position except the
&Pposi-
tion. Move the shift lever to the&P
position. (“Shift “P” warning”
page 2-43)
. If the Intelligent Key battery discharge
indicator appears on the vehicle infor-
mation display, the Intelligent Key
battery is discharged and the ignition
switch will not operate. Insert the
Intelligent Key into the key port to
operate the ignition switch.
(
“Intelligent Key battery discharge
indicator” page 2-44)
. When all of the following conditions
are met for 60 minutes, the battery
saver system will cut off the power
supply to prevent battery discharge. —
The ignition switch is in the ACC
position, and
— All doors are closed, and
— The shift lever is in the
&Pposition.
. Do not leave the vehicle with the
ignition switch in the ACC or ON
position when the engine is not run-
ning for an extended period of time.
This can discharge the battery.
EMERGENCY ENGINE SHUT OFF
To shut off the engine in an emergency situation
while driving, perform the following procedure:
.Rapidly push the push-button ignition switch
3 consecutive times in less than 1.5
seconds, or
. Push and hold the push button ignition
switch for more than 2 seconds.
INTELLIGENT KEY BATTERY DIS-
CHARGE
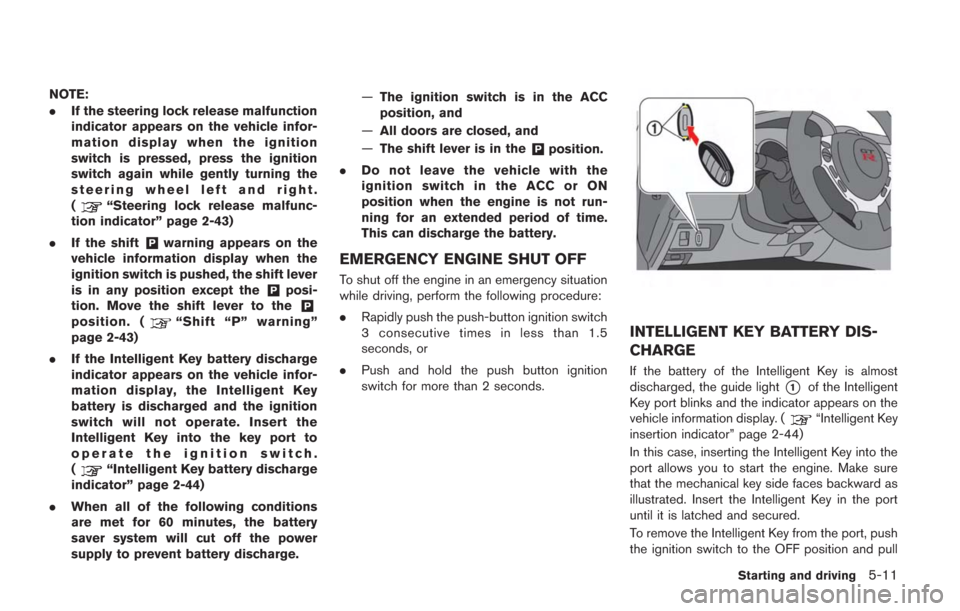
If the battery of the Intelligent Key is almost
discharged, the guide light
*1of the Intelligent
Key port blinks and the indicator appears on the
vehicle information display. (
“Intelligent Key
insertion indicator” page 2-44)
In this case, inserting the Intelligent Key into the
port allows you to start the engine. Make sure
that the mechanical key side faces backward as
illustrated. Insert the Intelligent Key in the port
until it is latched and secured.
To remove the Intelligent Key from the port, push
the ignition switch to the OFF position and pull
Starting and driving5-11
Page 210 of 354
.Make sure the area around the vehicle is
clear.
. Check fluid levels such as engine oil, cool-
ant, brake fluid and window washer fluid as
frequently as possible, or at least whenever
you refuel.
. Check that all windows and lights are clean.
. Visually inspect tires for their appearance
and condition. Also check tires for proper
inflation.
. Lock all doors.
. Position seat.
. Adjust inside and outside mirrors.
. Fasten seat belts and ask all passengers to
do likewise.
. Check the operation of warning lights when
the ignition switch is pushed to the ON
position. (
“Warning/indicator lights
and audible reminders” page 2-25)
NOTE:
. This vehicle includes spark plugs that
are designed for maximum perfor-
mance. If the start time becomes long-
er, the plugs may be fouled, making the
engine difficult to start. If this occurs,
start the engine using the procedure
described in this section.
. A click sound may be heard when the
brake pedal is depressed and released.
This is normal.
. A low rattling operating sound may
occur when the engine is started or
stopped. This is because of the trans-
mission gear design, light flywheel and
dry sump lubrication system used in
this transmission. This does not indi-
cate that there is a malfunction. This
sound is likely to occur in particular if
the engine is stopped when the tem-
perature of the transmission oil is high.
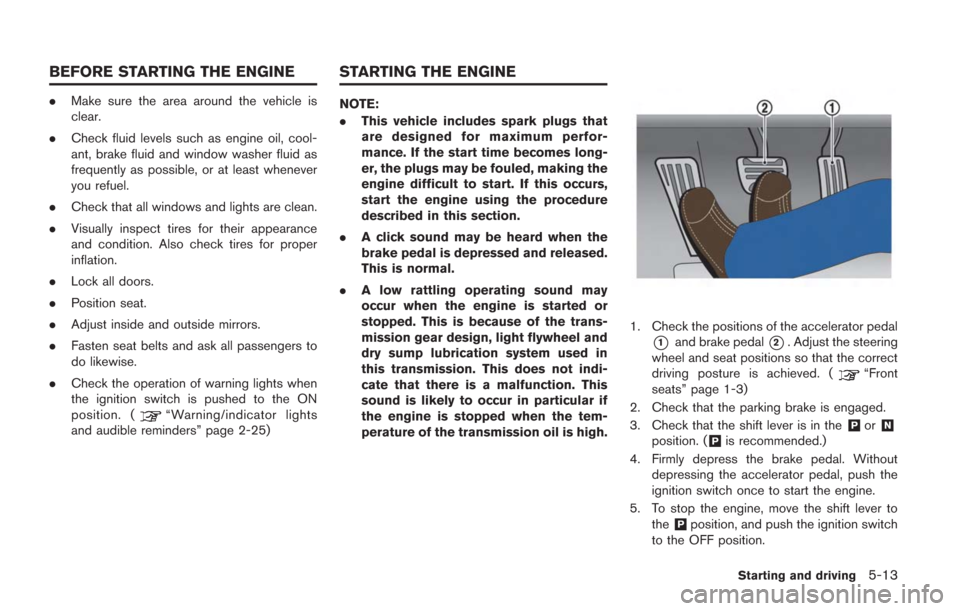
1. Check the positions of the accelerator pedal
*1and brake pedal*2. Adjust the steering
wheel and seat positions so that the correct
driving posture is achieved. (
“Front
seats” page 1-3)
2. Check that the parking brake is engaged.
3. Check that the shift lever is in the
&Por&N
position. (&Pis recommended.)
4. Firmly depress the brake pedal. Without depressing the accelerator pedal, push the
ignition switch once to start the engine.
5. To stop the engine, move the shift lever to the
&Pposition, and push the ignition switch
to the OFF position.
Starting and driving5-13
BEFORE STARTING THE ENGINE STARTING THE ENGINE
Page 216 of 354
Shift lock release
If the battery charge is low or discharged, the
shift lever may not be moved from the&P
position even with the brake pedal depressed
and the shift lever button pushed.
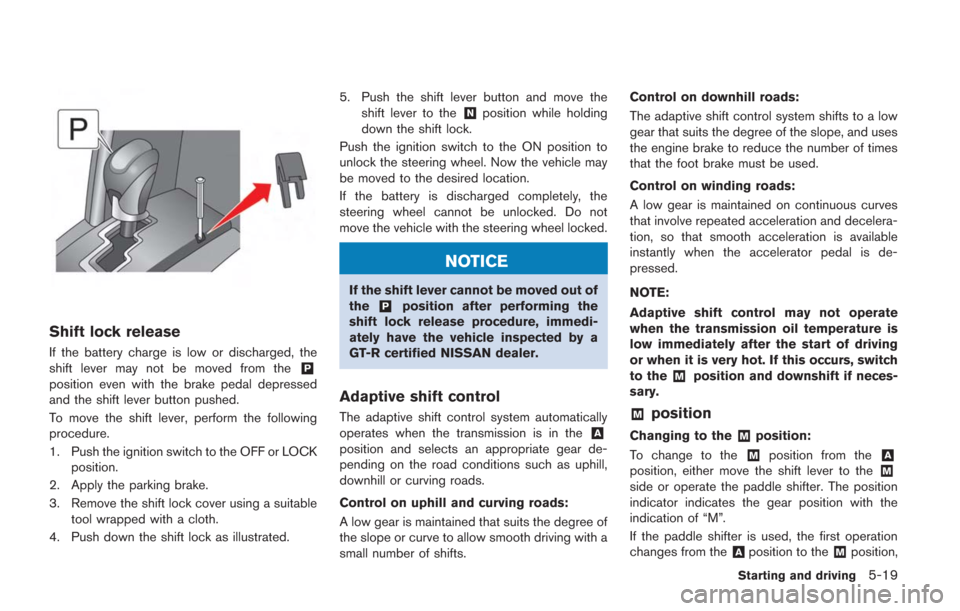
To move the shift lever, perform the following
procedure.
1. Push the ignition switch to the OFF or LOCKposition.
2. Apply the parking brake.
3. Remove the shift lock cover using a suitable tool wrapped with a cloth.
4. Push down the shift lock as illustrated. 5. Push the shift lever button and move the
shift lever to the
&Nposition while holding
down the shift lock.
Push the ignition switch to the ON position to
unlock the steering wheel. Now the vehicle may
be moved to the desired location.
If the battery is discharged completely, the
steering wheel cannot be unlocked. Do not
move the vehicle with the steering wheel locked.
NOTICE
If the shift lever cannot be moved out of
the&Pposition after performing the
shift lock release procedure, immedi-
ately have the vehicle inspected by a
GT-R certified NISSAN dealer.
Adaptive shift control
The adaptive shift control system automatically
operates when the transmission is in the&A
position and selects an appropriate gear de-
pending on the road conditions such as uphill,
downhill or curving roads.
Control on uphill and curving roads:
A low gear is maintained that suits the degree of
the slope or curve to allow smooth driving with a
small number of shifts. Control on downhill roads:
The adaptive shift control system shifts to a low
gear that suits the degree of the slope, and uses
the engine brake to reduce the number of times
that the foot brake must be used.
Control on winding roads:
A low gear is maintained on continuous curves
that involve repeated acceleration and decelera-
tion, so that smooth acceleration is available
instantly when the accelerator pedal is de-
pressed.
NOTE:
Adaptive shift control may not operate
when the transmission oil temperature is
low immediately after the start of driving
or when it is very hot. If this occurs, switch
to the
&Mposition and downshift if neces-
sary.
&Mposition
Changing to the&Mposition:
To change to the
&Mposition from the&A
position, either move the shift lever to the&M
side or operate the paddle shifter. The position
indicator indicates the gear position with the
indication of “M”.
If the paddle shifter is used, the first operation
changes from the
&Aposition to the&Mposition,
Starting and driving5-19
Page 226 of 354
Vehicle Dynamic Control (VDC)
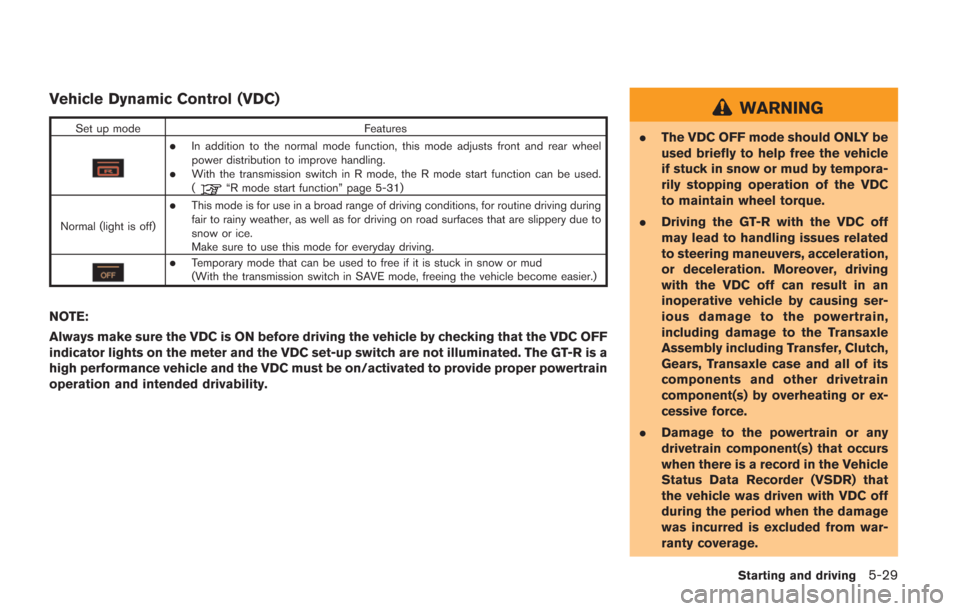
Set up modeFeatures
.In addition to the normal mode function, this mode adjusts front and rear wheel
power distribution to improve handling.
.With the transmission switch in R mode, the R mode start function can be used.
(“R mode start function” page 5-31)
Normal (light is off)
.This mode is for use in a broad range of driving conditions, for routine driving during
fair to rainy weather, as well as for driving on road surfaces that are slippery due to
snow or ice.
Make sure to use this mode for everyday driving.
.Temporary mode that can be used to free if it is stuck in snow or mud
(With the transmission switch in SAVE mode, freeing the vehicle become easier.)
NOTE:
Always make sure the VDC is ON before driving the vehicle by checking that the VDC OFF
indicator lights on the meter and the VDC set-up switch are not illuminated. The GT-R is a
high performance vehicle and the VDC must be on/activated to provide proper powertrain
operation and intended drivability.
WARNING
. The VDC OFF mode should ONLY be
used briefly to help free the vehicle
if stuck in snow or mud by tempora-
rily stopping operation of the VDC
to maintain wheel torque.
. Driving the GT-R with the VDC off
may lead to handling issues related
to steering maneuvers, acceleration,
or deceleration. Moreover, driving
with the VDC off can result in an
inoperative vehicle by causing ser-
ious damage to the powertrain,
including damage to the Transaxle
Assembly including Transfer, Clutch,
Gears, Transaxle case and all of its
components and other drivetrain
component(s) by overheating or ex-
cessive force.
. Damage to the powertrain or any
drivetrain component(s) that occurs
when there is a record in the Vehicle
Status Data Recorder (VSDR) that
the vehicle was driven with VDC off
during the period when the damage
was incurred is excluded from war-
ranty coverage.
Starting and driving5-29
Page 231 of 354
5-34Starting and driving
PRECAUTIONS ON CRUISE CON-
TROL
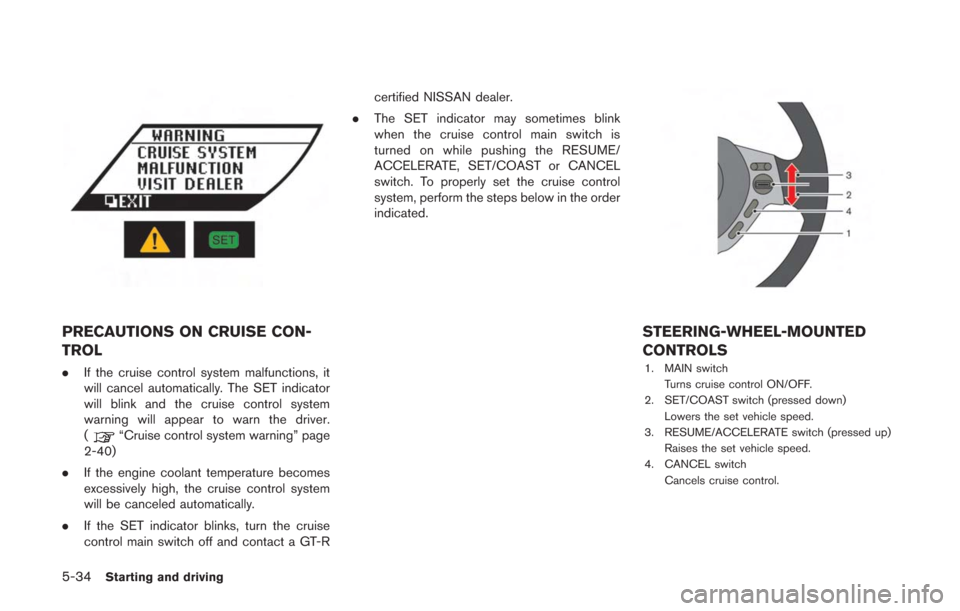
.If the cruise control system malfunctions, it
will cancel automatically. The SET indicator
will blink and the cruise control system
warning will appear to warn the driver.
(
“Cruise control system warning” page
2-40)
. If the engine coolant temperature becomes
excessively high, the cruise control system
will be canceled automatically.
. If the SET indicator blinks, turn the cruise
control main switch off and contact a GT-R certified NISSAN dealer.
. The SET indicator may sometimes blink
when the cruise control main switch is
turned on while pushing the RESUME/
ACCELERATE, SET/COAST or CANCEL
switch. To properly set the cruise control
system, perform the steps below in the order
indicated.
STEERING-WHEEL-MOUNTED
CONTROLS
1. MAIN switch
Turns cruise control ON/OFF.
2. SET/COAST switch (pressed down) Lowers the set vehicle speed.
3. RESUME/ACCELERATE switch (pressed up) Raises the set vehicle speed.
4. CANCEL switch
Cancels cruise control.
Page 235 of 354
5-38Starting and driving
hill start assist will stop operating completely.
Hill start assist will not operate when the shift
lever is moved to the
&Nor&Pposition or on a
flat and level road.
NOTE:
This system does not function when the
Vehicle Dynamic Control VDC) system
warning appears on the vehicle informa-
tion display located in the tachometer.
(
“Vehicle Dynamic Control (VDC) sys-
tem warning” page 2-37)
NOTICE
Follow these recommendations to ob-
tain maximum engine performance and
ensure the future reliability and econo-
my of your new vehicle. Failure to
follow these recommendations may
result in shortened engine life and
reduced vehicle performance.
Please observe the following types of driving
until the mileage shown below has been
reached.
Until 300 miles (500 km):
. Do not depress the accelerator pedal more
than halfway and avoid rapid acceleration.
. Drive with the engine speed kept at less
than 3,500 RPM.
. Avoid unnecessary quick steering, abrupt
braking and driving on poor roads.
300 to 600 miles (500 to 1,000 km)
. Avoid rapid acceleration in a low gear (1st to
3rd gears) with the accelerator pedal fully
depressed. Depress the pedal slowly.
. Avoid unnecessary quick steering and
abrupt braking. .
Drive with the suspension setup switch in
the COMF mode to allow more suspension
stroke.
600 to 1,200 miles (1,000 to 2,000 km)
. Drive with the engine speed kept relatively
high with the shift lever in the
&Mposition.
Shifting is recommended between 1st and
4th gears.
. Avoid unnecessary quick steering and
abrupt braking.
. Drive with the suspension setup switch in
the COMF mode to allow more suspension
stroke.
Even though the mileage reaches over 1,200
miles (2,000 km) , the clutch may take longer to
properly engage if the vehicle is mainly driven in
town at a low speed. NISSAN recommends
breaking in the clutch at a GT-R certified
NISSAN dealer.
WHEEL ALIGNMENT
Do not adjust the wheel alignment until the
mileage reaches 1,000 miles (1,600 km). Until
then, the suspension may not engage enough
and the height may be higher.
However, make sure to adjust the alignment
after 1,000 miles (1,600 km) .
The wheel alignment can be adjusted by a GT-R
BREAK-IN SCHEDULE
Page 239 of 354
5-42Starting and driving
TIGHT CORNER BRAKING PHE-
NOMENON
If the steering wheel is turned more than half a
turn when the vehicle is started when it is cold, it
may be harder to move the vehicle forward and
backward. This phenomenon is known as the
“tight corner braking phenomenon”.
This phenomenon is unique to AWD vehicles,
and occurs due to a difference in speeds
between the front and rear wheels while the
vehicle is turning. This does not indicate that
there is a malfunction.
NOTE:
If the tight corner braking phenomenon
occurs, a slipping sound may be heard
from the tires, or a squeaking sound may
be heard from the drive system.
Reducing tight corner braking phe-
nomenon
The tight corner braking phenomenon can be
temporarily reduced.
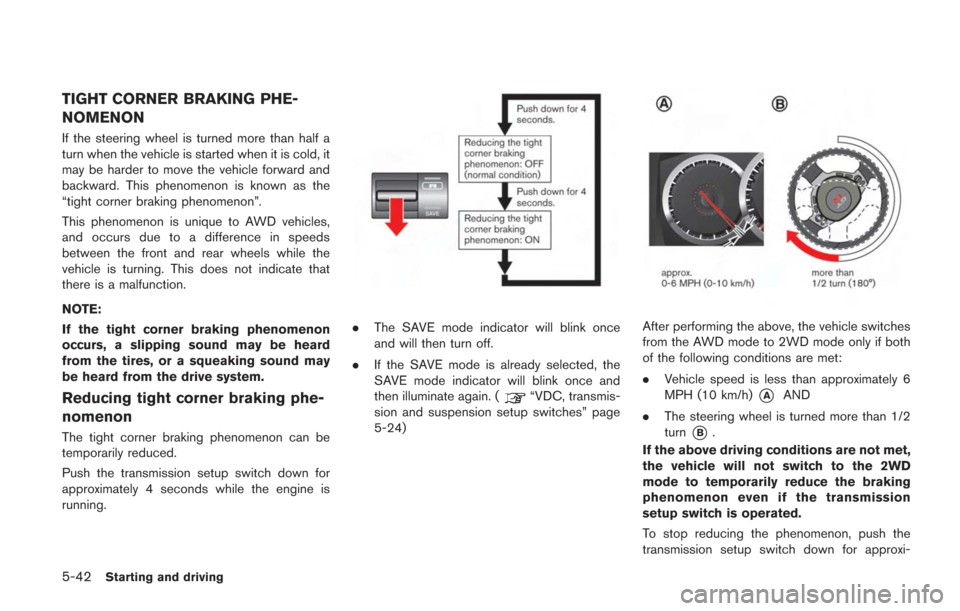
Push the transmission setup switch down for
approximately 4 seconds while the engine is
running.
.The SAVE mode indicator will blink once
and will then turn off.
. If the SAVE mode is already selected, the
SAVE mode indicator will blink once and
then illuminate again. (
“VDC, transmis-
sion and suspension setup switches” page
5-24)
After performing the above, the vehicle switches
from the AWD mode to 2WD mode only if both
of the following conditions are met:
. Vehicle speed is less than approximately 6
MPH (10 km/h)
*AAND
. The steering wheel is turned more than 1/2
turn
*B.
If the above driving conditions are not met,
the vehicle will not switch to the 2WD
mode to temporarily reduce the braking
phenomenon even if the transmission
setup switch is operated.
To stop reducing the phenomenon, push the
transmission setup switch down for approxi-
Page 241 of 354
5-44Starting and driving
The rear final drive of this vehicle is equipped
with a 1.5-way mechanical Limited Slip Differ-
ential (LSD) .
WARNING
Sudden operation of the accelerator
pedal can result in fishtailing or side-
slip, possibly causing an accident. Use
particular caution when driving in rainy
weather or on slippery roads.
NOTICE
Use the designated differential gear oil.
If any oil other than the designated oil
is used, the LSD may not operate
correctly, and noise and vibration may
occur, possibly resulting in a malfunc-
tion.
NOTE:
. If the vehicle accelerates from a stop
with the steering wheel turned in cold
temperatures, the inner wheel tire may
slip and some noise or vibration may
be heard. This phenomenon is unique
to vehicles equipped with the LSD. This does not indicate that there is a mal-
function.
. The LSD controls the speed difference
between the left and right wheels, and
optimally allocates torque to the
wheels.
. The 1.5-way mechanical LSD in the rear
final drive of this vehicle is character-
ized by its asymmetrical LSD effects
when the accelerator pedal is ON and
when it is OFF. This allows the appro-
priate amount of torque for the driving
environment to be transmitted to the
road surface.
LIMITED SLIP DIFFERENTIAL (LSD)