2014 NISSAN GT-R tow
[x] Cancel search: towPage 235 of 354
5-38Starting and driving
hill start assist will stop operating completely.
Hill start assist will not operate when the shift
lever is moved to the
&Nor&Pposition or on a
flat and level road.
NOTE:
This system does not function when the
Vehicle Dynamic Control VDC) system
warning appears on the vehicle informa-
tion display located in the tachometer.
(
“Vehicle Dynamic Control (VDC) sys-
tem warning” page 2-37)
NOTICE
Follow these recommendations to ob-
tain maximum engine performance and
ensure the future reliability and econo-
my of your new vehicle. Failure to
follow these recommendations may
result in shortened engine life and
reduced vehicle performance.
Please observe the following types of driving
until the mileage shown below has been
reached.
Until 300 miles (500 km):
. Do not depress the accelerator pedal more
than halfway and avoid rapid acceleration.
. Drive with the engine speed kept at less
than 3,500 RPM.
. Avoid unnecessary quick steering, abrupt
braking and driving on poor roads.
300 to 600 miles (500 to 1,000 km)
. Avoid rapid acceleration in a low gear (1st to
3rd gears) with the accelerator pedal fully
depressed. Depress the pedal slowly.
. Avoid unnecessary quick steering and
abrupt braking. .
Drive with the suspension setup switch in
the COMF mode to allow more suspension
stroke.
600 to 1,200 miles (1,000 to 2,000 km)
. Drive with the engine speed kept relatively
high with the shift lever in the
&Mposition.
Shifting is recommended between 1st and
4th gears.
. Avoid unnecessary quick steering and
abrupt braking.
. Drive with the suspension setup switch in
the COMF mode to allow more suspension
stroke.
Even though the mileage reaches over 1,200
miles (2,000 km) , the clutch may take longer to
properly engage if the vehicle is mainly driven in
town at a low speed. NISSAN recommends
breaking in the clutch at a GT-R certified
NISSAN dealer.
WHEEL ALIGNMENT
Do not adjust the wheel alignment until the
mileage reaches 1,000 miles (1,600 km). Until
then, the suspension may not engage enough
and the height may be higher.
However, make sure to adjust the alignment
after 1,000 miles (1,600 km) .
The wheel alignment can be adjusted by a GT-R
BREAK-IN SCHEDULE
Page 243 of 354
5-46Starting and driving
wheel gently touches the curb.
.HEADED UPHILL OR DOWNHILL, NO
CURB:
*3
Turn the wheels toward the side of the
road so the vehicle will move away from
the center of the road if it moves.
4. Push the ignition switch to the LOCK position.
The GT-R uses brake pad materials that have
high metallic content. The brake pad material
helps maintain braking performance in a wide
range of weather and driving conditions.
For the first 3,000 - 6,000 miles (5,000 -
10,000 km) of the vehicle’s service life, and for
the first 3,000 - 6,000 miles (5,000 - 10,000
km) after a brake replacement, the brake pad to
brake rotor clearance is very small. When
parking, apply the parking brake and move the
shift lever to the
&Pposition. Idle the engine for
more than 20 seconds without depressing the
brake pedal. This allows the brake pads to move
away from the rotor so the pad does not contact
the rotor.
Additionally, the brakes must be dry before
parking the vehicle after driving on wet roads or
after washing the vehicle. If the roads are wet,
lightly apply the brakes for a short distance
before parking the vehicle to dry the brakes.
After washing the vehicle, dry the brakes by driving on a dry road for a few miles and apply
the brakes normally based on traffic and road
conditions.
The metallic brake pads and brake disc rotor
may rust together when the brakes are not
applied:
.
If the vehicle is not idled for 20 seconds
without the brakes applied, or if the brakes
are applied when the vehicle is shut off, the
rotor and pads can rust together, even when
the brake pads are dry.
. If the brakes are wet when the vehicle is
parked and the parking brake is applied for a
long time.
Contact a GT-R certified NISSAN dealer if the
brake pads and brake rotor have rusted
together.
WARNING
If the engine is not running or is turned
off while driving, the power assist for
the steering will not work. Steering will
be harder to operate.
The power assisted steering uses a hydraulic
pump, driven by the engine, to assist steering.
If the engine stops or the drive belt breaks, you
will still have control of the vehicle. However,
much greater steering effort is needed, espe-
cially in sharp turns and at low speeds.
POWER STEERING
Page 252 of 354
6 In case of emergency
Hazard warning flasher switch ............................................. 6-2
Roadside assistance program .............................................. 6-2
Emergency engine shut off .................................................... 6-3
Flat tire ........................................................................\
................ 6-3Tire Pressure Monitoring System (TPMS) ................... 6-3
Run-flat tires ........................................................................\
6-4 Jump starting ........................................................................\
.... 6-5
Push starting ........................................................................\
..... 6-7
If your vehicle overheats ........................................................ 6-8
Towing your vehicle ................................................................ 6-9
Towing recommended by NISSAN ............................. 6-9
Vehicle recovery (freeing a stuck vehicle) .............. 6-10
Page 258 of 354
electrical systems (light, heater, air condi-
tioner, etc.).
3. Remove the battery cover. Cover the battery with a firmly wrung out moist cloth to reduce
explosion hazard.
4. Connect jumper cables in the sequence as illustrated (
*1?*2?*3?*4).
If the battery is disconnected or dis-
charged, the steering wheel will lock
and cannot be turned. Supply power
using jumper cables before pushing
the ignition switch and disengaging
the steering lock.
CAUTION
. Always connect positive (+) to posi-
tive (+) and negative (−) to body
ground (as illustrated) , not to the
battery.
. Make sure that the jumper cables
do not touch moving parts in the
engine compartment and that
clamps do not contact any other
metal.
5. Start the engine of the booster vehicle
*A
and let it run for a few minutes. 6. Keep the engine speed of the booster
vehicle
*Aat about 2,000 rpm, and start
the engine of the vehicle being jump started
*B.
NOTE:
Do not keep the starter motor engaged
for more than 10 seconds. If the engine
does not start right away, push the
ignition switch to the OFF position and
wait 10 seconds before trying again.
7. After starting your engine, carefully discon- nect the negative cable and then the positive
cable (
*4?*3?*2?*1).
8. Be sure to dispose of the cloth used to cover the vent holes as it may be contami-
nated with corrosive acid.
9. Put the battery cover on.
NOTE:
If the clamp clip is difficult to connect to
the battery terminal, remove the cowl top
cover to make it easier. (
“Removing
the cowl top cover” page 8-9)
Do not attempt to start the engine by pushing.
NOTICE
Your NISSAN cannot be push-started or
tow-started. Attempting to do so may
cause transmission damage.
In case of emergency6-7
PUSH STARTING
Page 260 of 354
When towing your vehicle, all State (Provincial in
Canada) and local regulations for towing must
be followed. Incorrect towing equipment could
damage your vehicle. Towing instructions are
available from a GT-R certified NISSAN dealer.
Local service operators are familiar with the
applicable laws and procedures for towing. To
assure proper towing and to prevent accidental
damage to your vehicle, NISSAN recommends
that you have a service operator tow your
vehicle. It is advisable to have the service
operator carefully read the following precau-
tions.
WARNING
.Never ride in a vehicle that is being
towed.
. Never get under your vehicle after it
has been lifted by a tow truck.
CAUTION
Always attach safety chains before
towing.
TOWING RECOMMENDED BY
NISSAN
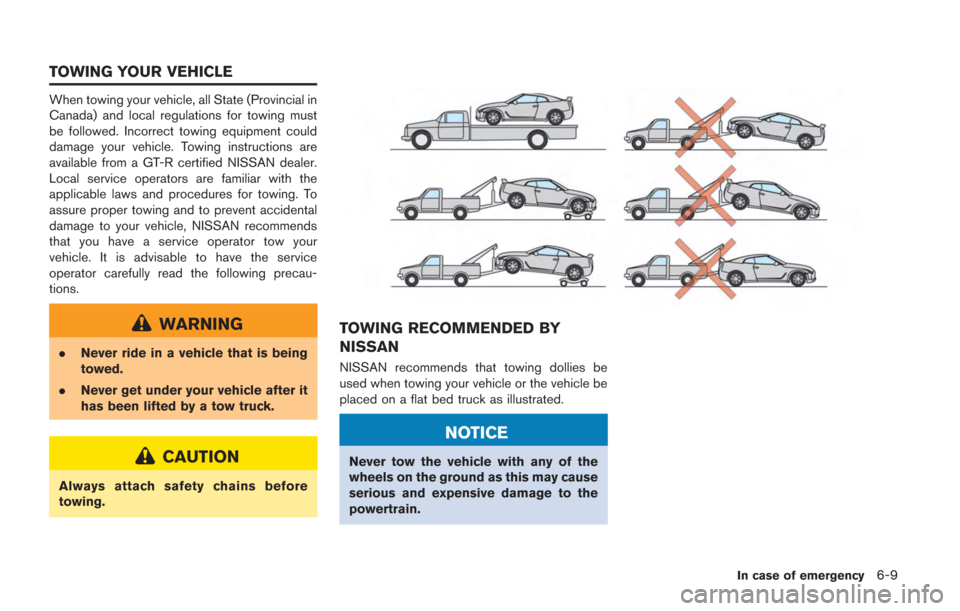
NISSAN recommends that towing dollies be
used when towing your vehicle or the vehicle be
placed on a flat bed truck as illustrated.
NOTICE
Never tow the vehicle with any of the
wheels on the ground as this may cause
serious and expensive damage to the
powertrain.
In case of emergency6-9
TOWING YOUR VEHICLE
Page 261 of 354
6-10In case of emergency
FrontRear
VEHICLE RECOVERY (freeing a
stuck vehicle)
WARNING
.Stand clear of a stuck vehicle.
. Do not spin your tires at high speed.
This could cause them to explode
and result in serious injury. Parts of
your vehicle could also overheat
and be damaged.
Pulling a stuck vehicle
If your vehicle is stuck in sand, snow, mud, etc.,
use a tow strap or other device designed
specifically for vehicle recovery. Always follow
the manufacturer’s instructions for the recovery
device.
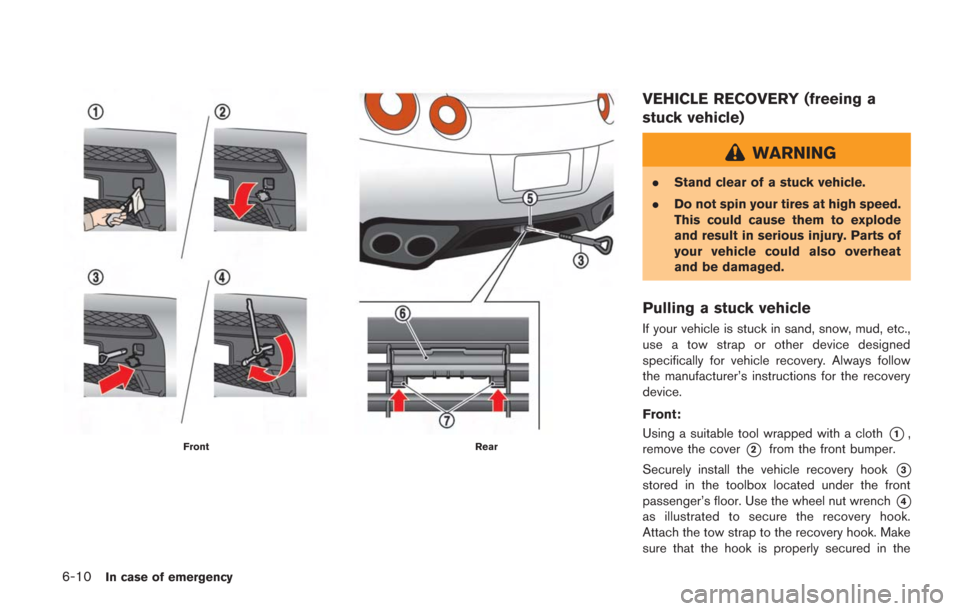
Front:
Using a suitable tool wrapped with a cloth
*1,
remove the cover
*2from the front bumper.
Securely install the vehicle recovery hook
*3
stored in the toolbox located under the front
passenger’s floor. Use the wheel nut wrench
*4
as illustrated to secure the recovery hook.
Attach the tow strap to the recovery hook. Make
sure that the hook is properly secured in the
Page 262 of 354
original place after use.
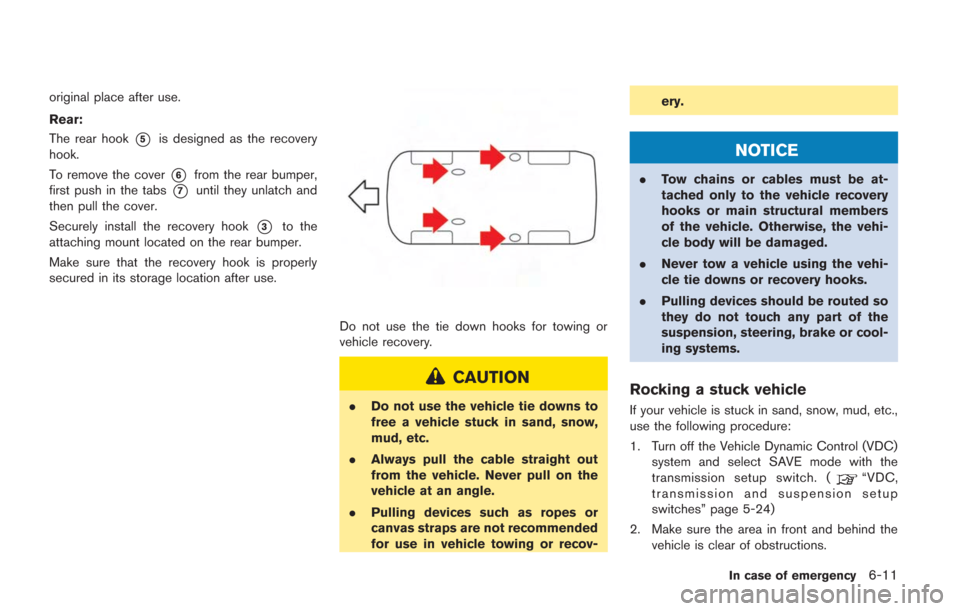
Rear:
The rear hook
*5is designed as the recovery
hook.
To remove the cover
*6from the rear bumper,
first push in the tabs
*7until they unlatch and
then pull the cover.
Securely install the recovery hook
*3to the
attaching mount located on the rear bumper.
Make sure that the recovery hook is properly
secured in its storage location after use.
Do not use the tie down hooks for towing or
vehicle recovery.
CAUTION
. Do not use the vehicle tie downs to
free a vehicle stuck in sand, snow,
mud, etc.
. Always pull the cable straight out
from the vehicle. Never pull on the
vehicle at an angle.
. Pulling devices such as ropes or
canvas straps are not recommended
for use in vehicle towing or recov- ery.
NOTICE
.
Tow chains or cables must be at-
tached only to the vehicle recovery
hooks or main structural members
of the vehicle. Otherwise, the vehi-
cle body will be damaged.
. Never tow a vehicle using the vehi-
cle tie downs or recovery hooks.
. Pulling devices should be routed so
they do not touch any part of the
suspension, steering, brake or cool-
ing systems.
Rocking a stuck vehicle
If your vehicle is stuck in sand, snow, mud, etc.,
use the following procedure:
1. Turn off the Vehicle Dynamic Control (VDC)
system and select SAVE mode with the
transmission setup switch. (
“VDC,
transmission and suspension setup
switches” page 5-24)
2. Make sure the area in front and behind the vehicle is clear of obstructions.
In case of emergency6-11
Page 263 of 354

6-12In case of emergency
3. Turn the steering wheel right and left to clearan area around the front tires.
4. Slowly rock the vehicle forward and back- ward.
.Shift back and forth between the&Rand
&A↔&Mpositions..Apply the accelerator as little as possible
to maintain the rocking motion.
.Release the accelerator pedal before
shifting between the&Rand&A↔&M
positions..Do not spin the tires above 35 MPH (55
km/h).
5. Turn on the Vehicle Dynamic Control (VDC) system.
6. If the vehicle cannot be freed after a few tries, contact a professional towing service
to remove the vehicle.