2014 NISSAN GT-R warning
[x] Cancel search: warningPage 288 of 354
.Keep the battery surface clean and dry.
Clean the battery with a solution of baking
soda and water.
. Make certain the terminal connections are
clean and securely tightened.
. If the vehicle is not to be used for 30 days or
longer, disconnect the negative (−) battery
terminal cable to prevent discharging it.
NOTE:
Care should be taken to avoid situations
that can lead to potential battery discharge
and potential no-start conditions such as:
1. Installation or extended use of electro-
nic accessories that consume battery
power when the engine is not running
(Phone chargers, GPS, DVD players,
etc.)
2. Vehicle is not driven regularly and/or
only driven short distances.
In these cases, the battery may need to be
charged to maintain battery health.PRECAUTIONS
NOTICE
When the battery cable is removed from
the battery terminal, do not close either
of the front doors. The automatic win-
dow adjusting function will not work,
and the side roof panel may be da-
maged.
To disconnect the negative (−) battery terminal,
perform the procedure in the following order.
Otherwise, the window and the side roof panel
may contact and be damaged.
1. Close the windows.
2. Open the hood.
3. Close and lock all the doors.
4. Disconnect the negative (−) battery terminal.
5. Securely close the hood.
To connect the negative (−) battery terminal,
perform the procedure in the following order.
Otherwise, the window and the side roof panel
may contact and be damaged.
1. Unlock and open the driver side door. Do not close the door.
2. Open the hood. 3. Connect the negative (−) battery terminal.
Then close the hood.
4. Fully open the driver side door window.
5. Close the driver side door and the window.
FLUID LEVEL CHECK
WARNING
. Do not expose the battery to flames
or electrical sparks. Hydrogen gas
generated by the battery is explo-
sive. Do not allow battery fluid to
contact your skin, eyes, fabrics, or
painted surfaces. After touching a
battery or battery cap, do not touch
or rub your eyes. Thoroughly wash
your hands. If the acid contacts your
eyes, skin or clothing, immediately
flush with water for at least 15
minutes and seek medical attention.
. Do not operate the vehicle if the
fluid in the battery is low. Low
battery fluid can cause a higher load
on the battery which can generate
heat, reduce battery life, and in
some cases lead to an explosion.
. When working on or near a battery,
always wear suitable eye protection
Maintenance and do-it-yourself8-17
BATTERY
Page 290 of 354
JUMP STARTING
If jump starting is necessary, see the following
section. (“Jump starting” page 6-5)
If the engine does not start by jump starting, the
battery may have to be replaced. Contact a
GT-R certified NISSAN dealer.
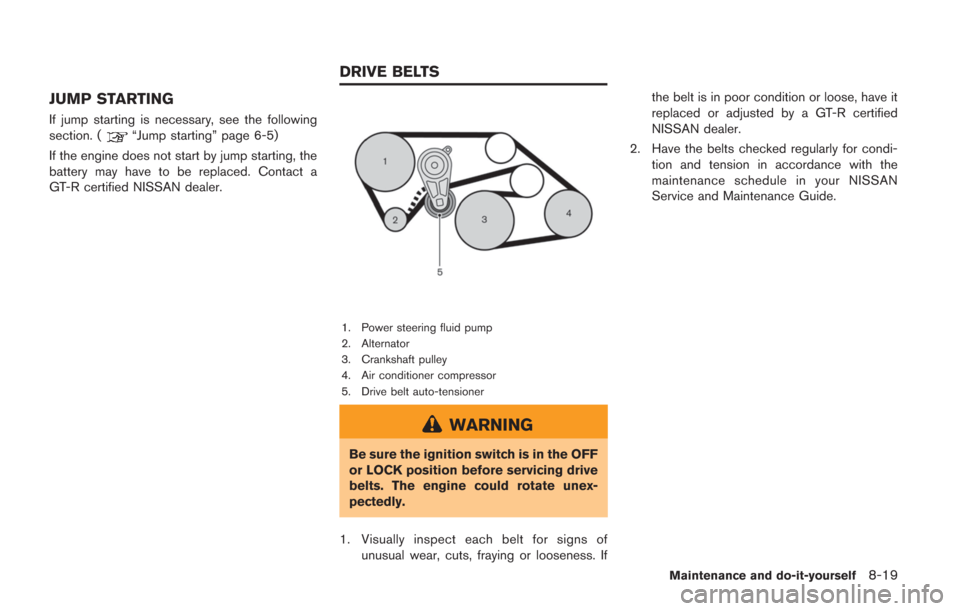
1. Power steering fluid pump
2. Alternator
3. Crankshaft pulley
4. Air conditioner compressor
5. Drive belt auto-tensioner
WARNING
Be sure the ignition switch is in the OFF
or LOCK position before servicing drive
belts. The engine could rotate unex-
pectedly.
1. Visually inspect each belt for signs of unusual wear, cuts, fraying or looseness. If the belt is in poor condition or loose, have it
replaced or adjusted by a GT-R certified
NISSAN dealer.
2. Have the belts checked regularly for condi- tion and tension in accordance with the
maintenance schedule in your NISSAN
Service and Maintenance Guide.
Maintenance and do-it-yourself8-19
DRIVE BELTS
Page 291 of 354
8-20Maintenance and do-it-yourself
WARNING
Be sure the engine and the ignition
switch are off and that the parking
brake is engaged securely.
NOTICE
Be sure to use the correct socket to
remove the spark plugs. An incorrect
socket can damage the spark plugs.
REPLACING SPARK PLUGS
If replacement is required, see a GT-R certified
NISSAN dealer for servicing.
Iridium-tipped spark plugs
It is not necessary to replace the iridium-tipped
spark plugs as frequently as the conventional
type spark plugs since they will last much longer.
Follow the maintenance schedule in NISSAN
Service and Maintenance Guide, but do not
reuse them by cleaning or regapping.
Always replace spark plugs with recom-
mended or equivalent ones.
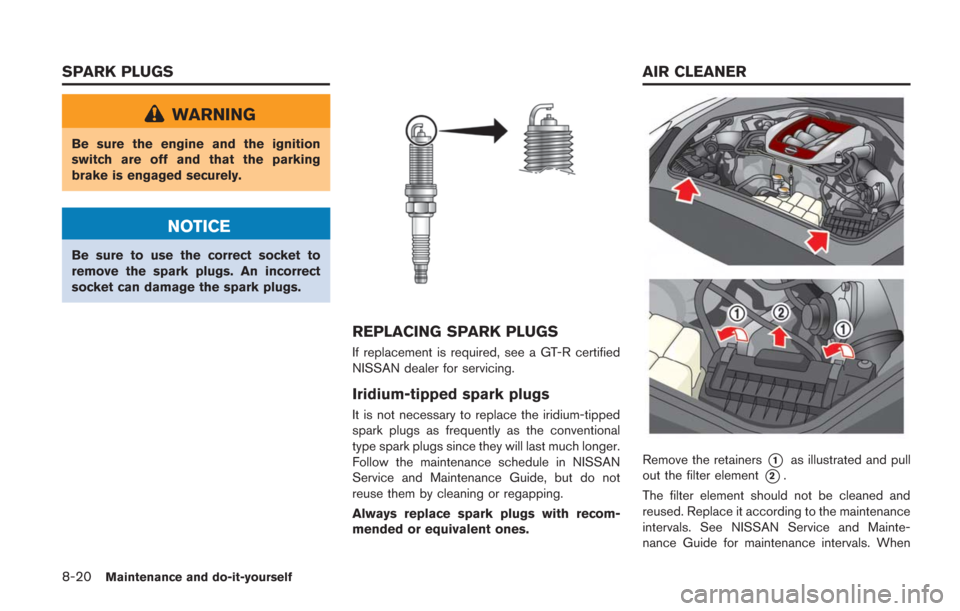
Remove the retainers*1as illustrated and pull
out the filter element
*2.
The filter element should not be cleaned and
reused. Replace it according to the maintenance
intervals. See NISSAN Service and Mainte-
nance Guide for maintenance intervals. When
SPARK PLUGS AIR CLEANER
Page 292 of 354
replacing the filter, wipe the inside of the air
cleaner housing and the cover with a damp
cloth.
WARNING
.Operating the engine with the air
cleaner removed can cause you or
others to be burned. The air cleaner
not only cleans the air, it stops
flame if the engine backfires. If it
isn’t there, and the engine backfires,
you could be burned. Do not drive
with the air cleaner removed, and be
careful when working on the engine
with the air cleaner removed.
. Never pour fuel into the throttle
body or attempt to start the engine
with the air cleaner removed. Doing
so could result in serious injury.
CLEANING
If your windshield is not clear after using the
windshield washer or if a wiper blade chatters
when running, wax or other material may be on
the blade or windshield.
Clean the outside of the windshield with a
washer solution or a mild detergent. Your
windshield is clean if beads do not form when
rinsing with clear water.
Clean each blade by wiping it with a cloth
soaked in a washer solution or a mild detergent.
Then rinse the blade with clear water. If your
windshield is still not clear after cleaning the
blades and using the wiper, replace the blades.
CAUTION
Worn windshield wiper blades can
damage the windshield and impair
driver vision.
Maintenance and do-it-yourself8-21
WINDSHIELD WIPER BLADES
Page 294 of 354
If the brakes do not operate properly, have the
brakes checked by a GT-R certified NISSAN
dealer.
SELF-ADJUSTING BRAKES
Your vehicle is equipped with self-adjusting
brakes.
The disc-type brakes self-adjust every time the
brake pedal is applied.
WARNING
See a GT-R certified NISSAN dealer for
a brake system check if the brake pedal
height does not return to normal.
BRAKE PAD WEAR WARNING
The disc brake pads have audible wear warn-
ings. When a brake pad requires replacement, it
will make a high pitched scraping sound when
the vehicle is in motion. This scraping sound will
first occur only when the brake pedal is
depressed. After more wear of the brake pad,
the sound will always be heard even if the brake
pedal is not depressed. Have the brakes
checked as soon as possible if the wear warning
sound is heard.
Under some driving or climate conditions,occasional brake squeak, squeal or other noise
may be heard. Occasional brake noise during
light to moderate stops is normal and does not
affect the function or performance of the brake
system.
Proper brake inspection intervals should
be followed.
For additional information, see the
maintenance log section of your NISSAN
Service and Maintenance Guide for mainte-
nance intervals.
HIGH PERFORMANCE BRAKE SYS-
TEM
This vehicle is equipped with high performance
brake pads that provide appropriate braking
force in a broad range of driving environments.
Due to the material used for the brake pads, the
road wheels may become more easily covered
by brake dust, however this does not indicate
that there is a malfunction.
The GT-R brake pads use material that contains
a lot of iron to maintain steady braking perfor-
mance even in high and low temperatures.
However, if the brake system is wet and the
parking brake is applied for a long time, the iron
in this material may get rusty and the brake pad
and disc rotor may be fixed together. This may
cause noise and vibration while driving. Before
parking the vehicle, dry the brake by driving on a dry road, especially after washing the vehicle or
driving in rain. Contact a GT-R certified NISSAN
dealer if the noise and vibration continue.
Frequent hard braking may cause scorching of
the brake pads. This will require the brake pads
to be replaced, even if the wear limit has not
been reached. Have the brake pads and disc
rotors inspected at the regular vehicle inspec-
tions.
For more details, contact a GT-R certified
NISSAN dealer.
REPLACING THE BRAKE PADS
NISSAN generally recommends to replace all
four sets of brake pads and disc rotors at the
same time to maintain maximum brake perfor-
mance.
However, replacing only the brake pads may be
allowed in some cases (four wheels or only front
wheels depending on the conditions). A GT-R
certified technician must inspect the vehicle and
determine that only the brake pads need to be
replaced. In this case, replacing all brake pads
and disc rotors as a set is not necessary.
Note that the replacement of brake pads and the
disc rotors as a set on all four wheels should be
performed when a GT-R certified technician
determines that this is the correct repair.
Maintenance and do-it-yourself8-23
BRAKES
Page 298 of 354
WARNING
Be careful that batteries and other
removed components are not swal-
lowed by children.
NOTICE
There is the possibility that the key may
be damaged when the battery is re-
placed. It is recommended that you
have the battery replaced by a GT-R
certified NISSAN dealer.Recommended battery: Lithium battery CR2032
or an equivalent.
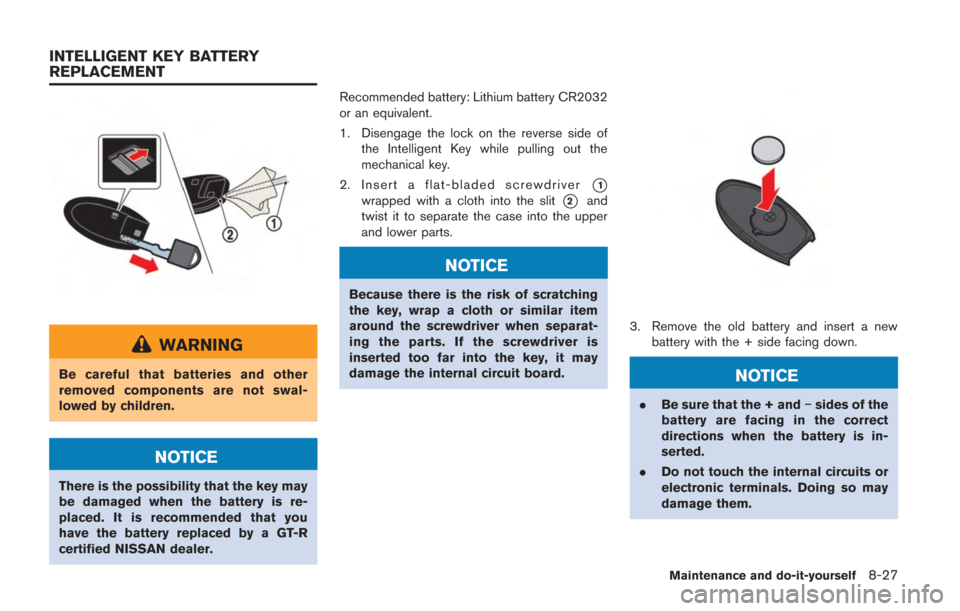
1. Disengage the lock on the reverse side of
the Intelligent Key while pulling out the
mechanical key.
2. Insert a flat-bladed screwdriver
*1
wrapped with a cloth into the slit*2and
twist it to separate the case into the upper
and lower parts.
NOTICE
Because there is the risk of scratching
the key, wrap a cloth or similar item
around the screwdriver when separat-
ing the parts. If the screwdriver is
inserted too far into the key, it may
damage the internal circuit board.
3. Remove the old battery and insert a new battery with the + side facing down.
NOTICE
.Be sure that the + and −sides of the
battery are facing in the correct
directions when the battery is in-
serted.
. Do not touch the internal circuits or
electronic terminals. Doing so may
damage them.
Maintenance and do-it-yourself8-27
INTELLIGENT KEY BATTERY
REPLACEMENT
Page 301 of 354
8-30Maintenance and do-it-yourself
HEADLIGHTS
Replacing
Xenon headlight bulb:
WARNING
HIGH VOLTAGE
When xenon headlights are on, they
produce a high voltage. To prevent an
electric shock, never attempt to modify
or disassemble. Always have your xe-
non headlights replaced at a GT-R
certified NISSAN dealer.
(
“Headlight and turn signal
switch” page 2-50)
Fog may temporarily form inside the lens of the
exterior lights in the rain or in a car wash. A
temperature difference between the inside and
the outside of the lens causes the fog. This does
not indicate that there is a malfunction. If large
drops of water collect inside the lens, contact a
GT-R certified NISSAN dealer.
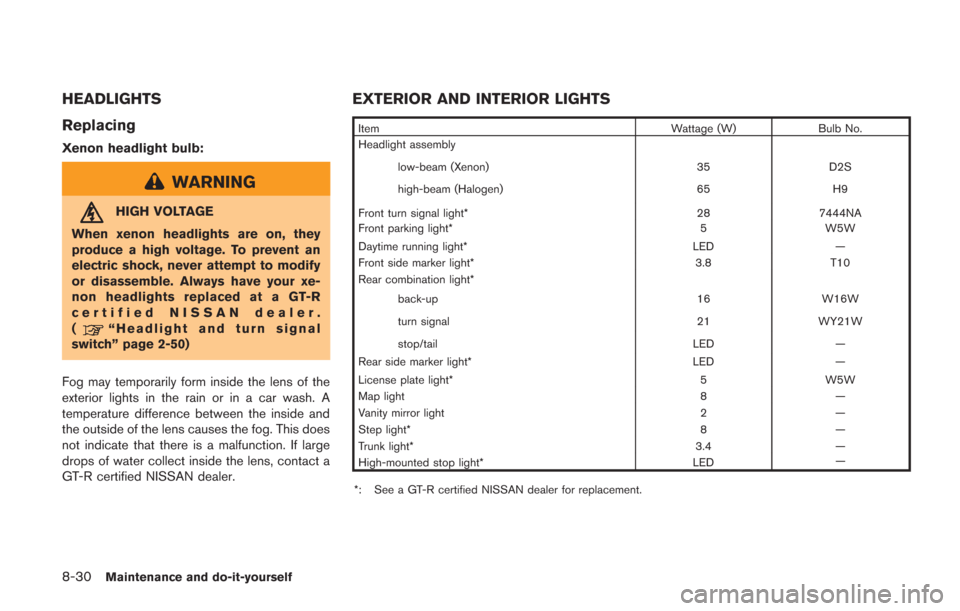
EXTERIOR AND INTERIOR LIGHTS
Item Wattage (W)Bulb No.
Headlight assembly
low-beam (Xenon) 35 D2S
high-beam (Halogen) 65 H9
Front turn signal light* 28 7444NA
Front parking light* 5 W5W
Daytime running light* LED —
Front side marker light* 3.8 T10
Rear combination light* back-up 16W16W
turn signal 21WY21W
stop/tail LED—
Rear side marker light* LED—
License plate light* 5W5W
Map light 8—
Vanity mirror light 2—
Step light* 8—
Trunk light* 3.4—
High-mounted stop light* LED—
*: See a GT-R certified NISSAN dealer for replacement.
Page 303 of 354
8-32Maintenance and do-it-yourself
If you have a flat tire, see the following
section. (“Flat tire” page 6-3)
CAUTION
A GT-R certified NISSAN dealer should
perform a tire change. It will be neces-
sary to reset the tire pressure sensors.
To change the tires, contact a GT-R
certified NISSAN dealer.
Be sure to use the tires and wheels together as
a set that are designated for use with this
vehicle.
When tire replacement is required, replacing the
tires as a set of four with new tires is
recommended. However, if a tire is punctured
or damaged, it may be possible to replace only
the damaged tire. Determining whether one tire
or a complete set of tires should be replaced is
based on a number of factors including tire wear
and condition. Contact your GT-R certified
NISSAN dealer. They can recommend if an
individual tire or a complete set should be
replaced.
NOTICE
Make sure the tire valve stem cap is
installed and that the valve stem is
tight. When installing the cap, make
sure to tighten the cap by hand. If a tool
is used to tighten the cap, the cap may
be damaged.
TIRE PRESSURE
Tire Pressure Monitoring System
(TPMS)
This vehicle is equipped with the Tire Pressure
Monitoring System (TPMS) . It monitors tire
pressure of all tires. When the low tire pressure
warning light is lit, one or more of your tires is
significantly under-inflated. The system also
displays pressure of all tires on the multi function
display by sending a signal from a sensor that is
installed in each wheel.
The TPMS will activate only when the vehicle is
driven at speeds above 16 MPH (25 km/h).
Also, this system may not detect a sudden drop
in tire pressure. (
“Low tire pressure warn-
ing light” page 2-27) (“Tire Pressure
Monitoring System (TPMS)” page 5-4)
(
“Flat tire” page 6-3)
Tire inflation pressure
Check the tire pressure often and always
prior to long distance trips. The recom-
mended tire pressure specifications are
shown on the F.M.V.S.S./C.M.V.S.S. label
or the Tire and Loading Information label (if
so equipped) under the “Cold Tire Pres-
sure” heading. The Tire and Loading
Information label is affixed to the driver
side door end. Tire pressures should be
checked regularly because:
.Most tires naturally lose air over time.
.Tires can lose air suddenly when driven
over potholes or other objects or if the
vehicle strikes a curb while parking.
NOTE:
. You can check the pressure of all four
tires on the multi function display. See
the separate Multi Function Display
Owner’s Manual.
. The tires of this vehicle are filled with
nitrogen gas. When the tire pressure is
low, fill the tires with nitrogen. Contact
a GT-R certified NISSAN dealer for
information on filling the tires with
nitrogen.
WHEELS AND TIRES