2014 NISSAN GT-R check engine light
[x] Cancel search: check engine lightPage 127 of 354
2-30Instruments and controls
.The supplemental air bag warning light
remains on after approximately 7 seconds.
. The supplemental air bag warning light
flashes intermittently.
. The supplemental air bag warning light does
not come on at all.
Unless checked and repaired, the supplemental
restraint system (air bag system) and/or the
pretensioners may not function properly.
(
“Supplemental restraint system” page 1-
34)
WARNING
If the supplemental air bag warning
light is on, it could mean that the front
air bag, side air bag, curtain air bag
and/or pretensioner systems will not
operate in an accident. To help avoid
injury to yourself or others, have your
vehicle checked by a GT-R certified
NISSAN dealer as soon as possible.
Transmission warning light
This light warns of the following malfunctions.
Transmission system malfunction:
The light blinks if a malfunction in the transmis-
sion system occurs. If the light blinks, certain
gear positions may become unusable, so that
the vehicle may become undrivable. Have the
system inspected promptly by a GT-R certified
NISSAN dealer.
Transmission oil temperature high:
The light illuminates if the transmission oil
temperature becomes unusually high. If the light
illuminates, avoid driving at high speed or at high
engine speed until the light turns off. The light
will turn off after a short period of time and the
vehicle can then be driven normally. If the light
illuminates frequently, contact a GT-R certified
NISSAN dealer.
NOTICE
If the light continues to illuminate, the
engine output may be reduced to pre-
vent transmission damage. Transmission clutch temperature high:
The light illuminates if clutch temperature
becomes unusually high. If the light illuminates,
pull off the road in a safe area and idle the
engine. When the light turns off, driving can be
resumed. If the light illuminates frequently,
contact a GT-R certified NISSAN dealer.
NOTICE
.
Continuing to drive with the light on
could cause serious damage to the
transmission.
. If the light continues to illuminate,
the vehicle cannot be driven be-
cause the engine output may be
reduced and the clutch may be
reduced to keep the clutch disen-
gaged.
R mode start function:
If the R mode start function is used 4 times
continuously, the function may be disabled and
cannot be turned on for protection. While the
function is disabled, the warning light illumi-
nates. When the warning light goes off, the
function can be used again. (
“R mode start
function” page 5-31)
Page 128 of 354
When the warning light illuminates, perform cool
down driving (driving 1.3 mile (2 km) in 5th or
6th gear at a speed of approximately 37 - 50
MPH (60 - 80 km/h) while checking the
temperature of the transmission oil until the
warning light goes off.
NOTICE
While the warning light is illuminated,
the engine output is controlled so that
it does not increase.
Vehicle Dynamic Control (VDC)
warning light
The light will blink when the VDC system or the
traction control system is operating, thus alerting
the driver that the vehicle is nearing its traction
limits. The road surface may be slippery.
If the VDC warning light illuminates when the
VDC system is turned on, this light alerts the
driver to the fact that the VDC system’s fail-safe
mode is operating, for example the VDC or hill
start assist system may not be functioning
properly. Have the system checked by a GT-R
certified NISSAN dealer. If a malfunction occurs
in the system, the VDC system function will be
canceled but the vehicle is still driveable. (
“Vehicle Dynamic Control (VDC) system”
page 5-49)
INDICATOR LIGHTS
Cruise main switch indicator
light
The light comes on when the cruise control is
pushed. The light turns off when the main switch
is pushed again. While the cruise control system
main switch indicator light is on, the cruise
control system is operational.
Cruise set switch indicator
light
The light comes on while the vehicle speed is
controlled by the cruise control system. If the
light blinks while the engine is running, it may
indicate the cruise control system is not
functioning properly. Have the system checked
by a GT-R certified NISSAN dealer.
Exterior light indicator
This indicator illuminates when the headlight
switch is turned to the AUTO,orposition and the front parking lights, instrument
panel lights, rear combination lights, license
plate lights or headlights are on. The indicator
turns off when these lights are turned off.
Front passenger air bag status
light
The front passenger air bag status light ()
will be lit and the passenger front air bag will be
OFF depending on how the front passenger
seat is being used. (
“NISSAN Advanced
Air Bag System (front seats)” page 1-40)
High beam indicator light
This light comes on when the headlight high
beam is on and goes out when the low beam is
selected.
Malfunction Indicator Light
(MIL)
If the malfunction indicator light comes on
steady or blinks while the engine is running, it
may indicate a potential emission control mal-
function.
The malfunction indicator light may also come on
steady if the fuel-filler cap is loose or missing, or
if the vehicle runs out of fuel. Check to make
sure the fuel-filler cap is installed and closed
tightly, and that the vehicle has at least 3 US
gallons (12 liters) of fuel in the fuel tank.
After a few driving trips, the
light should
turn off if no other potential emission control
system malfunction exists.
If this indicator light remains on for 20 seconds
Instruments and controls2-31
Page 129 of 354
2-32Instruments and controls
and then blinks for 10 seconds when the engine
is not running, it indicates that the vehicle is not
ready for an emission control system inspection/
maintenance test. (
“Readiness for Inspec-
tion/Maintenance (I/M) test (US only)” page 9-
20)
Operation:
The malfunction indicator light will come on in
one of two ways:
. Malfunction indicator light on steady — An
emission control system malfunction has
been detected. Check the fuel-filler cap. If
the fuel-filler cap is loose or missing, tighten
or install the cap and continue to drive the
vehicle. The
light should turn off after a
few driving trips. If thelight does not
turn off after a few driving trips, have the
vehicle inspected by a GT-R certified
NISSAN dealer. You do not need to have
your vehicle towed to the dealer.
. Malfunction indicator light blinking — An
engine misfire has been detected which may
damage the emission control system.
To reduce or avoid emission control system
damage:
a. Do not drive at speeds above 45 MPH
(72 km/h). b. Avoid hard acceleration or deceleration.
c. Avoid steep uphill grades.
d. If possible, reduce the amount of cargo
being hauled or towed.
The malfunction indicator light may stop
blinking and remain on.
Have the vehicle inspected by a GT-R
certified NISSAN dealer. You do not need
to have your vehicle towed to the dealer.
NOTICE
Continued vehicle operation without
having the emission control system
checked and repaired as necessary
could lead to poor driveability, reduced
fuel economy, and possible damage to
the emission control system.
Turn signal/hazard indicator
lights
The light flashes when the turn signal switch
lever or hazard switch is turned on.
Vehicle Dynamic Control (VDC)
off indicator light
The light comes on when the Vehicle Dynamic
Control (VDC) set up switch is pushed to OFF for more than 1 second. (
“VDC, transmis-
sion and suspension setup switches” page 5-
24)
This indicates that the vehicle dynamic control
system and traction control system are not
operating. (
“Vehicle Dynamic Control
(VDC) system” page 5-49)
AUDIBLE REMINDERS
Key reminder chime
A chime will sound if the driver side door is
opened while the ignition switch is pushed to
the ACC position or pushed to the OFF or
LOCK position with the Intelligent Key left in the
Intelligent Key port. Make sure the ignition
switch is pushed to the OFF position, and take
the Intelligent Key with you when leaving the
vehicle.
Light reminder chime
A chime will sound when the driver side door is
opened with the light switch in theorposition and the ignition switch in the ACC, OFF
or LOCK position.
Turn the light switch off when you leave the
vehicle.
Page 143 of 354
2-46Instruments and controls
5. Confirm that the security indicator lightcomes on. The security indicator light stays
on for about 30 seconds. The vehicle
security system is now pre-armed. After
about 30 seconds the vehicle security
system automatically shifts into the armed
phase. The security light begins to flash
once every approximately 3 seconds. If,
during this 30-second pre-arm time period,
the door is unlocked, or the ignition switch is
pushed to ACC or ON, the system will not
arm.
Even when the driver and/or passengers
are in the vehicle, the system will activate
with all doors, hood, and trunk lid locked
with the ignition switch in the LOCK
position. When pushing the ignition switch
to the ACC or ON position, the system will
be released.
Vehicle security system activation
The vehicle security system will give the follow-
ing alarm:
. The headlights blink and the horn sounds
intermittently.
. The alarm automatically turns off after
approximately 1 minute. However, the alarm
reactivates if the vehicle is tampered with
again. The alarm is activated by:
.
Opening the door or the trunk lid without
using the button on the Intelligent Key, the
door handle request switch or the mechan-
ical key. (Even if the door is opened by
releasing the door inside lock knob, the
alarm will activate.)
. Opening the hood.
How to stop an activated alarm
The alarm will stop by:
.Unlocking a door by pushing the UNLOCK
button on the Intelligent Key.
. Unlocking a door by pushing the door
handle request switch.
. Pushing the ignition switch to the ACC or
ON position.
If the system does not operate as de-
scribed above, have it checked by a GT-R
certified NISSAN dealer.
NISSAN VEHICLE IMMOBILIZER
SYSTEM
The NISSAN Vehicle Immobilizer System will not
allow the engine to start without the use of the
registered Intelligent Key. Never leave these
keys in the vehicle. FCC Notice:
For USA:
This device complies with Part 15 of the
FCC Rules. Operation is subject to the
following two conditions: (1) This device
may not cause harmful interference, and
(2) this device must accept any interfer-
ence received, including interference that
may cause undesired operation.
Note: Changes or modifications not ex-
pressly approved by the party responsible
for compliance could void the user’s
authority to operate the equipment.
For Canada:
This device complies with RSS-210 of
Industry Canada. Operation is subject to
the following two conditions: (1) this
device may not cause interference, and
(2) this device must accept any interfer-
ence, including interference that may
cause undesired operation of the device.
Page 151 of 354
2-54Instruments and controls
TURNING OFF THE HEATERS
Move the switch to the level position. The switch
indicator turns off.
WARNING
Do not use or allow occupants to use
the seat heater if you or the occupants
cannot monitor elevated seat tempera-
tures or have an inability to feel pain in
those body parts in contact with the
seat. Use of the seat heater by such
people could result in serious injury.
CAUTION
.Do not put anything on the seat
which insulates heat, such as a
blanket, cushion, seat cover, etc.
Otherwise, the seat may become
overheated.
. Do not place anything hard or heavy
on the seat or pierce it with a pin or
similar object. This may result in
damage to the heater.
. Any liquid spilled on the heated seat
should be removed immediately with a dry cloth.
. If any malfunctions are found or the
heated seat does not operate, turn
the switch off and have the system
checked by a GT-R certified NISSAN
dealer.
NOTICE
.The battery could run down if the
seat heater is operated while the
engine is not running.
. Do not use the seat heater for
extended periods or when no one
is using the seat.
. When cleaning the seat, never use
gasoline, thinner, or any similar
materials.
CAUTION
.The outlet and plug may be hot
during or immediately after use.
. Do not use with accessories that
exceed a 12 volt, 120W (10A) power
draw. Do not use double adapters or
more than one electrical accessory.
. This power outlet is not designed
for use with a cigarette lighter unit.
. Before inserting or disconnecting a
plug, be sure the electrical acces-
sory being used is turned OFF.
. When not in use, be sure to close
the cap. Do not allow water to
contact the outlet.
NOTICE
.Use power outlet with the engine
running to avoid discharging the
vehicle battery.
. Avoid using power outlet when the
air conditioner, headlights or rear
window defroster is on.
POWER OUTLETS
Page 169 of 354
3-4Pre-driving checks and adjustments
WARNING
.Always have the doors locked while
driving. Along with the use of seat
belts, this provides greater safety in
the event of an accident by helping
to prevent persons from being
thrown from the vehicle. This also
helps keep children and others from
unintentionally opening the doors,
and will help keep out intruders.
. Before opening any door, always
look for and avoid oncoming traffic.
. Do not leave children unattended
inside the vehicle. They could un-
knowingly activate switches or con-
trols. Unattended children could
become involved in serious acci-
dents.
CAUTION
To prevent theft or accidents, be sure to
stop the engine and lock the doors
before stepping away from the vehicle.
NOTICE
When the battery cable is removed from
the battery terminal, do not close either
of the front doors. The automatic win-
dow adjusting function will not work,
and the side roof panel may be da-
maged. (
“Automatic adjusting
function” page 2-61)
NOTE:
. The doors of this vehicle are somewhat
harder to close than those of an
ordinary vehicle (especially when the
vehicle is new) . This is because the
stiffness of the rubber has been in-
creased to improve the airtightness of
the vehicle interior during situations
such as higher speed driving. This does
not indicate that there is a malfunction.
. When the driver’s door is locked or
unlocked, the fuel-filler door is auto-
matically locked or unlocked at the
same time.
When the door is being opened, the window is
automatically lowered slightly to avoid contact
between the window and the side roof panel.
When the door is closed, the window is automatically raised slightly. (
“Automatic
adjusting function” page 2-61)
DOORS
Page 183 of 354
3-18Pre-driving checks and adjustments
OPENING THE HOOD
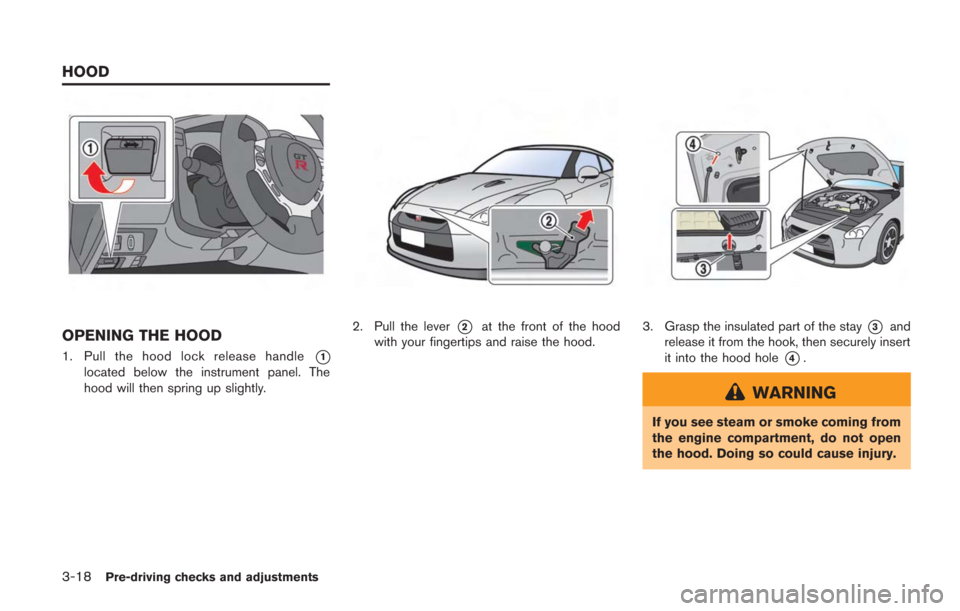
1. Pull the hood lock release handle*1
located below the instrument panel. The
hood will then spring up slightly.
2. Pull the lever*2at the front of the hood
with your fingertips and raise the hood.3. Grasp the insulated part of the stay*3and
release it from the hook, then securely insert
it into the hood hole
*4.
WARNING
If you see steam or smoke coming from
the engine compartment, do not open
the hood. Doing so could cause injury.
HOOD
Page 188 of 354
From the passenger compartment
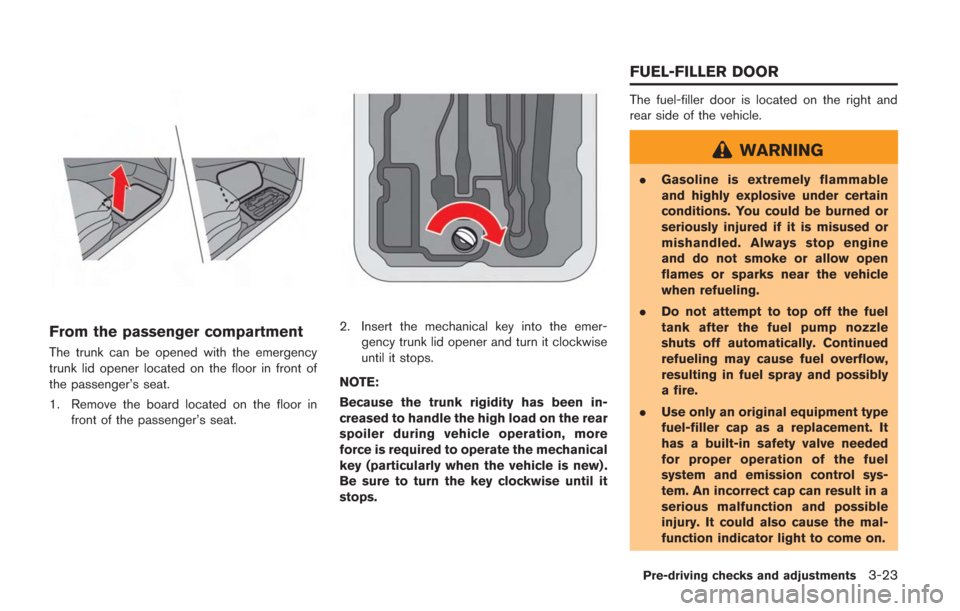
The trunk can be opened with the emergency
trunk lid opener located on the floor in front of
the passenger’s seat.
1. Remove the board located on the floor infront of the passenger’s seat.
2. Insert the mechanical key into the emer-gency trunk lid opener and turn it clockwise
until it stops.
NOTE:
Because the trunk rigidity has been in-
creased to handle the high load on the rear
spoiler during vehicle operation, more
force is required to operate the mechanical
key (particularly when the vehicle is new) .
Be sure to turn the key clockwise until it
stops.
The fuel-filler door is located on the right and
rear side of the vehicle.
WARNING
. Gasoline is extremely flammable
and highly explosive under certain
conditions. You could be burned or
seriously injured if it is misused or
mishandled. Always stop engine
and do not smoke or allow open
flames or sparks near the vehicle
when refueling.
. Do not attempt to top off the fuel
tank after the fuel pump nozzle
shuts off automatically. Continued
refueling may cause fuel overflow,
resulting in fuel spray and possibly
a fire.
. Use only an original equipment type
fuel-filler cap as a replacement. It
has a built-in safety valve needed
for proper operation of the fuel
system and emission control sys-
tem. An incorrect cap can result in a
serious malfunction and possible
injury. It could also cause the mal-
function indicator light to come on.
Pre-driving checks and adjustments3-23
FUEL-FILLER DOOR