2014 NISSAN GT-R battery
[x] Cancel search: batteryPage 141 of 354
2-44Instruments and controls
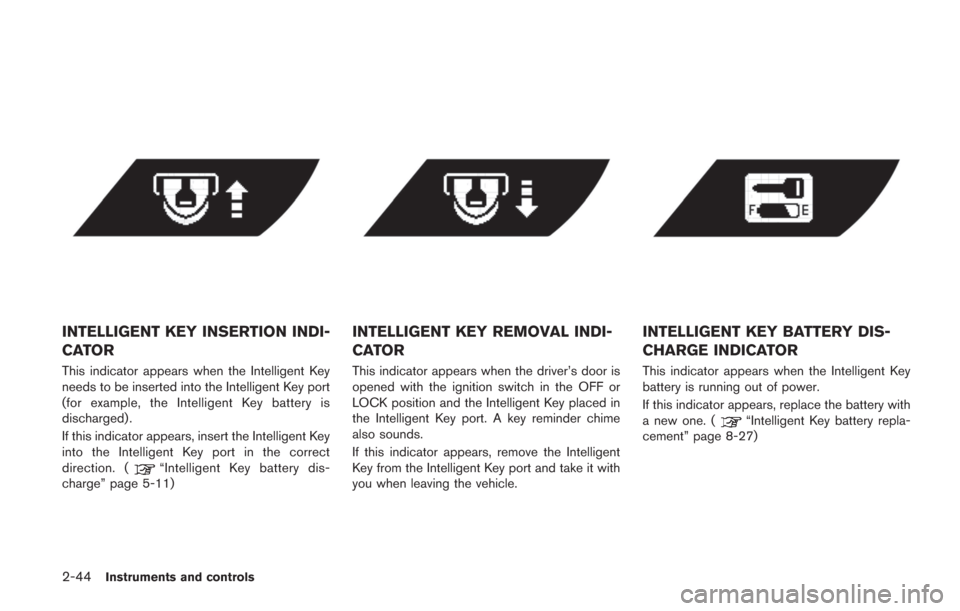
INTELLIGENT KEY INSERTION INDI-
CATOR
This indicator appears when the Intelligent Key
needs to be inserted into the Intelligent Key port
(for example, the Intelligent Key battery is
discharged) .
If this indicator appears, insert the Intelligent Key
into the Intelligent Key port in the correct
direction. (
“Intelligent Key battery dis-
charge” page 5-11)
INTELLIGENT KEY REMOVAL INDI-
CATOR
This indicator appears when the driver’s door is
opened with the ignition switch in the OFF or
LOCK position and the Intelligent Key placed in
the Intelligent Key port. A key reminder chime
also sounds.
If this indicator appears, remove the Intelligent
Key from the Intelligent Key port and take it with
you when leaving the vehicle.
INTELLIGENT KEY BATTERY DIS-
CHARGE INDICATOR
This indicator appears when the Intelligent Key
battery is running out of power.
If this indicator appears, replace the battery with
a new one. (
“Intelligent Key battery repla-
cement” page 8-27)
Page 149 of 354
2-52Instruments and controls
CAUTION
Use low beams when there are cars
approaching from the opposite direc-
tion, during city driving and at similar
times.
Battery saver system
A chime will sound when the driver side door is
opened with the light switch in theorposition and the ignition switch in the ACC,
OFF or LOCK position. (“Light reminder
chime” page 2-32)
When the headlight switch is in the
orposition while the ignition switch is in the ON
position, the lights will automatically turn off after
a period of time when the ignition switch has
been pushed to the OFF position.
When the headlight switch remains in the
orposition after the lights automatically turn
off, the lights will turn on when the ignition
switch is pushed to the ON position.
NOTICE
. When you turn on the headlight
switch again after the lights auto-
matically turn off, the lights will not
turn off automatically. Be sure to
turn the light switch to the OFF
position when you leave the vehicle
for extended periods of time, other-
wise the battery will be discharged.
. Never leave the light switch on
when the engine is not running for
extended periods of time even if the
headlights turn off automatically.
Daytime running light system
The daytime running lights automatically illumi-
nate when the engine is started with the parking
brake released. The daytime running lights
operate with the headlight switch in the OFF
position. Turn the headlight switch to the
position for full illumination when driving at night.
If the parking brake is applied before the engine
is started, the daytime running lights do not
illuminate. The daytime running lights illuminate
once the parking brake is released. The daytime
running lights will remain on until the ignition
switch is pushed to the OFF position.
WARNING
When the daytime running light system
is active, tail lights on your vehicle are
not on. It is necessary at dusk to turn on
your headlights. Failure to do so could
cause an accident injuring yourself and
others.
Page 151 of 354
2-54Instruments and controls
TURNING OFF THE HEATERS
Move the switch to the level position. The switch
indicator turns off.
WARNING
Do not use or allow occupants to use
the seat heater if you or the occupants
cannot monitor elevated seat tempera-
tures or have an inability to feel pain in
those body parts in contact with the
seat. Use of the seat heater by such
people could result in serious injury.
CAUTION
.Do not put anything on the seat
which insulates heat, such as a
blanket, cushion, seat cover, etc.
Otherwise, the seat may become
overheated.
. Do not place anything hard or heavy
on the seat or pierce it with a pin or
similar object. This may result in
damage to the heater.
. Any liquid spilled on the heated seat
should be removed immediately with a dry cloth.
. If any malfunctions are found or the
heated seat does not operate, turn
the switch off and have the system
checked by a GT-R certified NISSAN
dealer.
NOTICE
.The battery could run down if the
seat heater is operated while the
engine is not running.
. Do not use the seat heater for
extended periods or when no one
is using the seat.
. When cleaning the seat, never use
gasoline, thinner, or any similar
materials.
CAUTION
.The outlet and plug may be hot
during or immediately after use.
. Do not use with accessories that
exceed a 12 volt, 120W (10A) power
draw. Do not use double adapters or
more than one electrical accessory.
. This power outlet is not designed
for use with a cigarette lighter unit.
. Before inserting or disconnecting a
plug, be sure the electrical acces-
sory being used is turned OFF.
. When not in use, be sure to close
the cap. Do not allow water to
contact the outlet.
NOTICE
.Use power outlet with the engine
running to avoid discharging the
vehicle battery.
. Avoid using power outlet when the
air conditioner, headlights or rear
window defroster is on.
POWER OUTLETS
Page 158 of 354
activated if an impact or load similar to some-
thing being caught in the window occurs.
WARNING
There are some small distances imme-
diately before the closed position which
cannot be detected. Make sure that all
passengers have their hands, etc., in-
side the vehicle before closing the
window.
Automatic adjusting function
CAUTION
When the battery cable is removed from
the battery terminal, do not close either
of the front doors. The automatic win-
dow adjusting function will not work
and the side roof panel may be da-
maged.
The power window has an automatic adjusting
function. When the door is being opened, the
window is automatically lowered slightly to avoid
contact between the window and the side roof
panel. When the door is closed, the window is automatically raised slightly.
While the automatic adjusting function does not
work, the window will be controlled as follows:
.
When the door is opened, the window
lowers for approximately 2 seconds.
. While the door is open, the window cannot
be raised.
If the windows do not close auto-
matically
If the power window automatic function (closing
only) does not operate properly, perform the
following procedure to initialize the power
window system.
1. Push the ignition switch to the ON position.
2. Close the door.
3. Open the window completely by operating
the power window switch.
4. Pull the power window switch and hold it to close the driver side window, and then hold
the switch more than 3 seconds after the
window is closed completely.
5. Release the power window switch. Operate the window by the automatic function to
confirm the initialization is complete.
6. Perform steps 2 through 5 above for the passenger side window by operating either
driver’s or passenger’s side switch. If the power window automatic function does
not operate properly after performing the pro-
cedure above, have your vehicle checked by a
GT-R certified NISSAN dealer.
Instruments and controls2-61
Page 159 of 354
2-62Instruments and controls
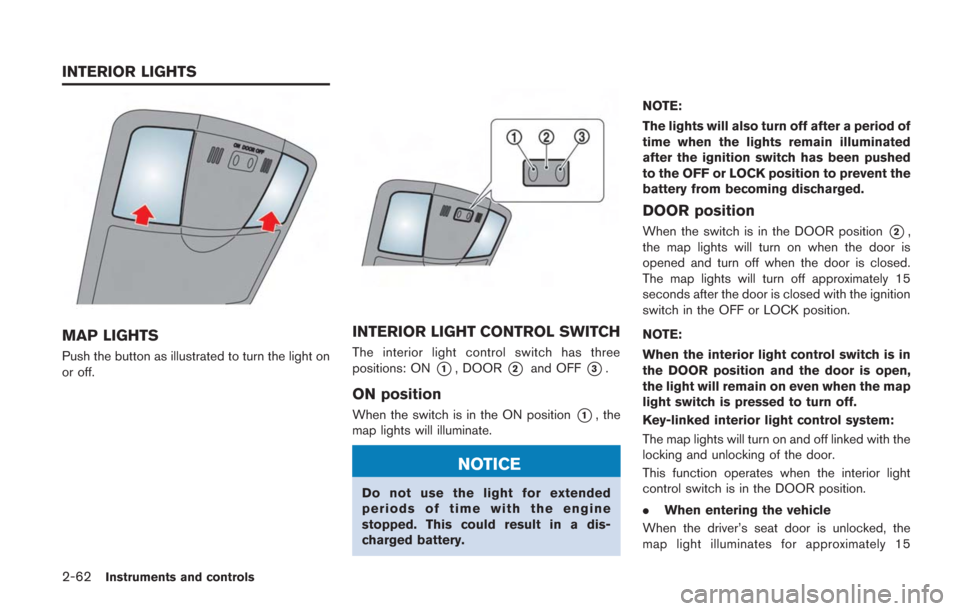
MAP LIGHTS
Push the button as illustrated to turn the light on
or off.
INTERIOR LIGHT CONTROL SWITCH
The interior light control switch has three
positions: ON
*1, DOOR*2and OFF*3.
ON position
When the switch is in the ON position*1, the
map lights will illuminate.
NOTICE
Do not use the light for extended
periods of time with the engine
stopped. This could result in a dis-
charged battery. NOTE:
The lights will also turn off after a period of
time when the lights remain illuminated
after the ignition switch has been pushed
to the OFF or LOCK position to prevent the
battery from becoming discharged.
DOOR position
When the switch is in the DOOR position*2,
the map lights will turn on when the door is
opened and turn off when the door is closed.
The map lights will turn off approximately 15
seconds after the door is closed with the ignition
switch in the OFF or LOCK position.
NOTE:
When the interior light control switch is in
the DOOR position and the door is open,
the light will remain on even when the map
light switch is pressed to turn off.
Key-linked interior light control system:
The map lights will turn on and off linked with the
locking and unlocking of the door.
This function operates when the interior light
control switch is in the DOOR position.
. When entering the vehicle
When the driver’s seat door is unlocked, the
map light illuminates for approximately 15
INTERIOR LIGHTS
Page 160 of 354
seconds, then it turns off.
While the map light is on, if the ignition switch is
pushed to the ACC or ON position, or if the
driver’s side door is locked, the light turns off.
.When exiting the vehicle
When the ignition switch is pushed to the OFF
or LOCK position, the map lights turn on for
approximately 15 seconds, then it turns off.
If the driver’s side door is locked while the map
lights are on, the light turns off.
NOTE:
It is possible to cancel the key-linked
interior light control system setting. See
the separate Multi Function Display Own-
er’s Manual.
OFF position
When the switch is in the OFF position*3, the
map lights will not illuminate, regardless of any
condition.
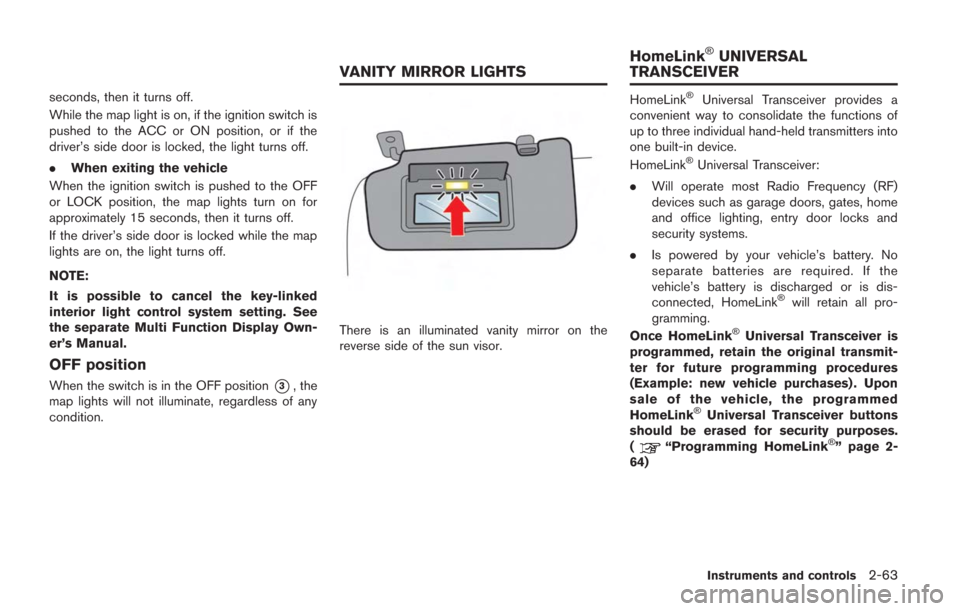
There is an illuminated vanity mirror on the
reverse side of the sun visor.
HomeLink®Universal Transceiver provides a
convenient way to consolidate the functions of
up to three individual hand-held transmitters into
one built-in device.
HomeLink
®Universal Transceiver:
. Will operate most Radio Frequency (RF)
devices such as garage doors, gates, home
and office lighting, entry door locks and
security systems.
. Is powered by your vehicle’s battery. No
separate batteries are required. If the
vehicle’s battery is discharged or is dis-
connected, HomeLink
®will retain all pro-
gramming.
Once HomeLink
®Universal Transceiver is
programmed, retain the original transmit-
ter for future programming procedures
(Example: new vehicle purchases) . Upon
sale of the vehicle, the programmed
HomeLink
®Universal Transceiver buttons
should be erased for security purposes.
(
“Programming HomeLink®” page 2-
64)
Instruments and controls2-63
VANITY MIRROR LIGHTS HomeLink
®UNIVERSAL
TRANSCEIVER
Page 163 of 354
2-66Instruments and controls
NOTE:
If programming a garage door opener, etc.,
it is advised to unplug the device during
the “cycling” process to prevent possible
damage to the garage door opener com-
ponents.
OPERATING THE HomeLink®UNI-
VERSAL TRANSCEIVER
HomeLink®Universal Transceiver (once pro-
grammed) may now be used to activate the
garage door, etc. To operate, simply push the
appropriate programmed HomeLink
®Universal
Transceiver button. The red indicator light will
illuminate while the signal is being transmitted.
PROGRAMMING TROUBLE-DIAG-
NOSIS
If HomeLink®does not quickly learn the hand-
held transmitter information:
. replace the hand-held transmitter batteries
with new batteries.
. position the hand-held transmitter with its
battery area facing away from the
HomeLink
®surface.
. push and hold both the HomeLink®and
hand-held transmitter buttons without inter-
ruption. .
position the hand-held transmitter 2 to 5 in
(50 to 127 mm) away from the HomeLink
®
surface. Hold the transmitter in that position
for up to 15 seconds. If HomeLink®is not
programmed within that time, try holding the
transmitter in another position - keeping the
indicator light in view at all times.
If you continue to have programming difficulties,
please contact the NISSAN Consumer Affairs
Department. The phone numbers are located in
the Foreword of this Owner’s Manual.
CLEARING THE PROGRAMMED IN-
FORMATION
Individual buttons cannot be cleared, however to
clear all programming, push and hold the two
outside buttons and release when the indicator
light begins to flash (in approximately 20
seconds) .
REPROGRAMMING A SINGLE
HomeLink®BUTTON
To reprogram a HomeLink®Universal Transcei-
ver button, complete the following.
1. Push and hold the desired HomeLink
®
button. Do not release the button until step
4 has been completed.
2. When the indicator light begins to flash slowly (after 20 seconds) , position the hand-held transmitter 2 to 5 in (50 to 127
mm) away from the HomeLink
®surface.
3. Push and hold the hand-held transmitter button.
4. The HomeLink
®indicator light will flash, first
slowly and then rapidly. When the indicator
light begins to flash rapidly, release both
buttons.
The HomeLink
®Universal Transceiver button
has now been reprogrammed. The new device
can be activated by pushing the HomeLink
®
button that was just programmed. This proce-
dure will not affect any other programmed
HomeLink
®buttons.
IF YOUR VEHICLE IS STOLEN
If your vehicle is stolen, you should change the
codes of any non-rolling code device that has
been programmed into HomeLink
®. Consult the
Owner’s Manual of each device or call the
manufacturer or dealer of those devices for
additional information.
When your vehicle is recovered, you will
need to reprogram the HomeLink
®Univer-
sal Transceiver with your new transmitter
information.
FCC Notice:
This device complies with FCC rules part
15. Operation is subject to the following
Page 167 of 354
3-2Pre-driving checks and adjustments
A key number plate is supplied with your keys.
Record the key number and keep it in a safe
place (such as your wallet), not in the vehicle. If
you lose your keys, see a GT-R certified
NISSAN dealer for duplicates by using the key
number. NISSAN does not record any key
numbers so it is very important to keep track of
your key number plate.
A key number is only necessary when you have
lost all keys and do not have one to duplicate
from. If you still have a key, this key can be
duplicated by a GT-R certified NISSAN dealer.
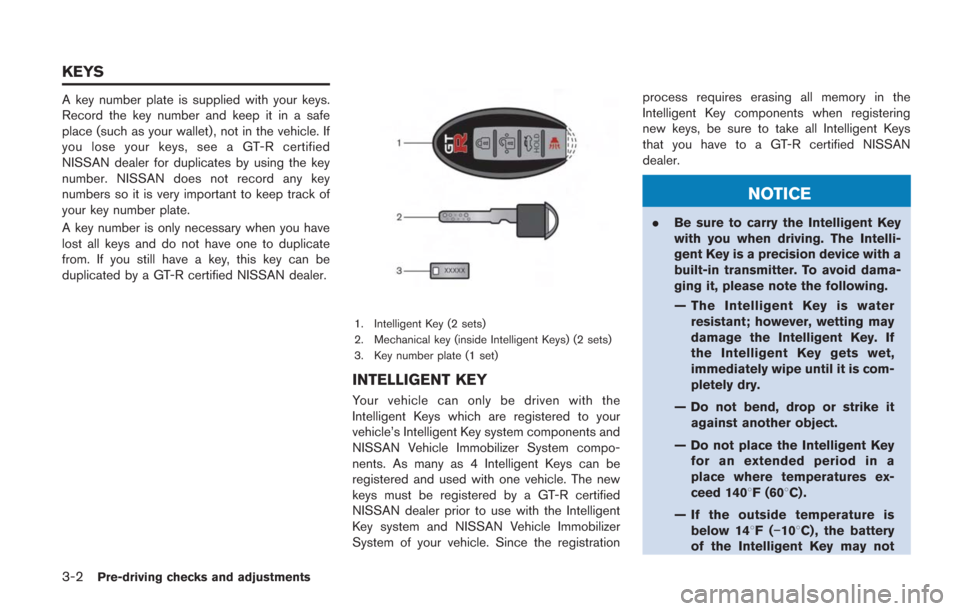
1. Intelligent Key (2 sets)
2. Mechanical key (inside Intelligent Keys) (2 sets)
3. Key number plate (1 set)
INTELLIGENT KEY
Your vehicle can only be driven with the
Intelligent Keys which are registered to your
vehicle’s Intelligent Key system components and
NISSAN Vehicle Immobilizer System compo-
nents. As many as 4 Intelligent Keys can be
registered and used with one vehicle. The new
keys must be registered by a GT-R certified
NISSAN dealer prior to use with the Intelligent
Key system and NISSAN Vehicle Immobilizer
System of your vehicle. Since the registrationprocess requires erasing all memory in the
Intelligent Key components when registering
new keys, be sure to take all Intelligent Keys
that you have to a GT-R certified NISSAN
dealer.
NOTICE
.
Be sure to carry the Intelligent Key
with you when driving. The Intelli-
gent Key is a precision device with a
built-in transmitter. To avoid dama-
ging it, please note the following.
— The Intelligent Key is water
resistant; however, wetting may
damage the Intelligent Key. If
the Intelligent Key gets wet,
immediately wipe until it is com-
pletely dry.
— Do not bend, drop or strike it against another object.
— Do not place the Intelligent Key for an extended period in a
place where temperatures ex-
ceed 1408F (608C) .
— If the outside temperature is below 148F( −108C) , the battery
of the Intelligent Key may not
KEYS