2014 NISSAN GT-R light
[x] Cancel search: lightPage 253 of 354
6-2In case of emergency
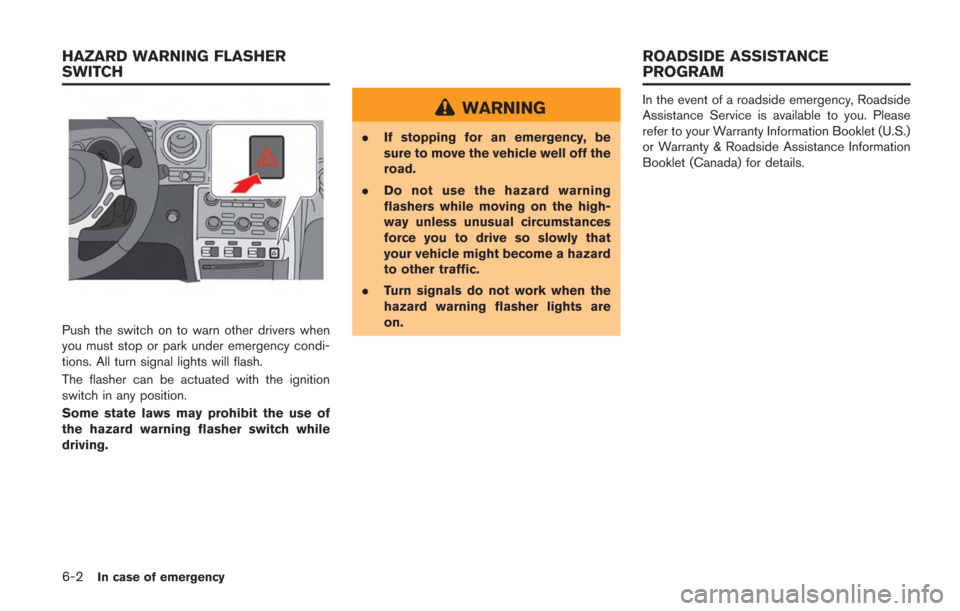
Push the switch on to warn other drivers when
you must stop or park under emergency condi-
tions. All turn signal lights will flash.
The flasher can be actuated with the ignition
switch in any position.
Some state laws may prohibit the use of
the hazard warning flasher switch while
driving.
WARNING
.If stopping for an emergency, be
sure to move the vehicle well off the
road.
. Do not use the hazard warning
flashers while moving on the high-
way unless unusual circumstances
force you to drive so slowly that
your vehicle might become a hazard
to other traffic.
. Turn signals do not work when the
hazard warning flasher lights are
on.
In the event of a roadside emergency, Roadside
Assistance Service is available to you. Please
refer to your Warranty Information Booklet (U.S.)
or Warranty & Roadside Assistance Information
Booklet (Canada) for details.
HAZARD WARNING FLASHER
SWITCH ROADSIDE ASSISTANCE
PROGRAM
Page 254 of 354
To shut off the engine in an emergency situation
while driving, perform the following procedure:
.Rapidly push the push-button ignition switch
3 consecutive times in less than 1.5
seconds, or
. Push and hold the push-button ignition
switch for more than 2 seconds.TIRE PRESSURE MONITORING
SYSTEM (TPMS)
This vehicle is equipped with the Tire Pressure
Monitoring System (TPMS) . It monitors tire
pressure of all tires. When the low tire pressure
warning light is lit, one or more of your tires is
significantly under-inflated. If the vehicle is being
driven with low tire pressure, the TPMS will
activate and warn you of it by the low tire
pressure warning light (in the instrument panel)
or the LOW PRESSURE information screen (on
the display) . This system will activate only when
the vehicle is driven at speeds above 16 MPH
(25 km/h). (
“Low tire pressure warning
light” page 2-27) (“Tire Pressure Monitor-
ing System (TPMS)” page 5-4)
WARNING
. If the low tire pressure warning light
illuminates or LOW PRESSURE in-
formation is displayed on the moni-
tor screen while driving, avoid
sudden steering maneuvers or
abrupt braking, reduce vehicle
speed, pull off the road to a safe
location and stop the vehicle as
soon as possible. Driving with un-
der-inflated tires may permanently damage the tires and increase the
likelihood of tire failure. Serious
vehicle damage could occur and
may lead to an accident and could
result in serious personal injury.
Check the tire pressure for all four
tires. Adjust the tire pressure to the
recommended COLD tire pressure
shown on the Tire and Loading
Information label to turn the low
tire pressure warning light off. If the
light still illuminates while driving
after adjusting the tire pressure, a
tire may be flat.
. When a wheel is replaced, the TPMS
will not function and the low tire
pressure warning light will flash for
approximately 1 minute. The light
will remain on after 1 minute. Con-
tact a GT-R certified NISSAN dealer
as soon as possible for tire replace-
ment and/or system resetting.
. Replacing tires with those not ori-
ginally specified by NISSAN could
affect the proper operation of the
TPMS.
. Do not inject any tire liquid or
aerosol tire sealant into the tires,
In case of emergency6-3
EMERGENCY ENGINE SHUT OFF FLAT TIRE
Page 256 of 354
6. Have all passengers get out of the vehicleand stand in a safe place, away from traffic
and clear of the vehicle.
For the tire removing procedure, see the
following section. (
“Jacking vehicle and
removing wheels” page 8-43)
The following circumstances indicate that the
battery is discharged.
. The starter motor does not turn or it turns
weakly and the engine does not start.
. The vehicle lights are much dimmer than
usual.
. The sound of the horn is weak. The horn
makes no sound.
NOTICE
When the battery is discharged, do not
close either of the front doors. The
automatic window adjusting function
will not work, and the side roof panel
may be damaged.
To start your engine with a booster battery, the
instructions and precautions below must be
followed.
For the battery maintenance information, see the
following section. (
“Battery” page 8-17)
WARNING
. If done incorrectly, jump starting
can lead to a battery explosion,
resulting in severe injury or death.
It could also damage your vehicle.
. Explosive hydrogen gas is always
present in the vicinity of the battery.
Keep all sparks and flames away
from the battery.
. Do not allow battery fluid to come
into contact with eyes, skin, clothing
or painted surfaces. Battery fluid is
a corrosive sulphuric acid solution
which can cause severe burns. If the
fluid should come into contact with
anything, immediately flush the con-
tacted area with water.
. Keep the battery out of the reach of
children.
. The booster battery must be rated at
12 volts. Use of an improperly rated
battery can damage your vehicle.
. Whenever working on or near a
battery, always wear suitable eye
protectors (for example, goggles or
industrial safety spectacles) and
In case of emergency6-5
JUMP STARTING
Page 258 of 354
electrical systems (light, heater, air condi-
tioner, etc.).
3. Remove the battery cover. Cover the battery with a firmly wrung out moist cloth to reduce
explosion hazard.
4. Connect jumper cables in the sequence as illustrated (
*1?*2?*3?*4).
If the battery is disconnected or dis-
charged, the steering wheel will lock
and cannot be turned. Supply power
using jumper cables before pushing
the ignition switch and disengaging
the steering lock.
CAUTION
. Always connect positive (+) to posi-
tive (+) and negative (−) to body
ground (as illustrated) , not to the
battery.
. Make sure that the jumper cables
do not touch moving parts in the
engine compartment and that
clamps do not contact any other
metal.
5. Start the engine of the booster vehicle
*A
and let it run for a few minutes. 6. Keep the engine speed of the booster
vehicle
*Aat about 2,000 rpm, and start
the engine of the vehicle being jump started
*B.
NOTE:
Do not keep the starter motor engaged
for more than 10 seconds. If the engine
does not start right away, push the
ignition switch to the OFF position and
wait 10 seconds before trying again.
7. After starting your engine, carefully discon- nect the negative cable and then the positive
cable (
*4?*3?*2?*1).
8. Be sure to dispose of the cloth used to cover the vent holes as it may be contami-
nated with corrosive acid.
9. Put the battery cover on.
NOTE:
If the clamp clip is difficult to connect to
the battery terminal, remove the cowl top
cover to make it easier. (
“Removing
the cowl top cover” page 8-9)
Do not attempt to start the engine by pushing.
NOTICE
Your NISSAN cannot be push-started or
tow-started. Attempting to do so may
cause transmission damage.
In case of emergency6-7
PUSH STARTING
Page 265 of 354

7-2Appearance and care
In order to maintain the appearance of your
vehicle, it is important to take proper care of it.
To protect the paint surfaces, wash your vehicle
as soon as you can:
.after a rainfall to prevent possible damage
from acid rain
. after driving on coastal roads
. when contaminants such as soot, bird
droppings, tree sap, metal particles or bugs
get on the paint surface
. when dust or mud builds up on the surface
Whenever possible, store or park your vehicle
inside a garage or in a covered area.
When it is necessary to park outside, park in a
shady area or protect the vehicle with a body
cover.
Be careful not to scratch the paint surface
when putting on or removing the body
cover.WASHING
Wash dirt off the vehicle with a wet sponge and
plenty of water. Clean the vehicle thoroughly
using a mild soap, a special vehicle soap or
general purpose dishwashing liquid mixed with
clean, lukewarm (never hot) water.
NOTICE
. Do not use an automatic car wash.
The rear spoiler may be damaged.
. Do not use car washes that use acid
in the detergent. Some car washes,
especially brushless ones, use some
acid for cleaning. The acid may react
with some plastic vehicle compo-
nents, causing them to crack. This
could affect their appearance, and
also could cause them not to func-
tion properly. Always check with
your car wash to confirm that acid
is not used.
. Do not wash the vehicle with strong
household soap, strong chemical
detergents, gasoline or solvents.
. Do not wash the vehicle in direct
sunlight or while the vehicle body is
hot, as the surface may become water-spotted.
. Avoid using tight-napped or rough
cloths, such as washing mitts. Care
must be taken when removing
caked-on dirt or other foreign sub-
stances so the paint surface is not
scratched or damaged.
Rinse the vehicle thoroughly with plenty of clean
water.
Inside flanges, seams and folds on the doors,
hatches and hood are particularly vulnerable to
the effects of road salt. Therefore, these areas
must be regularly cleaned. Take care that the
drain holes in the lower edge of the door are
open. Spray water under the body and in the
wheel wells to loosen the dirt and wash away
road salt.
Avoid leaving water spots on the paint surface
by using a damp chamois to dry the vehicle.
CLEANING EXTERIOR
Page 267 of 354
7-4Appearance and care
be waxed to protect against road salt in
areas where it is used during winter.
CAUTION
Do not use abrasive cleaners when
washing the wheels.
Aluminum alloy wheels
Wash regularly with a sponge dampened in a
mild soap solution, especially during winter
months in areas where road salt is used. Salt
could discolor the wheels if not removed.
The dark chrome coat wheel is specially coated
to a distinctive color. It may discolor to black
depending on storage conditions. If only one
wheel is changed, it may be different color with
other wheels. If the wheel is changed, consult
with a GT-R certified NISSAN dealer.
NOTICE
Follow the directions below to avoid
staining or discoloring the wheels:
.Do not use a cleaner that uses
strong acid or alkali contents to
clean the wheels. .
Do not apply wheel cleaners to the
wheels when they are hot. The
wheel temperature should be the
same as ambient temperature.
. Rinse the wheel to completely re-
move the cleaner within 15 minutes
after the cleaner is applied.
CHROME PARTS
Clean chrome parts regularly with a non-
abrasive chrome polish to maintain the finish.
OUTSIDE DOOR HANDLES
After driving on a road where salt is used in
winter, immediately wash and clean the outside
door handles that are provided with a special
coating. This will keep the beautiful finish longer.
TIRE DRESSING
NISSAN does not recommend the use of tire
dressings. Tire manufacturers apply a coating to
the tires to help reduce discoloration of the
rubber. If a tire dressing is applied to the tires, it
may react with the coating and form a com-
pound. This compound may come off the tire
while driving and stain the vehicle paint.
If you choose to use a tire dressing, take the
following precautions: .
Use a water-based tire dressing. The coat-
ing on the tire dissolves more easily with an
oil-based tire dressing.
. Apply a light coat of tire dressing to help
prevent it from entering the tire tread/
grooves (where it would be difficult to
remove) .
. Wipe off excess tire dressing using a dry
towel. Make sure the tire dressing is
completely removed from the tire tread/
grooves.
. Allow the tire dressing to dry as recom-
mended by tire dressing manufacturer.
DRY CARBON FIBER PARTS (if so
equipped)
The dry carbon fiber parts are made using the
same composite method used for race cars. The
dry carbon fiber parts has a special coating to
enhance the feel of the material.
NOTICE
.Do not use chemical agents (for
example: wax, coating agent, com-
pound agent, etc.) on the dry carbon
fiber parts because they can da-
mage the material. When the rear
Page 268 of 354
carbon fiber parts become dirty,
dilute one cap of mild detergent
with a bucket of water and use that
mixture to clean the carbon fiber
parts.
. The dry carbon fiber parts may turn
yellow due to age deterioration
because of the characteristics of
the material. Storing the vehicle
outside in direct sunlight for ex-
tended periods of time may cause
discoloration and deterioration.
NISSAN recommends that you do
not store the vehicle in direct sun-
light to protect the rear spoiler.
NOTE:
The surfaces of the dry carbon fiber parts
are lightly coated like a race car so that
you can feel the proper texture of real
carbon, which may feel rough. This is
normal.Occasionally remove loose dust from the interior
trim, plastic parts and seats using a vacuum
cleaner or soft bristled brush. Wipe the vinyl and
leather surfaces with a clean, soft cloth dam-
pened in mild soap solution, then wipe clean
with a dry soft cloth.
Regular care and cleaning is required in order to
maintain the appearance of the leather.
Before using any fabric protector, read the
manufacturer’s recommendations. Some fabric
protectors contain chemicals that may stain or
bleach the seat material.
Use a cloth dampened only with water, to clean
the meter and gauge lens.
WARNING
Do not use water or acidic cleaners (hot
steam cleaners) on the seat. This can
damage the seat or occupant classifica-
tion sensor. This can also affect the
operation of the air bag system and
result in serious personal injury.
CAUTION
. Never use benzine, thinner, or any
similar material.
. For cleaning, use a soft cloth, dam-
pened with water. Never use a rough
cloth, alcohol, benzine, thinner or
any kind of solvent or paper towel
with a chemical cleaning agent.
They will scratch or cause discolora-
tion to the lens.
. Do not spray any liquid such as
water on the meter lens. Spraying
liquid may cause the system to
malfunction.
NOTICE
.Small dirt particles can be abrasive
and damaging to the leather sur-
faces and should be removed
promptly. Do not use saddle soap,
car waxes, polishes, oils, cleaning
fluids, solvents, detergents or am-
monia-based cleaners as they may
damage the leather’s natural finish.
. Never use fabric protectors unless
Appearance and care7-5
CLEANING INTERIOR
Page 272 of 354
8 Maintenance and do-it-yourself
Maintenance requirement ....................................................... 8-3Scheduled maintenance ................................................... 8-3
General maintenance ........................................................ 8-3
Where to go for service ................................................... 8-3
General maintenance .............................................................. 8-4 Explanation of maintenance items ................................. 8-4
Maintenance precautions ....................................................... 8-6
Engine compartment check locations ................................. 8-8 Removing the cowl top cover ......................................... 8-9
Engine cooling system ......................................................... 8-10
Checking engine coolant level ..................................... 8-11
Changing engine coolant .............................................. 8-12
Engine oil ........................................................................\
........ 8-12
Checking engine oil level .............................................. 8-12
Changing engine oil and filter ...................................... 8-13
Transmission oil ..................................................................... 8-14
Power steering fluid .............................................................. 8-14
Brake fluid ........................................................................\
....... 8-15
Window washer fluid ........................................................... 8-16
Battery ........................................................................\
.............. 8-17
Precautions ....................................................................... 8-17
Fluid level check .............................................................. 8-17
Jump starting .................................................................... 8-19 Drive belts ........................................................................\
...... 8-19
Spark plugs ........................................................................\
.... 8-20
Replacing spark plugs ................................................. 8-20
Air cleaner ........................................................................\
...... 8-20
Windshield wiper blades .................................................... 8-21 Cleaning ........................................................................\
.. 8-21
Replacing the wiper blades ....................................... 8-22
Brakes ........................................................................\
............. 8-23 Self-adjusting brakes ................................................... 8-23
Brake pad wear warning ............................................. 8-23
High performance brake system ............................... 8-23
Replacing the brake pads ........................................... 8-23
Fuses ........................................................................\
............... 8-24
Engine compartment .................................................... 8-24
Passenger compartment ............................................. 8-25
Intelligent Key battery replacement .................................. 8-27
Lights ........................................................................\
............... 8-29 Headlights ....................................................................... 8-30Exterior and interior lights ........................................... 8-30
Wheels and tires .................................................................. 8-32
Tire pressure .................................................................. 8-32
Tire and loading information label ............................ 8-34
Checking the tire pressure ......................................... 8-35