Page 225 of 314
![NISSAN GT-R 2014 R35 Multi Function Display Owners Manual 8-16Voice recognition
1. Highlight [Using the Address Book] andpush <ENTER>. The tutorial starts.
2. The voice guide demonstrates how to speak
when giving commands.
3. When the tutorial is completed, NISSAN GT-R 2014 R35 Multi Function Display Owners Manual 8-16Voice recognition
1. Highlight [Using the Address Book] andpush <ENTER>. The tutorial starts.
2. The voice guide demonstrates how to speak
when giving commands.
3. When the tutorial is completed,](/manual-img/5/367/w960_367-224.png)
8-16Voice recognition
1. Highlight [Using the Address Book] andpush . The tutorial starts.
2. The voice guide demonstrates how to speak
when giving commands.
3. When the tutorial is completed, the system automatically switches to the Menu screen.
Useful tips for correct operation
It is possible to display useful speaking tips that
may help the system to accept a voice command
correctly.
1. Highlight [Help on Speaking] and push.
2. To confirm the page, scroll the screen using the up and down switches of the main
directional buttons or the center dial.
Voice recognition settings
The settings for easy operation of the voice
recognition system are displayed.
1. Highlight [Voice Recognition Settings] andpush .
2. To confirm the page, scroll the screen using the up and down switches of the main
directional buttons or the center dial.
Adapting Voice Recognition System
to Your Voice
The voice recognition system is equipped with a
learning function to adapt to the user’s voice for
better recognition. It is possible to confirm how
to operate the learning function through this
tutorial.
1. Highlight [Adapting the System to YourVoice] and push . The tutorial
starts.
Page 231 of 314
![NISSAN GT-R 2014 R35 Multi Function Display Owners Manual 8-22Voice recognition
SYSTEM FEEDBACK ANNOUNCE-
MENT MODES
It is possible to select two modes, long or short,
for the announcement by the system.
How to set
1. Push<SETTING>.
2. Highlight [Others] and NISSAN GT-R 2014 R35 Multi Function Display Owners Manual 8-22Voice recognition
SYSTEM FEEDBACK ANNOUNCE-
MENT MODES
It is possible to select two modes, long or short,
for the announcement by the system.
How to set
1. Push<SETTING>.
2. Highlight [Others] and](/manual-img/5/367/w960_367-230.png)
8-22Voice recognition
SYSTEM FEEDBACK ANNOUNCE-
MENT MODES
It is possible to select two modes, long or short,
for the announcement by the system.
How to set
1. Push.
2. Highlight [Others] and push .
3. Highlight [Voice Recognition] and push .
4. Highlight [Minimize Voice Feedback] andpush . The indicator illuminates,
and the system announcement mode
switches to the short mode.
5. Push to return to the previous
screen. Push
Page 232 of 314
4. Highlight [Speaker Adaptation] and push.
5. Highlight the user whose voice is memorizedby the system, and push .
6. Highlight [Start Speaker Adaptation Learn-
ing] and push .
7. Highlight the voice command category to be
learned by the system, and push .
The voice command category list is dis-
played.
8. Highlight the voice command to be learned by the system, and push . The
voice recognition system starts.
9. The system announces, “Please say a command”.
10. After the tone sounds and the icon on the screen changes from [
]to[], speak a
command.
11. When the system has recognized the voice command, the voice of the user is learned.
Push once to return to the
previous screen.
Voice recognition8-23
Page 233 of 314
![NISSAN GT-R 2014 R35 Multi Function Display Owners Manual 8-24Voice recognition
INFO:
With [Continuous Learning] set to on, the
system does not go back to the command
list screen, allowing to continue voice
command learning by the system.
12. If the system h NISSAN GT-R 2014 R35 Multi Function Display Owners Manual 8-24Voice recognition
INFO:
With [Continuous Learning] set to on, the
system does not go back to the command
list screen, allowing to continue voice
command learning by the system.
12. If the system h](/manual-img/5/367/w960_367-232.png)
8-24Voice recognition
INFO:
With [Continuous Learning] set to on, the
system does not go back to the command
list screen, allowing to continue voice
command learning by the system.
12. If the system has learned the command correctly, “None” will change to “Stored”.
Editing registered items
It is possible to edit user names and select
learning function settings.
1. Push .
2. Highlight [Others] and push .
3. Highlight [Voice Recognition] and push .
4. Highlight [Speaker Adaptation] and push
.
5. Highlight a user to edit, and push.
6. Highlight [Setting] and push .
7. Highlight an item to edit, and push
.
Setting items
.[Edit User Name]:
Edit the user name.
.[Delete Voice Data]:Reset the user voice that the voice
recognition system has learned.
.[Continuous Learning]:Have the system learn the voice com-
mands of the user in succession, without
selecting commands one by one.
VOICE COMMAND EXAMPLES
To use the voice recognition function, speaking
one command is sometimes sufficient, but at
other times it is necessary to speak two or more
commands. As examples, some additional basic
operations by voice commands are described
here.
Page 242 of 314

the object projects over the actual backing up
course.WARNING
.Always turn and check that it is safe
to park your car before backing up.
Always back up slowly.
. Use the displayed lines as a refer-
ence. The lines are highly affected
by the number of occupants, fuel
level, vehicle position, road condi-
tion and road grade.
. If the tires are replaced with differ-
ent sized tires, the predicted course
line may not be displayed correctly.
. On a snow-covered or slippery road,
there may be a difference between
the predicted course line and the
actual course line.
. If the battery is disconnected or
becomes discharged, the predicted
course lines may be displayed in-
correctly. If this occurs, drive the
vehicle on a straight road for more
than 5 minutes.
. When the steering wheel is turned
with the ignition switch in the ACC
position, the predicted course lines
may be displayed incorrectly. .
The displayed line will appear
slightly off to the right because the
rear view camera is not installed in
the rear center of the vehicle.
. The distance guide line and the
vehicle width guide line should be
used as a reference only when the
vehicle is on a level paved surface.
The distance viewed on the monitor
is for reference only and may be
different than the actual distance
between the vehicle and displayed
objects.
. When backing up the vehicle up a
hill, objects viewed in the monitor
are further than they appear. When
backing up the vehicle down a hill,
objects viewed in the monitor are
closer than they appear. Use the
inside mirror or glance over your
shoulder to properly judge dis-
tances to other objects.
The vehicle width and predicted course
lines are wider than the actual width and
course.
Monitor system9-5
HOW TO PARK WITH PREDICTED
COURSE LINES
Page 243 of 314

9-6Monitor system
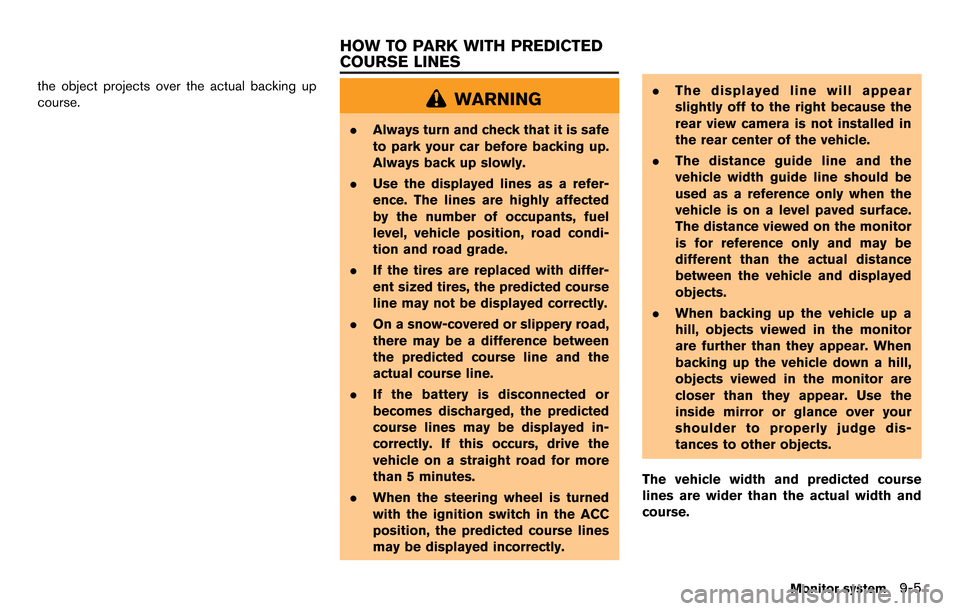
1. Visually check that the parking space is safebefore parking your vehicle.
2. The RearView of the vehicle is displayed on the screen
*Aas illustrated when the shift
lever is moved to the "R" (Reverse) position.
3. Slowly back up the vehicle, adjusting the steering wheel so that the predicted course
lines
*Benter the parking space*C.
4. Maneuver the steering wheel to make the vehicle width guide lines
*Dparallel to the
parking space
*Cwhile referring to the
predicted course lines. 5. When the vehicle is parked in the space
completely, move the shift lever to the
"P"(Park) position and apply the parking
brake
OPERATING TIPS
.When the shift lever is shifted to the "R"
(Reverse) position, the monitor screen auto-
matically changes to the RearView Monitor
mode. However, the radio can be heard.
. It may take some time until the RearView
Monitor is displayed after the shift lever has
been shifted to "R" from another position or
to another position from "R". Objects may be
distorted momentarily until the RearView
Monitor screen is displayed completely.
. When the temperature is extremely high or
low, the screen may not clearly display
objects. This is not a malfunction.
. When strong light directly enters the cam-
era, objects may not be displayed clearly.
This is not a malfunction.
. The screen may flicker under fluorescent
light. This is not a malfunction.
. The colors of objects on the RearView
Monitor may differ somewhat from those of
the actual object.
Page 254 of 314
No.Item Large panel Small panel
13 Brake pedal —*
14 Steering —*
15 Cornering g-force **
16 Accel/Braking g-force **
17 Total g-force **
18 Clock —*
19 Reset the CUSTOM VIEW #(1-4) to Default **
INFO:
. Each panel selected will be saved
. Panels will remain saved in the system even
after the engine is turned off.
. Two of the same panels cannot be displayed
at the same time.
. Two of the same panels of different sizes
cannot be displayed at the same time.
. Panels that have not been assigned a
display item remain empty.
Initializing display
The modified display will return to the screen
that was first configured.
1. Display the screen you would like to initialize
and push .
2. Select the panel and push .
3. Highlight [Reset the CUSTOM VIEW 1 to
Default] and push .
INFO:
When operating the touch panel to initialize the
display, the same procedure used to select a
meter is performed.
“Select using touch panel” (page 10-8)
Multi function meter10-9
Page 258 of 314
NOTICE
Even when traveling a distance for
which there is a sufficient amount of
fuel, refuel when the gas gauge ap-
proaches empty or when the fuel warn-
ing light illuminates.
Fuel flow
Displays the amount of fuel injected into the
engine by the fuel injector.
Large panel screen
Small panel screen
Recent fuel economy
In the large panel, this meter displays the
timeline of fuel consumption for each minute
over the past twenty minutes. In the small panel,
this meter displays fuel consumption readings
over the past twenty seconds.
Large panel screen
Small panel screen
INFO:
. The small panel will display “-.-”:
— when the vehicle is stopped
— for the first few moments of driving
. The large panel will not display a graph while
the vehicle is stopped.
Torque split
Displays the amount of forward distributed
torque. This can only be displayed as a small
panel.
Multi function meter10-13