Page 179 of 434

For proper truck box loading see “Vehicle loading
information” in the “Technical and consumer in-
formation” section of this manual.
WARNING
●It is extremely dangerous to ride in a
cargo area inside a vehicle. In a colli-
sion, people riding in these areas are
more likely to be seriously injured or
killed.
● Do not allow people to ride in any area
of your vehicle that is not equipped with
seats and seat belts.
● Be sure everyone in your vehicle is in a
seat and using a seat belt properly.
Disconnecting the rear camera (if so
equipped)
Before removing the tailgate disconnect the rear
camera by performing the following:
1. Open the tailgate to access the rear camera connector bracket
�1located on the rear
sill.
2. Remove the connector bracket
�2from the
sill by pressing the locking tab inward, in the
direction shown, while pulling the bracket
apart. 3. Disconnect the chassis wiring harness
�3
by pressing inward on the locking tab, in the
direction shown, while pulling the connec-
tors apart. Hold the connector firmly to pre-
vent the connector in the chassis harness
from falling into the sill.
4. Take the chassis plug and bracket from the glove box and connect them to the chassis
wiring harness to avoid contamination to the
terminals which will lead to malfunction of
the rear camera.
5. Insert the bracket back into the sill.
LPD2097
3-18Pre-driving checks and adjustments
Page 319 of 434
The first aid kit is located in the under-seat stor-
age bins.
To access the first aid kit:For King cab model, lift up the rear jump seat and
remove net to remove the first aid kit. Refer to
“Jump Seats” in the “Safety — Seats, seat belts
and supplemental restraint system” section ear-
lier in the manual.For Crew cab model, lift up the rear bench seat
and remove the net to remove the first aid kit.
Refer to “Folding the rear bench seat” in the
“Safety — Seats, seat belts and supplemental
restraint system” section earlier in the manual.
King cab model
LCE0108
Crew cab model
LCE0113
FIRST AID KIT (if so equipped)
6-2In case of emergency
Page 322 of 434
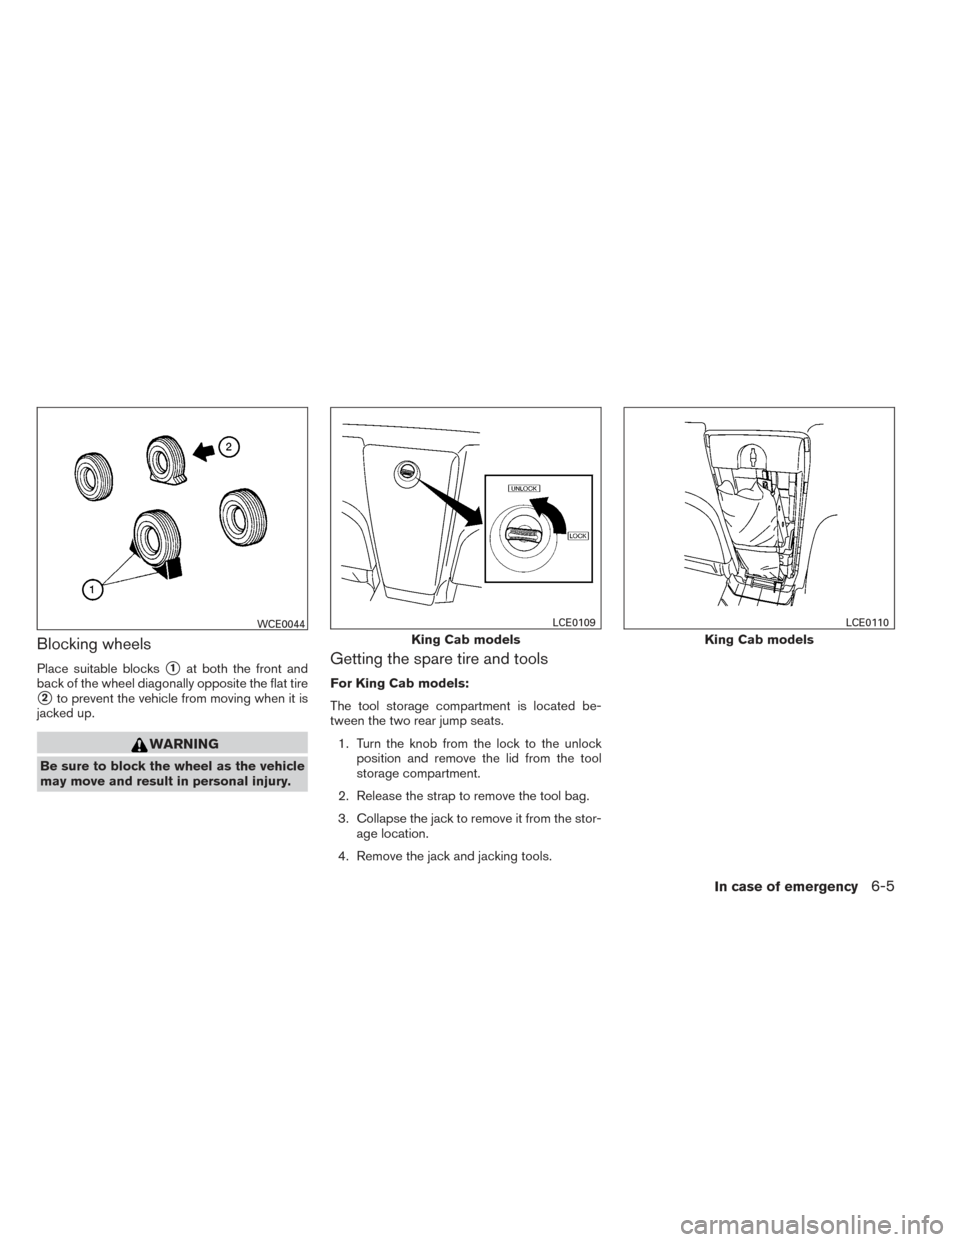
Blocking wheels
Place suitable blocks�1at both the front and
back of the wheel diagonally opposite the flat tire
�2to prevent the vehicle from moving when it is
jacked up.
WARNING
Be sure to block the wheel as the vehicle
may move and result in personal injury.
Getting the spare tire and tools
For King Cab models:
The tool storage compartment is located be-
tween the two rear jump seats.
1. Turn the knob from the lock to the unlock position and remove the lid from the tool
storage compartment.
2. Release the strap to remove the tool bag.
3. Collapse the jack to remove it from the stor- age location.
4. Remove the jack and jacking tools.
WCE0044
King Cab models
LCE0109
King Cab models
LCE0110
In case of emergency6-5
Page 323 of 434
For Crew Cab models:
The tools and tool case are located behind the
rear bench seat.1. Fold the rear bench seat down. Refer to “Folding the rear bench seatdown” in the
“Safety–Seats, seat belts and supplemental
restraint system” section earlier in this
manual.
2. Remove the jack
�1and jacking tools�2.
1. Fit the square end of the jack rod into the square hole of the wheel nut wrench to form
a handle. 2. Find the oval-shaped opening under the
middle of the tailgate. Pass the T-shaped
end of the jack rod through the opening and
direct it toward the spare tire winch, located
directly above the spare tire.
Crew Cab models
LCE0111
WCE0070
6-6In case of emergency
Page 339 of 434

Occasionally remove loose dust from the interior
trim, plastic parts and seats using a vacuum
cleaner or soft bristled brush. Wipe the vinyl and
leather surfaces with a clean, soft cloth damp-
ened in mild soap solution, then wipe clean with a
dry, soft cloth.
Regular care and cleaning is required in order to
maintain the appearance of the leather.
Before using any fabric protector, read the manu-
facturer’s recommendations. Some fabric pro-
tectors contain chemicals that may stain or
bleach the seat material.
Use a cloth dampened only with water to clean
the meter and gauge lens.
WARNING
Do not use water or acidic cleaners (hot
steam cleaners) on the seat. This can dam-
age the seat or occupant classification
sensor. This can also affect the operation
of the air bag system and result in serious
personal injury.
CAUTION
●Never use benzine, thinner or any simi-
lar material.
● Small dirt particles can be abrasive and
damaging to leather surfaces and
should be removed promptly. Do not
use saddle soap, car waxes, polishes,
oils, cleaning fluids, solvents, deter-
gents or ammonia-based cleaners as
they may damage the leather’s natural
finish.
● Never use fabric protectors unless rec-
ommended by the manufacturer.
● Do not use glass or plastic cleaner on
meter or gauge lens covers. It may dam-
age the lens cover.
AIR FRESHENERS
Most air fresheners use a solvent that could affect
the vehicle interior. If you use an air freshener,
take the following precautions:
● Hanging-type air fresheners can cause per-
manent discoloration when they contact ve-
hicle interior surfaces. Place the air fresh-
ener in a location that allows it to hang free
and not contact an interior surface. ●
Liquid-type air fresheners typically clip on
the vents. These products can cause imme-
diate damage and discoloration when
spilled on interior surfaces.
Carefully read and follow the manufacturer’s in-
structions before using the air fresheners.
FLOOR MATS
WARNING
To avoid potential pedal interference that
may result in a collision or injury:
● NEVER place a floor mat on top of an-
other floor mat in the driver front
position.
● Use only genuine NISSAN floor mats
specifically designed for use in your ve-
hicle model. See your NISSAN dealer
for more information.
● Properly position the mats in the floor-
well using the floor mat positioning aid.
See �Floor mat positioning aid� in this
section.
The use of genuine NISSAN floor mats can ex-
tend the life of your vehicle carpet and make it
easier to clean the interior. Mats should be main-
tained with regular cleaning and replaced if they
become excessively worn.
CLEANING INTERIOR
7-4Appearance and care
Page 340 of 434

Floor mat positioning aid
This vehicle includes two driver’s side front floor
mat brackets and one passenger’s side front floor
mat bracket to help keep your floor mats in place.
Genuine NISSAN floor mats have been specially
designed for your vehicle model. The driver’s side
floor mat has two grommet holes incorporated in
it and the passenger’s side has one grommet
hole. Position each mat by placing the floor mat
bracket hook through the floor mat grommet
holes while centering the mat in the floorwell.
Periodically check to make certain the mats are
properly positioned.
SEAT BELTS
The seat belts can be cleaned by wiping them
with a sponge dampened in a mild soap solution.
Allow the belts to dry completely in the shade
before using them. See “Seat belt maintenance”
in the “Safety – Seats, seat belts and supplemen-
tal restraint system” section of this manual.
WARNING
Do not allow wet seat belts to roll up in the
retractor. NEVER use bleach, dye or
chemical solvents to clean the seat belts,
since these materials may severely
weaken the seat belt webbing.
MOST COMMON FACTORS
CONTRIBUTING TO VEHICLE
CORROSION
●The accumulation of moisture-retaining dirt
and debris in body panel sections, cavities,
and other areas.
● Damage to paint and other protective coat-
ings caused by gravel and stone chips or
minor traffic accidents.
ENVIRONMENTAL FACTORS
INFLUENCE THE RATE OF
CORROSION
Moisture
Accumulation of sand, dirt and water on the ve-
hicle body underside can accelerate corrosion.
Wet floor coverings will not dry completely inside
the vehicle and should be removed for drying to
avoid floor panel corrosion.
Relative humidity
Corrosion will be accelerated in areas of high
relative humidity, especially those areas where
the temperatures stay above freezing and where
atmospheric pollution exists and road salt is
used.
LAI0009
CORROSION PROTECTION
Appearance and care7-5