2014 NISSAN CUBE light
[x] Cancel search: lightPage 137 of 332
3-24Pre-driving checks and adjustments
SIC2872
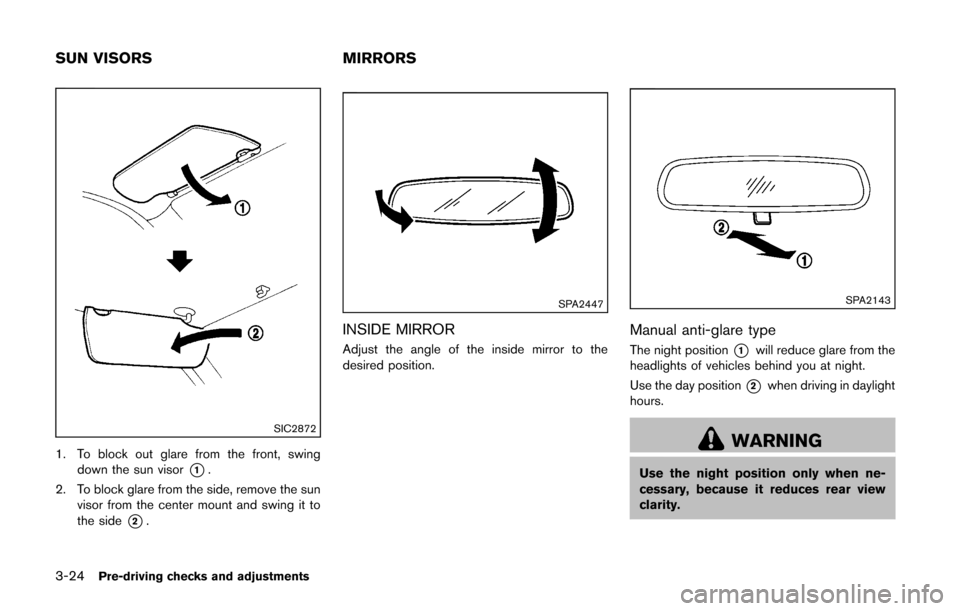
1. To block out glare from the front, swingdown the sun visor
*1.
2. To block glare from the side, remove the sun visor from the center mount and swing it to
the side
*2.
SPA2447
INSIDE MIRROR
Adjust the angle of the inside mirror to the
desired position.
SPA2143
Manual anti-glare type
The night position*1will reduce glare from the
headlights of vehicles behind you at night.
Use the day position
*2when driving in daylight
hours.
WARNING
Use the night position only when ne-
cessary, because it reduces rear view
clarity.
SUN VISORS MIRRORS
Page 146 of 332
SAA3388
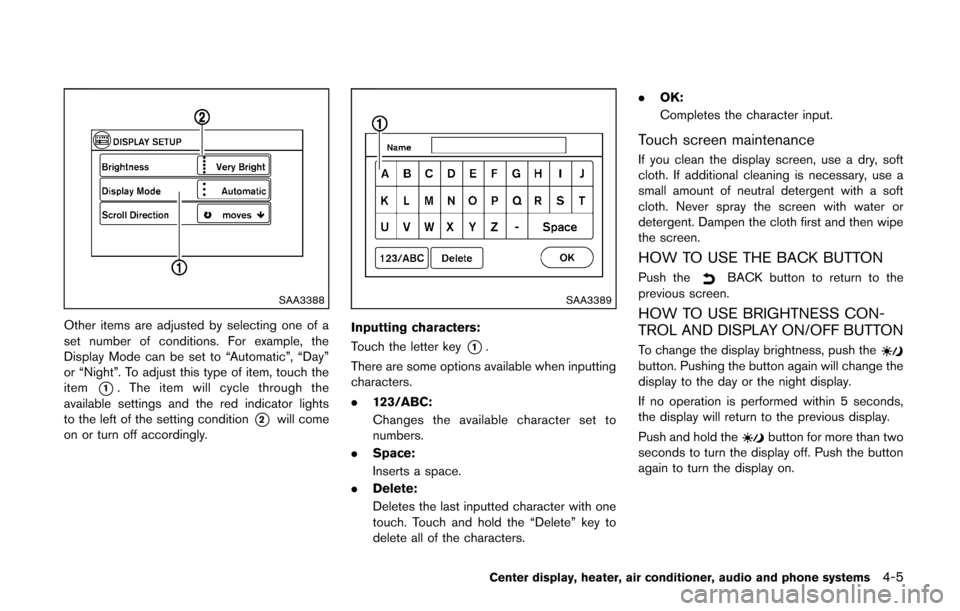
Other items are adjusted by selecting one of a
set number of conditions. For example, the
Display Mode can be set to “Automatic”, “Day”
or “Night”. To adjust this type of item, touch the
item
*1. The item will cycle through the
available settings and the red indicator lights
to the left of the setting condition
*2will come
on or turn off accordingly.
SAA3389
Inputting characters:
Touch the letter key
*1.
There are some options available when inputting
characters.
. 123/ABC:
Changes the available character set to
numbers.
. Space:
Inserts a space.
. Delete:
Deletes the last inputted character with one
touch. Touch and hold the “Delete” key to
delete all of the characters. .
OK:
Completes the character input.
Touch screen maintenance
If you clean the display screen, use a dry, soft
cloth. If additional cleaning is necessary, use a
small amount of neutral detergent with a soft
cloth. Never spray the screen with water or
detergent. Dampen the cloth first and then wipe
the screen.
HOW TO USE THE BACK BUTTON
Push theBACK button to return to the
previous screen.
HOW TO USE BRIGHTNESS CON-
TROL AND DISPLAY ON/OFF BUTTON
To change the display brightness, push thebutton. Pushing the button again will change the
display to the day or the night display.
If no operation is performed within 5 seconds,
the display will return to the previous display.
Push and hold the
button for more than two
seconds to turn the display off. Push the button
again to turn the display on.
Center display, heater, air conditioner, audio and phone systems4-5
Page 148 of 332
SAA3391
System setup
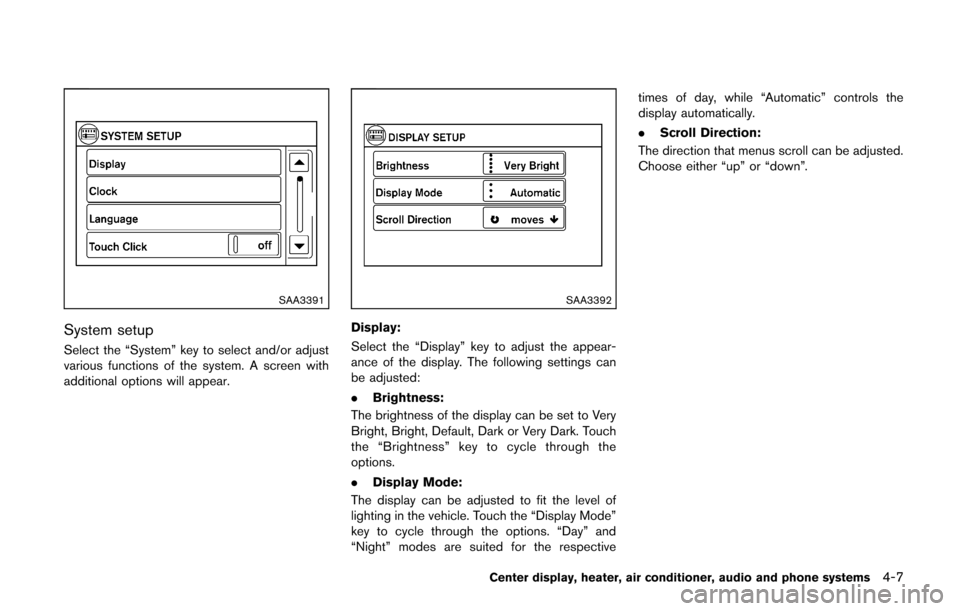
Select the “System” key to select and/or adjust
various functions of the system. A screen with
additional options will appear.
SAA3392
Display:
Select the “Display” key to adjust the appear-
ance of the display. The following settings can
be adjusted:
.Brightness:
The brightness of the display can be set to Very
Bright, Bright, Default, Dark or Very Dark. Touch
the “Brightness” key to cycle through the
options.
. Display Mode:
The display can be adjusted to fit the level of
lighting in the vehicle. Touch the “Display Mode”
key to cycle through the options. “Day” and
“Night” modes are suited for the respective times of day, while “Automatic” controls the
display automatically.
.
Scroll Direction:
The direction that menus scroll can be adjusted.
Choose either “up” or “down”.
Center display, heater, air conditioner, audio and phone systems4-7
Page 149 of 332
4-8Center display, heater, air conditioner, audio and phone systems
SAA3393
Clock:
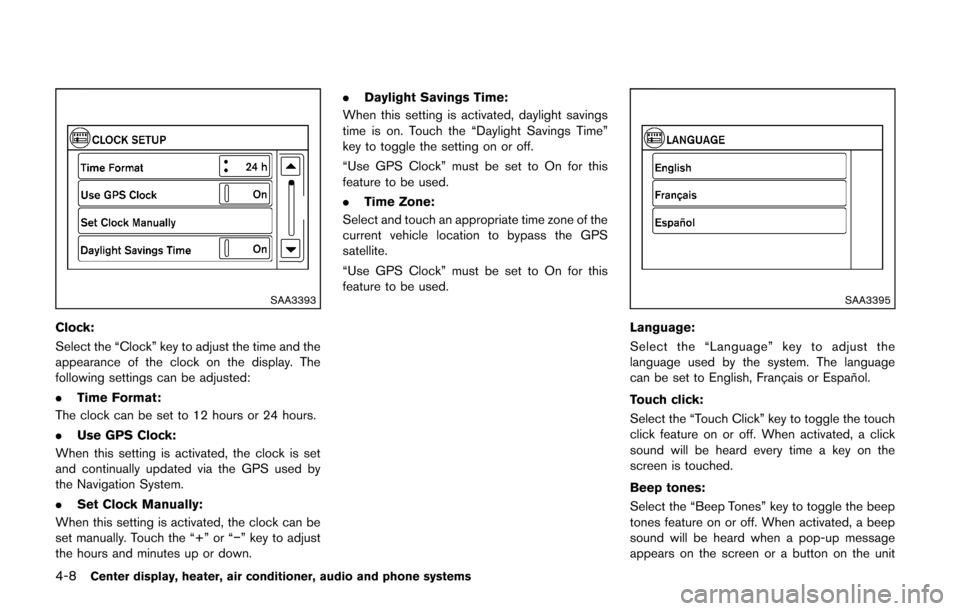
Select the “Clock” key to adjust the time and the
appearance of the clock on the display. The
following settings can be adjusted:
.Time Format:
The clock can be set to 12 hours or 24 hours.
. Use GPS Clock:
When this setting is activated, the clock is set
and continually updated via the GPS used by
the Navigation System.
. Set Clock Manually:
When this setting is activated, the clock can be
set manually. Touch the “+” or “−” key to adjust
the hours and minutes up or down. .
Daylight Savings Time:
When this setting is activated, daylight savings
time is on. Touch the “Daylight Savings Time”
key to toggle the setting on or off.
“Use GPS Clock” must be set to On for this
feature to be used.
. Time Zone:
Select and touch an appropriate time zone of the
current vehicle location to bypass the GPS
satellite.
“Use GPS Clock” must be set to On for this
feature to be used.
SAA3395
Language:
Select the “Language” key to adjust the
language used by the system. The language
can be set to English, Franc¸ ais or Espan ˜
ol.
Touch click:
Select the “Touch Click” key to toggle the touch
click feature on or off. When activated, a click
sound will be heard every time a key on the
screen is touched.
Beep tones:
Select the “Beep Tones” key to toggle the beep
tones feature on or off. When activated, a beep
sound will be heard when a pop-up message
appears on the screen or a button on the unit
Page 154 of 332
course.
HOW TO ADJUST THE SCREEN
The brightness can be adjusted by performing
the following procedure.
1. Push the SETUP button and then select the“System” key.
2. Select the “Display” key. The “Brightness” key is displayed.
3. Select the preferred brightness level.
OPERATING TIPS
. When the shift lever is shifted to the R
(Reverse) position, the monitor screen auto-
matically changes to the RearView Monitor
mode. However, the radio can be heard.
. When the view is switched, the display
images on the screen may be displayed with
some delay.
. When the temperature is extremely high or
low, the screen may not clearly display
objects. This is not a malfunction.
. When strong light is directly coming on the
camera, objects may not be displayed
clearly. This is not a malfunction.
. Vertical lines may be seen in objects on the
screen. This is due to strong reflected light
from the bumper. This is not a malfunction. .
The screen may flicker under fluorescent
light. This is not a malfunction.
. The colors of objects on the RearView
Monitor may differ somewhat from the actual
color of objects. This is not a malfunction.
. Objects on the monitor may not be clear in a
dark environment. This is not a malfunction.
. If dirt, rain or snow accumulates on the
camera, the RearView Monitor may not
display object clearly. Clean the camera.
. Do not use alcohol, benzine or thinner to
clean the camera. This will cause discolora-
tion. To clean the camera, wipe with a cloth
dampened with diluted mild cleaning agent
and then wipe with a dry cloth.
. Do not damage the camera as the monitor
screen may be adversely affected.
. Do not use wax on the camera window.
Wipe off any wax with a clean cloth
dampened with mild detergent diluted with
water.
SAA2343
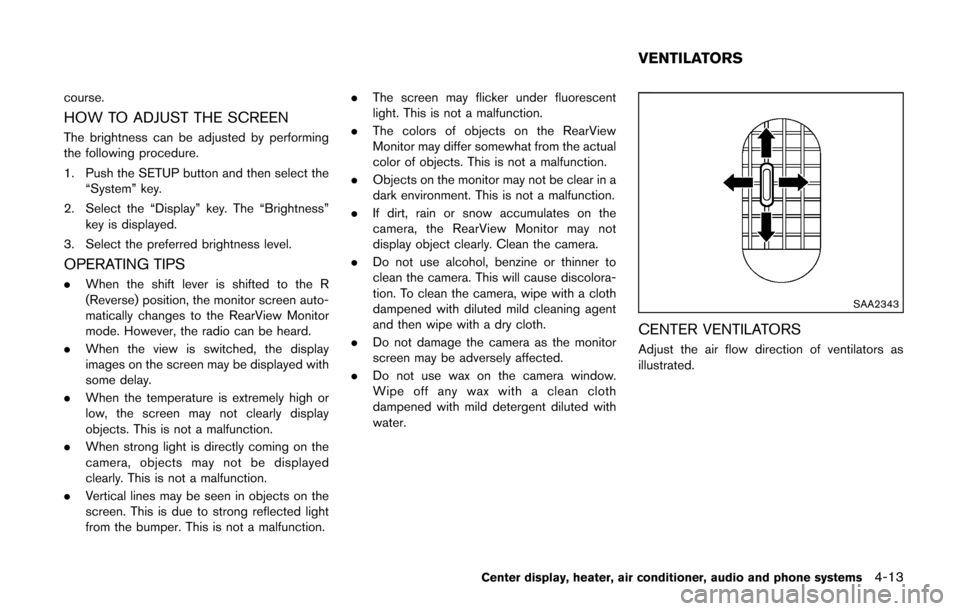
CENTER VENTILATORS
Adjust the air flow direction of ventilators as
illustrated.
Center display, heater, air conditioner, audio and phone systems4-13
VENTILATORS
Page 156 of 332
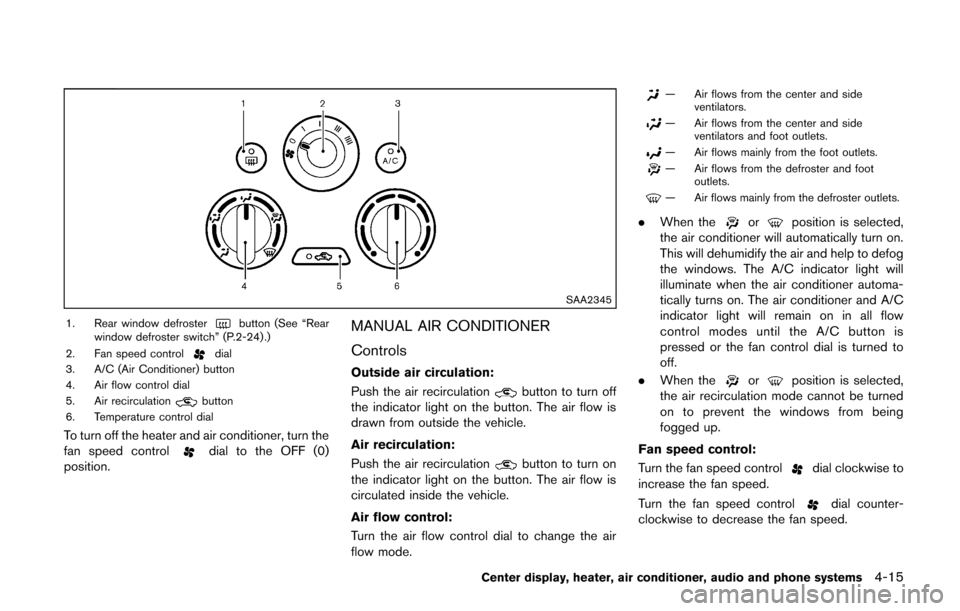
SAA2345
1. Rear window defrosterbutton (See “Rear
window defroster switch” (P.2-24) .)
2. Fan speed control
dial
3. A/C (Air Conditioner) button
4. Air flow control dial
5. Air recirculation
button
6. Temperature control dial
To turn off the heater and air conditioner, turn the
fan speed controldial to the OFF (0)
position.
MANUAL AIR CONDITIONER
Controls
Outside air circulation:
Push the air recirculation
button to turn off
the indicator light on the button. The air flow is
drawn from outside the vehicle.
Air recirculation:
Push the air recirculation
button to turn on
the indicator light on the button. The air flow is
circulated inside the vehicle.
Air flow control:
Turn the air flow control dial to change the air
flow mode.
— Air flows from the center and side ventilators.
— Air flows from the center and sideventilators and foot outlets.
— Air flows mainly from the foot outlets.
— Air flows from the defroster and footoutlets.
— Air flows mainly from the defroster outlets.
.When theorposition is selected,
the air conditioner will automatically turn on.
This will dehumidify the air and help to defog
the windows. The A/C indicator light will
illuminate when the air conditioner automa-
tically turns on. The air conditioner and A/C
indicator light will remain on in all flow
control modes until the A/C button is
pressed or the fan control dial is turned to
off.
. When the
orposition is selected,
the air recirculation mode cannot be turned
on to prevent the windows from being
fogged up.
Fan speed control:
Turn the fan speed control
dial clockwise to
increase the fan speed.
Turn the fan speed control
dial counter-
clockwise to decrease the fan speed.
Center display, heater, air conditioner, audio and phone systems4-15
Page 157 of 332
4-16Center display, heater, air conditioner, audio and phone systems
A/C (Air Conditioner) operation:
Push the A/C button to turn on or off the air
conditioner. When the air conditioner is on, the
A/C indicator light on the button illuminates.
Temperature control:
Turn the temperature control dial to set the
desired temperature. Turn the dial between the
middle and the right position (in red) to select
the hot temperature. Turn the dial between the
middle and the left position (in blue) to select the
cool temperature.
Heater operation
Heating:
This mode is used to direct heated air to the foot
outlets.
1. Push the air recirculation
button to
switch to the outside air circulation mode.
(The indicator light turns off.)
2. Turn the air flow control dial to the
position.
3. Turn the fan speed control
dial to the
desired position.
4. Turn the temperature control dial to the desired position between the middle and the
hot (right) position. Ventilation:
This mode directs outside air to the side and
center ventilators.
1. Push the air recirculation
button to
switch to the outside air circulation mode.
(The indicator light turns off.)
2. Turn the air flow control dial to the
position.
3. Turn the fan speed control
dial to the
desired position.
Defrosting or defogging:
This mode directs the air to the defroster outlets
to defrost/defog the windows.
1. Turn the air flow control dial to the
position.
2. Turn the fan speed control
dial to the
desired position.
3. Turn the temperature control dial to the desired position between the middle and the
hot (right) position.
. To remove frost from the outside surface of
the windshield quickly, turn the temperature
control dial to the maximum hot position and
the fan speed control
dial to maximum
(IIII) position.
. When the
position is selected, the air
conditioner will automatically turn on. This will dehumidify the air and help to defog the
windows. The A/C indicator light will illumi-
nate when the air conditioner automatically
turns on. The air conditioner and A/C
indicator light will remain on in all flow
control modes until the A/C button is
pressed or the fan control dial is turned to
off.
Bi-level heating:
This mode directs cool air from the side and
center vents and warm air from the foot outlets.
When the temperature control dial is turned to
the maximum hot or cool position, the air
between the ventilators and the foot outlets is
the same temperature.
1. Push the air recirculation
button to
switch to the outside air circulation mode.
(The indicator light turns off.)
2. Turn the air flow control dial to the
position.
3. Turn the fan speed control
dial to the
desired position.
4. Turn the temperature control dial to the desired position.
Heating and defogging:
This mode heats the interior and defogs the
windows.
Page 158 of 332
1. Turn the air flow control dial to theposition.
2. Turn the fan speed control
dial to the
desired position.
3. Turn the temperature control dial to the desired position.
When the
position is selected, the air
conditioner will automatically turn on. This will
dehumidify the air and help to defog the
windows. The A/C indicator light will illuminate
when the air conditioner automatically turns on.
The air conditioner and A/C indicator light will
remain on in all flow control modes until the A/C
button is pressed or the fan control dial is turned
to off.
Air conditioner operation
The air conditioner system should be operated
for approximately 10 minutes at least once a
month. This helps prevent damage to the air
conditioner system due to the lack of lubrication.
Cooling:
This mode is used to cool and dehumidify the air.
1. Push the air recirculation
button to
switch to the outside air circulation mode.
(The indicator light turns off.)
2. Turn the air flow control dial to the
position. 3. Turn the fan speed control
dial to the
desired position.
4. Push the A/C button on. (The A/C indicator light will illuminate.)
5. Turn the temperature control dial to the desired position between the middle and the
cool (left) position.
. For quick cooling when the outside tem-
perature is high, push the air recirculation
button to switch to the air recirculation
mode. (The indicator light turns on.) Be sure
to push the air recirculation button to the
OFF position for normal cooling.
. A visible mist may be seen coming from the
ventilators in hot, humid conditions as the air
is cooled rapidly. This does not indicate a
malfunction.
Dehumidified heating:
This mode is used to heat and dehumidify the
air.
1. Push the air recirculation
button to
switch to the outside air circulation mode.
(The indicator light turns off.)
2. Turn the air flow control dial to the
position.
3. Turn the fan speed control
dial to the
desired position. 4. Push the A/C button on. (The A/C indicator
light will illuminate.)
5. Turn the temperature control dial to the desired position between the middle and the
hot (right) position.
Dehumidified defogging:
This mode is used to defog the windows and
dehumidify the air.
1. Turn the air flow control dial to the
position.
2. Turn the fan speed control
dial to the
desired position.
3. Turn the temperature control dial to the desired position.
When the
position is selected, the air
conditioner will automatically turn on. This will
dehumidify the air and help to defog the
windows. The A/C indicator light will illuminate
when the air conditioner automatically turns on.
The air conditioner and A/C indicator light will
remain on in all flow control modes until the A/C
button is pressed or the fan control dial is turned
to off.
Center display, heater, air conditioner, audio and phone systems4-17