2014 NISSAN CUBE seats
[x] Cancel search: seatsPage 73 of 332
1-54Safety — Seats, seat belts and supplemental restraint system
activated, be sure to have the pre-
tensioner system checked and, if
necessary, replaced by a NISSAN
dealer.
. No unauthorized changes should be
made to any components or wiring
of the pretensioner system. This is
to prevent damage to or accidental
activation of the pretensioners.
Tampering with the pretensioner
system may result in serious perso-
nal injury.
. Work around and on the preten-
sioner system should be done by a
NISSAN dealer. Installation of elec-
trical equipment should also be
done by a NISSAN dealer. Un-
authorized electrical test equipment
and probing devices should not be
used on the pretensioner system.
. If you need to dispose of a preten-
sioner or scrap the vehicle, contact a
NISSAN dealer. Correct preten-
sioner disposal procedures are set
forth in the appropriate NISSAN
Service Manual. Incorrect disposal
procedures could cause personal
injury. The pretensioner system may activate with the
supplemental air bag system in certain types of
collisions. Working with the seat belt retractor, it
helps tighten the seat belt when the vehicle
becomes involved in certain types of collisions,
helping to restrain front seat occupants.
The pretensioner is encased with the seat belt
retractor. These seat belts are used the same
way as conventional seat belts.
When a pretensioner activates, smoke is re-
leased and a loud noise may be heard. The
smoke is not harmful and does not indicate a
fire. Care should be taken not to inhale it, as it
may cause irritation and choking. Those with a
history of a breathing condition should get fresh
air promptly.
After pretensioner activation, load limiters allow
the seat belt to release webbing (if necessary) to
reduce forces against the chest.
The supplemental air bag warning light
is
used to indicate malfunctions in the pretensioner
system. (See “Supplemental air bag warning
light” (P.1-55) for more details.) If the operation
of the supplemental air bag warning light
indicates there is a malfunction, have the system
checked by a NISSAN dealer.
When selling your vehicle, we request that you
inform the buyer about the pretensioner system
and guide the buyer to the appropriate sections in this Owner’s Manual.
SUPPLEMENTAL AIR BAG WARNING
LABELS
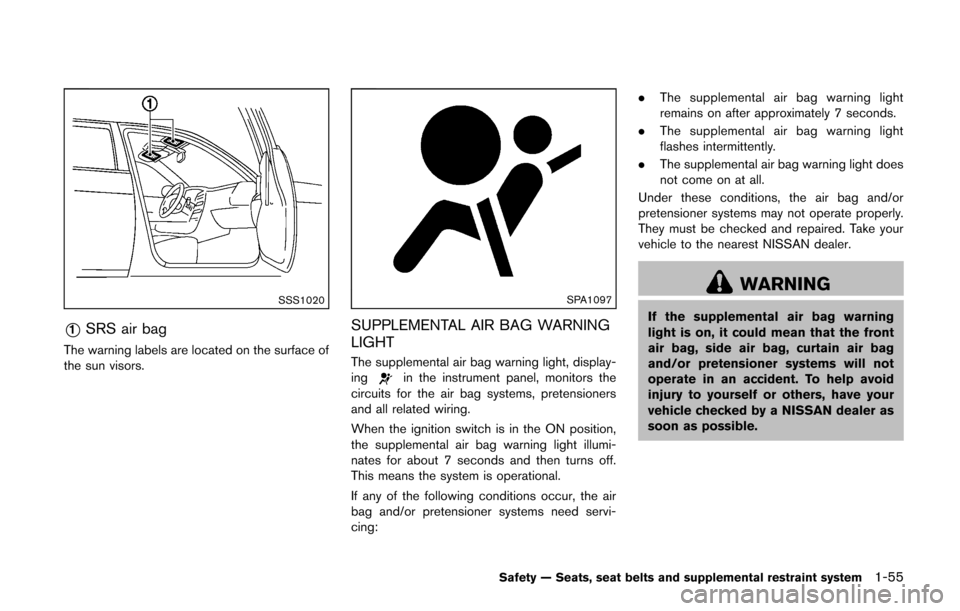
Warning labels about the supplemental front-
impact air bag system are placed in the vehicle
as shown in the illustration.
Page 74 of 332
SSS1020
*1SRS air bag
The warning labels are located on the surface of
the sun visors.
SPA1097
SUPPLEMENTAL AIR BAG WARNING
LIGHT
The supplemental air bag warning light, display-
ingin the instrument panel, monitors the
circuits for the air bag systems, pretensioners
and all related wiring.
When the ignition switch is in the ON position,
the supplemental air bag warning light illumi-
nates for about 7 seconds and then turns off.
This means the system is operational.
If any of the following conditions occur, the air
bag and/or pretensioner systems need servi-
cing: .
The supplemental air bag warning light
remains on after approximately 7 seconds.
. The supplemental air bag warning light
flashes intermittently.
. The supplemental air bag warning light does
not come on at all.
Under these conditions, the air bag and/or
pretensioner systems may not operate properly.
They must be checked and repaired. Take your
vehicle to the nearest NISSAN dealer.
WARNING
If the supplemental air bag warning
light is on, it could mean that the front
air bag, side air bag, curtain air bag
and/or pretensioner systems will not
operate in an accident. To help avoid
injury to yourself or others, have your
vehicle checked by a NISSAN dealer as
soon as possible.
Safety — Seats, seat belts and supplemental restraint system1-55
Page 75 of 332
1-56Safety — Seats, seat belts and supplemental restraint system
REPAIR AND REPLACEMENT PRO-
CEDURE
The front air bags, side air bags, curtain air bags
and pretensioners are designed to activate on a
one-time-only basis. As a reminder, unless it is
damaged, the supplemental air bag warning light
will remain illuminated after inflation has oc-
curred. Repair and replacement of these sys-
tems should be done only by a NISSAN dealer.
When maintenance work is required on the
vehicle, the front air bags, side air bags, curtain
air bags and pretensioners and related parts
should be pointed out to the person performing
the maintenance. The ignition switch should
always be in the LOCK position when working
under the hood or inside the vehicle.
WARNING
.Once a front air bag, side air bag or
curtain air bag has inflated, the air
bag module will not function again
and must be replaced. Additionally,
the activated pretensioners must
also be replaced. The air bag mod-
ule and pretensioner should be
replaced by a NISSAN dealer. The
air bag modules and pretensioner
system cannot be repaired. .
The front air bag, side air bag and
curtain air bag systems, and preten-
sioner system should be inspected
by a NISSAN dealer if there is any
damage to the front end or side
portion of the vehicle.
. If you need to dispose of a supple-
mental air bag or pretensioner or
scrap the vehicle, contact a NISSAN
dealer. Correct supplemental air
bag and pretensioner system dis-
posal procedures are set forth in the
appropriate NISSAN Service Man-
ual. Incorrect disposal procedures
could cause personal injury.
Page 91 of 332
2-16Instruments and controls
restraint system” (P.1-41) .
WARNING
If the supplemental air bag warning
light is on, it could mean that the front
air bag, side air bag, curtain air bag
and/or pretensioner systems will not
operate in an accident. To help avoid
injury to yourself or others, have your
vehicle checked by a NISSAN dealer as
soon as possible.
Vehicle Dynamic Control (VDC)
warning light
The light will blink when the Vehicle Dynamic
Control (VDC) system or the traction control
system is operating, thus alerting the driver that
the vehicle is nearing its traction limits. The road
surface may be slippery.
If the VDC warning light illuminates while the
VDC system is on, this light alerts the driver to
the fact that the VDC system’s fail-safe mode is
operating, for example the VDC system may not
be functioning properly. Have the system
checked by a NISSAN dealer. If a malfunction
occurs in the system, the VDC system function
will be canceled but the vehicle is still driveable. For additional information, see “Vehicle Dynamic
Control (VDC) system” (P.5-29) of this manual.
INDICATOR LIGHTS
Cruise indicator light
Cruise main switch indicator:
This light illuminates when the cruise control
main switch is pushed. The light turns off when
the main switch is pushed again. When the
cruise indicator light illuminates, the cruise
control system is operational.
Cruise malfunction:
If the cruise indicator light blinks while the
engine is running, it may indicate the cruise
control system is not functioning properly. Have
the system checked by a NISSAN dealer.
See “Cruise control” (P.5-21).
Engine start operation indicator
light (if so equipped)
This light appears when the shift lever is in the P
(Park) position. This light means that the engine
will start by pushing the ignition switch with the
brake pedal depressed. You can start the engine
directly in any position.
Exterior light indicator
This indicator illuminates when the headlight
switch is turned to the AUTO (if so equipped) ,
orposition and the front parking lights,
instrument panel lights, tail lights, license plate
lights or headlights are on. The indicator turns
off when these lights are turned off.
Front passenger air bag status light
The front passenger air bag status light (located
on the center of the instrument panel) will be lit
and the passenger front air bag will be OFF
depending on how the front passenger seat is
being used.
For front passenger air bag status light opera-
tion, see “NISSAN Advanced Air Bag System
(front seats)” (P.1-47) of this manual.
High beam indicator light
This light illuminates when the headlight high
beam is on and goes out when the low beam is
selected.
Page 166 of 332
.Sampling frequency — Sampling frequency
is the rate at which the samples of a signal
are converted from analog to digital (A/D
conversion) per second.
. Multisession — Multisession is one of the
methods for writing data to media. Writing
data once to the media is called a single
session, and writing more than once is
called a multisession.
. ID3/WMA Tag — The ID3/WMA tag is the
part of the encoded MP3 or WMA file that
contains information about the digital music
file such as song title, artist, album title,
encoding bit rate, track time duration, etc.
ID3 tag information is displayed on the
Album/Artist/Track title line on the display.
* Windows®and Windows Media®are registered
trademarks or trademarks of Microsoft Corpora-
tion in the United States of America and other
countries of Microsoft Corporation of the USA.
USB (Universal Serial Bus) (if so
equipped)
WARNING
Do not connect, disconnect or operate
the USB device while driving. Doing so
can be a distraction. If distracted you
could lose control of your vehicle and cause an accident or serious injury.
CAUTION
.
Do not force the USB device into the
USB port. Inserting the USB device
tilted or up-side-down into the port
may damage the port. Make sure
that the USB device is connected
correctly into the USB port.
. Do not grab the USB port cover (if
so equipped) when pulling the USB
device out of the port. This could
damage the port and the cover.
. Do not leave the USB cable in a
place where it can be pulled unin-
tentionally. Pulling the cable may
damage the port.
The vehicle is not equipped with a USB device.
USB devices should be purchased separately
as necessary.
This system cannot be used to format USB
devices. To format a USB device, use a personal
computer.
In some states/area, the USB device for the
front seats plays only sound without images for regulatory reasons, even when the vehicle is
parked.
This system supports various USB memory
devices, USB hard drives and iPod
®players.
Some USB devices may not be supported by
this system.
. Partitioned USB devices may not be played
correctly.
. Some characters used in other languages
(Chinese, Japanese, etc.) are not displayed
properly on display. Using English language
characters with a USB device is recom-
mended.
General notes for USB use:
Refer to your device manufacturer’s owner
information regarding the proper use and care
of the device.
Notes for iPod
®use:
iPod®is a trademark of Apple Inc., registered in
the U.S. and other countries.
. Improperly plugging in the iPod
®may cause
a checkmark to be displayed on and off
(flickering) . Always make sure that the iPod
®
is connected properly.
. An iPod nano®(1st Generation) may remain
in fast forward or rewind mode if it is
connected during a seek operation. In this
case, please manually reset the iPod
®.
Center display, heater, air conditioner, audio and phone systems4-25
Page 259 of 332
7-4Appearance and care
TIRE DRESSING
NISSAN does not recommend the use of tire
dressings. Tire manufacturers apply a coating to
the tires to help reduce discoloration of the
rubber. If a tire dressing is applied to the tires, it
may react with the coating and form a com-
pound. This compound may come off the tire
while driving and stain the vehicle paint.
If you choose to use a tire dressing, take the
following precautions:
.Use a water-based tire dressing. The coat-
ing on the tire dissolves more easily with an
oil-based tire dressing.
. Apply a light coat of tire dressing to help
prevent it from entering the tire tread/
grooves (where it would be difficult to
remove) .
. Wipe off excess tire dressing using a dry
towel. Make sure the tire dressing is
completely removed from the tire tread/
grooves.
. Allow the tire dressing to dry as recom-
mended by tire dressing manufacturer. Occasionally remove loose dust from the interior
trim, plastic parts and seats using a vacuum
cleaner or soft bristled brush. Wipe the vinyl and
leather surfaces with a clean, soft cloth dam-
pened in mild soap solution, then wipe clean
with a dry soft cloth.
Regular care and cleaning is required in order to
maintain the appearance of the leather.
Before using any fabric protector, read the
manufacturer’s recommendations. Some fabric
protectors contain chemicals that may stain or
bleach the seat material.
Use a cloth dampened only with water, to clean
the meter and gauge lens.
WARNING
Do not use water or acidic cleaners (hot
steam cleaners) on the seat. This can
damage the seat or occupant classifica-
tion sensors. This can also affect the
operation of the air bag system and
result in serious personal injury.
CAUTION
.
Never use benzine, thinner, or any
similar material.
. For cleaning, use a soft cloth, dam-
pened with water. Never use a rough
cloth, alcohol, benzine, thinner or
any kind of solvent or paper towel
with a chemical cleaning agent.
They will scratch or cause discolora-
tion to the lens.
. Do not spray any liquid such as
water on the meter lens. Spraying
liquid may cause the system to
malfunction.
. Small dirt particles can be abrasive
and damaging to the leather sur-
faces and should be removed
promptly. Do not use saddle soap,
car waxes, polishes, oils, cleaning
fluids, solvents, detergents or am-
monia-based cleaners as they may
damage the leather’s natural finish.
. Never use fabric protectors unless
recommended by the manufacturer.
. Do not use glass or plastic cleaner
on meter or gauge lens covers. It
CLEANING INTERIOR
Page 266 of 332
Lights*:Clean the headlights on a regular basis.
Make sure that the headlights, stop lights, tail
lights, turn signal lights, and other lights are all
operating properly and installed securely. Also
check headlight aim.
Road wheel nuts (lug nuts)*: When checking
the tires, make sure no wheel nuts are missing,
and check for any loose wheel nuts. Tighten if
necessary.
Tire rotation*: Tires should be rotated every
5,000 miles (8,000 km) .
Tires*: Check the pressure with a gauge often
and always prior to long distance trips. If
necessary, adjust the pressure in all tires,
including the spare, to the pressure specified.
Check carefully for damage, cuts or excessive
wear.
Tire Pressure Monitoring System (TPMS)
transmitter components: Replace the TPMS
transmitter grommet seal, valve core and cap
when the tires are replaced due to wear or age.
Wheel alignment and balance: If the vehicle
should pull to either side while driving on a
straight and level road, or if you detect uneven or
abnormal tire wear, there may be a need for
wheel alignment.
If the steering wheel or seat vibrates at normal
highway speeds, wheel balancing may be
needed. For additional information regarding tires, refer
to “Important Tire Safety Information” in the
Warranty Information Booklet.
Windshield:
Clean the windshield on a regular
basis. Check the windshield at least every six
months for cracks or other damage. Have a
damaged windshield repaired by a qualified
repair facility.
Windshield wiper blades*: Check for cracks
or wear if they do not wipe properly.
Inside the vehicle
The maintenance items listed here should be
checked on a regular basis, such as when
performing scheduled maintenance, cleaning
the vehicle, etc.
Accelerator pedal: Check the pedal for
smooth operation and make sure the pedal
does not catch or require uneven effort. Keep
the floor mat away from the pedal.
Brake pedal: Check the pedal for smooth
operation. If the brake pedal suddenly goes
down further than normal, the pedal feels
spongy or the vehicle seems to take longer to
stop, see a NISSAN dealer immediately. Keep
the floor mat away from the pedal.
Brakes: Check that the brakes do not pull the
vehicle to one side when applied. Continuously Variable Transmission (CVT)
P (Park) position mechanism:
On a fairly
steep hill, check that the vehicle is held securely
with the shift lever in the P (Park) position
without applying any brakes.
Parking brake: Check the parking brake
operation regularly. The vehicle should be
securely held on a fairly steep hill with only the
parking brake applied. If the parking brake needs
adjusted, see a NISSAN dealer.
Seat belts: Check that all parts of the seat belt
system (for example, buckles, anchors, adjusters
and retractors) operate properly and smoothly,
and are installed securely. Check the belt
webbing for cuts, fraying, wear or damage.
Seats: Check seat position controls such as
seat adjusters, seatback recliners, etc. to ensure
they operate smoothly and that all latches lock
securely in every position. Check that the head
restraints move up and down smoothly and that
the locks (if so equipped) hold securely in all
latched positions.
Steering wheel: Check for changes in the
steering conditions, such as excessive free play,
hard steering or strange noises.
Warning lights and chimes: Make sure that
all warning lights and chimes are operating
properly.
Maintenance and do-it-yourself8-3
Page 316 of 332
7. Carefully drill the two pilot holes using a0.39 in (10 mm) drill bit at the marked
locations. (Be sure that the drill only
goes through the bumper fascia.)
8. Insert grommets into the hole on the fascia.
9. Insert a flat-blade screwdriver into the grommet hole to add a 908 turn onto the
part
*E.
10. Insert a J-nut into the license plate bracket before placing the license plate bracket on
the fascia.
11. Install the license plate bracket with the screws.
12. Install the license plate with bolts that are not longer than 0.55 in (14 mm).
WARNING
.It is extremely dangerous to ride
in a cargo area inside the vehi-
cle. In a collision, people riding
in these areas are more likely to
be seriously injured or killed.
.Do not allow people to ride in
any area of your vehicle that is
not equipped with seats and
seat belts.
.Be sure everyone in your vehicle
is in a seat and using a seat belt
properly.
TERMS
It is important to familiarize yourself with the
following terms before loading your vehicle:
.Curb Weight (actual weight of your
vehicle) - vehicle weight including:
standard and optional equipment,
fluids, emergency tools, and spare tire
assembly. This weight does notin-
clude passengers and cargo. .
GVW (Gross Vehicle Weight) - curb
weight plus the combined weight of
passengers and cargo.
. GVWR (Gross Vehicle Weight Rating)
- maximum total combined weight of the
unloaded vehicle, passengers, luggage,
hitch, trailer tongue load and any other
optional equipment. This information is
located on the F.M.V.S.S. label.
. GAWR (Gross Axle Weight Rating) -
maximum weight (load) limit specified
for the front or rear axle. This informa-
tion is located on the F.M.V.S.S. label.
. GCWR (Gross Combined Weight Rat-
ing) - The maximum total weight rating
of the vehicle, passengers, cargo, and
trailer.
. Vehicle Capacity Weight, Load limit,
Total load capacity - maximum total
weight limit specified of the load
(passengers and cargo) for the vehicle.
This is the maximum combined weight
of occupants and cargo that can be
loaded into the vehicle. If the vehicle is
used to tow a trailer, the trailer tongue
weight must be included as part of the
Technical and consumer information9-13
VEHICLE LOADING INFORMATION