2014 NISSAN CUBE ignition
[x] Cancel search: ignitionPage 181 of 332
4-40Center display, heater, air conditioner, audio and phone systems
TUNE (Tuning):
.For AM and FM radio
Turn the TUNE/SCROLL knob for manual
tuning.
. For SiriusXM Satellite Radio
Turn the TUNE/SCROLL knob to seek
channels from all of the categories when
any category is not selected.
SEEK tuning:
. For AM and FM radio
Push the SEEK/CATEGORY button
orto tune from low to high or high to low
frequencies and to stop at the next broad-
casting station.
. For SiriusXM Satellite Radio
Push the SEEK/CATEGORY button
orto tune to the first channel of the next or
previous category.
Tuning with the touch screen (AM and FM
radio):
When in AM or FM mode, the radio can be
tuned using the touch screen. To bring up the
visual tuner, touch the “Tune” key on the lower
right corner of the screen. A screen appears
with a bar running from low frequencies on the
left to high frequencies on the right. Touch the
screen at the location of the frequency you wish to tune and the station will change to that
frequency. To return to the regular radio display
screen, touch the “OK” key.
toStation memory operations:
12 stations/channels can be set for the FM band
(6 each for FM1 and FM2) , 18 for SiriusXM
Satellite Radio (6 each for XM1, XM2 and XM3)
and 6 stations can be set for the AM band.
1. Choose the radio band using the radio band select button.
2. Tune to the desired station/channel using the SEEK/CATEGORY button or the TUNE/
SCROLL knob.
3. Push and hold the desired station preset button
tountil the beep sound is
heard.
4. The station indicator will then come on and the sound will resume. Memorizing is now
complete.
5. Other buttons can be set in the same manner.
If the battery cable is disconnected, or if the fuse
opens, the radio memory will be erased. In that
case, reset the desired stations/channels.
Channels (SiriusXM Satellite Radio):
When the SiriusXM Satellite Radio is being
played, select “Channels” key to display a list of channels. Select a preferred channel from the
list to change to that channel.
Categories (SiriusXM Satellite Radio):
When the SiriusXM Satellite Radio is being
played, select “Categories” key to display a list
of channels. Select a preferred channel from the
list to display options within that category.
Compact Disc (CD) player operation
Place the ignition switch in the ACC or ON
position and insert the Compact Disc (CD) into
the slot with the label side facing up. The CD will
be guided automatically into the slot and start
playing.
If the radio is already operating, it will auto-
matically turn off and the CD will play.
If the system has been turned off while the CD
was playing, pushing the ON·OFF button will
start the CD.
Do not use 3.1 in (8 cm) discs.
PLAY:
When the CD button is pushed with the system
off and the CD loaded, the system will turn on
and the CD will start to play.
When the CD button is pushed with the CD
loaded and the radio playing, the radio will
automatically be turned off and the CD will start
Page 186 of 332
the U.S. and other countries.
WARNING
Do not connect, disconnect or operate
the USB device while driving. Doing so
can be a distraction. If distracted you
could lose control of your vehicle and
cause an accident or serious injury.
CAUTION
.Do not force the USB device into the
USB port. Inserting the USB device
tilted or up-side-down into the port
may damage the port. Make sure
that the USB device is connected
correctly into the USB port.
. Do not grab the USB port cover (if
so equipped) when pulling the USB
device out of the port. This could
damage the port and the cover.
. Do not leave the USB cable in a
place where it can be pulled unin-
tentionally. Pulling the cable may
damage the port. Refer to your device manufacturer’s owner
information regarding the proper use and care
of the device.
Compatibility:
The following models are available:
.
Fifth generation iPod
®(firmware version
1.2.3 or later)
. iPod classic
®(firmware version 1.1.1 or
later)
. First generation iPod touch
®(firmware ver-
sion 2.0.0 or later)
. Second generation iPod touch
®(firmware
version 1.2.3 or later)
. First generation iPod nano
®(firmware ver-
sion 1.3.1 or later)
. Second generation iPod nano
®(firmware
version 1.1.3 or later)
. Third generation iPod nano
®(firmware ver-
sion 1.1 or later)
. Fourth generation iPod nano
®(firmware
version 1.0.2 or later)
This unit may not control/operate correctly when
connected to some iPod
®model/firmware ver-
sion and iPhone.
Make sure that the iPod
®firmware version is
updated. Audio main operation:
Place the ignition switch in the ACC or ON
position. Then, push the
button repeatedly
to switch to the iPod®mode.
If the system has been turned off while the iPod®
was playing, pushing the ON·OFF button will
start the iPod®.
PLAY:
When the
button is pushed with the system
off and the iPod®connected, the system will turn
on. If another audio source is playing and the
iPod
®is connected, push thebutton
repeatedly to switch to the iPod®mode.
Interface:
The interface for iPod
®operation shown on the
vehicle display is similar to the iPod®interface.
Use the touchscreen, BACK button or the
TUNE/SCROLL knob to navigate the menus
on the screen.
The following items can be chosen from the
menu list screen. For further information about
each item, see the iPod
®Owner’s Manual.
. Playlists
. Artists
. Album
Center display, heater, air conditioner, audio and phone systems4-45
Page 188 of 332
SAA0451
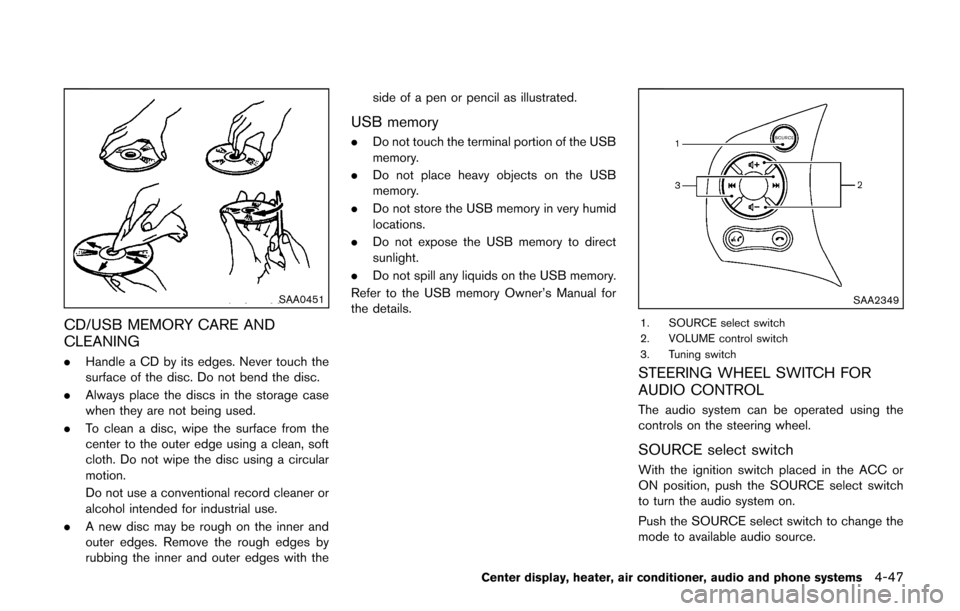
CD/USB MEMORY CARE AND
CLEANING
.Handle a CD by its edges. Never touch the
surface of the disc. Do not bend the disc.
. Always place the discs in the storage case
when they are not being used.
. To clean a disc, wipe the surface from the
center to the outer edge using a clean, soft
cloth. Do not wipe the disc using a circular
motion.
Do not use a conventional record cleaner or
alcohol intended for industrial use.
. A new disc may be rough on the inner and
outer edges. Remove the rough edges by
rubbing the inner and outer edges with the side of a pen or pencil as illustrated.
USB memory
.
Do not touch the terminal portion of the USB
memory.
. Do not place heavy objects on the USB
memory.
. Do not store the USB memory in very humid
locations.
. Do not expose the USB memory to direct
sunlight.
. Do not spill any liquids on the USB memory.
Refer to the USB memory Owner’s Manual for
the details.
SAA2349
1. SOURCE select switch
2. VOLUME control switch
3. Tuning switch
STEERING WHEEL SWITCH FOR
AUDIO CONTROL
The audio system can be operated using the
controls on the steering wheel.
SOURCE select switch
With the ignition switch placed in the ACC or
ON position, push the SOURCE select switch
to turn the audio system on.
Push the SOURCE select switch to change the
mode to available audio source.
Center display, heater, air conditioner, audio and phone systems4-47
Page 191 of 332
4-50Center display, heater, air conditioner, audio and phone systems
WARNING
.Use a phone after stopping your
vehicle in a safe location. If you
have to use a phone while driving,
exercise extreme caution at all
times so full attention may be given
to vehicle operation.
. If you find yourself unable to devote
full attention to vehicle operation
while talking on the phone, pull off
the road to a safe location and stop
your vehicle before doing so.
CAUTION
To avoid draining the vehicle battery,
use a phone after starting the engine.
SAA2350
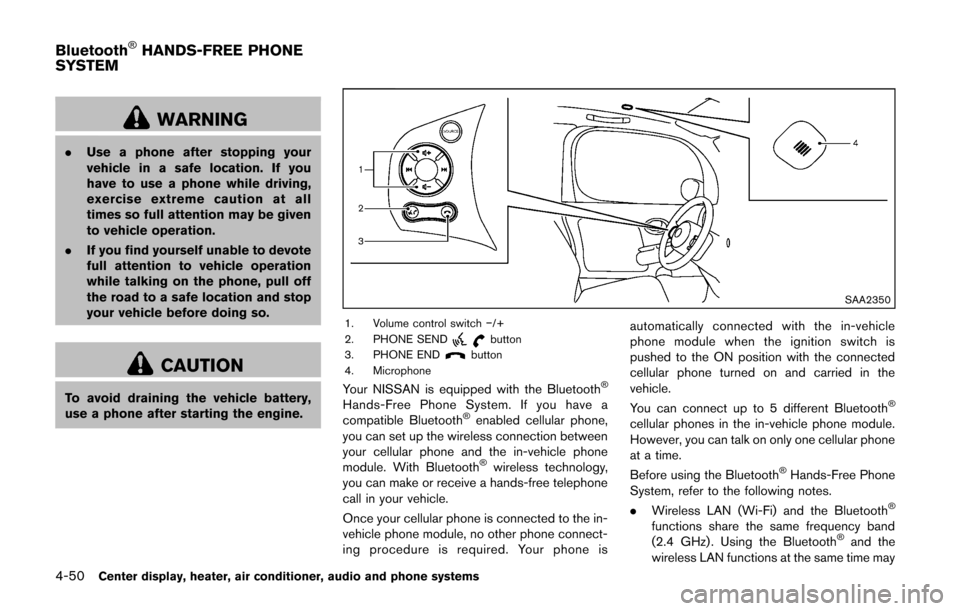
1. Volume control switch −/+
2. PHONE SENDbutton
3. PHONE ENDbutton
4. Microphone
Your NISSAN is equipped with the Bluetooth®
Hands-Free Phone System. If you have a
compatible Bluetooth®enabled cellular phone,
you can set up the wireless connection between
your cellular phone and the in-vehicle phone
module. With Bluetooth
®wireless technology,
you can make or receive a hands-free telephone
call in your vehicle.
Once your cellular phone is connected to the in-
vehicle phone module, no other phone connect-
ing procedure is required. Your phone is automatically connected with the in-vehicle
phone module when the ignition switch is
pushed to the ON position with the connected
cellular phone turned on and carried in the
vehicle.
You can connect up to 5 different Bluetooth
®
cellular phones in the in-vehicle phone module.
However, you can talk on only one cellular phone
at a time.
Before using the Bluetooth
®Hands-Free Phone
System, refer to the following notes.
. Wireless LAN (Wi-Fi) and the Bluetooth
®
functions share the same frequency band
(2.4 GHz) . Using the Bluetooth®and the
wireless LAN functions at the same time may
Bluetooth®HANDS-FREE PHONE
SYSTEM
Page 192 of 332
slow down or disconnect the communica-
tion and cause undesired noise. It is
recommended that you turn off the wireless
LAN (Wi-Fi) when using the Bluetooth
®
functions.
. Set up the wireless connection between a
compatible cellular phone and the in-vehicle
phone module before using the Bluetooth
®
Hands-Free Phone System.
. Some Bluetooth®enabled cellular phones
may not be recognized by the in-vehicle
phone module. Please visit www.nissanusa.
com/bluetooth for a recommended phone
list and instructions for connecting your
phone.
. You will not be able to use a hands-free
phone under the following conditions:
— Your vehicle is outside of the telephone
service area.
— Your vehicle is in an area where it is difficult to receive radio waves; such as in
a tunnel, in an underground parking
garage, near a tall building or in a
mountainous area.
— Your cellular phone is locked to prevent it from being dialed.
. When the radio wave condition is not ideal
or ambient sound is too loud, it may be
difficult to hear the other person’s voice during a call.
. Immediately after the ignition switch is
pushed to the ON position, it may be
impossible to receive a call for a short
period of time.
. Do not place the cellular phone in an area
surrounded by metal or far away from the in-
vehicle phone module to prevent tone quality
degradation and wireless connection dis-
ruption.
. While a cellular phone is connected through
the Bluetooth
®wireless connection, the
battery power of the cellular phone may
discharge quicker than usual. The Blue-
tooth
®Hands-Free Phone System cannot
charge cellular phones.
. If the Bluetooth
®Hands-Free Phone System
seems to be malfunctioning, see “Trouble-
shooting guide” later in this section. You can
also visit www.nissanusa.com/bluetooth for
troubleshooting help.
. Some cellular phones or other devices may
cause interference or a buzzing noise to
come from the audio system speakers.
Storing the device in a different location
may reduce or eliminate the noise.
. Refer to the cellular phone Owner’s Manual
regarding battery charging, cellular phone
antenna, etc. This wireless hands-free car kit is based on
Bluetooth technology.
* Frequency: 2402 MHz - 2480 MHz
* Output power: 4.14 dBm E.I.R.P
* Modulation: FHSS GFSK 8DPSK,
p/4DQPSK
* Number of channels: 79
* This wireless equipment cannot be used for any services related to life safety because there is
the possibility of radio interference.
REGULATORY INFORMATION
Bluetooth trademark
Bluetooth®is a trademark
owned by Bluetooth SIG, Inc.,
and licensed to Visteon Cor-
poration.
FCC Regulatory information
. CAUTION: To maintain compliance with
FCC’s RF exposure guidelines, use only
the supplied antenna. Unauthorized antenna,
modification, or attachments could damage
the transmitter and may violate FCC regula-
tions.
. Operation is subject to the following two
conditions:
1. this device may not cause interference and
2. this device must accept any interference, including interference that may cause un-
desired operation of the device
Center display, heater, air conditioner, audio and phone systems4-51
Page 193 of 332
4-52Center display, heater, air conditioner, audio and phone systems
USING THE SYSTEM
The NISSAN Voice Recognition system allows
hands-free operation of the Bluetooth®Hands-
Free Phone System.
If the vehicle is in motion, some commands may
not be available so full attention may be given to
vehicle operation.
Initialization
When the ignition switch is pushed to the ON
position, NISSAN Voice Recognition is initia-
lized, which takes a few seconds. If the
button is pushed before the initialization com-
pletes, the system will not accept any command.
Operating tips
To get the best performance out of the NISSAN
Voice Recognition system, observe the follow-
ing:
. Keep the interior of the vehicle as quiet as
possible. Close the windows to eliminate
surrounding noises (traffic noises, vibration
sounds, etc.), which may prevent the system
from recognizing voice commands correctly.
. Wait until the tone sounds before speaking a
command. Otherwise, the command will not
be received properly.
. Start speaking a command within 5 seconds
after the tone sounds. .
Speak in a natural voice without pausing
between words.
Giving voice command
To operate NISSAN Voice Recognition, push
and release thebutton located on the
steering wheel. After the tone sounds, speak a
command.
The command given is picked up by the
microphone, and voice feedback is given when
the command is accepted.
. If you need to hear the available commands
for the current menu again, say “Help” and
the system will repeat them.
. If a command is not recognized, the system
announces, “Command not recognized.
Please say again.” Repeat the command in
a clear voice.
. If you want to go back to the previous
command, you can say “Go back” or
“Correction” anytime the system is waiting
for a response.
. You can cancel a command when the
system is waiting for a response by saying,
“Cancel” or “Quit.” The system announces
“Cancel” and ends the VR session. You can
also push and hold the
button for 5
seconds on the steering wheel at any time to
cancel the VR session. Whenever the VR session is cancelled, a double beep is
played to indicate you have exited the
system.
. If you want to adjust the volume of the voice
feedback, push the volume control switch (+
or−) on the steering wheel while being
provided with feedback. You can also use
the radio volume control knob.
. In most cases you can interrupt the voice
feedback to speak the next command by
pressing the
button on the steering
wheel.
. To use the system faster, you may speak the
second level commands with the main menu
command on the main menu. For example,
press the
button and after the tone say,
“Call Redial.” Note: The combined com-
mand of Call and (Speak Name) cannot be
used.
How to say numbers
NISSAN Voice Recognition requires a certain
way to speak numbers in voice commands.
Refer to the rules and examples below.
. Either “zero” or “oh” can be used for “0”.
Example: 1-800-662-6200
— “One eight oh oh six six two six two oh
oh”, or
Page 201 of 332
4-60Center display, heater, air conditioner, audio and phone systems
Training procedure
1. Position the vehicle in a reasonably quietoutdoor location.
2. Sit in the driver’s seat with the engine running, the parking brake on, and the
transmission in Park.
3. Press and hold the
button for more than
5 seconds.
4. The system announces: “Press the PHONE SEND (
) button for the hands-free
phone system to enter the speaker adapta-
tion mode or press the PHONE END (
)
button to select a different language.”
5. Press the
button.
For information on selecting a different
language, see “Choosing a language” (P.4-
54).
6. If the connected phone is already in use, the system will prompt you to overwrite. Follow
the instructions provided by the system.
7. When preparation is complete and you are ready to begin, press the
button.
8. The SA mode will be explained. Follow the instructions provided by the system.
9. When training is finished, the system will tell you an adequate number of phrases have
been recorded. 10. The system will announce that speaker
adaptation has been completed and the
system is ready.
The SA mode will stop if:
. The
button is pressed for more than 5
seconds in SA mode.
. The vehicle is driven during SA mode.
. The ignition switch is turned to the OFF or
LOCK position.
Training phrases
During the SA mode, the system instructs you to
say the following phrases.
(The system will prompt you for each phrase.)
.phonebook transfer entry
. dial 30429
. delete call back number
. incoming
. transfer entry
. 8 pause 9 3 2 pause 7
. delete all entries
. call 7 2409
. phonebook delete entry
. next entry
. dial star 2170
. yes .
no
. select
. missed
. dial 85692
. Bluetooth on
. Outgoing
. call 3 1902
. 9 7 pause pause 3 0 8
. cancel
. call back number
. call star 2095
. delete phone
. dial 83051
. Record name
. 4 3 pause 2 9 pause 0
. delete redial number
. phonebook list names
. call 8 0541
. correction
. setup main menu
. dial 74018
. memo pad delete
. delete
. dial 97266
. call 7 6301
Page 206 of 332
5 Starting and driving
Precautions when starting and driving ................................ 5-2Exhaust gas (carbon monoxide) ...................................... 5-2
Three-way catalyst .............................................................. 5-3
Tire Pressure Monitoring System (TPMS) .................... 5-3
Avoiding collision and rollover ......................................... 5-5
Off-road recovery ................................................................ 5-6
Rapid air pressure loss ...................................................... 5-6
Drinking alcohol/drugs and driving ................................. 5-7
Ignition switch (models without Intelligent
Key system) ........................................................................\
........ 5-7
Continuously Variable Transmission (CVT) ................... 5-8
Manual Transmission (MT) ................................................ 5-8
Key positions ........................................................................\
5-9
Push-button ignition switch (models with Intelligent
Key system) ........................................................................\
........ 5-9 Operating range for engine start function .................... 5-9
Push-button ignition switch operation ........................ 5-10
Push-button ignition switch positions ......................... 5-10
Emergency engine shut off ............................................ 5-11
Intelligent Key battery discharge .................................. 5-11
Before starting the engine ................................................... 5-12
Starting the engine ................................................................ 5-12 Models without Intelligent Key system ....................... 5-12
Models with Intelligent Key system ............................. 5-13 Driving the vehicle ................................................................. 5-14
Continuously Variable Transmission (CVT) ............. 5-14
Manual Transmission (MT) ........................................... 5-18
Parking brake ........................................................................\
.. 5-20
Cruise control ........................................................................\
. 5-21 Precautions on cruise control ..................................... 5-21
Cruise control operations ............................................ 5-22
Break-in schedule ................................................................. 5-23
Fuel Efficient Driving Tips ................................................... 5-23
Increasing fuel economy ...................................................... 5-24
Parking/parking on hills ........................................................ 5-25
Electric power steering system ......................................... 5-26
Brake system ........................................................................\
.. 5-27
Braking precautions ...................................................... 5-27
Anti-lock Braking System (ABS) ............................... 5-27
Vehicle Dynamic Control (VDC) system ......................... 5-29
Cold weather driving ............................................................ 5-30 Freeing a frozen door lock ........................................... 5-30
Anti-freeze ........................................................................\
5-30
Battery ........................................................................\
....... 5-30
Draining of coolant water ............................................. 5-30
Tire equipment ................................................................ 5-31
Special winter equipment ............................................ 5-31
Driving on snow or ice ................................................. 5-31