2014 NISSAN CUBE window
[x] Cancel search: windowPage 159 of 332
4-18Center display, heater, air conditioner, audio and phone systems
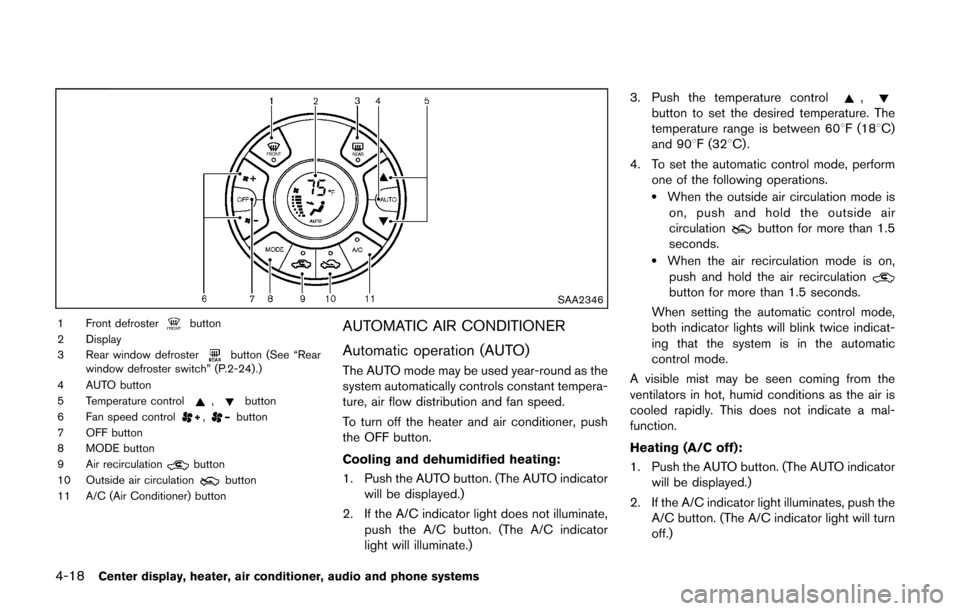
SAA2346
1 Front defrosterbutton
2 Display
3 Rear window defroster
button (See “Rear
window defroster switch” (P.2-24) .)
4 AUTO button
5 Temperature control
,button
6 Fan speed control,button
7 OFF button
8 MODE button
9 Air recirculation
button
10 Outside air circulationbutton
11 A/C (Air Conditioner) button
AUTOMATIC AIR CONDITIONER
Automatic operation (AUTO)
The AUTO mode may be used year-round as the
system automatically controls constant tempera-
ture, air flow distribution and fan speed.
To turn off the heater and air conditioner, push
the OFF button.
Cooling and dehumidified heating:
1. Push the AUTO button. (The AUTO indicator will be displayed.)
2. If the A/C indicator light does not illuminate, push the A/C button. (The A/C indicator
light will illuminate.) 3. Push the temperature control
,button to set the desired temperature. The
temperature range is between 608F (188C)
and 908F (328C) .
4. To set the automatic control mode, perform one of the following operations.
.When the outside air circulation mode ison, push and hold the outside air
circulation
button for more than 1.5
seconds.
.When the air recirculation mode is on,
push and hold the air recirculation
button for more than 1.5 seconds.
When setting the automatic control mode,
both indicator lights will blink twice indicat-
ing that the system is in the automatic
control mode.
A visible mist may be seen coming from the
ventilators in hot, humid conditions as the air is
cooled rapidly. This does not indicate a mal-
function.
Heating (A/C off):
1. Push the AUTO button. (The AUTO indicator will be displayed.)
2. If the A/C indicator light illuminates, push the A/C button. (The A/C indicator light will turn
off.)
Page 160 of 332
3. Push the temperature control,button to set the desired temperature. The
temperature range is between 608F (188C)
and 908F (328C) .
.Do not set the temperature lower than the outside air temperature. Doing so may
cause the temperature to not be con-
trolled properly.
.If the windows fog up, use dehumidifiedheating instead of the A/C off heating.
Dehumidified defrosting/defogging:
1. Push the front defroster
button. (The
indicator light will illuminate.)
2. Turn the temperature control
,button to set the desired temperature..To remove moisture or fog on the front window quickly, set the temperature to
the high temperature and the fan speed
to their maximum level.
.After the windshield is cleared, push thefront defrosterbutton again. (The
indicator light will turn off.)
.When the front defrosterbutton is
pushed, the air conditioner will automa-
tically turn on to defog the windshield.
The outside air circulation mode will be
selected to improve the defogging per-
formance.
Manual operation
The manual mode can be used to control the
heater and air conditioner to your desired
settings.
To turn off the heater and air conditioner, push
the OFF button.
Fan speed control:
Turn the fan speed control
,dial to
adjust the fan speed.
Air flow control:
Push the MODE button to change the air flow
mode.
— Air flows from the center and side ventilators.
— Air flows from the center and sideventilators and foot outlets.
— Air flows mainly from the foot outlets.
— Air flows from the defroster outlets andfoot outlets.
Temperature control:
Push the temperature control
,button
to set the desired temperature.
The temperature range is between 608F (188C)
and 908F (328C) .
Air recirculation:
Push the air recirculation
button to change
the air circulation mode. When the indicator light illuminates, the flowing air is recirculated inside
the vehicle.
Outside air circulation:
Push the outside air circulation
button to
change the air circulation mode. When the
indicator light illuminates, the flowing air is
drawn from outside the vehicle.
Automatic air intake control:
To set the automatic control mode, perform one
of the following operations.
. When the outside air circulation mode is on,
push and hold the outside air circulation
button for more than 1.5 seconds.
. When the air recirculation mode is on, push
and hold the air recirculation
button for
more than 1.5 seconds.
When setting the automatic control mode, both
indicator lights will blink twice indicating that the
system is in the automatic control mode.
Center display, heater, air conditioner, audio and phone systems4-19
Page 161 of 332
4-20Center display, heater, air conditioner, audio and phone systems
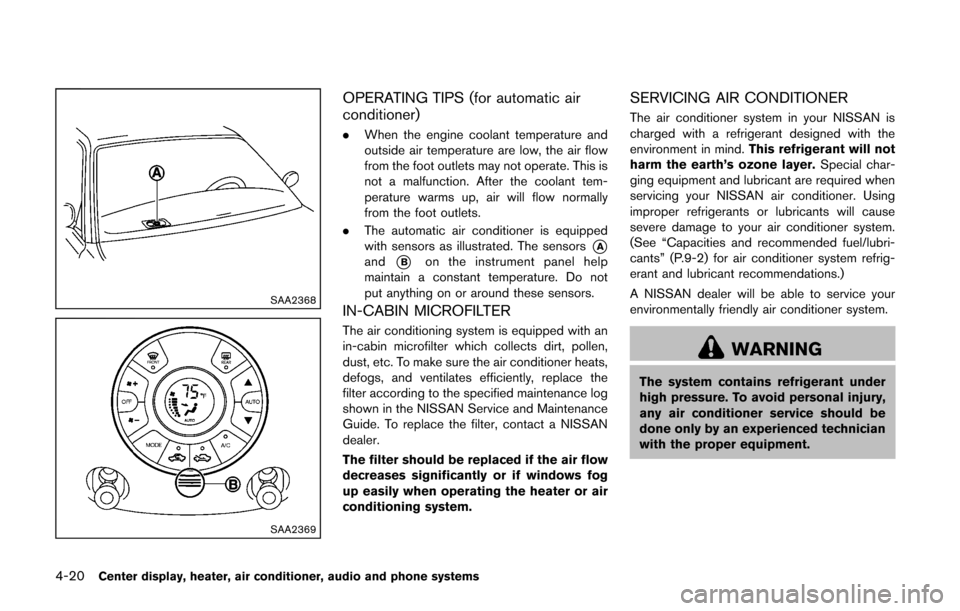
SAA2368
SAA2369
OPERATING TIPS (for automatic air
conditioner)
.When the engine coolant temperature and
outside air temperature are low, the air flow
from the foot outlets may not operate. This is
not a malfunction. After the coolant tem-
perature warms up, air will flow normally
from the foot outlets.
. The automatic air conditioner is equipped
with sensors as illustrated. The sensors
*Aand*Bon the instrument panel help
maintain a constant temperature. Do not
put anything on or around these sensors.
IN-CABIN MICROFILTER
The air conditioning system is equipped with an
in-cabin microfilter which collects dirt, pollen,
dust, etc. To make sure the air conditioner heats,
defogs, and ventilates efficiently, replace the
filter according to the specified maintenance log
shown in the NISSAN Service and Maintenance
Guide. To replace the filter, contact a NISSAN
dealer.
The filter should be replaced if the air flow
decreases significantly or if windows fog
up easily when operating the heater or air
conditioning system.
SERVICING AIR CONDITIONER
The air conditioner system in your NISSAN is
charged with a refrigerant designed with the
environment in mind. This refrigerant will not
harm the earth’s ozone layer. Special char-
ging equipment and lubricant are required when
servicing your NISSAN air conditioner. Using
improper refrigerants or lubricants will cause
severe damage to your air conditioner system.
(See “Capacities and recommended fuel/lubri-
cants” (P.9-2) for air conditioner system refrig-
erant and lubricant recommendations.)
A NISSAN dealer will be able to service your
environmentally friendly air conditioner system.
WARNING
The system contains refrigerant under
high pressure. To avoid personal injury,
any air conditioner service should be
done only by an experienced technician
with the proper equipment.
Page 165 of 332
4-24Center display, heater, air conditioner, audio and phone systems
.The iPod nano®(1st Generation) may
remain in fast forward or rewind mode if it
is connected during a seek operation. In this
case, please manually reset the iPod
®.
. If you are using an iPod®(3rd Generation
with Dock connector) , do not use very long
names for the song title, album name or
artist name to avoid the iPod
®from resetting
itself.
. Be careful not to do the following, or the
cable could be damaged and a loss of
function may occur.
— Bend the cable excessively (1.6 in (40
mm) radius minimum).
— Twist the cable excessively (more than 180 degrees) .
— Pull or drop the cable.
— Store objects with sharp edges in the storage where the cable is stored.
— Spill liquids on the cable and connectors.
. Do not connect the cable to the iPod
®if the
cable and/or connectors are wet. It may
damage the iPod
®.
. If the cable and connectors are exposed to
water, allow the cable and/or connectors to
dry completely before connecting the cable
to the iPod
®(wait 24 hours for it to dry) . .
If the connector is exposed to fluids other
than water, evaporative residue may cause a
short between the connector pins. In this
case, replace the cable, otherwise damage
to the iPod
®and a loss of function may
occur.
. If the cable is damaged (insulation cut,
connectors cracked, contamination such as
liquids, dust, dirt, etc. in the connectors) , do
not use the cable and contact a NISSAN
dealer to replace the cable with a new one.
. When not in use for extended periods of
time, store the cable in a clean, dust free
environment at room temperature and with-
out direct sun exposure.
. Do not use the cable for any other purposes
other than its intended use in the vehicle.
. iPod
®charging is only possible for devices
that support charging via a FireWire®
connection.* 12V-charge iPod®s are not chargeable with this
system.
*iPod
®, iPhone®and FireWire®are trademarks of
Apple Inc., registered in the U.S. and other
countries.
Compact Disc (CD) with MP3 or WMA
(if so equipped)
Explanation of terms:
. MP3 — MP3 is short for Moving Pictures
Experts Group Audio Layer 3. MP3 is the
most well-known compressed digital audio
file format. This format allows for near “CD
quality” sound, but at a fraction of the size of
normal audio files. MP3 conversion of an
audio track from CD-ROM can reduce the
file size by approximately 10:1 ratio (Sam-
pling: 44.1 kHz, Bit rate: 128 kbps) with
virtually no perceptible loss in quality. MP3
compression removes the redundant and
irrelevant parts of a sound signal that the
human ear doesn’t hear.
. WMA — Windows Media Audio (WMA) is a
compressed audio format created by Micro-
soft as an alternative to MP3. The WMA
codec offers greater file compression than
the MP3 codec, enabling storage of more
digital audio tracks in the same amount of
space when compared to MP3s at the same
level of quality.
. Bit rate — Bit rate denotes the number of
bits per second used by a digital music files.
The size and quality of a compressed digital
audio file is determined by the bit rate used
when encoding the file.
Page 166 of 332
.Sampling frequency — Sampling frequency
is the rate at which the samples of a signal
are converted from analog to digital (A/D
conversion) per second.
. Multisession — Multisession is one of the
methods for writing data to media. Writing
data once to the media is called a single
session, and writing more than once is
called a multisession.
. ID3/WMA Tag — The ID3/WMA tag is the
part of the encoded MP3 or WMA file that
contains information about the digital music
file such as song title, artist, album title,
encoding bit rate, track time duration, etc.
ID3 tag information is displayed on the
Album/Artist/Track title line on the display.
* Windows®and Windows Media®are registered
trademarks or trademarks of Microsoft Corpora-
tion in the United States of America and other
countries of Microsoft Corporation of the USA.
USB (Universal Serial Bus) (if so
equipped)
WARNING
Do not connect, disconnect or operate
the USB device while driving. Doing so
can be a distraction. If distracted you
could lose control of your vehicle and cause an accident or serious injury.
CAUTION
.
Do not force the USB device into the
USB port. Inserting the USB device
tilted or up-side-down into the port
may damage the port. Make sure
that the USB device is connected
correctly into the USB port.
. Do not grab the USB port cover (if
so equipped) when pulling the USB
device out of the port. This could
damage the port and the cover.
. Do not leave the USB cable in a
place where it can be pulled unin-
tentionally. Pulling the cable may
damage the port.
The vehicle is not equipped with a USB device.
USB devices should be purchased separately
as necessary.
This system cannot be used to format USB
devices. To format a USB device, use a personal
computer.
In some states/area, the USB device for the
front seats plays only sound without images for regulatory reasons, even when the vehicle is
parked.
This system supports various USB memory
devices, USB hard drives and iPod
®players.
Some USB devices may not be supported by
this system.
. Partitioned USB devices may not be played
correctly.
. Some characters used in other languages
(Chinese, Japanese, etc.) are not displayed
properly on display. Using English language
characters with a USB device is recom-
mended.
General notes for USB use:
Refer to your device manufacturer’s owner
information regarding the proper use and care
of the device.
Notes for iPod
®use:
iPod®is a trademark of Apple Inc., registered in
the U.S. and other countries.
. Improperly plugging in the iPod
®may cause
a checkmark to be displayed on and off
(flickering) . Always make sure that the iPod
®
is connected properly.
. An iPod nano®(1st Generation) may remain
in fast forward or rewind mode if it is
connected during a seek operation. In this
case, please manually reset the iPod
®.
Center display, heater, air conditioner, audio and phone systems4-25
Page 167 of 332
4-26Center display, heater, air conditioner, audio and phone systems
.An iPod nano®(2nd Generation) will con-
tinue to fast-forward or rewind if it is
disconnected during a seek operation.
. An incorrect song title may appear when the
Play Mode is changed while using an iPod
nano
®(2nd Generation)
. Audiobooks may not play in the same order
as they appear on an iPod
®.
. Large video files cause slow responses in an
iPod
®. The vehicle center display may
momentarily black out, but will soon recover.
. If an iPod
®automatically selects large video
files while in the shuffle mode, the vehicle
center display may momentarily black out,
but will soon recover.
Compressed Audio Files (MP3/WMA/
AAC) (if so equipped)
Explanation of terms:
. MP3 — MP3 is short for Moving Pictures
Experts Group Audio Layer 3. MP3 is the
most well known compressed digital audio
file format. This format allows for near “CD
quality” sound, but at a fraction of the size of
normal audio files. MP3 conversion of an
audio track can reduce the file size by
approximately a 10:1 ratio (Sampling: 44.1
kHz, Bit rate: 128 kbps) with virtually no
perceptible loss in quality. The compression reduces certain parts of sound that seem
inaudible to most people.
. WMA — Windows Media Audio (WMA) is a
compressed audio format created by Micro-
soft as an alternative to MP3. The WMA
codec offers greater file compression than
the MP3 codec, enabling storage of more
digital audio tracks in the same amount of
space when compared to MP3s at the same
level of quality.
. AAC/M4A — Advanced Audio Coding
(AAC) is a lossy audio compression format.
Audio files that have been encoded with
AAC are generally smaller in size and deliver
a higher quality of sound than MP3.
. Bit rate — Bit rate denotes the number of
bits per second used by a digital music file.
The size and quality of a compressed digital
audio file is determined by the bit rate used
when encoding the file.
. Sampling frequency — Sampling frequency
is the rate at which the samples of a signal
are converted from analog to digital (A/D
conversion) per second.
. Multisession — Multisession is one of the
methods for writing data to media. Writing
data once to the media is called a single
session, and writing more than once is
called a multisession. .
ID3/WMA Tag — The ID3/WMA tag is the
part of the encoded MP3 or WMA file that
contains information about the digital music
file such as song title, artist, album title,
encoding bit rate, track time duration, etc.
ID3 tag information is displayed on the
Album/Artist/Track title line on the display.
* Windows
®and Windows Media®are regis-
tered trademarks or trademarks of Microsoft
Corporation in the United States of America
and/or other countries.
Page 169 of 332
4-28Center display, heater, air conditioner, audio and phone systems
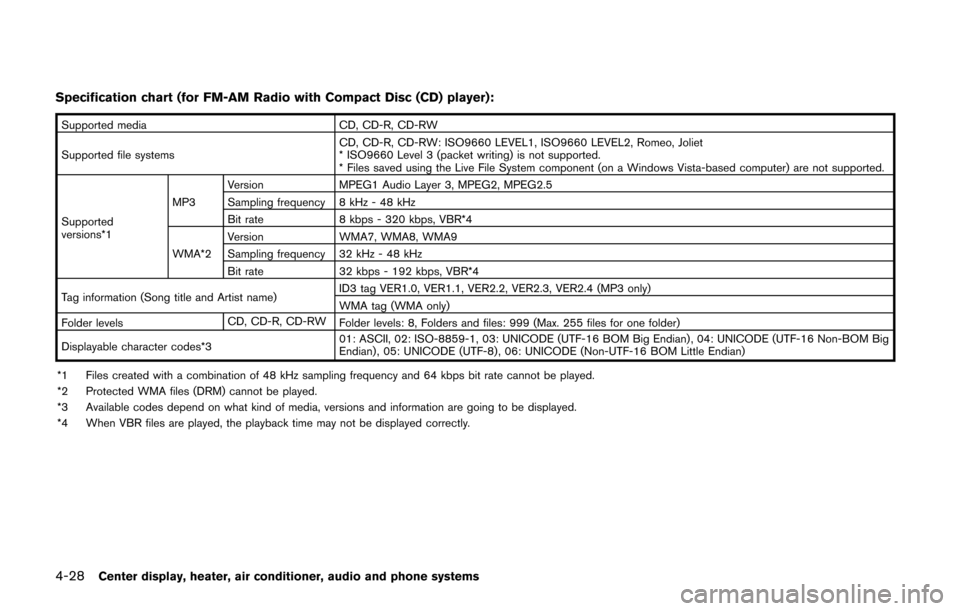
Specification chart (for FM-AM Radio with Compact Disc (CD) player):
Supported mediaCD, CD-R, CD-RW
Supported file systems CD, CD-R, CD-RW: ISO9660 LEVEL1, ISO9660 LEVEL2, Romeo, Joliet
* ISO9660 Level 3 (packet writing) is not supported.
* Files saved using the Live File System component (on a Windows Vista-based computer) are not supported.
Supported
versions*1 MP3
Version
MPEG1 Audio Layer 3, MPEG2, MPEG2.5
Sampling frequency 8 kHz - 48 kHz
Bit rate 8 kbps - 320 kbps, VBR*4
WMA*2 Version
WMA7, WMA8, WMA9
Sampling frequency 32 kHz - 48 kHz
Bit rate 32 kbps - 192 kbps, VBR*4
Tag information (Song title and Artist name) ID3 tag VER1.0, VER1.1, VER2.2, VER2.3, VER2.4 (MP3 only)
WMA tag (WMA only)
Folder levels CD, CD-R, CD-RW
Folder levels: 8, Folders and files: 999 (Max. 255 files for one folder)
Displayable character codes*3 01: ASCII, 02: ISO-8859-1, 03: UNICODE (UTF-16 BOM Big Endian) , 04: UNICODE (UTF-16 Non-BOM Big
Endian) , 05: UNICODE (UTF-8), 06: UNICODE (Non-UTF-16 BOM Little Endian)
*1 Files created with a combination of 48 kHz sampling frequency and 64 kbps bit rate cannot be played.
*2 Protected WMA files (DRM) cannot be played.
*3 Available codes depend on what kind of media, versions and information are going to be displayed.
*4 When VBR files are played, the playback time may not be displayed correctly.
Page 193 of 332
4-52Center display, heater, air conditioner, audio and phone systems
USING THE SYSTEM
The NISSAN Voice Recognition system allows
hands-free operation of the Bluetooth®Hands-
Free Phone System.
If the vehicle is in motion, some commands may
not be available so full attention may be given to
vehicle operation.
Initialization
When the ignition switch is pushed to the ON
position, NISSAN Voice Recognition is initia-
lized, which takes a few seconds. If the
button is pushed before the initialization com-
pletes, the system will not accept any command.
Operating tips
To get the best performance out of the NISSAN
Voice Recognition system, observe the follow-
ing:
. Keep the interior of the vehicle as quiet as
possible. Close the windows to eliminate
surrounding noises (traffic noises, vibration
sounds, etc.), which may prevent the system
from recognizing voice commands correctly.
. Wait until the tone sounds before speaking a
command. Otherwise, the command will not
be received properly.
. Start speaking a command within 5 seconds
after the tone sounds. .
Speak in a natural voice without pausing
between words.
Giving voice command
To operate NISSAN Voice Recognition, push
and release thebutton located on the
steering wheel. After the tone sounds, speak a
command.
The command given is picked up by the
microphone, and voice feedback is given when
the command is accepted.
. If you need to hear the available commands
for the current menu again, say “Help” and
the system will repeat them.
. If a command is not recognized, the system
announces, “Command not recognized.
Please say again.” Repeat the command in
a clear voice.
. If you want to go back to the previous
command, you can say “Go back” or
“Correction” anytime the system is waiting
for a response.
. You can cancel a command when the
system is waiting for a response by saying,
“Cancel” or “Quit.” The system announces
“Cancel” and ends the VR session. You can
also push and hold the
button for 5
seconds on the steering wheel at any time to
cancel the VR session. Whenever the VR session is cancelled, a double beep is
played to indicate you have exited the
system.
. If you want to adjust the volume of the voice
feedback, push the volume control switch (+
or−) on the steering wheel while being
provided with feedback. You can also use
the radio volume control knob.
. In most cases you can interrupt the voice
feedback to speak the next command by
pressing the
button on the steering
wheel.
. To use the system faster, you may speak the
second level commands with the main menu
command on the main menu. For example,
press the
button and after the tone say,
“Call Redial.” Note: The combined com-
mand of Call and (Speak Name) cannot be
used.
How to say numbers
NISSAN Voice Recognition requires a certain
way to speak numbers in voice commands.
Refer to the rules and examples below.
. Either “zero” or “oh” can be used for “0”.
Example: 1-800-662-6200
— “One eight oh oh six six two six two oh
oh”, or