2014 NISSAN CUBE lights
[x] Cancel search: lightsPage 102 of 332
Instrument brightness control
The instrument brightness control operates
when the ignition switch is in the ON position.
Push the control knob
*Ato adjust the bright-
ness of the instrument panel lights. The bright-
ness indicator
*Bwill be shown briefly in the
vehicle information display when the control is
turned.
When the brightness level reaches the maximum
or minimum, a beep will sound.
SIC3671
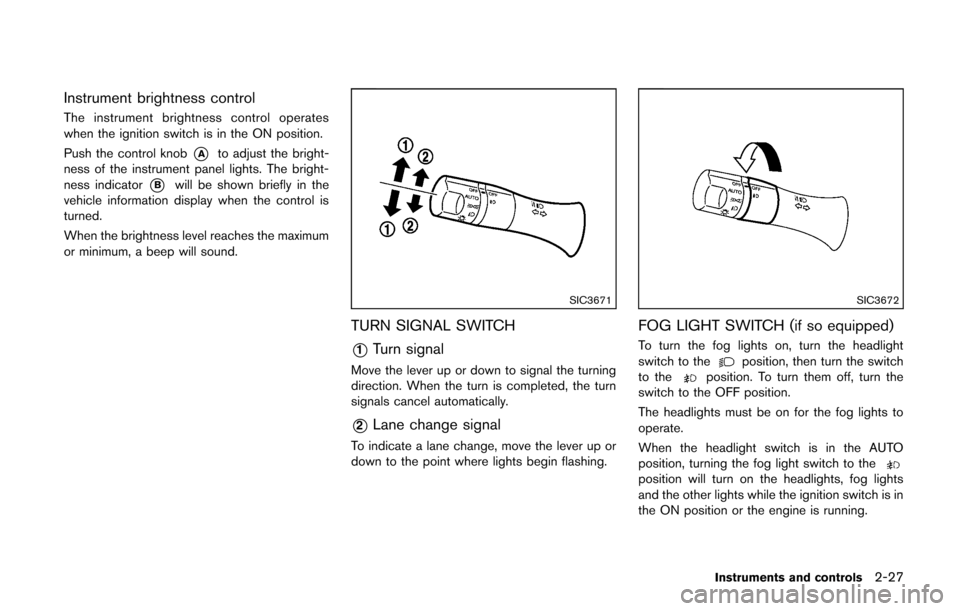
TURN SIGNAL SWITCH
*1Turn signal
Move the lever up or down to signal the turning
direction. When the turn is completed, the turn
signals cancel automatically.
*2Lane change signal
To indicate a lane change, move the lever up or
down to the point where lights begin flashing.
SIC3672
FOG LIGHT SWITCH (if so equipped)
To turn the fog lights on, turn the headlight
switch to theposition, then turn the switch
to theposition. To turn them off, turn the
switch to the OFF position.
The headlights must be on for the fog lights to
operate.
When the headlight switch is in the AUTO
position, turning the fog light switch to the
position will turn on the headlights, fog lights
and the other lights while the ignition switch is in
the ON position or the engine is running.
Instruments and controls2-27
Page 104 of 332
.Avoid using power outlet when the
air conditioner, headlights or rear
window defroster is on.
. This power outlet is not designed
for use with a cigarette lighter unit.
. Push the plug in as far as it will go.
If good contact is not made, the plug
may overheat or the internal tem-
perature fuse may open.
. Before inserting or disconnecting a
plug, be sure the electrical acces-
sory being used is turned OFF.
. When not in use, be sure to close
the cap. Do not allow water to
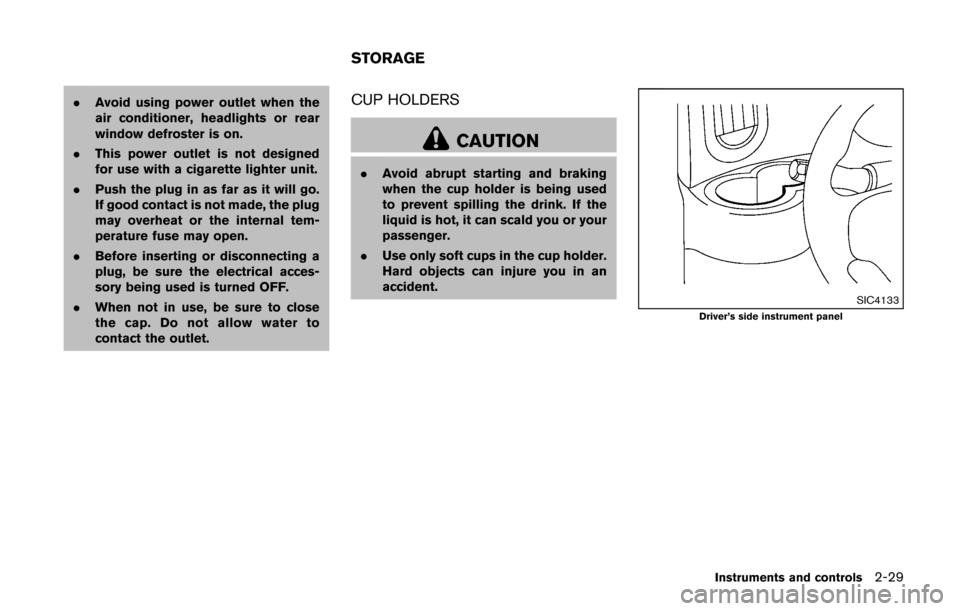
contact the outlet.CUP HOLDERS
CAUTION
. Avoid abrupt starting and braking
when the cup holder is being used
to prevent spilling the drink. If the
liquid is hot, it can scald you or your
passenger.
. Use only soft cups in the cup holder.
Hard objects can injure you in an
accident.
SIC4133Driver’s side instrument panel
Instruments and controls2-29
STORAGE
Page 111 of 332
2-36Instruments and controls
CAUTION
Do not use for extended periods of time
with the engine stopped. This could
result in a discharged battery.
SIC4572
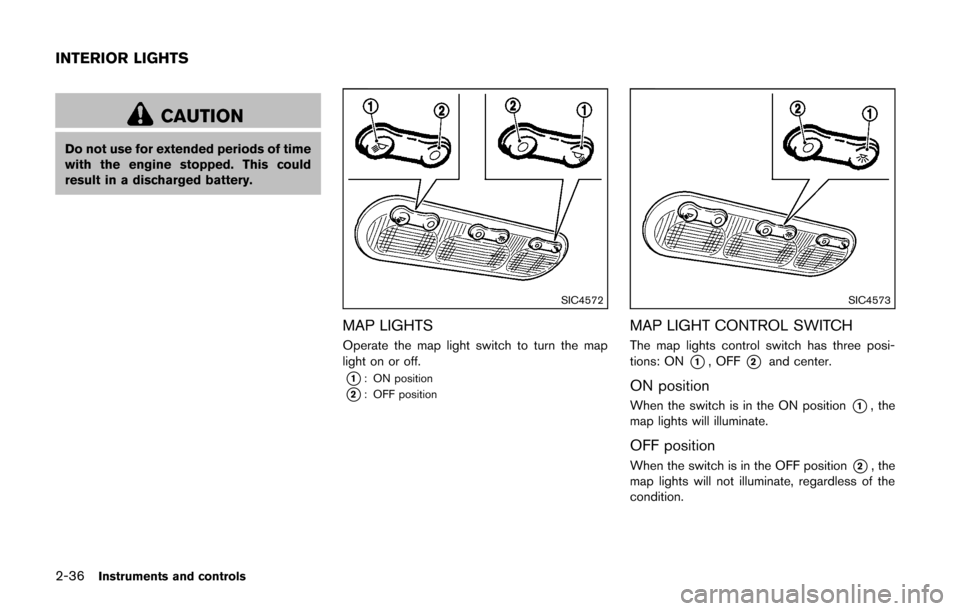
MAP LIGHTS
Operate the map light switch to turn the map
light on or off.
*1: ON position
*2: OFF position
SIC4573
MAP LIGHT CONTROL SWITCH
The map lights control switch has three posi-
tions: ON
*1, OFF*2and center.
ON position
When the switch is in the ON position*1, the
map lights will illuminate.
OFF position
When the switch is in the OFF position*2, the
map lights will not illuminate, regardless of the
condition.
INTERIOR LIGHTS
Page 112 of 332
Center position
When the switch is in the center position, the
map lights will illuminate under the following
conditions:
.ignition switch is placed in the OFF position
(models with Intelligent Key system)
— remain on for about 15 seconds.
. the key is removed from the ignition switch
(models without Intelligent Key system)
— remain on for about 15 seconds.
. doors are unlocked by pushing the UN-
LOCK
button (on the keyfob or
Intelligent Key) or the request switch (In-
telligent Key system equipped model) , with
the ignition switch in the LOCK position
— remain on for about 15 seconds.
. any door is opened and then closed with the
ignition switch in the LOCK position
— remain on for about 15 seconds.
. any door is opened with the ignition switch
in the ACC or ON position
— remain on while the door is opened.
When the door is closed, the lights go
off.
The lights will turn off after a period of
time when the lights remain illuminated to
prevent the battery from becoming dis-
charged.SIC4148
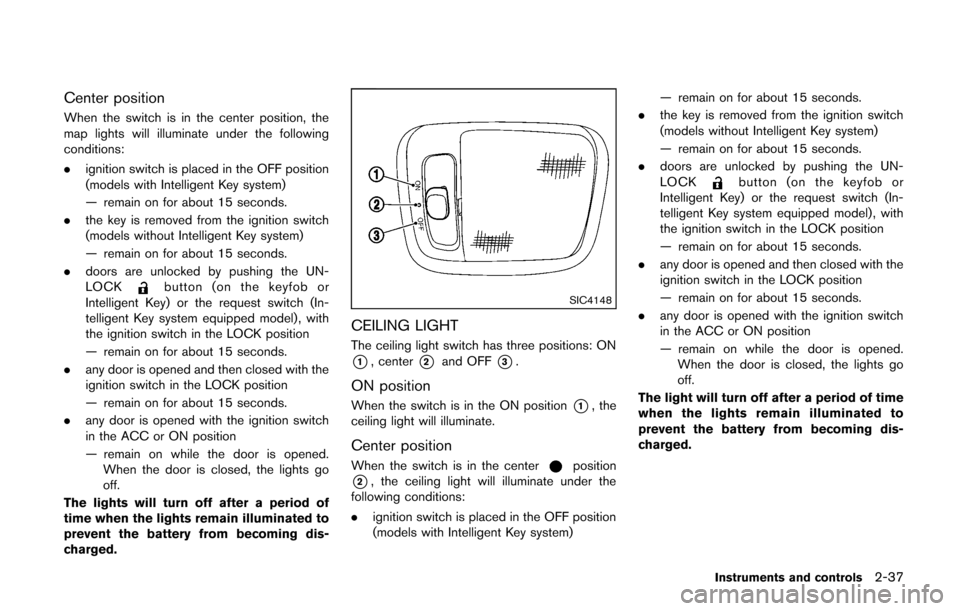
CEILING LIGHT
The ceiling light switch has three positions: ON
*1, center*2and OFF*3.
ON position
When the switch is in the ON position*1, the
ceiling light will illuminate.
Center position
When the switch is in the centerposition
*2, the ceiling light will illuminate under the
following conditions:
. ignition switch is placed in the OFF position
(models with Intelligent Key system) — remain on for about 15 seconds.
. the key is removed from the ignition switch
(models without Intelligent Key system)
— remain on for about 15 seconds.
. doors are unlocked by pushing the UN-
LOCK
button (on the keyfob or
Intelligent Key) or the request switch (In-
telligent Key system equipped model) , with
the ignition switch in the LOCK position
— remain on for about 15 seconds.
. any door is opened and then closed with the
ignition switch in the LOCK position
— remain on for about 15 seconds.
. any door is opened with the ignition switch
in the ACC or ON position
— remain on while the door is opened.
When the door is closed, the lights go
off.
The light will turn off after a period of time
when the lights remain illuminated to
prevent the battery from becoming dis-
charged.
Instruments and controls2-37
Page 114 of 332
3 Pre-driving checks and adjustments
Keys ........................................................................\
...................... 3-2NISSAN Vehicle Immobilizer System keys ................... 3-2
Intelligent Keys (if so equipped) ..................................... 3-3
Doors ........................................................................\
.................... 3-4 Locking with key .................................................................. 3-5
Locking with inside lock knob .......................................... 3-5
Locking with power door lock switch ............................ 3-5
Automatic door locks ......................................................... 3-6
Child safety rear door lock ............................................... 3-6
Remote keyless entry system (if so equipped) ................. 3-7
How to use remote keyless entry system ..................... 3-8
Intelligent Key system (if so equipped) ............................ 3-10 Intelligent Key operating range ..................................... 3-12
Door locks/unlocks precaution .................................... 3-12
Intelligent Key operation ................................................. 3-13
Battery saver system ....................................................... 3-14 Warning lights and audible reminders ...................... 3-14
Troubleshooting guide .................................................. 3-15
How to use remote keyless entry function .............. 3-16
Hood ........................................................................\
................. 3-19
Back door ........................................................................\
........ 3-20
Fuel-filler door ........................................................................\
3-21
Opening the fuel-filler door ......................................... 3-21
Fuel-filler cap .................................................................. 3-21
Tilt steering column .............................................................. 3-23 Tilt operation ................................................................... 3-23
Sun visors ........................................................................\
........ 3-24
Mirrors ........................................................................\
............. 3-24 Inside mirror ..................................................................... 3-24
Outside mirrors ............................................................... 3-25
Vanity mirror ..................................................................... 3-26
Page 121 of 332
3-8Pre-driving checks and adjustments
JVP0213X
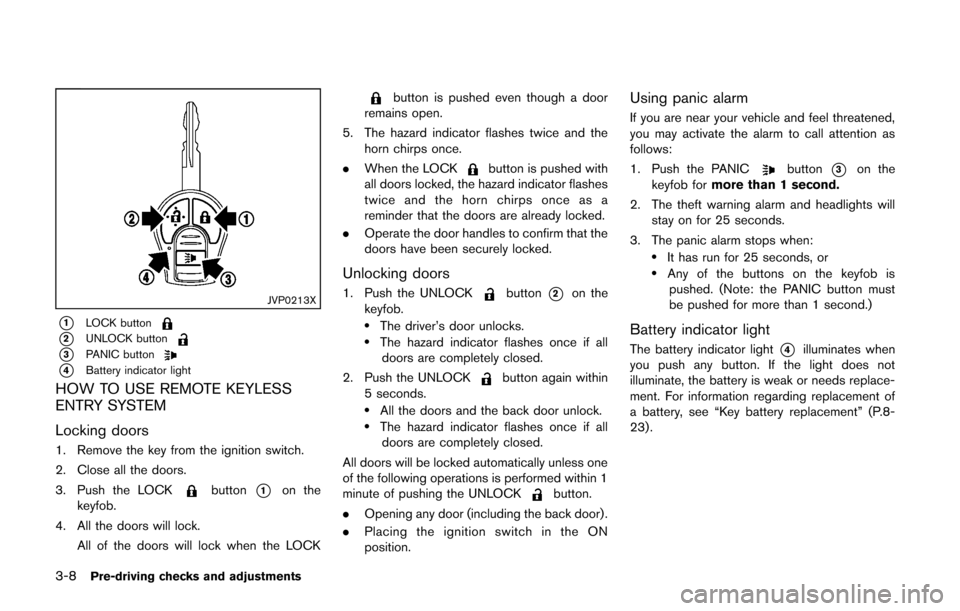
*1LOCK button
*2UNLOCK button
*3PANIC button
*4Battery indicator light
HOW TO USE REMOTE KEYLESS
ENTRY SYSTEM
Locking doors
1. Remove the key from the ignition switch.
2. Close all the doors.
3. Push the LOCK
button*1on the
keyfob.
4. All the doors will lock. All of the doors will lock when the LOCK
button is pushed even though a door
remains open.
5. The hazard indicator flashes twice and the horn chirps once.
. When the LOCK
button is pushed with
all doors locked, the hazard indicator flashes
twice and the horn chirps once as a
reminder that the doors are already locked.
. Operate the door handles to confirm that the
doors have been securely locked.
Unlocking doors
1. Push the UNLOCKbutton*2on the
keyfob.
.The driver’s door unlocks..The hazard indicator flashes once if all doors are completely closed.
2. Push the UNLOCK
button again within
5 seconds.
.All the doors and the back door unlock..The hazard indicator flashes once if all doors are completely closed.
All doors will be locked automatically unless one
of the following operations is performed within 1
minute of pushing the UNLOCK
button.
. Opening any door (including the back door) .
. Placing the ignition switch in the ON
position.
Using panic alarm
If you are near your vehicle and feel threatened,
you may activate the alarm to call attention as
follows:
1. Push the PANIC
button*3on the
keyfob for more than 1 second.
2. The theft warning alarm and headlights will stay on for 25 seconds.
3. The panic alarm stops when:
.It has run for 25 seconds, or.Any of the buttons on the keyfob is pushed. (Note: the PANIC button must
be pushed for more than 1 second.)
Battery indicator light
The battery indicator light*4illuminates when
you push any button. If the light does not
illuminate, the battery is weak or needs replace-
ment. For information regarding replacement of
a battery, see “Key battery replacement” (P.8-
23).
Page 127 of 332
3-14Pre-driving checks and adjustments
Locking doors
1. Place the ignition switch in the OFF positionand carry the Intelligent Key with you.*1
2. Close all the doors.*2
3. Push the door handle request switch (dri- ver’s or front passenger’s)
*Aor the back
door request switch
*Bwhile carrying the
Intelligent Key with you.*3
4. All the doors and the back door will lock.
5. The hazard indicator flashes twice and the outside chime sounds twice.
*1: Doors will lock with the request switch while
the ignition switch is in the ACC or ON position.
*2: Doors will not lock with the request switch
while any door is open.
*3: Doors will not lock with the request switch
when the Intelligent Key is left inside the vehicle.
However, when an Intelligent Key is inside the
vehicle, doors can be locked with another
registered Intelligent Key.
Unlocking doors
1. Push the door handle request switch*Aor
the back door request switch
*Bwhile
carrying the Intelligent Key with you.
2. The hazard indicator flashes once and out- side chime sounds once. The corresponding
door or the back door will unlock. 3. Push the request switch again within 1
minute.
4. The hazard indicator flashes once and out- side chime sounds once again. All the doors
and the back door will unlock.
All doors will be locked automatically unless one
of the following operations is performed within 1
minute after pushing the request switch while
the doors are locked.
. Opening any door.
. Pushing the ignition switch.
During this 1-minute time period, if the UNLOCK
button on the Intelligent Key is pushed, all
doors will be locked automatically after another
1 minute.
BATTERY SAVER SYSTEM
When all the following conditions are met for a
period of time, the battery saver system will cut
off the power supply to prevent battery dis-
charge.
. The ignition switch is in the ACC position,
and
. All doors are closed, and
. The shift lever is in the P (Park) position.
WARNING LIGHTS AND AUDIBLE
REMINDERS
To help prevent the vehicle from moving
unexpectedly by erroneous operation of the
Intelligent Key listed on the following chart or
to help prevent the vehicle from being stolen,
chime or beep sounds inside and outside the
vehicle and a warning light illuminates or blinks.
When a chime or beep sounds or the warning
light illuminates or blinks, be sure to check the
vehicle and Intelligent Key.
See “Troubleshooting guide” (P.3-15) and
“Warning/indicator lights and audible remin-
ders” (P.2-11) .
Intelligent Key system warning light:
P position selecting warning light:
Page 130 of 332
SPA2252
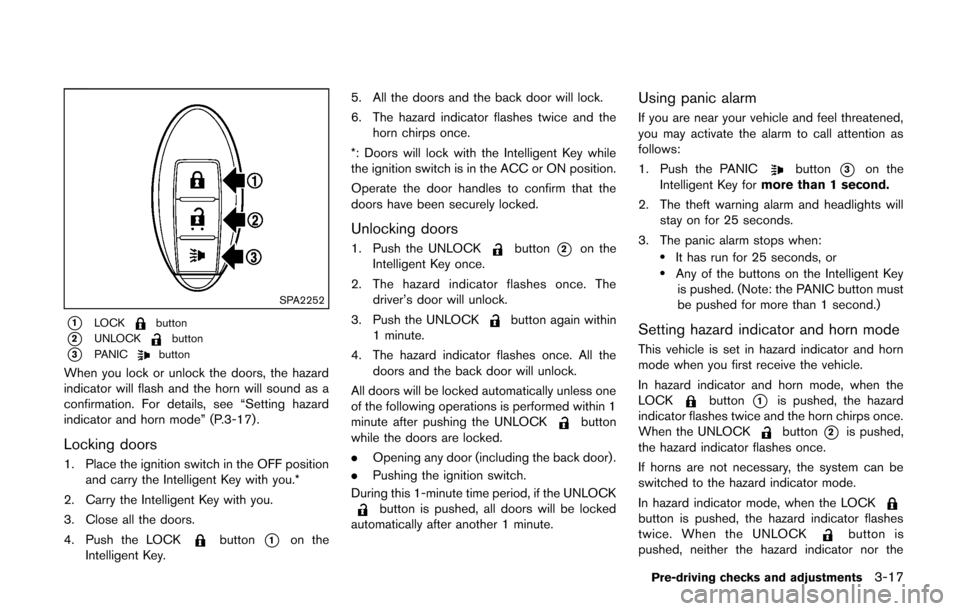
*1LOCKbutton
*2UNLOCKbutton
*3PANICbutton
When you lock or unlock the doors, the hazard
indicator will flash and the horn will sound as a
confirmation. For details, see “Setting hazard
indicator and horn mode” (P.3-17) .
Locking doors
1. Place the ignition switch in the OFF positionand carry the Intelligent Key with you.*
2. Carry the Intelligent Key with you.
3. Close all the doors.
4. Push the LOCK
button*1on the
Intelligent Key. 5. All the doors and the back door will lock.
6. The hazard indicator flashes twice and the
horn chirps once.
*: Doors will lock with the Intelligent Key while
the ignition switch is in the ACC or ON position.
Operate the door handles to confirm that the
doors have been securely locked.
Unlocking doors
1. Push the UNLOCKbutton*2on the
Intelligent Key once.
2. The hazard indicator flashes once. The driver’s door will unlock.
3. Push the UNLOCK
button again within
1 minute.
4. The hazard indicator flashes once. All the doors and the back door will unlock.
All doors will be locked automatically unless one
of the following operations is performed within 1
minute after pushing the UNLOCK
button
while the doors are locked.
. Opening any door (including the back door) .
. Pushing the ignition switch.
During this 1-minute time period, if the UNLOCK
button is pushed, all doors will be locked
automatically after another 1 minute.
Using panic alarm
If you are near your vehicle and feel threatened,
you may activate the alarm to call attention as
follows:
1. Push the PANIC
button*3on the
Intelligent Key for more than 1 second.
2. The theft warning alarm and headlights will stay on for 25 seconds.
3. The panic alarm stops when:
.It has run for 25 seconds, or.Any of the buttons on the Intelligent Key is pushed. (Note: the PANIC button must
be pushed for more than 1 second.)
Setting hazard indicator and horn mode
This vehicle is set in hazard indicator and horn
mode when you first receive the vehicle.
In hazard indicator and horn mode, when the
LOCK
button*1is pushed, the hazard
indicator flashes twice and the horn chirps once.
When the UNLOCK
button*2is pushed,
the hazard indicator flashes once.
If horns are not necessary, the system can be
switched to the hazard indicator mode.
In hazard indicator mode, when the LOCK
button is pushed, the hazard indicator flashes
twice. When the UNLOCKbutton is
pushed, neither the hazard indicator nor the
Pre-driving checks and adjustments3-17