2014 NISSAN CUBE weight
[x] Cancel search: weightPage 70 of 332
.Do not place objects with sharp
edges on the seat. Also, do not
place heavy objects on the seat that
will leave permanent impressions in
the seat. Such objects can damage
the seat or occupant classification
sensors (weight sensors) . This can
affect the operation of the air bag
system and result in serious perso-
nal injury.
. Do not use water or acidic cleaners
(hot steam cleaners) on the seat.
This can damage the seat or occu-
pant classification sensors. This can
also affect the operation of the air
bag system and result in serious
personal injury.
. Immediately after inflation, several
front air bag system components
will be hot. Do not touch them; you
may severely burn yourself.
. No unauthorized changes should be
made to any components or wiring
of the supplemental air bag system.
This is to prevent accidental infla-
tion of the supplemental air bag or
damage to the supplemental air bag
system. .
Do not make unauthorized changes
to your vehicle’s electrical system,
suspension system or front end
structure. This could affect proper
operation of the front air bag sys-
tem.
. Tampering with the front air bag
system may result in serious perso-
nal injury. Tampering includes
changes to the steering wheel and
the instrument panel assembly by
placing material over the steering
wheel pad and above the instrument
panel or by installing additional trim
material around the air bag system.
. Removing or modifying the front
passenger seat may affect the func-
tion of the air bag system and result
in serious personal injury.
. Modifying or tampering with the
front passenger seat may result in
serious personal injury. For exam-
ple, do not change the front seats by
placing material on the seat cushion
or by installing additional trim ma-
terial, such as seat covers, on the
seat that is not specifically designed
to assure proper air bag operation.
Additionally, do not stow any ob- jects under the front passenger seat
or the seat cushion and seatback.
Such objects may interfere with the
proper operation of the occupant
classification sensors.
. No unauthorized changes should be
made to any components or wiring
of the seat belt system. This may
affect the front air bag system.
Tampering with the seat belt system
may result in serious personal in-
jury.
. Work on and around the front air
bag system should be done by a
NISSAN dealer. Installation of elec-
trical equipment should also be
done by a NISSAN dealer. The
Supplemental Restraint System
(SRS) wiring harnesses* should not
be modified or disconnected. Un-
authorized electrical test equipment
and probing devices should not be
used on the air bag system.
. A cracked windshield should be
replaced immediately by a qualified
repair facility. A cracked windshield
could affect the function of the
supplemental air bag system.
Safety — Seats, seat belts and supplemental restraint system1-51
Page 293 of 332
8-30Maintenance and do-it-yourself
If you have a flat tire, see “Flat tire” (P.6-3) .
TIRE PRESSURE
Tire Pressure Monitoring System (TPMS)
This vehicle is equipped with the Tire Pressure
Monitoring System (TPMS) . It monitors tire
pressure of all tires except the spare. When
the low tire pressure warning light is lit, and the
CHECK TIRE PRES (pressure) warning mes-
sage is displayed in the vehicle information
display, one or more of your tires is significantly
under-inflated.
The TPMS will activate only when the vehicle is
driven at speeds above 16 MPH (25 km/h).
Also, this system may not detect a sudden drop
in tire pressure (for example a flat tire while
driving) .
For more details, see “Low tire pressure warning
light” (P.2-14) , “Tire Pressure Monitoring Sys-
tem (TPMS)” (P.5-3) and “Tire Pressure Mon-
itoring System (TPMS)” (P.6-3) .
Tire inflation pressure
Check the pressure of the tires (including
the spare) often and always prior to long
distance trips. The recommended tire
pressure specifications are shown on the
Tire and Loading Information label under
the “Cold Tire Pressure” heading. The Tireand Loading Information label is affixed to
the driver side center pillar. Tire pressures
should be checked regularly because:
.
Most tires naturally lose air over time.
. Tires can lose air suddenly when driven
over potholes or other objects or if the
vehicle strikes a curb while parking.
The tire pressures should be checked
when the tires are cold. The tires are
considered COLD after the vehicle has
been parked for 3 or more hours, or driven
less than 1 mile (1.6 km) at moderate
speeds.
Incorrect tire pressure, including un-
der inflation, may adversely affect tire
life and vehicle handling.
WARNING
. Improperly inflated tires can fail
suddenly and cause an accident.
. The Gross Vehicle Weight rating
(GVWR) is located on the F.M.V.
S.S. certification label. The ve-
hicle weight capacity is indi-
cated on the Tire and Loading Information label. Do not load
your vehicle beyond this capa-
city. Overloading your vehicle
may result in reduced tire life,
unsafe operating conditions due
to premature tire failure, or un-
favorable handling characteris-
tics and could also lead to a
serious accident. Loading be-
yond the specified capacity may
also result in failure of other
vehicle components.
. Before taking a long trip, or
whenever you heavily load your
vehicle, use a tire pressure
gauge to ensure that the tire
pressures are at the specified
level.
. For additional information re-
garding tires, refer to “Important
Tire Safety Information” in the
Warranty Information Booklet.
WHEELS AND TIRES
Page 296 of 332
SDI1575Example
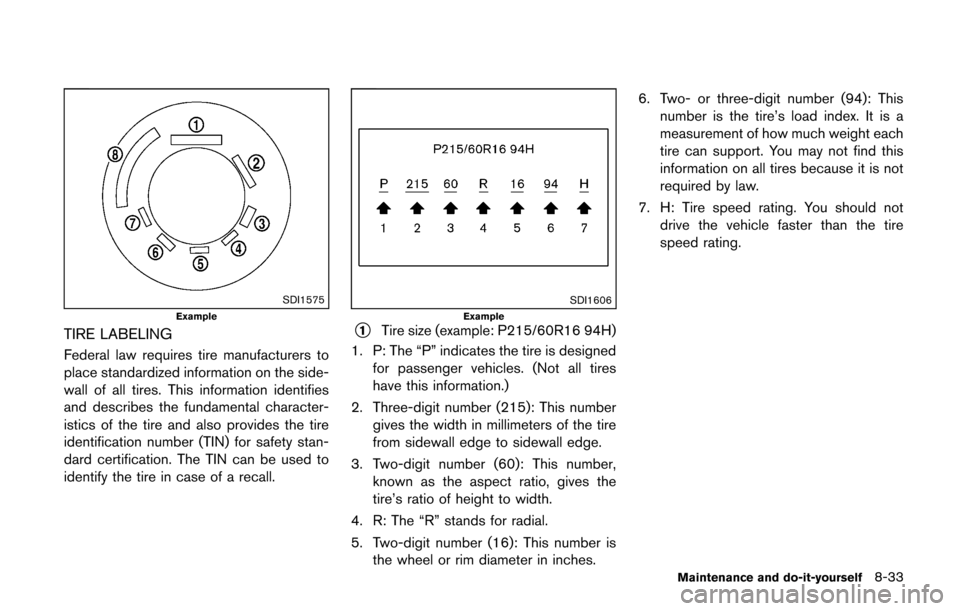
TIRE LABELING
Federal law requires tire manufacturers to
place standardized information on the side-
wall of all tires. This information identifies
and describes the fundamental character-
istics of the tire and also provides the tire
identification number (TIN) for safety stan-
dard certification. The TIN can be used to
identify the tire in case of a recall.
SDI1606Example*1Tire size (example: P215/60R16 94H)
1. P: The “P” indicates the tire is designedfor passenger vehicles. (Not all tires
have this information.)
2. Three-digit number (215): This number gives the width in millimeters of the tire
from sidewall edge to sidewall edge.
3. Two-digit number (60): This number, known as the aspect ratio, gives the
tire’s ratio of height to width.
4. R: The “R” stands for radial.
5. Two-digit number (16): This number is the wheel or rim diameter in inches. 6. Two- or three-digit number (94): This
number is the tire’s load index. It is a
measurement of how much weight each
tire can support. You may not find this
information on all tires because it is not
required by law.
7. H: Tire speed rating. You should not drive the vehicle faster than the tire
speed rating.
Maintenance and do-it-yourself8-33
Page 304 of 332
9 Technical and consumer information
Capacities and recommended fuel/lubricants ................... 9-2Fuel recommendation ......................................................... 9-4
Engine oil and oil filter recommendation ....................... 9-6
Air conditioning system refrigerant and
lubricant recommendations ............................................... 9-7
Specifications ........................................................................\
..... 9-8
Engine ........................................................................\
............ 9-8
Wheels and tires ................................................................. 9-8
Dimensions and weights ................................................... 9-9
When traveling or registering your vehicle in
another country ........................................................................\
.. 9-9
Vehicle identification ................................................................. 9-9 Vehicle Identification Number (VIN) plate ..................... 9-9
Vehicle identification number (chassis number) ....... 9-10
Engine serial number ....................................................... 9-10
F.M.V.S.S. certification label .......................................... 9-10
Emission control information label ............................... 9-11
Tire and loading information label ................................ 9-11
Air conditioner specification label (if
so equipped) ..................................................................... 9-11 Installing front license plate ................................................ 9-12
Vehicle loading information ................................................. 9-13
Terms ........................................................................\
......... 9-13
Vehicle load capacity .................................................... 9-14
Securing the load .......................................................... 9-15
Loading tips ..................................................................... 9-15
Measurement of weights .............................................. 9-16
Towing a trailer ....................................................................... 9-16
Flat towing ........................................................................\
....... 9-17 Continuously Variable Transmission (CVT) ............. 9-17
Manual Transmission ..................................................... 9-17
Uniform tire quality grading ................................................. 9-17 Treadwear ........................................................................\
9-17
Traction AA, A, B and C .............................................. 9-17
Temperature A, B and C .............................................. 9-18
Emission control system warranty ..................................... 9-18
Reporting safety defects ..................................................... 9-19
Readiness for Inspection/Maintenance (I/M) test ......... 9-19
Event Data Recorders (EDR) ............................................. 9-19
Owner’s Manual/Service Manual order information ..... 9-20
Page 312 of 332
DIMENSIONS AND WEIGHTS
Overall length in (mm) 156.7 (3,980)*1156.5 (3,975)*2
Overall width in (mm) 66.7 (1,695)
Overall height in (mm) 66.1 (1,680)
Front tread in (mm) 58.1 (1,475)
Rear tread in (mm) 58.3 (1,480)
Wheelbase in (mm) 99.6 (2,530)
Gross Vehicle
Weight Rating
(GVWR) lb (kg)
See the F.M.V.S.S.
certification label on the
driver’s side center pil-
lar.
Gross Axle
Weight Rating
(GAWR)
Front lb (kg)
Rear lb (kg)
*1: With front license plate bracket
*2: Without front license plate bracket When planning to travel in another coun-
try,
you should first find out if the fuel available is
suitable for your vehicle’s engine.
Using fuel with an octane rating that is too low
may cause engine damage. All gasoline vehicles
must be operated with unleaded gasoline.
Therefore, avoid taking your vehicle to areas
where appropriate fuel is not available.
When transferring the registration of your
vehicle to another country, state, province
or district, it may be necessary to modify the
vehicle to meet local laws and regulations.
The laws and regulations for motor vehicle
emission control and safety standards vary
according to the country, state, province or
district; therefore, vehicle specifications may
differ.
When any vehicle is to be taken into
another country, state, province or district
and registered, its modifications, transpor-
tation, and registration are the responsi-
bility of the user. NISSAN is not
responsible for any inconvenience that
may result.
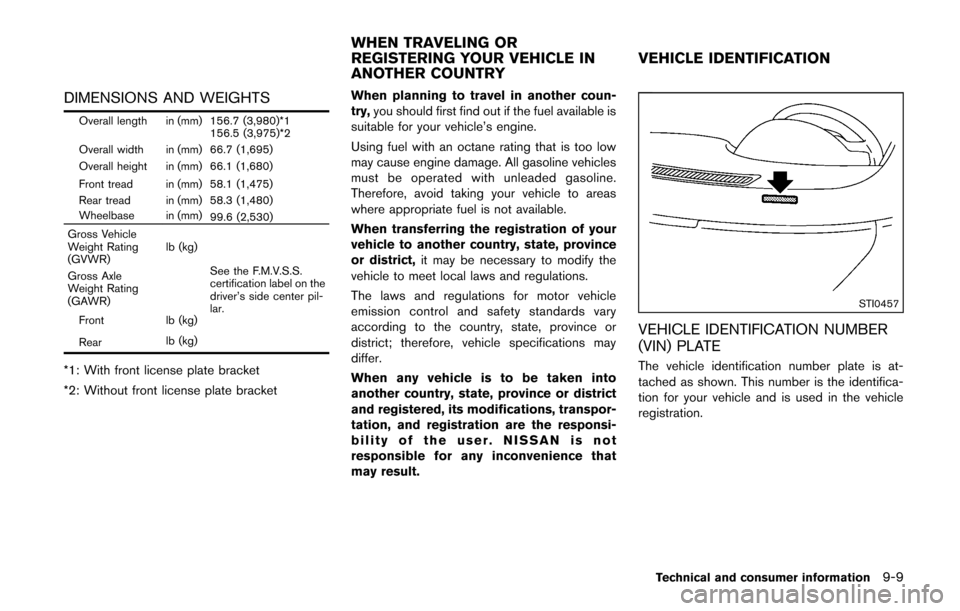
STI0457
VEHICLE IDENTIFICATION NUMBER
(VIN) PLATE
The vehicle identification number plate is at-
tached as shown. This number is the identifica-
tion for your vehicle and is used in the vehicle
registration.
Technical and consumer information9-9
WHEN TRAVELING OR
REGISTERING YOUR VEHICLE IN
ANOTHER COUNTRY VEHICLE IDENTIFICATION
Page 313 of 332
9-10Technical and consumer information
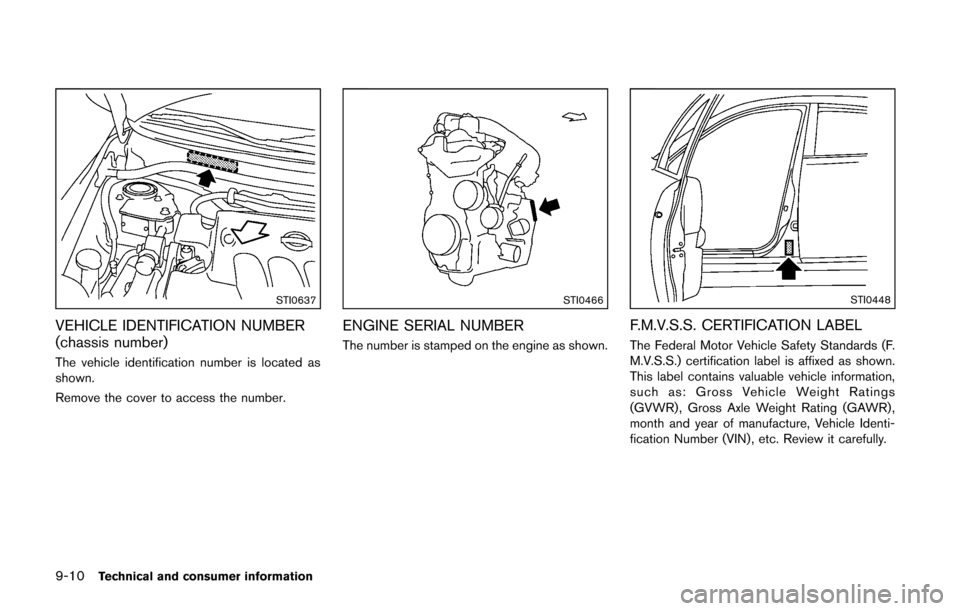
STI0637
VEHICLE IDENTIFICATION NUMBER
(chassis number)
The vehicle identification number is located as
shown.
Remove the cover to access the number.
STI0466
ENGINE SERIAL NUMBER
The number is stamped on the engine as shown.
STI0448
F.M.V.S.S. CERTIFICATION LABEL
The Federal Motor Vehicle Safety Standards (F.
M.V.S.S.) certification label is affixed as shown.
This label contains valuable vehicle information,
such as: Gross Vehicle Weight Ratings
(GVWR), Gross Axle Weight Rating (GAWR) ,
month and year of manufacture, Vehicle Identi-
fication Number (VIN) , etc. Review it carefully.
Page 316 of 332
7. Carefully drill the two pilot holes using a0.39 in (10 mm) drill bit at the marked
locations. (Be sure that the drill only
goes through the bumper fascia.)
8. Insert grommets into the hole on the fascia.
9. Insert a flat-blade screwdriver into the grommet hole to add a 908 turn onto the
part
*E.
10. Insert a J-nut into the license plate bracket before placing the license plate bracket on
the fascia.
11. Install the license plate bracket with the screws.
12. Install the license plate with bolts that are not longer than 0.55 in (14 mm).
WARNING
.It is extremely dangerous to ride
in a cargo area inside the vehi-
cle. In a collision, people riding
in these areas are more likely to
be seriously injured or killed.
.Do not allow people to ride in
any area of your vehicle that is
not equipped with seats and
seat belts.
.Be sure everyone in your vehicle
is in a seat and using a seat belt
properly.
TERMS
It is important to familiarize yourself with the
following terms before loading your vehicle:
.Curb Weight (actual weight of your
vehicle) - vehicle weight including:
standard and optional equipment,
fluids, emergency tools, and spare tire
assembly. This weight does notin-
clude passengers and cargo. .
GVW (Gross Vehicle Weight) - curb
weight plus the combined weight of
passengers and cargo.
. GVWR (Gross Vehicle Weight Rating)
- maximum total combined weight of the
unloaded vehicle, passengers, luggage,
hitch, trailer tongue load and any other
optional equipment. This information is
located on the F.M.V.S.S. label.
. GAWR (Gross Axle Weight Rating) -
maximum weight (load) limit specified
for the front or rear axle. This informa-
tion is located on the F.M.V.S.S. label.
. GCWR (Gross Combined Weight Rat-
ing) - The maximum total weight rating
of the vehicle, passengers, cargo, and
trailer.
. Vehicle Capacity Weight, Load limit,
Total load capacity - maximum total
weight limit specified of the load
(passengers and cargo) for the vehicle.
This is the maximum combined weight
of occupants and cargo that can be
loaded into the vehicle. If the vehicle is
used to tow a trailer, the trailer tongue
weight must be included as part of the
Technical and consumer information9-13
VEHICLE LOADING INFORMATION
Page 317 of 332
9-14Technical and consumer information
cargo load. This information is located
on the Tire and Loading Information
label.
. Cargo capacity - permissible weight of
cargo, the subtracted weight of occu-
pants from the load limit.
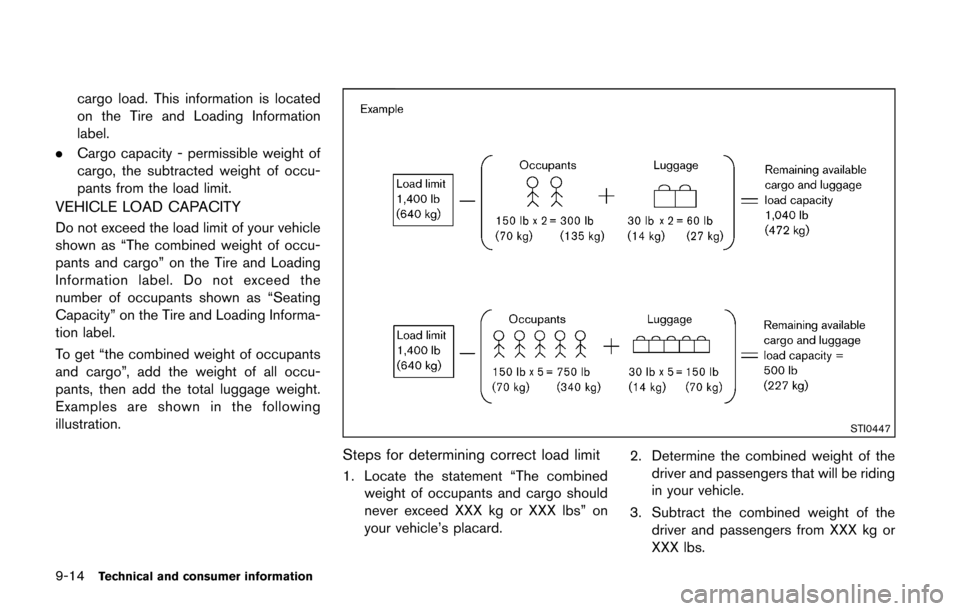
VEHICLE LOAD CAPACITY
Do not exceed the load limit of your vehicle
shown as “The combined weight of occu-
pants and cargo” on the Tire and Loading
Information label. Do not exceed the
number of occupants shown as “Seating
Capacity” on the Tire and Loading Informa-
tion label.
To get “the combined weight of occupants
and cargo”, add the weight of all occu-
pants, then add the total luggage weight.
Examples are shown in the following
illustration.
STI0447
Steps for determining correct load limit
1. Locate the statement “The combined
weight of occupants and cargo should
never exceed XXX kg or XXX lbs” on
your vehicle’s placard. 2. Determine the combined weight of the
driver and passengers that will be riding
in your vehicle.
3. Subtract the combined weight of the driver and passengers from XXX kg or
XXX lbs.