Page 10 of 489
1. Engine hood (P. 3-23)
2. Windshield wiper and washer switch(P. 2-28)
3. Windshield (P. 8-20)
4. Power windows (P. 2-51)
5. Door locks, NISSAN Intelligent Key�,
keys (P. 3-5, 3-12, 3-2)
6. Mirrors (P. 3-32)
7. Tire pressure (P. 9-12)
8. Flat tire (P. 6-3)
9. Tire chains (P. 8-43)
10. Replacing bulbs (P. 8-33)
11. Headlight and turn signal switch
(P. 2-30)
12. Fog light switch (P. 2-34)
13. Tow hooks (if so equipped) (P. 6-14)
See the page number indicated in paren-
theses for operating details.
WII0123
EXTERIOR FRONT
Illustrated table of contents0-3
Page 16 of 489
Warninglight Name Page
or
Anti-lock Braking
System (ABS) warn-
ing light 2-14
Automatic transmis-
sion check warning
light2-14
Automatic transmis-
sion park warning
light (
model)2-14
or
Brake warning light 2-14
Charge warning
light
2-15
Warning
light Name Page
Check suspension
warning light (if so
equipped) 2-15
Engine oil pressure
low/engine coolant
temperature high
warning light2-15
4WD warning light
(
model)
2-16
Low fuel warning
light 2-16
Low tire pressure
warning light2-16
Master warning light 2-18
Seat belt warning
light and chime2-18
Warning
light Name Page
Supplemental air
bag warning light 2-18
Indicator
light Name Page
Front passenger air
bag status light 2-19
High beam indicator
light (Blue)2-19
Malfunction indica-
tor light (MIL)2-19
Security indicator
light2-20
Slip indicator light 2-20
Tow mode ON indi-
cator light (if so
equipped)2-20
WARNING/INDICATOR LIGHTS
Illustrated table of contents0-9
Page 22 of 489

Tip up for easy entry to the 3rd row
The 2nd row captain’s chairs can be tipped for-
ward for easy entry or exit from the 3rd row bench
seat. To enter the 3rd row
�1, raise the armrest so
it is parallel to the seatback and in the stowed
position, then lift up on the seatback latch located
on the upper corner of the seatback on the 2nd
row captain’s chair and fold the seatback forward
at an angle over the seat base. This will release
the back of the seat so it may be tipped forward. Then
�2lift up on the lower corner of the seat
base and tip the 2nd row captain’s chair forward.
To exit the 3rd row bench seat, lift up on the same
seatback latch and fold the seatback forward
onto the seat base. Then lift up on the seat base
and tip it forward.
2ND ROW BENCH SEAT
ADJUSTMENT (if so equipped)
Reclining
To recline the seatback, pull up on the lever and
lean back.
The recline feature allows adjustment of the seat-
back for occupants of different sizes for added
comfort and to help obtain proper seat belt fit
(see “Precautions on seat belt usage” later in this
section) . Also, the seatback can be reclined to
allow occupants to rest when the vehicle is
stopped and the shift selector is in P (Park) .
WRS0415LRS0372
Outboard seats
WRS0369
Safety—Seats, seat belts and supplemental restraint system1-5
Page 24 of 489
ARMRESTS
To use the armrests, pull them down to the rest-
ing position.
�AStowed position
�BResting position
HEAD RESTRAINTS (1st row only)
WARNING
Head restraints supplement the other ve-
hicle safety systems. They may provide
additional protection against injury in cer-
tain rear end collisions. Adjust the head
restraints properly, as specified in this
section. Check the adjustment after
someone else uses the seat. Do not attach
anything to the head restraint stalks. Do
not use the seat if the head restraint has
been removed. If the head restraint was
removed, reinstall and properly adjust the
head restraint before an occupant uses
the seating position. Failure to follow
these instructions can reduce the effec-
tiveness of the head restraints. This may
increase the risk of serious injury or death
in a collision.
WRS0368
Safety—Seats, seat belts and supplemental restraint system1-7
Page 34 of 489

�2Once the seatback is released, it will enable
you to fold the front passenger seatback flat
over the seat cushion.
3. To return the front passenger’s seat to a seating position, lift up on the seatback and
push it up to an upright position. Move the
recline switch backward until the desired
angle is obtained.
WARNING
●If you fold the front passenger’s seat-
back flat forward to carry longer ob-
jects, be sure this cargo is properly se-
cured and not near an air bag. In a
crash, an inflating air bag might force
that object toward a person. This could
cause severe injury or even death. Se-
cure objects away from the area in
which an air bag would inflate. See
“Precautions on supplemental restraint
system” later in this section.
● Never allow anyone to ride in the cargo
area or on the front passenger’s seat
when it is in the fold-down position. Use
of these areas by passengers could re-
sult in serious injury in an accident or
sudden stop.
Folding the 2nd row captain’s chairs (if
so equipped)
To fold the 2nd row captain’s chairs flat for maxi-
mum cargo hauling:
�1Raise the armrest to the stowed position.
Remove the 2nd row center console, see
“2nd row center console” in the “Instruments
and controls” section of this Owner’s
Manual.
�2Pull the strap forward, located in the center
of the seat cushion, and fold the seat cush-
ion toward the front of the vehicle.
LRS0342LRS0332
Safety—Seats, seat belts and supplemental restraint system1-17
Page 35 of 489
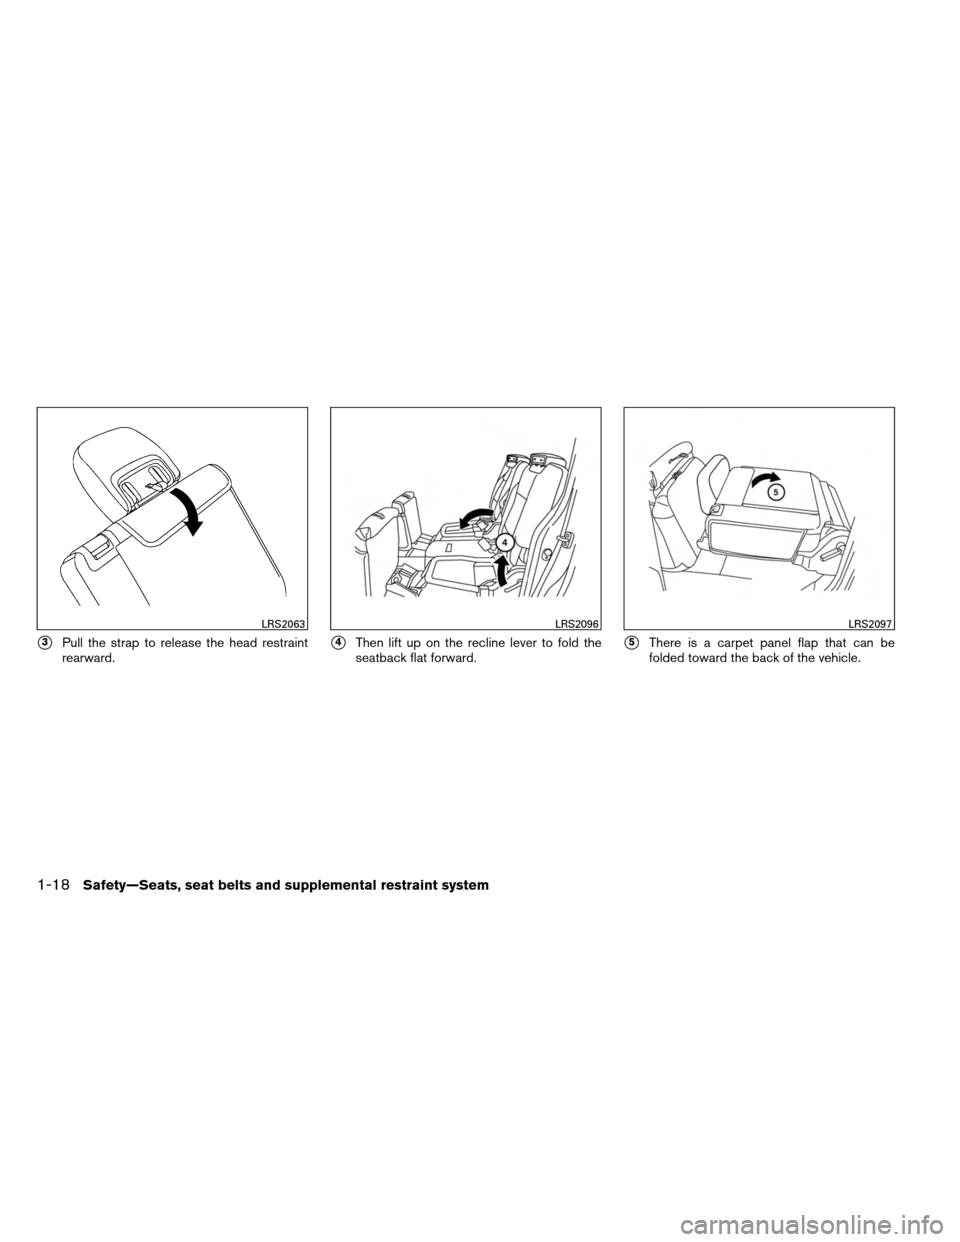
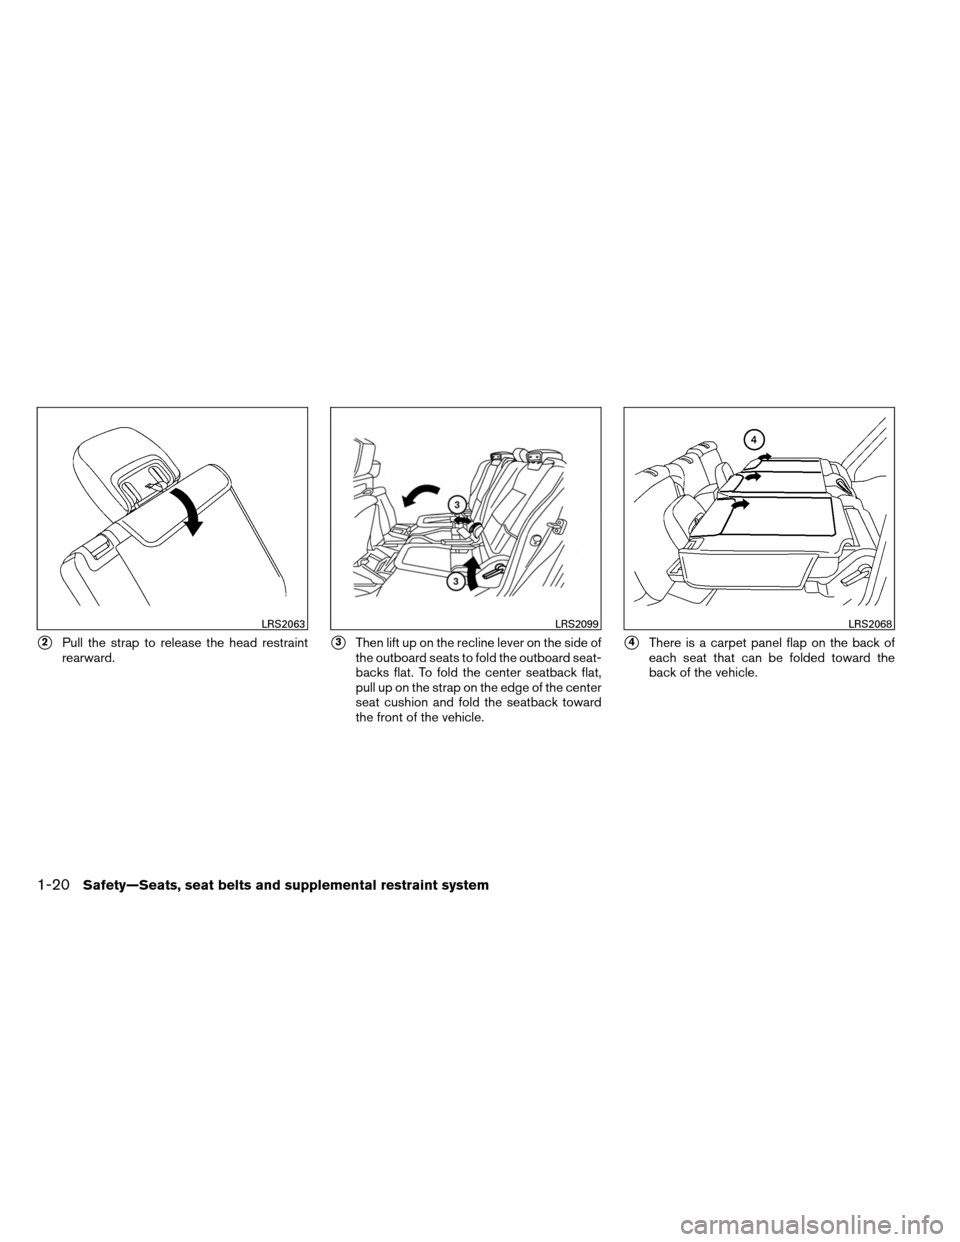
�3Pull the strap to release the head restraint
rearward.�4Then lift up on the recline lever to fold the
seatback flat forward.�5There is a carpet panel flap that can be
folded toward the back of the vehicle.
LRS2063LRS2096LRS2097
1-18Safety—Seats, seat belts and supplemental restraint system
Page 36 of 489
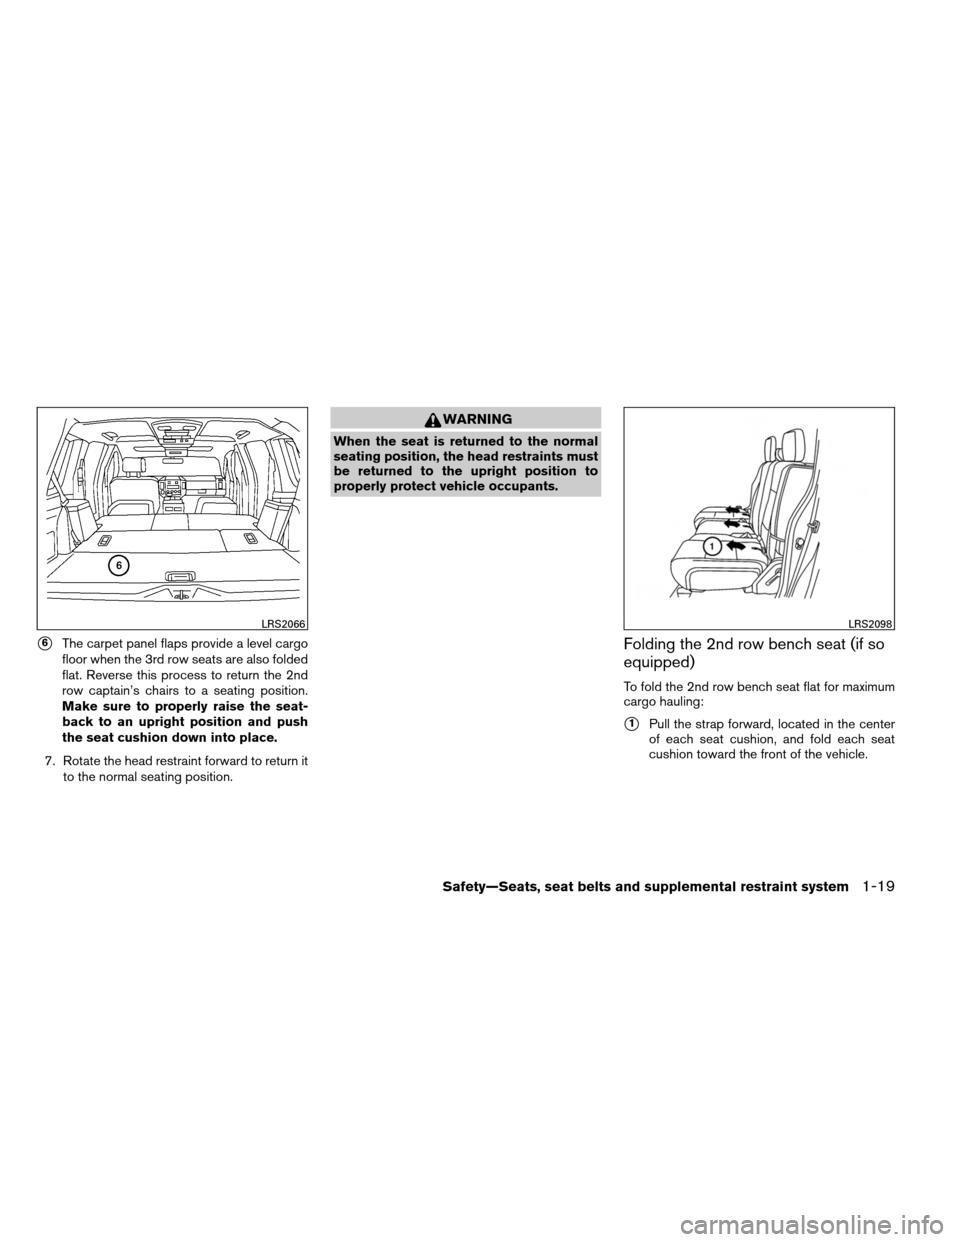
�6The carpet panel flaps provide a level cargo
floor when the 3rd row seats are also folded
flat. Reverse this process to return the 2nd
row captain’s chairs to a seating position.
Make sure to properly raise the seat-
back to an upright position and push
the seat cushion down into place.
7. Rotate the head restraint forward to return it to the normal seating position.
WARNING
When the seat is returned to the normal
seating position, the head restraints must
be returned to the upright position to
properly protect vehicle occupants.
Folding the 2nd row bench seat (if so
equipped)
To fold the 2nd row bench seat flat for maximum
cargo hauling:
�1Pull the strap forward, located in the center
of each seat cushion, and fold each seat
cushion toward the front of the vehicle.
LRS2066LRS2098
Safety—Seats, seat belts and supplemental restraint system1-19
Page 37 of 489
�2Pull the strap to release the head restraint
rearward.�3Then lift up on the recline lever on the side of
the outboard seats to fold the outboard seat-
backs flat. To fold the center seatback flat,
pull up on the strap on the edge of the center
seat cushion and fold the seatback toward
the front of the vehicle.�4There is a carpet panel flap on the back of
each seat that can be folded toward the
back of the vehicle.
LRS2063LRS2099LRS2068
1-20Safety—Seats, seat belts and supplemental restraint system

 warn-
ing light 2-14
Automatic transmis-
sion check warning
light2-14
Automatic transmis-
sion park warning
light (
model)2-14
or
Brake warning")