Page 112 of 428
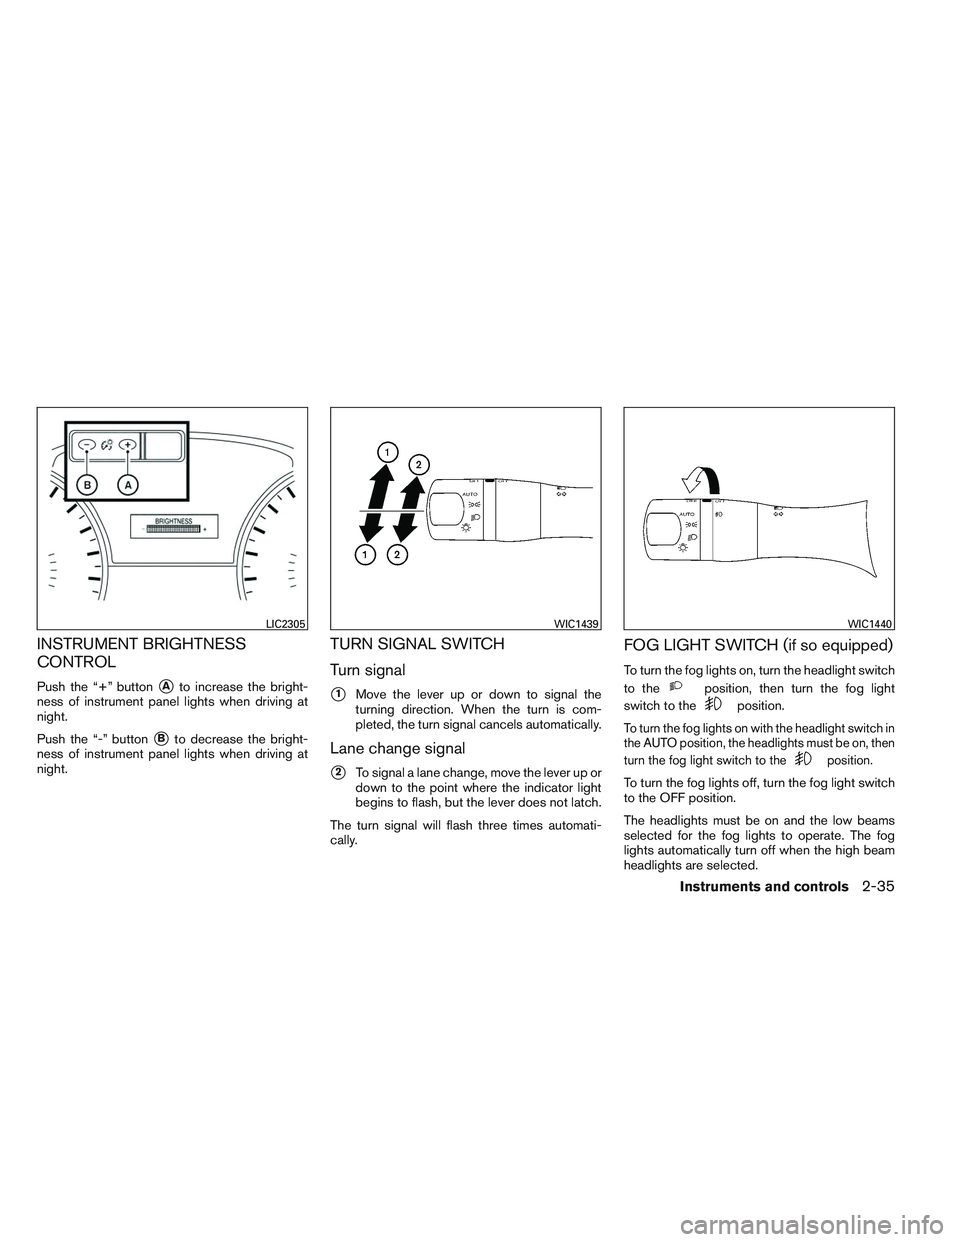
INSTRUMENT BRIGHTNESS
CONTROL
Push the “+” button�Ato increase the bright-
ness of instrument panel lights when driving at
night.
Push the “-” button
�Bto decrease the bright-
ness of instrument panel lights when driving at
night.
TURN SIGNAL SWITCH
Turn signal
�1Move the lever up or down to signal the
turning direction. When the turn is com-
pleted, the turn signal cancels automatically.
Lane change signal
�2To signal a lane change, move the lever up or
down to the point where the indicator light
begins to flash, but the lever does not latch.
The turn signal will flash three times automati-
cally.
FOG LIGHT SWITCH (if so equipped)
To turn the fog lights on, turn the headlight switch
to the
position, then turn the fog light
switch to the
position.
To turn the fog lights on with the headlight switch in
the AUTO position, the headlights must be on, then
turn the fog light switch to the
position.
To turn the fog lights off, turn the fog light switch
to the OFF position.
The headlights must be on and the low beams
selected for the fog lights to operate. The fog
lights automatically turn off when the high beam
headlights are selected.
LIC2305WIC1439WIC1440
Instruments and controls2-35
Page 116 of 428
The power outlets are for powering electrical
accessories such as cellular telephones. They
are rated at 12 volt, 120W (10A) maximum.
The power outlets are powered only when the
ignition switch is in the ACC or ON position.
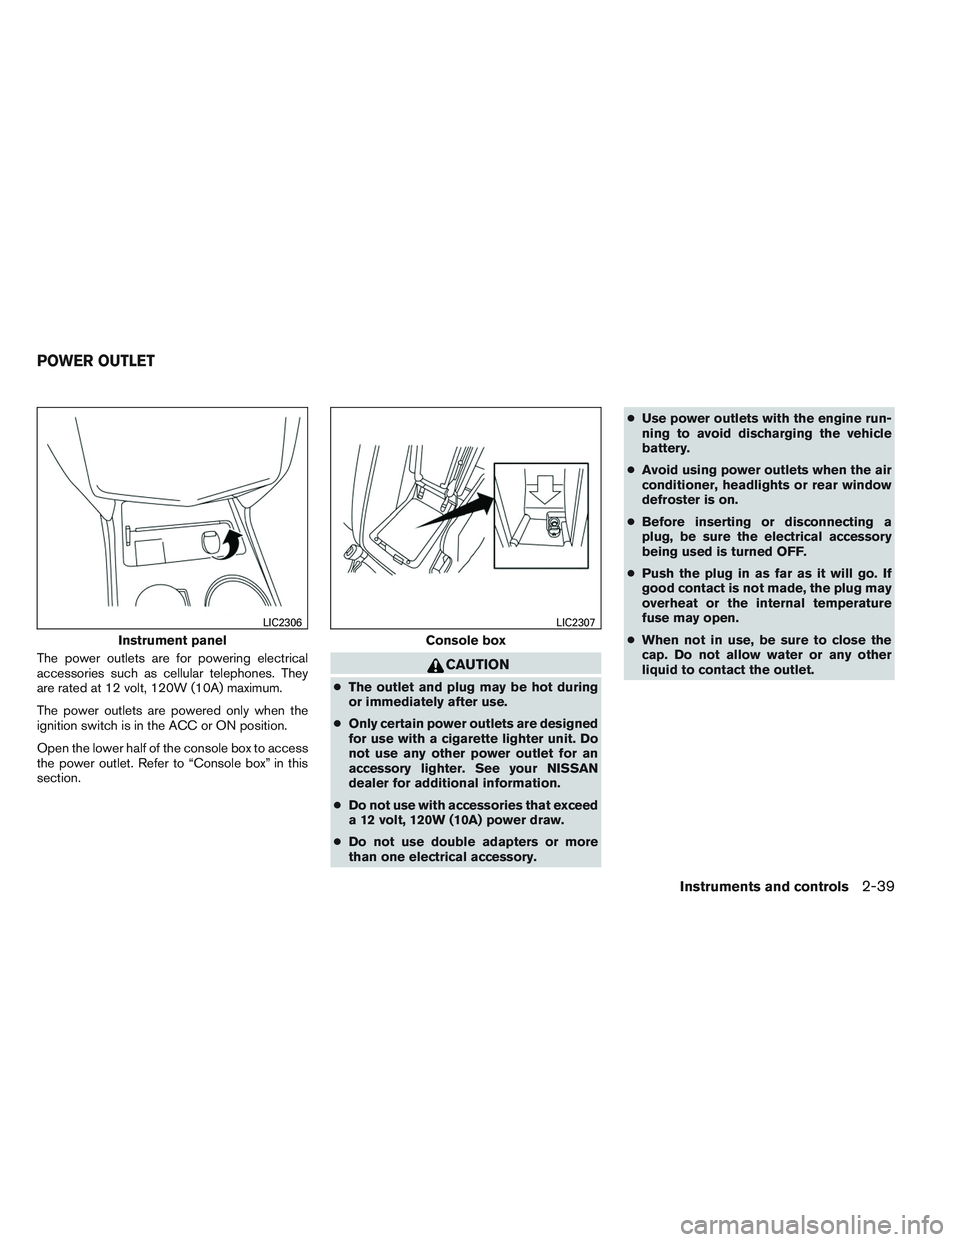
Open the lower half of the console box to access
the power outlet. Refer to “Console box” in this
section.CAUTION
●The outlet and plug may be hot during
or immediately after use.
● Only certain power outlets are designed
for use with a cigarette lighter unit. Do
not use any other power outlet for an
accessory lighter. See your NISSAN
dealer for additional information.
● Do not use with accessories that exceed
a 12 volt, 120W (10A) power draw.
● Do not use double adapters or more
than one electrical accessory. ●
Use power outlets with the engine run-
ning to avoid discharging the vehicle
battery.
● Avoid using power outlets when the air
conditioner, headlights or rear window
defroster is on.
● Before inserting or disconnecting a
plug, be sure the electrical accessory
being used is turned OFF.
● Push the plug in as far as it will go. If
good contact is not made, the plug may
overheat or the internal temperature
fuse may open.
● When not in use, be sure to close the
cap. Do not allow water or any other
liquid to contact the outlet.
Instrument panel
LIC2306
Console box
LIC2307
POWER OUTLET
Instruments and controls2-39
Page 121 of 428
1. Window lock button
2. Power door lock switch
3. Front passenger side
4. Right rear passenger side
5. Left rear passenger side
6. Driver side automatic switch
Driver’s side power window switch
The driver’s side control panel is equipped with
switches to open or close all of the windows.
To open a window, push the switch to the first
detent and continue to hold down until the de-
sired window position is reached. To close a
window, pull the switch to the first detent and
continue to hold up until the desired window
position is reached.
Front passenger’s power window
switch
The passenger’s window switch operates only
the corresponding passenger’s window. To open
the window, push the switch to the first detent
and continue to hold it down until the desired
window position is reached
�1. To close the
window, pull the switch to the first detent and
continue to hold it up until the desired window
position is reached
�2.
LIC2299LIC2309
2-44Instruments and controls
Page 142 of 428
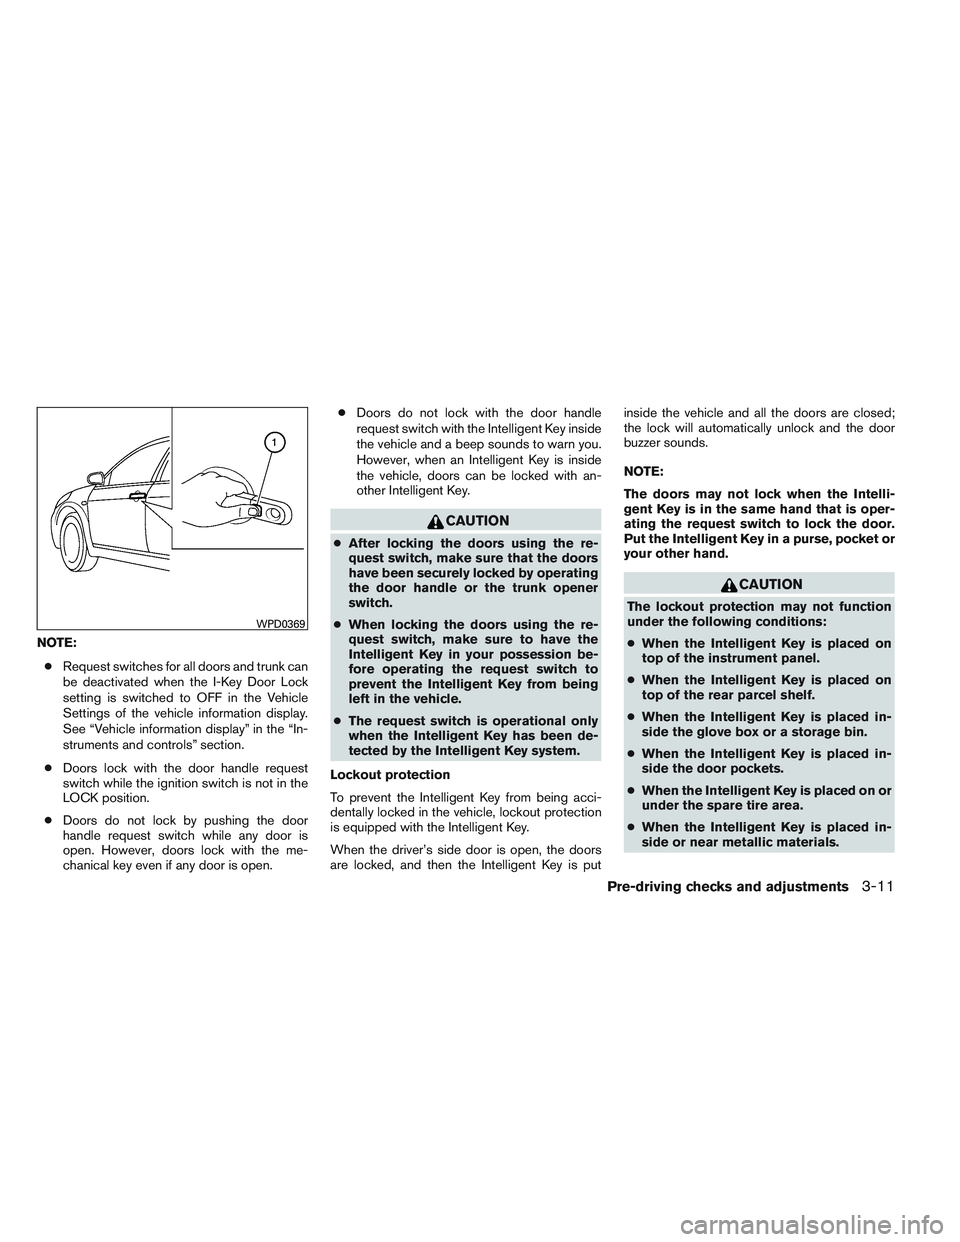
NOTE:● Request switches for all doors and trunk can
be deactivated when the I-Key Door Lock
setting is switched to OFF in the Vehicle
Settings of the vehicle information display.
See “Vehicle information display” in the “In-
struments and controls” section.
● Doors lock with the door handle request
switch while the ignition switch is not in the
LOCK position.
● Doors do not lock by pushing the door
handle request switch while any door is
open. However, doors lock with the me-
chanical key even if any door is open. ●
Doors do not lock with the door handle
request switch with the Intelligent Key inside
the vehicle and a beep sounds to warn you.
However, when an Intelligent Key is inside
the vehicle, doors can be locked with an-
other Intelligent Key.
CAUTION
● After locking the doors using the re-
quest switch, make sure that the doors
have been securely locked by operating
the door handle or the trunk opener
switch.
● When locking the doors using the re-
quest switch, make sure to have the
Intelligent Key in your possession be-
fore operating the request switch to
prevent the Intelligent Key from being
left in the vehicle.
● The request switch is operational only
when the Intelligent Key has been de-
tected by the Intelligent Key system.
Lockout protection
To prevent the Intelligent Key from being acci-
dentally locked in the vehicle, lockout protection
is equipped with the Intelligent Key.
When the driver’s side door is open, the doors
are locked, and then the Intelligent Key is put inside the vehicle and all the doors are closed;
the lock will automatically unlock and the door
buzzer sounds.
NOTE:
The doors may not lock when the Intelli-
gent Key is in the same hand that is oper-
ating the request switch to lock the door.
Put the Intelligent Key in a purse, pocket or
your other hand.
CAUTION
The lockout protection may not function
under the following conditions:
●
When the Intelligent Key is placed on
top of the instrument panel.
● When the Intelligent Key is placed on
top of the rear parcel shelf.
● When the Intelligent Key is placed in-
side the glove box or a storage bin.
● When the Intelligent Key is placed in-
side the door pockets.
● When the Intelligent Key is placed on or
under the spare tire area.
● When the Intelligent Key is placed in-
side or near metallic materials.
WPD0369
Pre-driving checks and adjustments3-11
Page 148 of 428
NOTE:
If you change the answer back horn and
light flash feature with the Intelligent Key,
the vehicle information display screen will
show the current mode after the ignition
switch has been cycled from the OFF to the
ON position. The vehicle information dis-
play screen can also be used to change the
answer back horn mode. See “Answer back
horn” in the “Instruments and controls”
section.
To deactivate:Press and hold the
andbuttonsfor at least 2 seconds.
The hazard warning lights will flash 3 times to
confirm that the answer back horn feature has
been deactivated.
To activate: Press and hold the
andbuttonsfor at least 2 seconds once
more.
The hazard warning lights will flash once and the
horn will sound once to confirm that the horn
beep feature has been reactivated.
Deactivating the horn beep feature does not si-
lence the horn if the alarm is triggered.
WARNING SIGNALS
To help prevent the vehicle from moving unex-
pectedly by erroneous operation of the Intelligent
Key or to help prevent the vehicle from being
stolen, a chime or buzzer sounds from inside and
outside the vehicle and a warning is displayed in
the instrument panel.
When a chime or beep sounds or a warning is
displayed, be sure to check the vehicle and the
Intelligent Key.
See the “Troubleshooting guide” that follows and
“Vehicle information display” in the “Instruments
and controls” section of this manual.
Pre-driving checks and adjustments3-17
Page 155 of 428
WARNING SIGNALS
To help prevent the vehicle from moving unex-
pectedly by erroneous operation of the Intelligent
Key or to help prevent the vehicle from being
stolen, a chime or buzzer sounds from inside and
outside the vehicle and a warning is displayed in
the instrument panel.
When a chime or beep sounds or a warning is
displayed, be sure to check the vehicle and the
Intelligent Key.
See the “Troubleshooting guide” that follows and
“Vehicle information display” in the “Instruments
and controls” section of this manual.
3-24Pre-driving checks and adjustments
Page 159 of 428
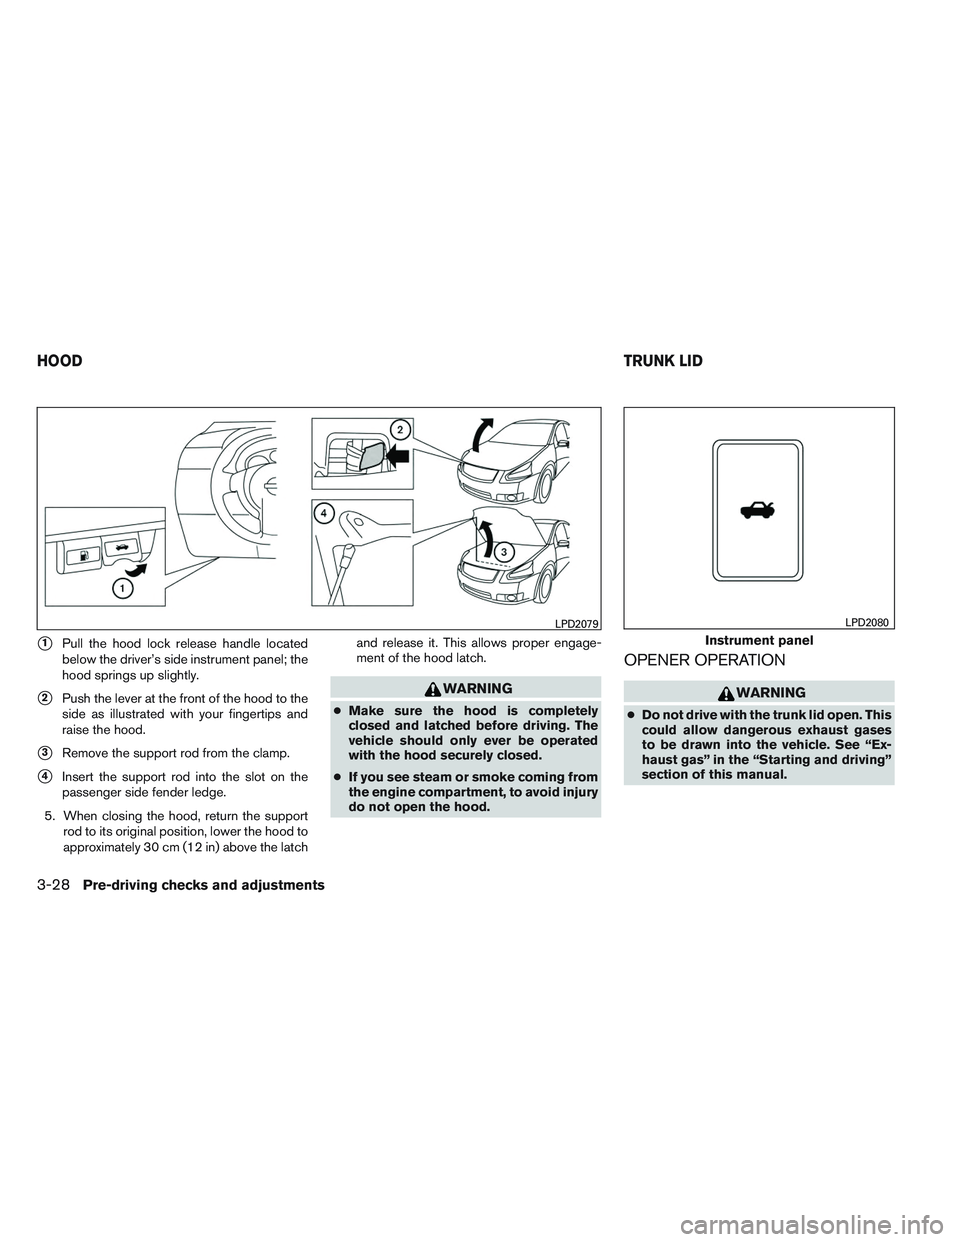
�1Pull the hood lock release handle located
below the driver’s side instrument panel; the
hood springs up slightly.
�2Push the lever at the front of the hood to the
side as illustrated with your fingertips and
raise the hood.
�3Remove the support rod from the clamp.
�4Insert the support rod into the slot on the
passenger side fender ledge.
5. When closing the hood, return the support rod to its original position, lower the hood to
approximately 30 cm (12 in) above the latch and release it. This allows proper engage-
ment of the hood latch.
WARNING
●
Make sure the hood is completely
closed and latched before driving. The
vehicle should only ever be operated
with the hood securely closed.
● If you see steam or smoke coming from
the engine compartment, to avoid injury
do not open the hood.
OPENER OPERATION
WARNING
● Do not drive with the trunk lid open. This
could allow dangerous exhaust gases
to be drawn into the vehicle. See “Ex-
haust gas” in the “Starting and driving”
section of this manual.
LPD2079
Instrument panel
LPD2080
HOOD TRUNK LID
3-28Pre-driving checks and adjustments
Page 160 of 428
●Closely supervise children when they
are around cars to prevent them from
playing and becoming locked in the
trunk where they could be seriously in-
jured. Keep the car locked, with the rear
seatback and trunk lid securely latched
when not in use, and prevent children’s
access to car keys. To open the trunk lid perform one of the following
after unlocking all doors:
● Press the button on the instrument panel.
● Press the button on the Intelligent Key.
● Push the
�Arelease switch (if so equipped) .
To close the trunk lid, lower and push the trunk lid
down securely. NOTE:
Request switches for all doors and trunk
can be deactivated when the I-Key Door
Lock setting is switched to OFF in the Ve-
hicle Settings of the vehicle information
display. See “Vehicle information display”
in the “Instruments and controls” section.
Intelligent Key
WPD0364
Request switch
LPD2077
Pre-driving checks and adjustments3-29