2014 NISSAN ALTIMA buttons
[x] Cancel search: buttonsPage 235 of 428

CAUTION
●Do not force the USB device into the
USB port. Inserting the USB device
tilted or up-side-down into the port may
damage the port. Make sure that the
USB device is connected correctly into
the USB port.
● Do not grab the USB port cover (if so
equipped) when pulling the USB device
out of the port. This could damage the
port and the cover.
● Do not leave the USB cable in a place
where it can be pulled unintentionally.
Pulling the cable may damage the port.
● To avoid damage and loss of function
when using a USB device, note the fol-
lowing precautions.
Refer to your device manufacturer’s owner infor-
mation regarding the proper use and care of the
device.
The USB input jack is located on the center
console beneath the heater and air conditioner
controls. Insert the USB device into the jack.
When a compatible storage device is plugged
into the jack, compatible audio files on the stor-
age device can be played through the vehicle’s
audio system.
Audio file operation
MEDIA button:
Place the ignition switch in the ON or ACC
position and press the MEDIA button to switch to
the USB input mode. If a CD is playing or another
audio source is plugged in through the AUX IN
jack located in the center console, the MEDIA
button toggles between the three sources.
Play information
Information about the audio files being played
can be displayed on the display screen of the
vehicle’s audio system. Depending on how the
audio files are encoded, information such as
Folder, Song and Artist will be displayed.
The track number and number of total tracks in
the folder are displayed on the screen as well.
SEEK•CAT/TRACK (Reverse or Fast Forward)
button:
Press and hold the SEEK•CAT/TRACK
button
(rewind) or SEEK•CAT/TRACK
button
(fast forward) for 1.5 seconds while
an audio file on the USB device is playing to
reverse or fast forward the track being played.
The track plays at an increased speed while reversing or fast forwarding. When the button is
released, the audio file returns to normal play
speed.
SEEK/CAT and TRACK
buttons:
Press the SEEK/CAT button
while an au-
dio file on the USB device is playing to return to
the beginning of the current track. Press the
SEEK/CAT button
several times to skip
backward several tracks.
Press the TRACK button
while an audio
file on the USB device is playing to advance one
track. Press the TRACK button
several
times to skip forward several tracks. If the last
track in a folder on the USB device is skipped, the
first track of the next folder is played.
RDM button:
When the RDM button is pressed while an audio
file on the USB device is playing, the play pattern
can be changed as follows:
All Random →1 Folder Random →OFF
All Random: all tracks on the USB device will be
played randomly.
1 Folder Random: all tracks in the current folder
will be played randomly.
4-66Monitor, climate, audio, phone and voice recognition systems
Page 237 of 428
CAUTION
●Do not force the USB device into the
USB port. Inserting the USB device
tilted or up-side-down into the port may
damage the port. Make sure that the
USB device is connected correctly into
the USB port.
● Do not grab the USB port cover (if so
equipped) when pulling the USB device
out of the port. This could damage the
port and the cover.
● Do not leave the USB cable in a place
where it can be pulled unintentionally.
Pulling the cable may damage the port.
● To avoid damage and loss of function
when using a USB device, note the fol-
lowing precautions.
Refer to your device manufacturer’s owner infor-
mation regarding the proper use and care of the
device.
The USB input jack is located on the center
console beneath the heater and air conditioner
controls. Insert the USB device into the jack.
When a compatible storage device is plugged
into the jack, compatible audio files on the stor-
age device can be played through the vehicle’s
audio system.
Audio file operation
AUX button:
Place the ignition switch in the ON or ACC
position and press the AUX button to switch to
the USB input mode. If another audio source is
playing and a USB memory device is inserted,
press the AUX button until the center display
changes to the USB memory mode.
If the system has been turned off while the USB
memory was playing, push the ON-OFF/VOL
control knob to restart the USB memory.
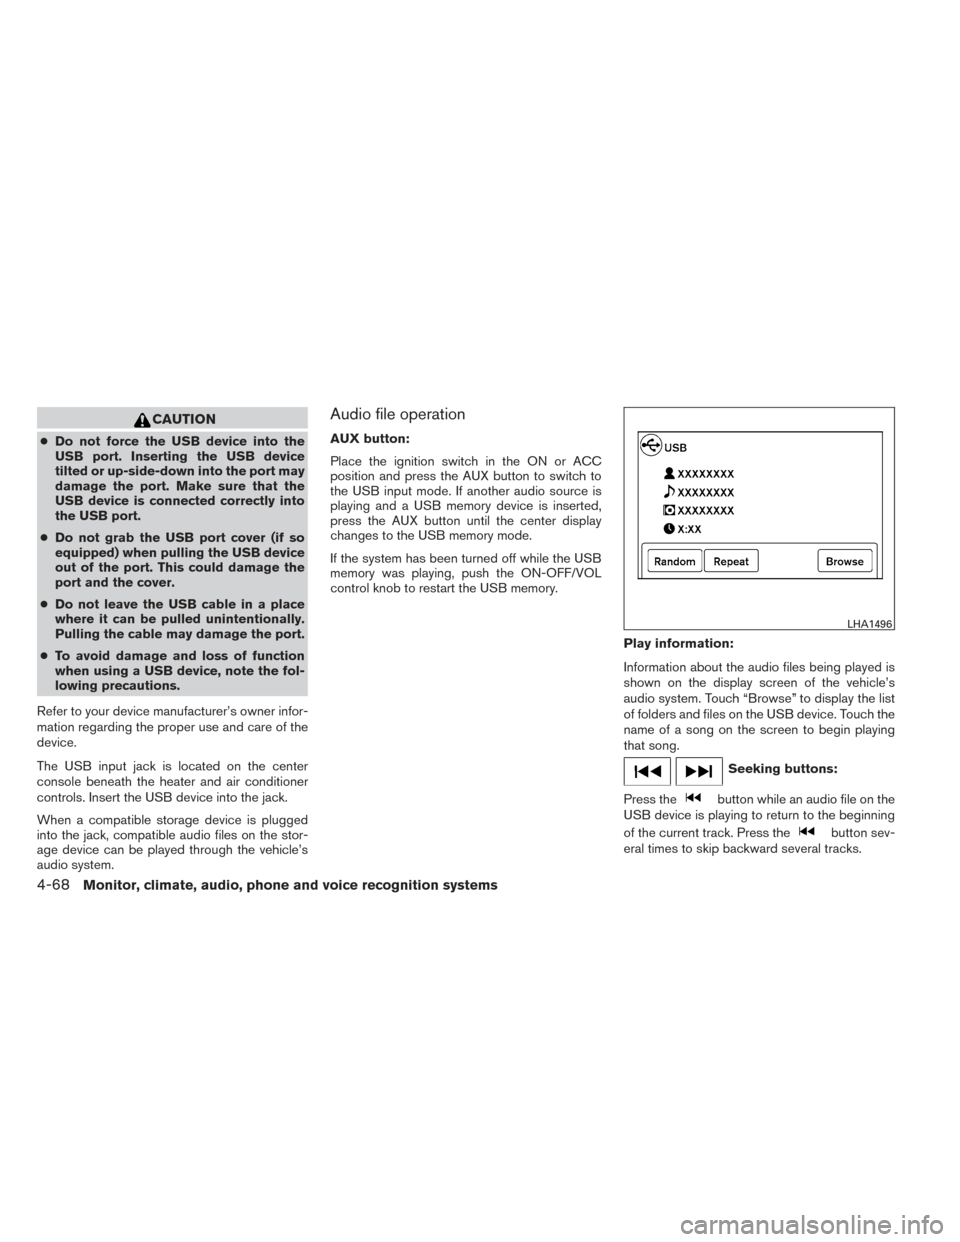
Play information:
Information about the audio files being played is
shown on the display screen of the vehicle’s
audio system. Touch “Browse” to display the list
of folders and files on the USB device. Touch the
name of a song on the screen to begin playing
that song.
Seeking buttons:
Press the
button while an audio file on the
USB device is playing to return to the beginning
of the current track. Press the
button sev-
eral times to skip backward several tracks.
LHA1496
4-68Monitor, climate, audio, phone and voice recognition systems
Page 240 of 428
●iPod® nano - 5th generation (8GB) (firm-
ware version 1.0.2PC or later)
● iPod® nano - 5th generation (16GB) (firm-
ware version 1.0.1PC or later)
● iPod® nano - 6th generation (8GB) (firm-
ware version 1.2PC or later)
● iPod® nano - 6th generation (8GB) (firm-
ware version 1.1PC or later)
● iPod® Touch - 1st generation (firmware ver-
sion 2.2.1 or later)
● iPod® Touch - 2nd generation (firmware
version 2.2.1 or later)
● iPod® Touch - 3rd generation (firmware ver-
sion 3.1.3 or later)
● iPod® Touch - 4th generation (firmware ver-
sion 4.3.5 or later)
● iPhone® 3G (firmware version 4.1 or later)
● iPhone® 3GS (firmware version 4.3 or later)
● iPhone® 4 (firmware version 5.0 or later)
● iPhone® 4S (firmware version 5.1 or later)
● iPad® (firmware version 4.3.2 or later)
● iPad® 2 (firmware version 4.3.3 or later)
Make sure that your iPod® firmware is updated to
the version indicated above.Audio main operation
Place the ignition switch in the ACC or ON
position. Press the MEDIA button repeatedly to
switch to the iPod® mode.
If the system has been turned off while the iPod®
was playing, pressing the VOL/
control
knob will start the iPod®.
iPod® MENU button:
Press the iPod® MENU button while the iPod® is
connected to show the iPod® operation menu on
the audio display. Scroll through the menu list using
the TUNE·SCROLL control dial. Press ENTER to
select a menu item. Items in the iPod® menu
appear on the display in the following order:
● Now playing
● Playlists
● Artists
● Albums
● Songs
● Podcasts
● Genres
● Composers
● Audiobooks
● Shuffle songs For more information about each item, see the
iPod® Owner’s Manual.
SEEK/CAT and TRACK buttons:
When the
SEEK/CAT button orTRACK button is pressed for less than 1.5 sec-
onds while the iPod® is playing, the next track or
the beginning of the current track on the iPod®
will be played.
When the
SEEK/CAT button orTRACK button is pressed for more than 1.5 sec-
onds while the iPod® is playing, the iPod® will
play while fast forwarding or rewinding. When the
button is released, the iPod® will return to the
normal play speed.
The NISSAN controller can also be used to se-
lect tracks when the iPod® is playing.
REPEAT (RPT):
When the RPT button is pressed while a track is
being played, the play pattern can be changed as
follows:
Repeat Off
→1 Track Repeat →All Repeat →
Repeat Off
1 Track Repeat: the current track will be re-
peated.
All Repeat: all songs in the current list are re-
peated.
Monitor, climate, audio, phone and voice recognition systems4-71
Page 244 of 428
Seek buttons:
Press the seek button
orto skip
backward or forward one track.
Press and hold the seek button
orfor 1.5 seconds while a track is playing to reverse
or fast forward the track being played. The track
plays at an increased speed while reversing or
fast forwarding. When the button is released, the
track returns to normal play speed.
Scrolling menus:
While navigating long lists of artists, albums or
songs in the music menu, it is possible to scroll
the list by the first character in the name. To
activate character indexing, touch and hold the
“A-Z” key in the upper right corner of the screen.
Turn the TUNE/SCROLL knob to choose the
number or letter to jump to in the list and then
press the ENTER button.
If no character is selected after two seconds, the
display returns to normal.
BLUETOOTH® STREAMING AUDIO
WITHOUT NAVIGATION SYSTEM
(Type A) (if so equipped)
If you have a compatible Bluetooth® audio de-
vice that is capable of playing audio files, the
device can be connected to the vehicle’s audio
system so that the audio files on the device play
through the vehicle’s speakers.
Connecting Bluetooth® audio
To connect your Bluetooth® audio device to the
vehicle, follow the procedure below:1. Press the
button. The system an-
nounces the available commands.
2. Say “Connect Phone”. The system acknowl- edges the command and announces the
next set of available commands.
3. Say “Add Phone”. The system acknowl- edges the command and asks you to initiate
connecting from the phone handset. The
connecting procedure of the cellular phone
varies according to each cellular phone
model. See the cellular phone Owner’s
Manual for details. You can also visit
www.nissanusa.com/bluetooth for instruc-
tions on connecting NISSAN recommended
cellular phones.LHA2279
Monitor, climate, audio, phone and voice recognition systems4-75
Page 255 of 428
CONTROL BUTTONS
The control buttons for the Bluetooth® Hands-Free
Phone System are located on the steering wheel.
PHONE/SEND
Press the
button to initiate a VR
session or answer an incoming call.
You can also use the
button to
interrupt the system feedback and
give a command at once. See “List of
voice commands” and “During a call”
in this section for more information.
PHONE/END
While the Voice Recognition system is
active, press and hold the
but-
ton for 5 seconds to quit the Voice
Recognition system at any time.
ENTER button / tuning switch
While using the Voice Recognition
system, tilt the tuning switch up or
down to manually control the phone
system. Press the ENTER button to
select an option on the display screen.
GETTING STARTED
The following procedures will help you get
started using the Bluetooth® Hands-Free Phone
System with NISSAN Voice Recognition. For ad-
ditional command options, refer to “List of voice
commands” in this section.
Choosing a language
You can interact with the Bluetooth® Hands-
Free Phone System using English, Spanish or
French.
To change the language, perform the following.
1. Press and hold the
button for more
than 5 seconds. 2. The system announces: “Press the
PHONE/SEND (
) button for the
hands-free phone system to enter the voice
adaptation mode or press the PHONE/END
(
) button to select a different lan-
guage.”
3. Press the
button.
For information on voice adaptation, see
“Voice Adaptation (VA) mode” in this sec-
tion.
4. The system announces the current language and gives you the option to change the lan-
guage to Spanish (in Spanish) or French (in
French) . To select the current language,
press the PHONE/SEND (
) button. To
select a different language, tilt the tuning
switch (
or) up or down.
NOTE:
You must press the
button within
5 seconds to change the language.
5. If you decide not to change the language, do not press either button. After 5 seconds, the
VR session will end, and the language will
not be changed.
LHA2273
4-86Monitor, climate, audio, phone and voice recognition systems
Page 268 of 428
●You can cancel a command when the sys-
tem is waiting for a response by saying,
“Cancel” or “Quit.” The system announces
“Cancel” and ends the VR session. You can
also press and hold the
button on the
steering wheel for 5 seconds at any time to
end the VR session. Whenever the VR ses-
sion is cancelled, a double beep is played to
indicate you have exited the system.
● If you want to adjust the volume of the voice
feedback, press the volume control switches
(+ or -) on the steering wheel while being
provided with feedback. You can also use
the radio volume control knob.
Voice Prompt Interrupt
In most cases you can interrupt the voice feed-
back to speak the next command by pressing
the
button on the steering wheel. After
interrupting the system, wait for a beep before
speaking your command.
One Shot Call
To use the system faster, you may speak the
second level commands with the main menu
command on the main menu. For example, press
the
button and after the tone say, “Call
Redial”.
CONTROL BUTTONS
The control buttons for the Bluetooth® Hands-
Free Phone System are located on the steering
wheel.
PHONE/SEND
Press the
button to initiate
a VR session or answer an incom-
ing call. You can also use the
button
to interrupt the system feedback
and give a command at once. See
“List of voice commands” and
“During a call” in this section for
more information.
PHONE/END
While the voice recognition sys-
tem is active, press and hold
the
button for 5 seconds to
quit the voice recognition system
at any time.
Tuning switch
While using the voice recognition
system, tilt the tuning switch up or
down to manually control the
phone system.
LHA2273
Monitor, climate, audio, phone and voice recognition systems4-99
Page 310 of 428
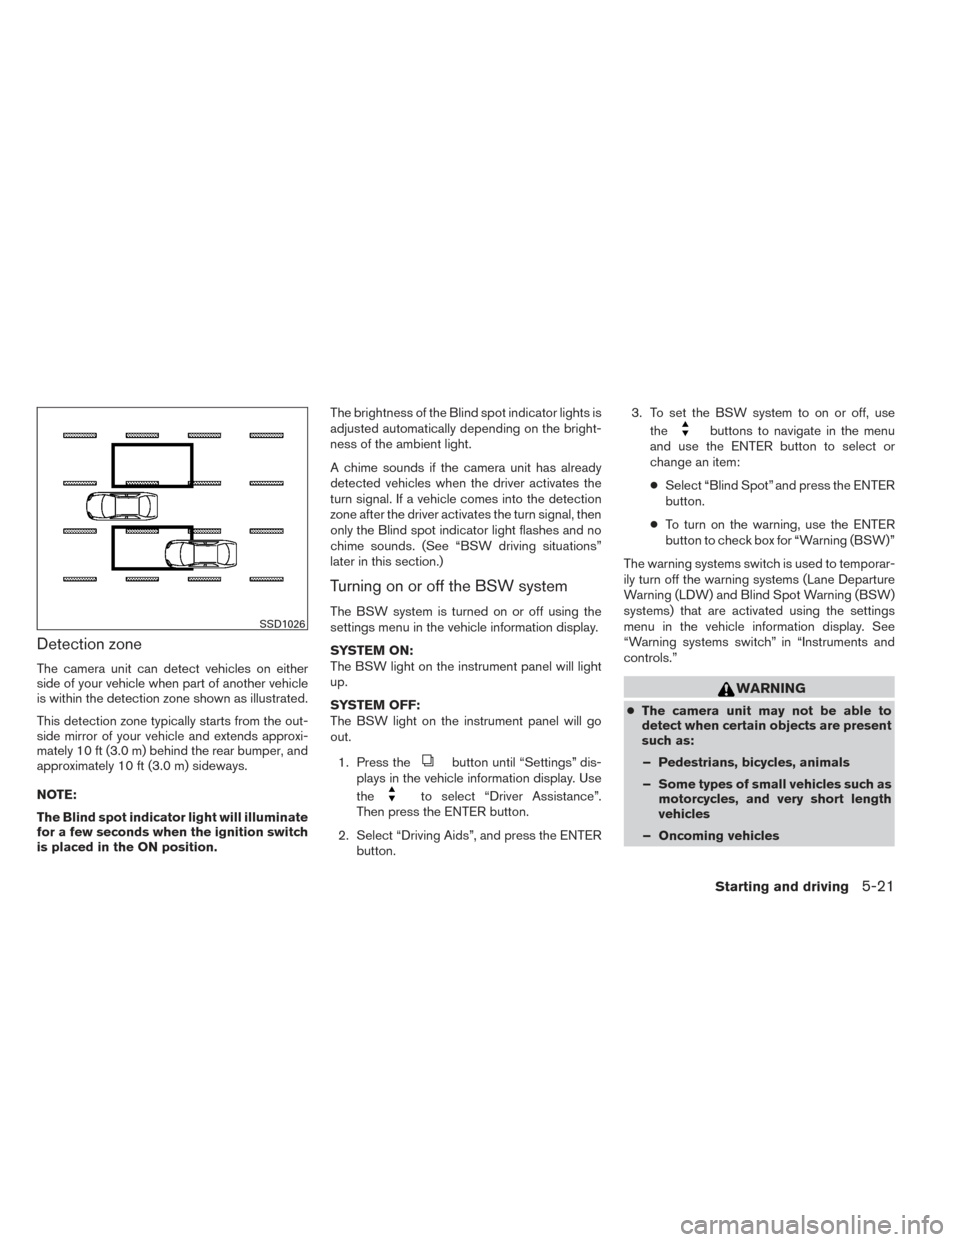
Detection zone
The camera unit can detect vehicles on either
side of your vehicle when part of another vehicle
is within the detection zone shown as illustrated.
This detection zone typically starts from the out-
side mirror of your vehicle and extends approxi-
mately 10 ft (3.0 m) behind the rear bumper, and
approximately 10 ft (3.0 m) sideways.
NOTE:
The Blind spot indicator light will illuminate
for a few seconds when the ignition switch
is placed in the ON position.The brightness of the Blind spot indicator lights is
adjusted automatically depending on the bright-
ness of the ambient light.
A chime sounds if the camera unit has already
detected vehicles when the driver activates the
turn signal. If a vehicle comes into the detection
zone after the driver activates the turn signal, then
only the Blind spot indicator light flashes and no
chime sounds. (See “BSW driving situations”
later in this section.)
Turning on or off the BSW system
The BSW system is turned on or off using the
settings menu in the vehicle information display.
SYSTEM ON:
The BSW light on the instrument panel will light
up.
SYSTEM OFF:
The BSW light on the instrument panel will go
out.
1. Press the
button until “Settings” dis-
plays in the vehicle information display. Use
the
to select “Driver Assistance”.
Then press the ENTER button.
2. Select “Driving Aids”, and press the ENTER button. 3. To set the BSW system to on or off, use
the
buttons to navigate in the menu
and use the ENTER button to select or
change an item:
● Select “Blind Spot” and press the ENTER
button.
● To turn on the warning, use the ENTER
button to check box for “Warning (BSW)”
The warning systems switch is used to temporar-
ily turn off the warning systems (Lane Departure
Warning (LDW) and Blind Spot Warning (BSW)
systems) that are activated using the settings
menu in the vehicle information display. See
“Warning systems switch” in “Instruments and
controls.”
WARNING
● The camera unit may not be able to
detect when certain objects are present
such as:
– Pedestrians, bicycles, animals
– Some types of small vehicles such as motorcycles, and very short length
vehicles
– Oncoming vehicles
SSD1026
Starting and driving5-21
Page 313 of 428
LDW SYSTEM OPERATION
The LDW system operates above approximately
45 MPH (70 km/h).
When the vehicle approaches either the left or
the right of the traveling lane, the LDW system
will chime a sound and the LDW light on the
instrument panel will blink to alert the driver
The LDW system is not designed to operate
under the following conditions●
When you operate the lane change signal
and change traveling lanes in the direction of
the signal. (The LDW system will become
operable again approximately 2 seconds af-
ter the lane change signal is turned off.)
● When the vehicle speed is less than approxi-
mately 45 MPH (70 km/h).
Turning on or off the LDW system
The LDW system is turned on or off using the
settings menu in the vehicle information display. SYSTEM ON:
The LDW light on the instrument panel will light
up.
SYSTEM OFF:
The LDW light on the instrument panel will go
out.
1. Press the
button until “Settings” dis-
plays in the vehicle information display. Use
the
to select “Driver Assistance”.
Then press the ENTER button.
2. Select “Driving Aids”, and press the ENTER button.
3. To set the LDW system to on or off, use the
buttons to navigate in the menu
and use the ENTER button to select or
change an item:
● Select “Lane” and press the ENTER but-
ton.
● To turn on the warning, use the ENTER
button to check box for “Warning (LDW)”
The warning systems switch is used to temporar-
ily turn off the warning systems (Lane Departure
Warning (LDW) and Blind Spot Warning (BSW)
systems) that are activated using the settings
menu in the vehicle information display. See
“Warning systems switch” in “Instruments and
controls.”
LSD2101
Lane departure warning light
LSD2102
5-24Starting and driving