2014 NISSAN 370Z ROADSTER transmission
[x] Cancel search: transmissionPage 340 of 428
SCE0792
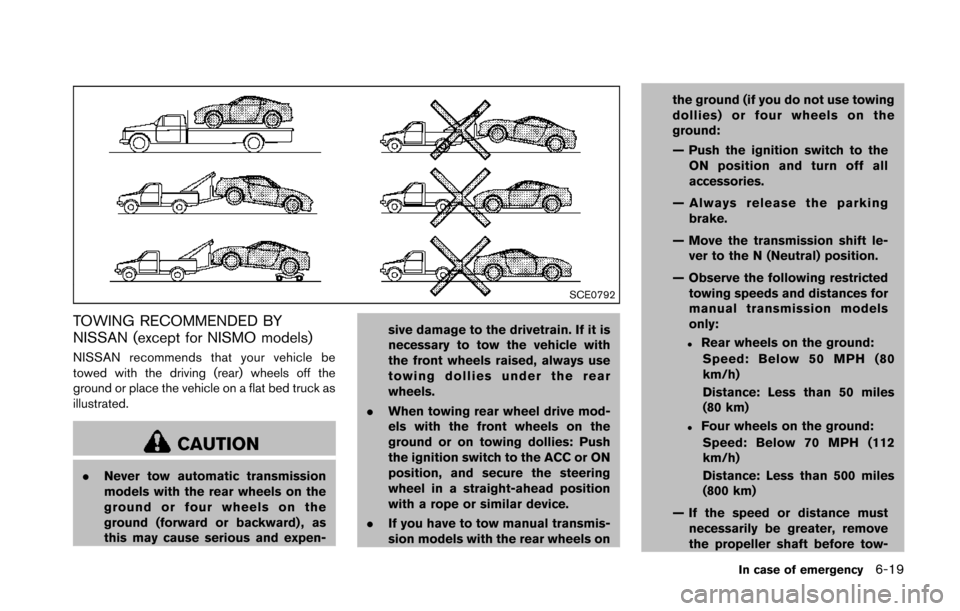
TOWING RECOMMENDED BY
NISSAN (except for NISMO models)
NISSAN recommends that your vehicle be
towed with the driving (rear) wheels off the
ground or place the vehicle on a flat bed truck as
illustrated.
CAUTION
.Never tow automatic transmission
models with the rear wheels on the
ground or four wheels on the
ground (forward or backward) , as
this may cause serious and expen- sive damage to the drivetrain. If it is
necessary to tow the vehicle with
the front wheels raised, always use
towing dollies under the rear
wheels.
. When towing rear wheel drive mod-
els with the front wheels on the
ground or on towing dollies: Push
the ignition switch to the ACC or ON
position, and secure the steering
wheel in a straight-ahead position
with a rope or similar device.
. If you have to tow manual transmis-
sion models with the rear wheels on the ground (if you do not use towing
dollies) or four wheels on the
ground:
— Push the ignition switch to the
ON position and turn off all
accessories.
— Always release the parking brake.
— Move the transmission shift le- ver to the N (Neutral) position.
— Observe the following restricted towing speeds and distances for
manual transmission models
only:
.Rear wheels on the ground:
Speed: Below 50 MPH (80
km/h)
Distance: Less than 50 miles
(80 km)
.Four wheels on the ground:Speed: Below 70 MPH (112
km/h)
Distance: Less than 500 miles
(800 km)
— If the speed or distance must necessarily be greater, remove
the propeller shaft before tow-
In case of emergency6-19
Page 343 of 428
6-22In case of emergency
.Always pull the cable straight out
from the front of the vehicle. Never
pull on the vehicle at an angle.
. Pulling devices should be routed so
they do not touch any part of the
suspension, steering, brake or cool-
ing systems.
. Pulling devices such as ropes or
canvas straps are not recommended
for use in vehicle towing or recov-
ery.
Rocking a stuck vehicle
If your vehicle is stuck in sand, snow, mud, etc.,
use the following procedure:
1. Turn off the Vehicle Dynamic Control (VDC)
system.
2. Make sure the area in front and behind the vehicle is clear of obstructions.
3. Turn the steering wheel right and left to clear an area around the front tires.
4. Slowly rock the vehicle forward and back- ward.
.Shift back and forth between R (Reverse)
and D (Drive) (automatic transmission
models) or 1st and R (Reverse) (manual
transmission models) .
.Apply the accelerator as little as possibleto maintain the rocking motion.
.Release the accelerator pedal beforeshifting between R (Reverse) and D
(Drive) (automatic transmission models)
or 1st and R (Reverse) (manual transmis-
sion models) .
.Do not spin the tires above 35 MPH (55 km/h).
5. If the vehicle cannot be freed after a few tries, contact a professional towing service
to remove the vehicle.
Page 354 of 428
8 Maintenance and do-it-yourself
Maintenance requirement ........................................................ 8-3Scheduled maintenance .................................................... 8-3
General maintenance ......................................................... 8-3
Where to go for service .................................................... 8-3
General maintenance ............................................................... 8-3 Explanation of maintenance items ................................... 8-3
Maintenance precautions ........................................................ 8-6
Engine compartment check locations .................................. 8-7 VQ37VHR engine model .................................................. 8-7
Engine cooling system ............................................................. 8-8
Checking engine coolant level ......................................... 8-9
Changing engine coolant .................................................. 8-9
Engine oil ........................................................................\
......... 8-10
Checking engine oil level ............................................... 8-10
Changing engine oil and filter ....................................... 8-10
Automatic transmission fluid ............................................... 8-12
Power steering fluid ............................................................... 8-12
Brake and clutch fluid ........................................................... 8-13 Brake fluid ........................................................................\
.. 8-13
Clutch fluid (Manual transmission models) ............... 8-14
Window washer fluid ............................................................ 8-14
Battery ........................................................................\
............... 8-15 Jump starting ..................................................................... 8-17 Variable voltage control system ......................................... 8-17
Drive belts ........................................................................\
....... 8-18
Spark plugs ........................................................................\
..... 8-18
Replacing spark plugs .................................................. 8-19
Air cleaner ........................................................................\
....... 8-19
Windshield wiper blades ..................................................... 8-20
Cleaning ........................................................................\
... 8-20
Replacing ........................................................................\
. 8-20
Brakes ........................................................................\
.............. 8-21 Self-adjusting brakes .................................................... 8-21
Brake pad wear warning .............................................. 8-21
Fuses ........................................................................\
................ 8-22 Engine compartment ..................................................... 8-22
Passenger compartment .............................................. 8-23
Intelligent Key battery replacement ................................... 8-24
Lights ........................................................................\
................ 8-26
Coupe ........................................................................\
....... 8-26
Roadster ........................................................................\
... 8-27
Headlights ........................................................................\
8-28
Exterior and interior lights ............................................ 8-28
Wheels and tires ................................................................... 8-30 Tire pressure ................................................................... 8-30
Tire labeling ..................................................................... 8-33
Page 357 of 428
8-4Maintenance and do-it-yourself
Make sure that the headlights, stop lights, tail
lights, turn signal lights, and other lights are all
operating properly and installed securely. Also
check headlight aim.
Road wheel nuts (lug nuts)*:When checking
the tires, make sure no wheel nuts are missing,
and check for any loose wheel nuts. Tighten if
necessary.
Tire rotation*: Tires cannot be rotated, as the
front tires are a different size from the rear tires
and the direction of wheel rotation is fixed in
each tire.
Tires*: Check the pressure with a gauge often
and always prior to long distance trips. If
necessary, adjust the pressure in all tires,
including the spare, to the pressure specified.
Check carefully for damage, cuts or excessive
wear.
Tire Pressure Monitoring System (TPMS)
transmitter components: Replace the TPMS
transmitter grommet seal, valve core and cap
when the tires are replaced due to wear or age.
Tire, wheel alignment and balance: If the
vehicle should pull to either side while driving on
a straight and level road, or if you detect uneven
or abnormal tire wear, there may be a need for
wheel alignment.
If the steering wheel or seat vibrates at normal
highway speeds, wheel balancing may be needed.
For additional information regarding tires, refer
to “Important Tire Safety Information” (US) or
“Tire Safety Information” (Canada) in the
NISSAN Warranty Information Booklet.
Windshield:
Clean the windshield on a regular
basis. Check the windshield at least every six
months for cracks or other damage. Have a
damaged windshield repaired by a qualified
repair facility.
Windshield wiper blades*: Check for cracks
or wear if they do not wipe properly.
Inside the vehicle
The maintenance items listed here should be
checked on a regular basis, such as when
performing scheduled maintenance, cleaning
the vehicle, etc.
Accelerator pedal: Check the pedal for
smooth operation and make sure the pedal
does not catch or require uneven effort. Keep
the floor mat away from the pedal.
Automatic transmission P (Park) mechan-
ism: On a fairly steep hill, check that your
vehicle is held securely with the shift lever in the
P (Park) position without applying any brakes.
Brake pedal: Check the pedal for smooth
operation. If the brake pedal suddenly goes
down further than normal, the pedal feels spongy or the vehicle seems to take longer to
stop, see a NISSAN dealer immediately. Keep
the floor mat away from the pedal.
Brakes:
Check that the brakes do not pull the
vehicle to one side when applied.
Parking brake: Check the parking brake
operation regularly. The vehicle should be
securely held on a fairly steep hill with only the
parking brake applied. If the parking brake needs
adjusted, see a NISSAN dealer.
Seat belts: Check that all parts of the seat belt
system (for example, buckles, anchors, adjuster
and retractors) operate properly and smoothly,
and are installed securely. Check the belt
webbing for cuts, fraying, wear or damage.
Seats: Check seat position controls such as
seat adjusters, seatback recliner, etc. to ensure
they operate smoothly and that all latches lock
securely in every position. Check that the head
restraints move up and down smoothly and that
the locks (if so equipped) hold securely in all
latched positions.
Steering wheel: Check for changes in the
steering conditions, such as excessive free play,
hard steering or strange noises.
Warning lights and chimes: Make sure that
all warning lights and chimes are operating
properly.
Page 359 of 428
8-6Maintenance and do-it-yourself
When performing any inspection or mainte-
nance work on your vehicle, always take care
to prevent serious accidental injury to yourself or
damage to the vehicle. The following are general
precautions which should be closely observed.
WARNING
.Park the vehicle on a level surface,
apply the parking brake securely
and block the wheels to prevent
the vehicle from moving. For man-
ual transmission models, move the
shift lever to N (Neutral) . For auto-
matic transmission models, move
the shift lever to P (Park) .
. Be sure the ignition switch is in the
OFF or LOCK position when per-
forming any parts replacement or
repairs.
. Never connect or disconnect the
battery or any transistorized com-
ponent while the ignition switch is
in the ON position.
. Never leave the engine or automatic
transmission related component
harnesses disconnected while the
ignition switch is in the ON position. .
If you must work with the engine
running, keep your hands, clothing,
hair and tools away from moving
fans, belts and any other moving
parts.
. It is advisable to secure or remove
any loose clothing and remove any
jewelry, such as rings, watches, etc.
before working on your vehicle.
. Always wear eye protection when-
ever you work on your vehicle.
. If you must run the engine in an
enclosed space such as a garage, be
sure there is proper ventilation for
exhaust gases to escape.
. Never get under the vehicle while it
is supported only by a jack. If it is
necessary to work under the vehicle,
support it with safety stands.
. Keep smoking materials, flame and
sparks away from fuel tank and the
battery.
. Your vehicle is equipped with an
automatic engine cooling fan. It may
come on at any time without warn-
ing, even if the ignition key is in the
OFF position and the engine is not
running. To avoid injury, always disconnect the negative battery
cable before working near the fan.
. The fuel filter or fuel lines should be
serviced by a NISSAN dealer be-
cause the fuel lines are under high
pressure even when the engine is
off.
CAUTION
.Do not work under the hood while
the engine is hot. Turn the engine
off and wait until it cools down.
. Avoid direct contact with used en-
gine oil and coolant. Improperly
disposed engine oil, coolant, and/
or other vehicle fluids can damage
the environment. Always conform to
local regulations for disposal of
vehicle fluid.
This “8. Maintenance and do-it-yourself” section
gives instructions regarding only those items
which are relatively easy for an owner to perform.
A genuine NISSAN Service Manual is also
available. (See “Owner’s Manual/Service Man-
ual order information” (P.9-25).)
MAINTENANCE PRECAUTIONS
Page 360 of 428
You should be aware that incomplete or
improper servicing may result in operating
difficulties or excessive emissions, and could
affect your warranty coverage.If in doubt
about any servicing, we recommend that
it be done by a NISSAN dealer.
JVM0086X
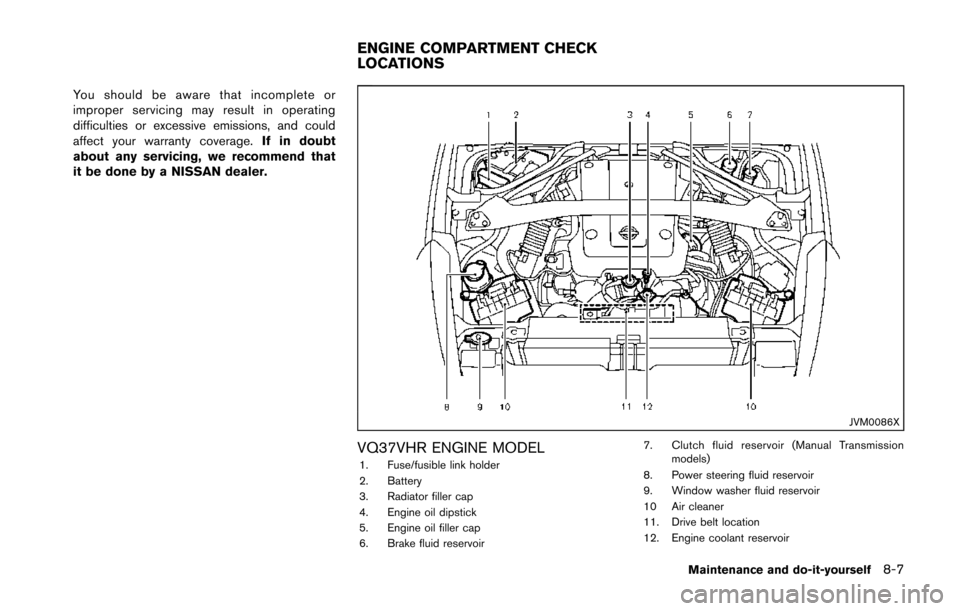
VQ37VHR ENGINE MODEL1. Fuse/fusible link holder
2. Battery
3. Radiator filler cap
4. Engine oil dipstick
5. Engine oil filler cap
6. Brake fluid reservoir 7. Clutch fluid reservoir (Manual Transmission
models)
8. Power steering fluid reservoir
9. Window washer fluid reservoir
10 Air cleaner
11. Drive belt location
12. Engine coolant reservoir
Maintenance and do-it-yourself8-7
ENGINE COMPARTMENT CHECK
LOCATIONS
Page 361 of 428
8-8Maintenance and do-it-yourself
The engine cooling system is filled at the factory
with a pre-diluted mixture of 50% Genuine
NISSAN Long Life Antifreeze/Coolant (blue) and
50% water to provide year-round anti-freeze
and coolant protection. The antifreeze solution
contains rust and corrosion inhibitors. Additional
engine cooling system additives are not neces-
sary.
WARNING
.Never remove the radiator or cool-
ant reservoir cap when the engine is
hot. Wait until the engine and
radiator cool down. Serious burns
could be caused by high pressure
fluid escaping from the radiator.
See precautions in “If your vehicle
overheats” (P.6-16) of this manual.
. The radiator is equipped with a
pressure type radiator cap. To pre-
vent engine damage, use only a
genuine NISSAN radiator cap.
CAUTION
.Never use any cooling system ad-
ditives such as radiator sealer. Ad-
ditives may clog the cooling system
and cause damage to the engine,
transmission and/or cooling sys-
tem.
. When adding or replacing coolant,
be sure to use only Genuine
NISSAN Long Life Antifreeze/Cool-
ant (blue) or equivalent. Genuine
NISSAN Long Life Antifreeze/Cool-
ant (blue) is pre-diluted to provide
antifreeze protection to −348 F
(−378C) . If additional freeze protec-
tion is needed due to weather where
you operate your vehicle, add Gen-
uine NISSAN Long Life Antifreeze/
Coolant (blue) concentrate follow-
ing the directions on the container.
If an equivalent coolant other than
Genuine NISSAN Long Life Anti-
freeze/Coolant (blue) is used, fol-
low the coolant manufacturer’s
instructions to maintain minimum
antifreeze protection to −348 F
(−378C) . The use of other types of
coolant solutions other than Genu- ine NISSAN Long Life Antifreeze/
Coolant (blue) or equivalent may
damage the engine cooling system.
. The life expectancy of the factory-fill
coolant is 105,000 miles (168,000
km) or 7 years. Mixing any other
type of coolant other than Genuine
NISSAN Long Life Antifreeze/Cool-
ant (blue) , including Genuine
NISSAN Long Life Antifreeze/Cool-
ant (green) , or the use of non-
distilled water will reduce the life
expectancy of the factory-fill cool-
ant. Refer to the NISSAN Service
and Maintenance Guide for more
details.
ENGINE COOLING SYSTEM
Page 365 of 428
8-12Maintenance and do-it-yourself
c. Insert the clip through the undercoverinto the hole in the frame, then push the
center of the clip in to lock the clip in
place.
d. Install the bolts that hold the undercover in place. Be careful not to strip the bolts
or over-tighten them.
2. Lower the vehicle carefully to the ground.
3. Dispose of waste oil and filter properly.
WARNING
. Prolonged and repeated contact
with used engine oil may cause skin
cancer.
. Try to avoid direct skin contact with
used oil. If skin contact is made,
wash thoroughly with soap or hand
cleaner as soon as possible.
. Keep used engine oil out of reach of
children. When checking or replacement is required, we
recommend a NISSAN dealer for servicing.
CAUTION
.
Use only Genuine NISSAN Matic S
ATF. Do not mix with other fluids.
. Using automatic transmission fluid
other than Genuine NISSAN Matic S
ATF will cause deterioration in dri-
veability and automatic transmis-
sion durability, and may damage
the automatic transmission, which
is not covered by the NISSAN new
vehicle limited warranty.
SDI1765A
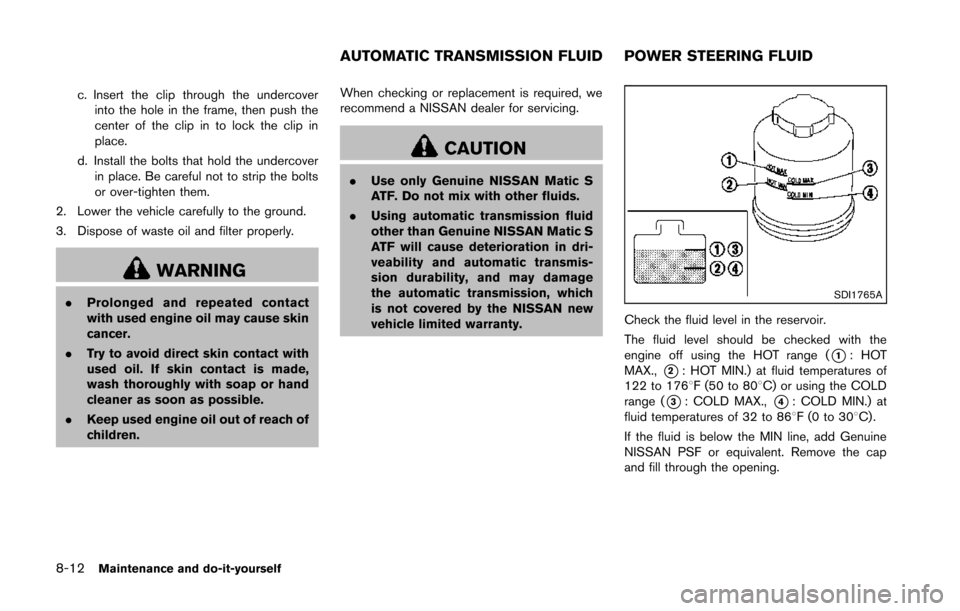
Check the fluid level in the reservoir.
The fluid level should be checked with the
engine off using the HOT range (
*1:HOT
MAX.,
*2: HOT MIN.) at fluid temperatures of
122 to 1768F (50 to 808C) or using the COLD
range (
*3: COLD MAX.,*4: COLD MIN.) at
fluid temperatures of 32 to 868F(0to30 8C) .
If the fluid is below the MIN line, add Genuine
NISSAN PSF or equivalent. Remove the cap
and fill through the opening.
AUTOMATIC TRANSMISSION FLUID POWER STEERING FLUID