2014 NISSAN 370Z ROADSTER check engine light
[x] Cancel search: check engine lightPage 303 of 428
5-16Starting and driving
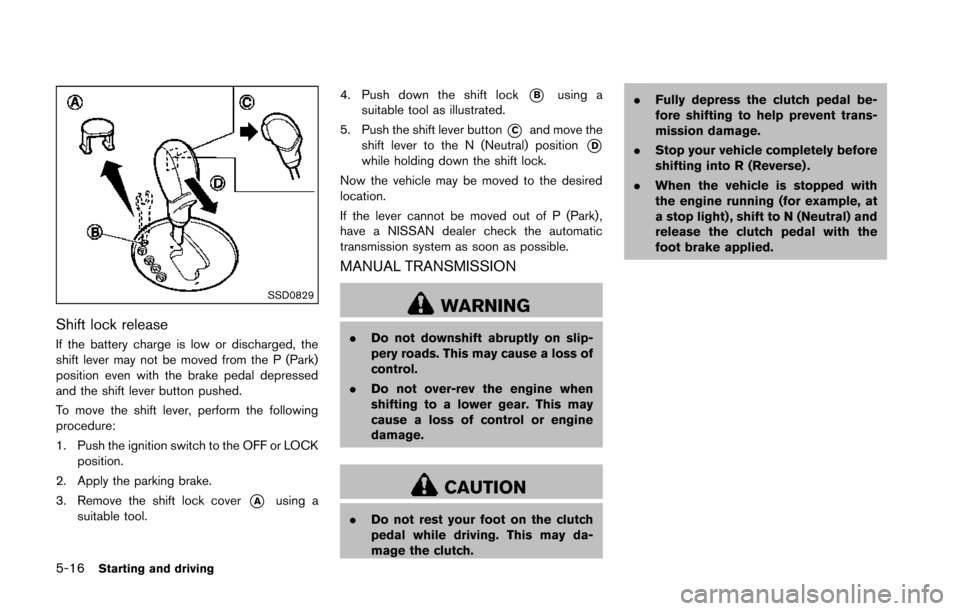
SSD0829
Shift lock release
If the battery charge is low or discharged, the
shift lever may not be moved from the P (Park)
position even with the brake pedal depressed
and the shift lever button pushed.
To move the shift lever, perform the following
procedure:
1. Push the ignition switch to the OFF or LOCKposition.
2. Apply the parking brake.
3. Remove the shift lock cover
*Ausing a
suitable tool. 4. Push down the shift lock
*Busing a
suitable tool as illustrated.
5. Push the shift lever button
*Cand move the
shift lever to the N (Neutral) position
*Dwhile holding down the shift lock.
Now the vehicle may be moved to the desired
location.
If the lever cannot be moved out of P (Park) ,
have a NISSAN dealer check the automatic
transmission system as soon as possible.
MANUAL TRANSMISSION
WARNING
. Do not downshift abruptly on slip-
pery roads. This may cause a loss of
control.
. Do not over-rev the engine when
shifting to a lower gear. This may
cause a loss of control or engine
damage.
CAUTION
.Do not rest your foot on the clutch
pedal while driving. This may da-
mage the clutch. .
Fully depress the clutch pedal be-
fore shifting to help prevent trans-
mission damage.
. Stop your vehicle completely before
shifting into R (Reverse) .
. When the vehicle is stopped with
the engine running (for example, at
a stop light) , shift to N (Neutral) and
release the clutch pedal with the
foot brake applied.
Page 308 of 428
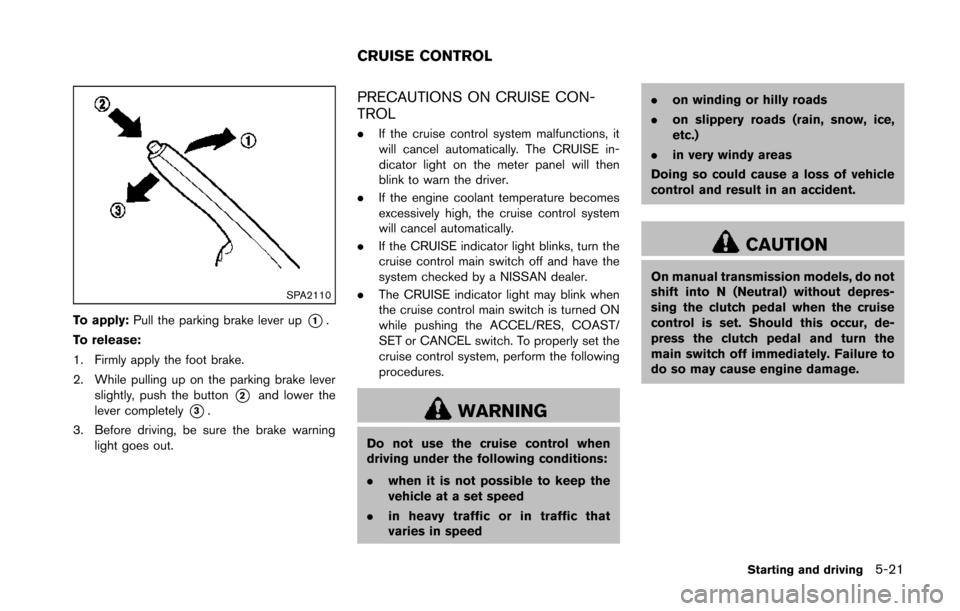
SPA2110
To apply:Pull the parking brake lever up*1.
To release:
1. Firmly apply the foot brake.
2. While pulling up on the parking brake lever slightly, push the button
*2and lower the
lever completely
*3.
3. Before driving, be sure the brake warning light goes out.
PRECAUTIONS ON CRUISE CON-
TROL
.If the cruise control system malfunctions, it
will cancel automatically. The CRUISE in-
dicator light on the meter panel will then
blink to warn the driver.
. If the engine coolant temperature becomes
excessively high, the cruise control system
will cancel automatically.
. If the CRUISE indicator light blinks, turn the
cruise control main switch off and have the
system checked by a NISSAN dealer.
. The CRUISE indicator light may blink when
the cruise control main switch is turned ON
while pushing the ACCEL/RES, COAST/
SET or CANCEL switch. To properly set the
cruise control system, perform the following
procedures.
WARNING
Do not use the cruise control when
driving under the following conditions:
.when it is not possible to keep the
vehicle at a set speed
. in heavy traffic or in traffic that
varies in speed .
on winding or hilly roads
. on slippery roads (rain, snow, ice,
etc.)
. in very windy areas
Doing so could cause a loss of vehicle
control and result in an accident.
CAUTION
On manual transmission models, do not
shift into N (Neutral) without depres-
sing the clutch pedal when the cruise
control is set. Should this occur, de-
press the clutch pedal and turn the
main switch off immediately. Failure to
do so may cause engine damage.
Starting and driving5-21
CRUISE CONTROL
Page 315 of 428
5-28Starting and driving
surfaces even with ABS. Stopping
distances may also be longer on
rough, gravel or snow covered
roads, or if you are using tire chains.
Always maintain a safe distance
from the vehicle in front of you.
Ultimately, the driver is responsible
for safety.
. Tire type and condition may also
affect braking effectiveness.
— When replacing tires, install the
specified size of tires on all four
wheels.
— When installing a spare tire, make sure that it is the proper
size and type as specified on the
Tire and Loading Information
label. See “Tire and Loading
Information label” (P.9-13) of
this manual.
— For detailed information, see “Wheels and tires” (P.8-30) of
this manual.
The Anti-lock Braking System (ABS) controls
the brakes so the wheels do not lock during hard
braking or when braking on slippery surfaces.
The system detects the rotation speed at each wheel and varies the brake fluid pressure to
prevent each wheel from locking and sliding. By
preventing each wheel from locking, the system
helps the driver maintain steering control and
helps to minimize swerving and spinning on
slippery surfaces.
Using the system
Depress the brake pedal and hold it down.
Depress the brake pedal with firm steady
pressure, but do not pump the brakes. The
ABS will operate to prevent the wheels from
locking up. Steer the vehicle to avoid obstacles.
WARNING
Do not pump the brake pedal. Doing so
may result in increased stopping dis-
tances.
Self-test feature
The ABS includes electronic sensors, electric
pumps, hydraulic solenoids and a computer. The
computer has a built-in diagnostic feature that
tests the system each time you start the engine
and move the vehicle at a low speed in forward
or reverse. When the self-test occurs, you may
hear a “clunk” noise and/or feel a pulsation in the
brake pedal. This is normal and does notindicate a malfunction. If the computer senses
a malfunction, it switches the ABS off and
illuminates the ABS warning light on the
instrument panel. The brake system then oper-
ates normally, but without anti-lock assistance.
If the ABS warning light illuminates during the
self-test or while driving, have the vehicle
checked by a NISSAN dealer.
Normal operation
The ABS operates at speeds above 3 to 6 MPH
(5 to 10 km/h).
When the ABS senses that one or more wheels
are close to locking up, the actuator rapidly
applies and releases hydraulic pressure. This
action is similar to pumping the brakes very
quickly. You may feel a pulsation in the brake
pedal and hear a noise from under the hood or
feel a vibration from the actuator when it is
operating. This is normal and indicates that the
ABS is operating properly. However, the pulsa-
tion may indicate that road conditions are
hazardous and extra care is required while
driving.
Page 354 of 428
8 Maintenance and do-it-yourself
Maintenance requirement ........................................................ 8-3Scheduled maintenance .................................................... 8-3
General maintenance ......................................................... 8-3
Where to go for service .................................................... 8-3
General maintenance ............................................................... 8-3 Explanation of maintenance items ................................... 8-3
Maintenance precautions ........................................................ 8-6
Engine compartment check locations .................................. 8-7 VQ37VHR engine model .................................................. 8-7
Engine cooling system ............................................................. 8-8
Checking engine coolant level ......................................... 8-9
Changing engine coolant .................................................. 8-9
Engine oil ........................................................................\
......... 8-10
Checking engine oil level ............................................... 8-10
Changing engine oil and filter ....................................... 8-10
Automatic transmission fluid ............................................... 8-12
Power steering fluid ............................................................... 8-12
Brake and clutch fluid ........................................................... 8-13 Brake fluid ........................................................................\
.. 8-13
Clutch fluid (Manual transmission models) ............... 8-14
Window washer fluid ............................................................ 8-14
Battery ........................................................................\
............... 8-15 Jump starting ..................................................................... 8-17 Variable voltage control system ......................................... 8-17
Drive belts ........................................................................\
....... 8-18
Spark plugs ........................................................................\
..... 8-18
Replacing spark plugs .................................................. 8-19
Air cleaner ........................................................................\
....... 8-19
Windshield wiper blades ..................................................... 8-20
Cleaning ........................................................................\
... 8-20
Replacing ........................................................................\
. 8-20
Brakes ........................................................................\
.............. 8-21 Self-adjusting brakes .................................................... 8-21
Brake pad wear warning .............................................. 8-21
Fuses ........................................................................\
................ 8-22 Engine compartment ..................................................... 8-22
Passenger compartment .............................................. 8-23
Intelligent Key battery replacement ................................... 8-24
Lights ........................................................................\
................ 8-26
Coupe ........................................................................\
....... 8-26
Roadster ........................................................................\
... 8-27
Headlights ........................................................................\
8-28
Exterior and interior lights ............................................ 8-28
Wheels and tires ................................................................... 8-30 Tire pressure ................................................................... 8-30
Tire labeling ..................................................................... 8-33
Page 356 of 428
Some day-to-day and regular maintenance is
essential to maintain your vehicle’s good me-
chanical condition, as well as its emission and
engine performance.
It is the owner’s responsibility to make sure that
the scheduled maintenance, as well as general
maintenance, is performed.
As the vehicle owner, you are the only one who
can ensure that your vehicle receives the proper
maintenance care. You are a vital link in the
maintenance chain.
SCHEDULED MAINTENANCE
For your convenience, both required and op-
tional scheduled maintenance items are de-
scribed and listed in your “NISSAN Service and
Maintenance Guide”. You must refer to that
guide to ensure that necessary maintenance is
performed on your vehicle at regular intervals.
GENERAL MAINTENANCE
General maintenance includes those items
which should be checked during normal day-
to-day operation. They are essential for proper
vehicle operation. It is your responsibility to
perform these procedures regularly as pre-
scribed.
Performing general maintenance checks re-
quires minimal mechanical skill and only a few
general automotive tools.These checks or inspections can be done by
yourself, a qualified technician or, if you prefer, a
NISSAN dealer.
WHERE TO GO FOR SERVICE
If maintenance service is required or your vehicle
appears to malfunction, have the systems
checked and serviced by a NISSAN dealer.
NISSAN technicians are well-trained specialists
and are kept up to date with the latest service
information through technical bulletins, service
tips, and in-dealership information systems.
They are completely qualified to work on
NISSAN vehicles
beforework begins.
You can be confident that a NISSAN dealer’s
service department performs the best job to
meet the maintenance requirements on your
vehicle. During the normal day-to-day operation of the
vehicle, general maintenance should be per-
formed regularly as prescribed in this section. If
you detect any unusual sounds, vibrations or
smell, be sure to check for the cause or have a
NISSAN dealer do it promptly. In addition, you
should notify a NISSAN dealer if you think that
repairs are required.
When performing any checks or maintenance
work, see “Maintenance precautions” (P.8-6) .
EXPLANATION OF MAINTENANCE
ITEMS
Additional information on the following
items with “*” is found later in this section.
Outside the vehicle
The maintenance items listed here should be
performed from time to time, unless otherwise
specified.
Doors and engine hood:
Check that all doors
and the engine hood, operate properly. Also
ensure that all latches lock securely. Lubricate
hinges, latches, latch pins, rollers and links if
necessary. Make sure that the secondary latch
keeps the hood from opening when the primary
latch is released.
When driving in areas using road salt or other
corrosive materials, check lubrication frequently.
Lights*: Clean the headlights on a regular basis.
Maintenance and do-it-yourself8-3
MAINTENANCE REQUIREMENT GENERAL MAINTENANCE
Page 364 of 428
SDI2335
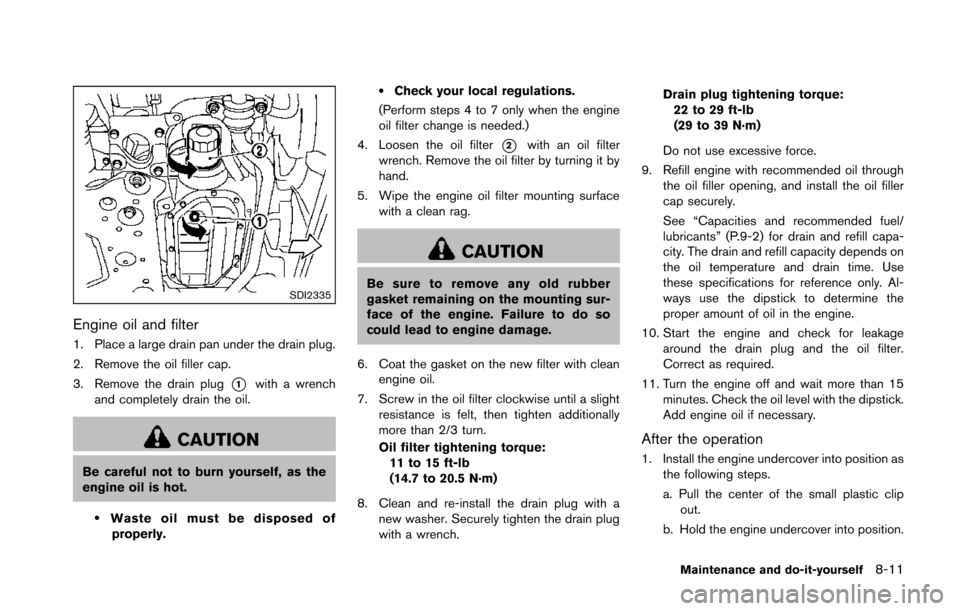
Engine oil and filter
1. Place a large drain pan under the drain plug.
2. Remove the oil filler cap.
3. Remove the drain plug
*1with a wrench
and completely drain the oil.
CAUTION
Be careful not to burn yourself, as the
engine oil is hot.
.Waste oil must be disposed of
properly.
.Check your local regulations.
(Perform steps 4 to 7 only when the engine
oil filter change is needed.)
4. Loosen the oil filter
*2with an oil filter
wrench. Remove the oil filter by turning it by
hand.
5. Wipe the engine oil filter mounting surface with a clean rag.
CAUTION
Be sure to remove any old rubber
gasket remaining on the mounting sur-
face of the engine. Failure to do so
could lead to engine damage.
6. Coat the gasket on the new filter with clean engine oil.
7. Screw in the oil filter clockwise until a slight resistance is felt, then tighten additionally
more than 2/3 turn.
Oil filter tightening torque:11 to 15 ft-lb
(14.7 to 20.5 N·m)
8. Clean and re-install the drain plug with a new washer. Securely tighten the drain plug
with a wrench. Drain plug tightening torque:
22 to 29 ft-lb
(29 to 39 N·m)
Do not use excessive force.
9. Refill engine with recommended oil through the oil filler opening, and install the oil filler
cap securely.
See “Capacities and recommended fuel/
lubricants” (P.9-2) for drain and refill capa-
city. The drain and refill capacity depends on
the oil temperature and drain time. Use
these specifications for reference only. Al-
ways use the dipstick to determine the
proper amount of oil in the engine.
10. Start the engine and check for leakage around the drain plug and the oil filter.
Correct as required.
11. Turn the engine off and wait more than 15 minutes. Check the oil level with the dipstick.
Add engine oil if necessary.
After the operation
1. Install the engine undercover into position asthe following steps.
a. Pull the center of the small plastic clipout.
b. Hold the engine undercover into position.
Maintenance and do-it-yourself8-11
Page 375 of 428
8-22Maintenance and do-it-yourself
SDI1479A
ENGINE COMPARTMENT
CAUTION
Never use a fuse of a higher or lower
amperage rating than that specified on
the fuse box cover. This could damage
the electrical system or cause a fire.
If any electrical equipment does not operate,
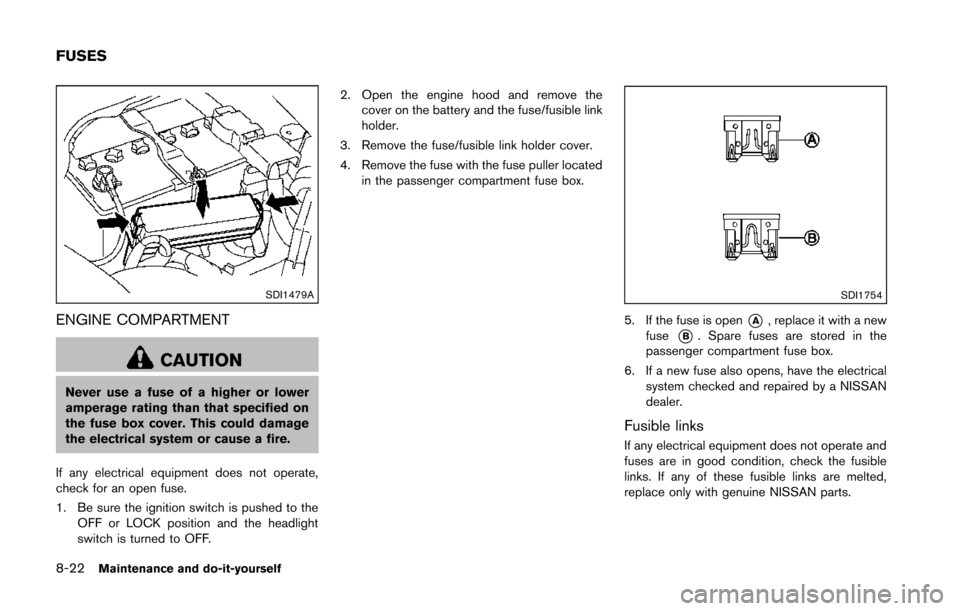
check for an open fuse.
1. Be sure the ignition switch is pushed to the OFF or LOCK position and the headlight
switch is turned to OFF. 2. Open the engine hood and remove the
cover on the battery and the fuse/fusible link
holder.
3. Remove the fuse/fusible link holder cover.
4. Remove the fuse with the fuse puller located in the passenger compartment fuse box.
SDI1754
5. If the fuse is open*A, replace it with a new
fuse
*B. Spare fuses are stored in the
passenger compartment fuse box.
6. If a new fuse also opens, have the electrical system checked and repaired by a NISSAN
dealer.
Fusible links
If any electrical equipment does not operate and
fuses are in good condition, check the fusible
links. If any of these fusible links are melted,
replace only with genuine NISSAN parts.
FUSES
Page 398 of 428
.E-15 fuel contains more than 10%
oxygenate. E-15 fuel will adversely
affect the emission control devices
and systems of the vehicle and should
not be used. Damage caused by such
fuel is not covered by the NISSAN New
Vehicle Limited Warranty.
. If a methanol blend is used, it should
contain no more than 5% methanol
(methyl alcohol, wood alcohol) . It
should also contain a suitable amount
of appropriate cosolvents and corro-
sion inhibitors. If not properly formu-
lated with appropriate cosolvents and
corrosion inhibitors, such methanol
blends may cause fuel system damage
and/or vehicle performance problems.
At this time, sufficient data is not
available to ensure that all methanol
blends are suitable for use in NISSAN
vehicles.
If any undesirable driveability problems such as
engine stalling or hard hot starting are experi-
enced after using oxygenate-blend fuels, im-
mediately change to a non-oxygenate fuel or a
fuel with a low blend of MTBE.
Take care not to spill gasoline during
refueling. Gasoline containing oxygenates
can cause paint damage.E-15 fuel
E-15 fuel is a mixture of approximately 15% fuel
ethanol and 85% unleaded gasoline. E-15 can
only be used in vehicles designed to run on E-
15 fuel. Do not use E-15 in your vehicle. U.S.
government regulations require fuel ethanol
dispensing pumps to be identified with small,
square, orange and black label with the common
abbreviation or the appropriate percentage for
that region.
E-85 fuel
E-85 fuel is a mixture of approximately 85% fuel
ethanol and 15% unleaded gasoline. E-85 can
only be used in a Flexible Fuel Vehicle (FFV) . Do
not use E-85 fuel in your vehicle. U.S. govern-
ment regulations require fuel ethanol dispensing
pumps to be identified by a small, square,
orange and black label with the common
abbreviation or the appropriate percentage for
that region.
Aftermarket fuel additives
NISSAN does not recommend the use of any
aftermarket fuel additives (Example: fuel injector
cleaner, octane booster, intake valve deposit
removers, etc.) which are sold commercially.
Many of these additives intended for gum,
varnish or deposit removal may contain active
solvent or similar ingredients that can be harmful to the fuel system and engine.
Octane rating tips
Using unleaded gasoline with an octane
rating lower than recommended above can
cause persistent, heavy spark knock.
(Spark knock is a metallic rapping noise.)
If severe, this can lead to engine damage.
If you detect a persistent heavy spark
knock even when using gasoline of the
stated octane rating, or if you hear steady
spark knock while holding a steady speed
on level roads, have a NISSAN dealer
correct the condition. Failure to correct
the condition is misuse of the vehicle, for
which NISSAN is not responsible.
Incorrect ignition timing will result in knocking,
after-run or overheating. This in turn may cause
excessive fuel consumption or damage to the
engine. If any of the above symptoms are
encountered, have your vehicle checked at a
NISSAN dealer or other competent service
facility.
However, now and then you may notice
light spark knock for a short time while
accelerating or driving up hills. This is no
cause for concern, because you get the
greatest fuel benefit when there is light
spark knock for a short time under heavy
engine load.
Technical and consumer information9-5