2014 NISSAN 370Z ROADSTER tow
[x] Cancel search: towPage 100 of 428
SIC3996
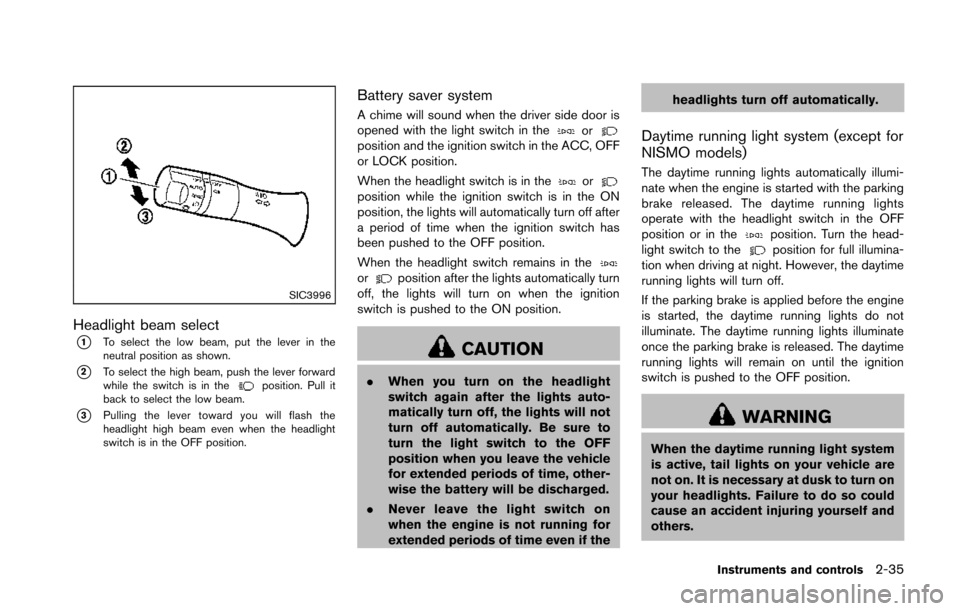
Headlight beam select
*1To select the low beam, put the lever in the
neutral position as shown.
*2To select the high beam, push the lever forward
while the switch is in theposition. Pull it
back to select the low beam.
*3Pulling the lever toward you will flash the
headlight high beam even when the headlight
switch is in the OFF position.
Battery saver system
A chime will sound when the driver side door is
opened with the light switch in theorposition and the ignition switch in the ACC, OFF
or LOCK position.
When the headlight switch is in the
orposition while the ignition switch is in the ON
position, the lights will automatically turn off after
a period of time when the ignition switch has
been pushed to the OFF position.
When the headlight switch remains in the
orposition after the lights automatically turn
off, the lights will turn on when the ignition
switch is pushed to the ON position.
CAUTION
. When you turn on the headlight
switch again after the lights auto-
matically turn off, the lights will not
turn off automatically. Be sure to
turn the light switch to the OFF
position when you leave the vehicle
for extended periods of time, other-
wise the battery will be discharged.
. Never leave the light switch on
when the engine is not running for
extended periods of time even if the headlights turn off automatically.
Daytime running light system (except for
NISMO models)
The daytime running lights automatically illumi-
nate when the engine is started with the parking
brake released. The daytime running lights
operate with the headlight switch in the OFF
position or in the
position. Turn the head-
light switch to theposition for full illumina-
tion when driving at night. However, the daytime
running lights will turn off.
If the parking brake is applied before the engine
is started, the daytime running lights do not
illuminate. The daytime running lights illuminate
once the parking brake is released. The daytime
running lights will remain on until the ignition
switch is pushed to the OFF position.
WARNING
When the daytime running light system
is active, tail lights on your vehicle are
not on. It is necessary at dusk to turn on
your headlights. Failure to do so could
cause an accident injuring yourself and
others.
Instruments and controls2-35
Page 109 of 428
2-44Instruments and controls
SIC4026
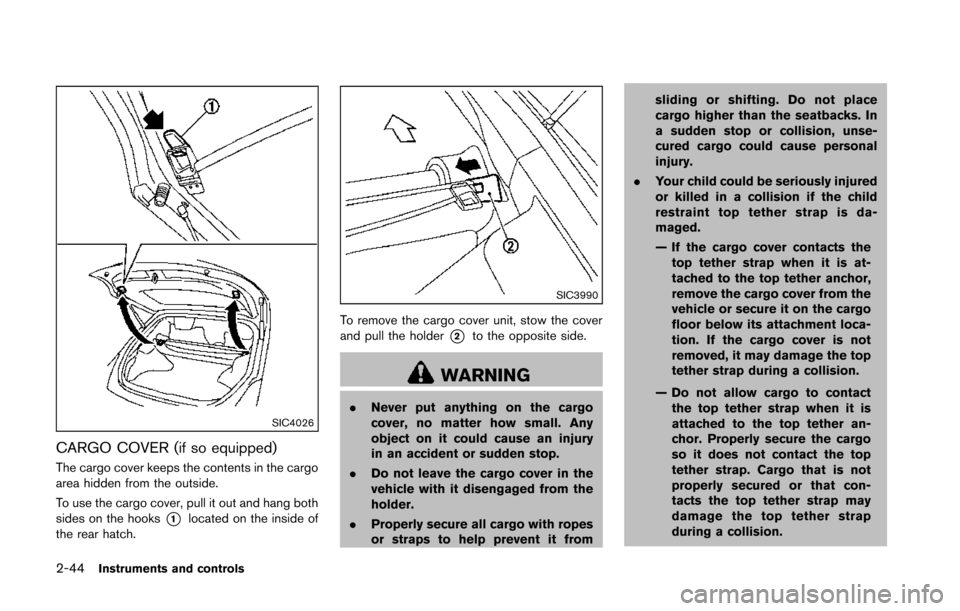
CARGO COVER (if so equipped)
The cargo cover keeps the contents in the cargo
area hidden from the outside.
To use the cargo cover, pull it out and hang both
sides on the hooks
*1located on the inside of
the rear hatch.
SIC3990
To remove the cargo cover unit, stow the cover
and pull the holder
*2to the opposite side.
WARNING
. Never put anything on the cargo
cover, no matter how small. Any
object on it could cause an injury
in an accident or sudden stop.
. Do not leave the cargo cover in the
vehicle with it disengaged from the
holder.
. Properly secure all cargo with ropes
or straps to help prevent it from sliding or shifting. Do not place
cargo higher than the seatbacks. In
a sudden stop or collision, unse-
cured cargo could cause personal
injury.
. Your child could be seriously injured
or killed in a collision if the child
restraint top tether strap is da-
maged.
— If the cargo cover contacts the
top tether strap when it is at-
tached to the top tether anchor,
remove the cargo cover from the
vehicle or secure it on the cargo
floor below its attachment loca-
tion. If the cargo cover is not
removed, it may damage the top
tether strap during a collision.
— Do not allow cargo to contact the top tether strap when it is
attached to the top tether an-
chor. Properly secure the cargo
so it does not contact the top
tether strap. Cargo that is not
properly secured or that con-
tacts the top tether strap may
damage the top tether strap
during a collision.
Page 127 of 428
3-6Pre-driving checks and adjustments
3. Within 20 seconds of performing Step 2,push and hold the power door lock switch to
the
position (UNLOCK) for more than 5
seconds.
4. When activated, the hazard indicator will flash twice. When deactivated, the hazard
indicator will flash once.
5. The ignition switch must be placed in the OFF and ON position again between each
setting change.
When the automatic door unlock system is
deactivated, the doors do not unlock when the
ignition switch is placed in the OFF position. To
unlock the door manually, use the inside lock
knob or the power door lock switch (driver’s or
front passenger’s side).WARNING
. Radio waves could adversely affect
electric medical equipment. Those
who use a pacemaker should con-
tact the electric medical equipment
manufacturer for the possible influ-
ences before use.
. The Intelligent Key transmits radio
waves when the buttons are
pushed. The FAA advises that the
radio waves may affect aircraft na-
vigation and communication sys-
tems. Do not operate the
Intelligent Key while on an airplane.
Make sure the buttons are not
operated unintentionally when the
unit is stored during a flight.
The Intelligent Key system can operate all the
door and rear hatch/trunk lid locks using the
remote controller function or pushing the re-
quest switch on the vehicle without taking the
key out from a pocket or purse. The operating
environment and/or conditions may affect the
Intelligent Key system operation.
Be sure to read the following before using the
Intelligent Key system.
CAUTION
. Be sure to carry the Intelligent Key
with you when operating the vehi-
cle.
. Never leave the Intelligent Key in
the vehicle when you leave the
vehicle.
The Intelligent Key is always communicating with
the vehicle as it receives radio waves. The
Intelligent Key system transmits weak radio
waves. Environmental conditions may interfere
with the operation of the Intelligent Key system
under the following operating conditions.
. When operating near a location where
strong radio waves are transmitted, such
as a TV tower, power station and broad-
casting station.
. When in possession of wireless equipment,
such as a cellular telephone, transceiver,
and CB radio.
. When the Intelligent Key is in contact with or
covered by metallic materials.
. When any type of radio wave remote control
is used nearby.
. When the Intelligent Key is placed near an
electric appliance such as a personal
INTELLIGENT KEY SYSTEM
Page 153 of 428
3-32Pre-driving checks and adjustments
locked completely, and this may
allow wind and rain to get into your
vehicle.
CARE OF THE SOFT TOP AND THE
VEHICLE BODY
To use your Roadster safely and comfortably,
you need to observe all the warnings and
cautions shown in the previous pages. Also, to
maintain a good appearance of the soft top and
the vehicle body, you need to care for them by
cleaning and/or washing properly.
CAUTION
.Do not use an automatic car wash or
a high-pressure car wash to clean
your vehicle. The top may be da-
maged and water may leak into the
inside of the vehicle.
. Store the vehicle with the top closed
if it is not to be used for long
periods. Keeping the top stowed
for long periods may cause wrinkles
on the surface of the top.
See “Cleaning exterior” (P.7-2) for detailed
instructions. .
A protective clear tape is applied to the top
storage lid painted surface where the soft
top contacts the surface. When the top is
fully closed, the tape may transmit some
light, visible from the inside of the vehicle.
This does not affect the water and air
tightness of the seal.
. The inner surface of the trunk and top
storage lids may show a fibrous, or marbled
pattern. This is the normal appearance of the
material used in these parts.
SPA2647
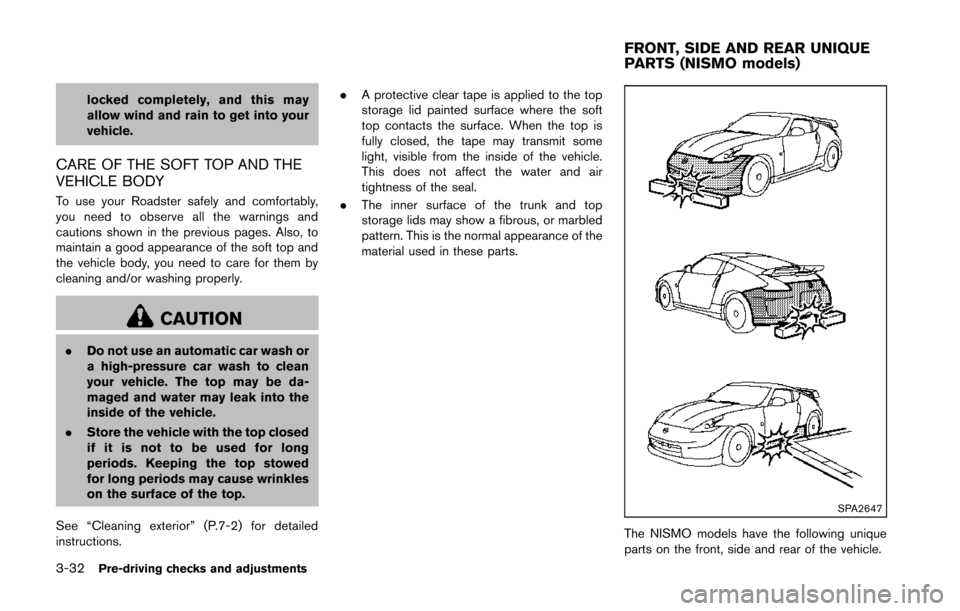
The NISMO models have the following unique
parts on the front, side and rear of the vehicle.
FRONT, SIDE AND REAR UNIQUE
PARTS (NISMO models)
Page 160 of 428
SPA1829
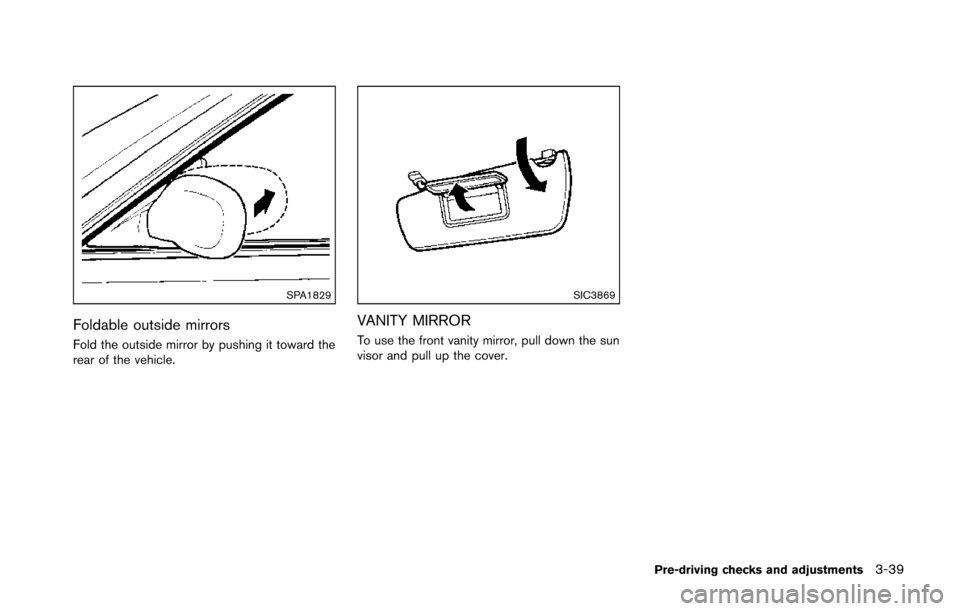
Foldable outside mirrors
Fold the outside mirror by pushing it toward the
rear of the vehicle.
SIC3869
VANITY MIRROR
To use the front vanity mirror, pull down the sun
visor and pull up the cover.
Pre-driving checks and adjustments3-39
Page 165 of 428
4-4Center display, heater, air conditioner, audio, phone and voice recognition systems
SAA2274
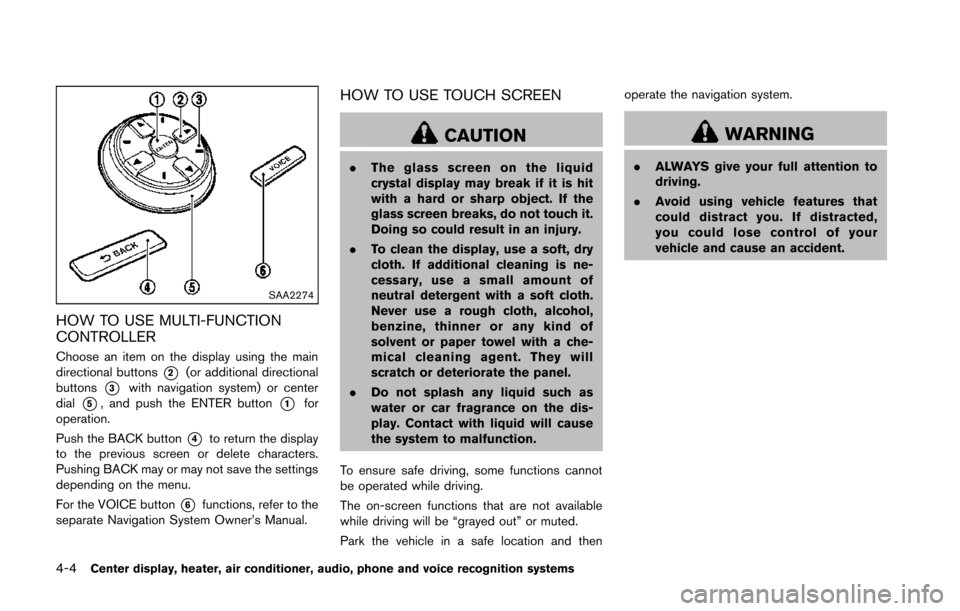
HOW TO USE MULTI-FUNCTION
CONTROLLER
Choose an item on the display using the main
directional buttons
*2(or additional directional
buttons
*3with navigation system) or center
dial
*5, and push the ENTER button*1for
operation.
Push the BACK button
*4to return the display
to the previous screen or delete characters.
Pushing BACK may or may not save the settings
depending on the menu.
For the VOICE button
*6functions, refer to the
separate Navigation System Owner’s Manual.
HOW TO USE TOUCH SCREEN
CAUTION
. The glass screen on the liquid
crystal display may break if it is hit
with a hard or sharp object. If the
glass screen breaks, do not touch it.
Doing so could result in an injury.
. To clean the display, use a soft, dry
cloth. If additional cleaning is ne-
cessary, use a small amount of
neutral detergent with a soft cloth.
Never use a rough cloth, alcohol,
benzine, thinner or any kind of
solvent or paper towel with a che-
mical cleaning agent. They will
scratch or deteriorate the panel.
. Do not splash any liquid such as
water or car fragrance on the dis-
play. Contact with liquid will cause
the system to malfunction.
To ensure safe driving, some functions cannot
be operated while driving.
The on-screen functions that are not available
while driving will be “grayed out” or muted.
Park the vehicle in a safe location and then operate the navigation system.
WARNING
.
ALWAYS give your full attention to
driving.
. Avoid using vehicle features that
could distract you. If distracted,
you could lose control of your
vehicle and cause an accident.
Page 290 of 428
THREE-WAY CATALYST
The three-way catalyst is an emission control
device installed in the exhaust system. Exhaust
gases in the three-way catalyst are burned at
high temperatures to help reduce pollutants.
WARNING
.The exhaust gas and the exhaust
system are very hot. Keep people,
animals or flammable materials
away from the exhaust system com-
ponents.
. Do not stop or park the vehicle over
flammable materials such as dry
grass, waste paper or rags. They
may ignite and cause a fire.
CAUTION
.Do not use leaded gasoline. Depos-
its from leaded gasoline seriously
reduce the three-way catalyst’s abil-
ity to help reduce exhaust pollu-
tants.
. Keep your engine tuned up. Mal-
functions in the ignition, fuel injec- tion, or electrical systems can cause
overrich fuel flow into the three-way
catalyst, causing it to overheat. Do
not keep driving if the engine mis-
fires, or if noticeable loss of perfor-
mance or other unusual operating
conditions are detected. Have the
vehicle inspected promptly by a
NISSAN dealer.
. Avoid driving with an extremely low
fuel level. Running out of fuel could
cause the engine to misfire, dama-
ging the three-way catalyst.
. Do not race the engine while warm-
ing it up.
. Do not push or tow your vehicle to
start the engine.
TIRE PRESSURE MONITORING SYS-
TEM (TPMS)
Each tire, including the spare (if provided) ,
should be checked monthly when cold and
inflated to the inflation pressure recommended
by the vehicle manufacturer on the vehicle
placard or tire inflation pressure label. (If your
vehicle has tires of a different size than the size
indicated on the vehicle placard or tire inflation
pressure label, you should determine the proper
tire inflation pressure for those tires.)
As an added safety feature, your vehicle has
been equipped with a Tire Pressure Monitoring
System (TPMS) that illuminates a low tire
pressure telltale when one or more of your tires
is significantly under-inflated. Accordingly, when
the low tire pressure telltale illuminates, you
should stop and check your tires as soon as
possible, and inflate them to the proper pres-
sure. Driving on a significantly under-inflated tire
causes the tire to overheat and can lead to tire
failure. Under-inflation also reduces fuel effi-
ciency and tire tread life, and may affect the
vehicle’s handling and stopping ability.
Please note that the TPMS is not a substitute for
proper tire maintenance, and it is the driver’s
responsibility to maintain correct tire pressure,
even if under-inflation has not reached the level
to trigger illumination of the TPMS low tire
Starting and driving5-3
Page 296 of 428
SSD1021
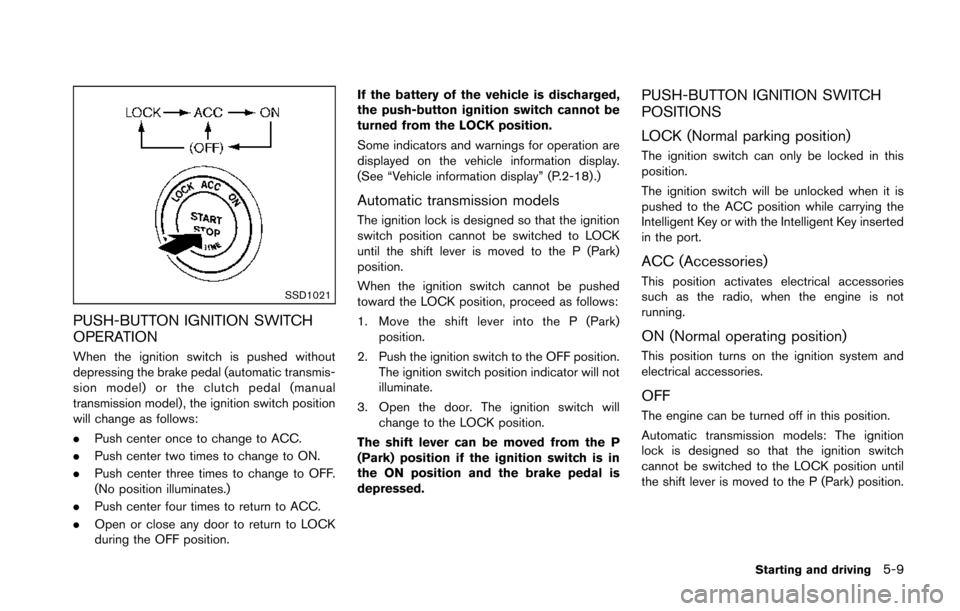
PUSH-BUTTON IGNITION SWITCH
OPERATION
When the ignition switch is pushed without
depressing the brake pedal (automatic transmis-
sion model) or the clutch pedal (manual
transmission model) , the ignition switch position
will change as follows:
.Push center once to change to ACC.
. Push center two times to change to ON.
. Push center three times to change to OFF.
(No position illuminates.)
. Push center four times to return to ACC.
. Open or close any door to return to LOCK
during the OFF position. If the battery of the vehicle is discharged,
the push-button ignition switch cannot be
turned from the LOCK position.
Some indicators and warnings for operation are
displayed on the vehicle information display.
(See “Vehicle information display” (P.2-18) .)
Automatic transmission models
The ignition lock is designed so that the ignition
switch position cannot be switched to LOCK
until the shift lever is moved to the P (Park)
position.
When the ignition switch cannot be pushed
toward the LOCK position, proceed as follows:
1. Move the shift lever into the P (Park)
position.
2. Push the ignition switch to the OFF position. The ignition switch position indicator will not
illuminate.
3. Open the door. The ignition switch will change to the LOCK position.
The shift lever can be moved from the P
(Park) position if the ignition switch is in
the ON position and the brake pedal is
depressed.
PUSH-BUTTON IGNITION SWITCH
POSITIONS
LOCK (Normal parking position)
The ignition switch can only be locked in this
position.
The ignition switch will be unlocked when it is
pushed to the ACC position while carrying the
Intelligent Key or with the Intelligent Key inserted
in the port.
ACC (Accessories)
This position activates electrical accessories
such as the radio, when the engine is not
running.
ON (Normal operating position)
This position turns on the ignition system and
electrical accessories.
OFF
The engine can be turned off in this position.
Automatic transmission models: The ignition
lock is designed so that the ignition switch
cannot be switched to the LOCK position until
the shift lever is moved to the P (Park) position.
Starting and driving5-9