2014 NISSAN 370Z ROADSTER light
[x] Cancel search: lightPage 317 of 428

5-30Starting and driving
.If brake related parts such as brake
pads, rotors and calipers are not
NISSAN recommended or are extre-
mely deteriorated, the VDC system
may not operate properly and the
VDC warning light
may illumi-
nate.
. If engine control related parts are
not NISSAN recommended or are
extremely deteriorated, the VDC
warning light
may illuminate.
. When driving on extremely inclined
surfaces such as higher banked
corners, the VDC system may not
operate properly and the VDC warn-
ing light
may illuminate. Do not
drive on these types of roads.
. When driving on an unstable sur-
face such as a turntable, ferry,
elevator or ramp, the VDC warning
light
may illuminate. This is not
a malfunction. Restart the engine
after driving onto a stable surface.
. If wheels or tires other than the
NISSAN recommended ones are
used, the VDC system may not
operate properly and the VDC warn-
ing light
may illuminate. .
The VDC system is not a substitute
for winter tires or tire chains on a
snow covered road.
Page 323 of 428
6-2In case of emergency
SIC2574
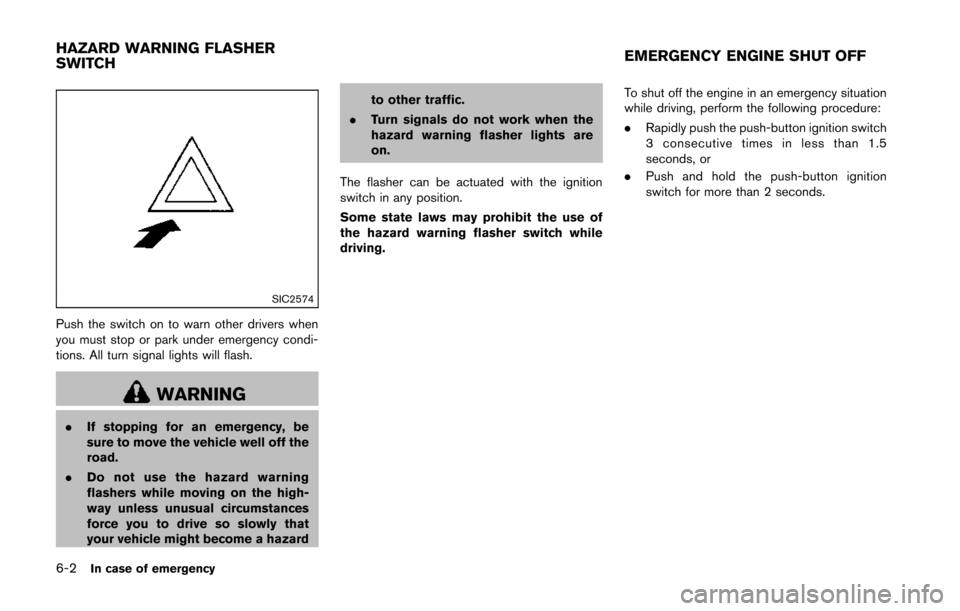
Push the switch on to warn other drivers when
you must stop or park under emergency condi-
tions. All turn signal lights will flash.
WARNING
.If stopping for an emergency, be
sure to move the vehicle well off the
road.
. Do not use the hazard warning
flashers while moving on the high-
way unless unusual circumstances
force you to drive so slowly that
your vehicle might become a hazard to other traffic.
. Turn signals do not work when the
hazard warning flasher lights are
on.
The flasher can be actuated with the ignition
switch in any position.
Some state laws may prohibit the use of
the hazard warning flasher switch while
driving. To shut off the engine in an emergency situation
while driving, perform the following procedure:
.
Rapidly push the push-button ignition switch
3 consecutive times in less than 1.5
seconds, or
. Push and hold the push-button ignition
switch for more than 2 seconds.
HAZARD WARNING FLASHER
SWITCH EMERGENCY ENGINE SHUT OFF
Page 324 of 428
TIRE PRESSURE MONITORING SYS-
TEM (TPMS)
This vehicle is equipped with the Tire Pressure
Monitoring System (TPMS) . It monitors tire
pressure of all tires except the spare. When
the low tire pressure warning light is lit and the
CHECK TIRE PRESSURE warning appears on
the vehicle information display, one or more of
your tires is significantly under-inflated. If the
vehicle is being driven with low tire pressure, the
TPMS will activate and warn you of it by the low
tire pressure warning light. This system will
activate only when the vehicle is driven at
speeds above 16 MPH (25 km/h). For more
details, see “Warning/indicator lights and audi-
ble reminders” (P.2-10) and “Tire Pressure
Monitoring System (TPMS)” (P.5-3) .
WARNING
.If the low tire pressure warning light
illuminates while driving, avoid sud-
den steering maneuvers or abrupt
braking, reduce vehicle speed, pull
off the road to a safe location and
stop the vehicle as soon as possi-
ble. Driving with under-inflated tires
may permanently damage the tires
and increase the likelihood of tire failure. Serious vehicle damage
could occur and may lead to an
accident and could result in serious
personal injury. Check the tire pres-
sure for all four tires. Adjust the tire
pressure to the recommended COLD
tire pressure shown on the Tire and
Loading Information label to turn
the low tire pressure warning light
OFF. If the light still illuminates
while driving after adjusting the tire
pressure, a tire may be flat. If you
have a flat tire, replace it with a
spare tire as soon as possible.
. When a spare tire is mounted or a
wheel is replaced, the TPMS will not
function and the low tire pressure
warning light will flash for approxi-
mately 1 minute. The light will
remain on after 1 minute. Contact
your NISSAN dealer as soon as
possible for tire replacement and/
or system resetting.
. Replacing tires with those not ori-
ginally specified by NISSAN could
affect the proper operation of the
TPMS.
. Do not inject any tire liquid or
aerosol tire sealant into the tires, as this may cause a malfunction of
the tire pressure sensors (for mod-
els not equipped with the emer-
gency tire puncture repair kit) .
. If you used the Emergency Tire
Sealant to repair a minor tire punc-
ture, your NISSAN dealer will also
need to replace the TPMS sensor in
addition to repairing or replacing
the tire (for models equipped with
the emergency tire puncture repair
kit) .
. NISSAN recommends using only
NISSAN Genuine Emergency Tire
Sealant provided with your vehicle.
Other tire sealants may damage the
valve stem seal which can cause the
tire to lose air pressure (for models
equipped with the emergency tire
puncture repair kit) .
In case of emergency6-3
FLAT TIRE
Page 329 of 428

6-8In case of emergency
SCE0845
Roadster models:
Securely store the jacking tools in the storage
area.
Place the spare tire cover and trunk room carpet
back in the trunk, and then close the trunk lid.
Securely store the damaged tire according to
the following procedure as illustrated.
1. Put the damaged tire in the plastic bag
*Astored in the trunk.
2. Move the passenger seat forward, and then place the damaged tire
*Bwrapped in the
plastic bag behind the seat.
3. Move the passenger seat backward to secure the damaged tire.
WARNING
.Always make sure that the spare tire
and jacking equipment are properly
secured after use. Such items can
become dangerous projectiles in an
accident or sudden stop.
. The spare tire is designed for emer-
gency use. See specific instructions
under the heading “Wheels and
tires” (P.8-30) .
REPAIRING FLAT TIRE (for models with
emergency tire puncture repair kit)
WARNING
.After using Emergency Tire Sealant
to repair a minor tire puncture, do
not drive the vehicle at speeds
faster than 50 MPH (80 km/h) .
. Immediately after using the Emer-
gency Tire Sealant to repair a minor
tire puncture, take your vehicle to a
NISSAN dealer to inspect, and re-
pair or replace the tire. The Emer-
gency Tire Sealant cannot
permanently seal a punctured tire. Continuing operation of the vehicle
without a permanent tire repair can
lead to a crash.
. If you used the Emergency Tire
Sealant to repair a minor tire punc-
ture, your NISSAN dealer will also
need to replace the TPMS sensor in
addition to repairing or replacing
the tire.
. NISSAN recommends using only
NISSAN Genuine Emergency Tire
Sealant provided with your vehicle.
Other tire sealants may damage the
valve stem seal which can cause the
tire to lose air pressure.
This vehicle does not have a spare tire. The
emergency tire puncture repair kit (Emergency
Tire Sealant) is supplied with the vehicle instead
of a spare tire. It can be used to temporarily
repair minor tire punctures.
If possible, have the vehicle towed to a facility
that can repair or replace the flat tire. Using the
emergency tire puncture repair kit may cause a
malfunction of the tire pressure sensor and
cause the low tire pressure warning light to
illuminate.
If you have a flat tire, follow the instructions
below.
Page 331 of 428

6-10In case of emergency
JVE0122X
Getting emergency tire puncture repair
kit
Take out the emergency tire puncture repair kit
located under the cargo room or in the trunk.
The repair kit consists of the following items:
*1Tire sealant bottle
*2Air compressor*
*3Speed restriction sticker
*: The compressor shape may differ depending
on the models.
NOTE:
For models with the emergency tire punc-
ture repair kit, a spare tire, jack and rod are
not equipped as standard. These parts aredealer options. Contact a NISSAN dealer
about obtaining these parts. See “Chan-
ging a flat tire (for models with spare tire)”
(P.6-4) for usage of jacking tools and tire
replacement.
Before using emergency tire puncture
repair kit
.
If any foreign object (for example, a screw or
nail) is embedded in the tire, do not remove
it.
. Check the expiration date of the sealant
(shown on the label attached to the bottle) .
Never use a sealant whose expiration date
has passed.
Repairing tire
WARNING
Observe the following precautions
when using the tire repair compound.
.Swallowing the compound is dan-
gerous. Immediately drink as much
water as possible and seek prompt
medical assistance.
. Rinse well with lots of water if the
compound comes into contact with
skin or eyes. If irritation persists, seek prompt medical attention.
. Keep the repair compound out of
the reach of children.
. The emergency repair compound
may cause a malfunction of the tire
pressure sensors and cause the low
tire pressure warning light to illumi-
nate. Have the tire pressure sensor
replaced as soon as possible.
NOTE:
Do not remove any nails or screws that
have penetrated the tire when performing
repairs.
Page 332 of 428

JVE0014X
1. Take out the speed restriction sticker fromthe air compressor*, then put it in a location
where the driver can see it while driving.
*: The compressor shape may differ depend-
ing on the models.
CAUTION
Do not put the speed restriction label
on the steering wheel pad, the speed-
ometer or the warning light locations.
SCE0868
2. Take the hose*1and the power plug*2out of the air compressor. Remove the cap
of the bottle holder from the air compressor.
SCE0869
3. Remove the cap from the tire sealant bottle,and screw the bottle clockwise onto the
bottle holder. (Leave the bottle seal intact.
Screwing the bottle onto the bottle holder
will pierce the seal of the bottle.)
4. Remove the cap from the tire valve on the flat tire.
In case of emergency6-11
Page 336 of 428
SCE0791
WARNING
Always follow the instructions below.
Failure to do so could result in damage
to the charging system and cause
personal injury.
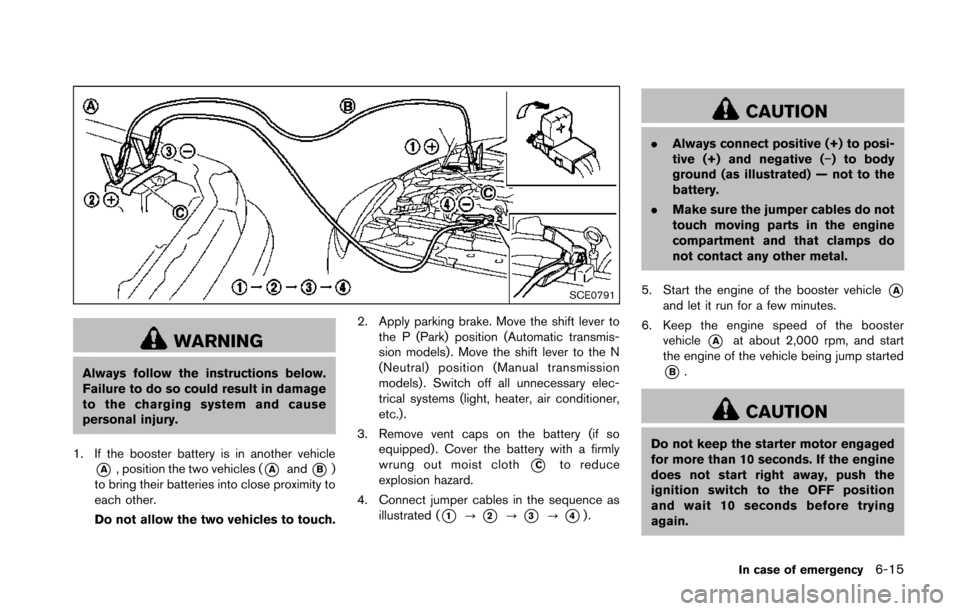
1. If the booster battery is in another vehicle
*A, position the two vehicles (*Aand*B)
to bring their batteries into close proximity to
each other.
Do not allow the two vehicles to touch. 2. Apply parking brake. Move the shift lever to
the P (Park) position (Automatic transmis-
sion models). Move the shift lever to the N
(Neutral) position (Manual transmission
models) . Switch off all unnecessary elec-
trical systems (light, heater, air conditioner,
etc.).
3. Remove vent caps on the battery (if so equipped) . Cover the battery with a firmly
wrung out moist cloth*Cto reduce
explosion hazard.
4. Connect jumper cables in the sequence as illustrated (
*1?*2?*3?*4).
CAUTION
.Always connect positive (+) to posi-
tive (+) and negative (−) to body
ground (as illustrated) — not to the
battery.
. Make sure the jumper cables do not
touch moving parts in the engine
compartment and that clamps do
not contact any other metal.
5. Start the engine of the booster vehicle
*Aand let it run for a few minutes.
6. Keep the engine speed of the booster vehicle
*Aat about 2,000 rpm, and start
the engine of the vehicle being jump started
*B.
CAUTION
Do not keep the starter motor engaged
for more than 10 seconds. If the engine
does not start right away, push the
ignition switch to the OFF position
and wait 10 seconds before trying
again.
In case of emergency6-15
Page 347 of 428

7-2Appearance and care
In order to maintain the appearance of your
vehicle, it is important to take proper care of it.
To protect the paint surface, wash your vehicle
as soon as you can:
.after a rainfall to prevent possible damage
from acid rain
. after driving on coastal roads
. when contaminants such as soot, bird
droppings, tree sap, metal particles or bugs
get on the paint surface
. when dust or mud builds up on the surface
Whenever possible, store or park your vehicle
inside a garage or in a covered area.
When it is necessary to park outside, park in a
shady area or protect the vehicle with a body
cover.
Be careful not to scratch the paint surface
when putting on or removing the body
cover.WASHING
Wash dirt off the vehicle with a wet sponge and
plenty of water. Clean the vehicle thoroughly
using a mild soap, a special vehicle soap or
general purpose dishwashing liquid mixed with
clean, lukewarm (never hot) water.
CAUTION
. Do not use car washes that use acid
in the detergent. Some car washes,
especially brushless ones, use some
acid for cleaning. The acid may react
with some plastic vehicle compo-
nents, causing them to crack. This
could affect their appearance, and
also could cause them not to func-
tion properly. Always check with
your car wash to confirm that acid
is not used.
. Do not wash the vehicle with strong
household soap, strong chemical
detergents, gasoline or solvents.
. Do not wash the vehicle in direct
sunlight or while the vehicle body is
hot, as the surface may become
water-spotted. .
Avoid using tight-napped or rough
cloths, such as washing mitts. Care
must be taken when removing
caked-on dirt or other foreign sub-
stances so the paint surface is not
scratched or damaged.
. For Roadster models, observe the
following:
— Do not use an automatic car
wash or a high pressure car
wash. The soft top may be
damaged.
— Avoid applying direct water pressure, such as high pres-
sured water from household
hoses, on the lining of the soft
top and vehicle body. Avoid
applying continuous water on
the parts around the soft top
and the windows. These may
cause water to leak into the
inside of your vehicle.
Rinse the vehicle thoroughly with plenty of clean
water.
Inside flanges, seams and folds on the doors,
hatches and hood are particularly vulnerable to
the effects of road salt. Therefore, these areas
CLEANING EXTERIOR