2014 NISSAN 370Z COUPE maintenance
[x] Cancel search: maintenancePage 5 of 24

3
LOOSE FUEL CAP
A LOOSE FUEL CAP warning message will
appear in the vehicle information display
01 when
the fuel-filler cap is not tightened correctly.
To tighten, turn the cap clockwise until a single click
is heard.
The warning message will disappear when the vehicle
detects the fuel-filler cap is properly tightened and the
reset button
02 is pressed for about 1 second.
If the cap is not properly tightened, the Malfunction
Indicator Light
may illuminate.
For more information, refer to the “Instruments and controls (section 2)”
and the “Pre-driving checks and adjustments (section 3)” of your Owner’s Manual.
02
01
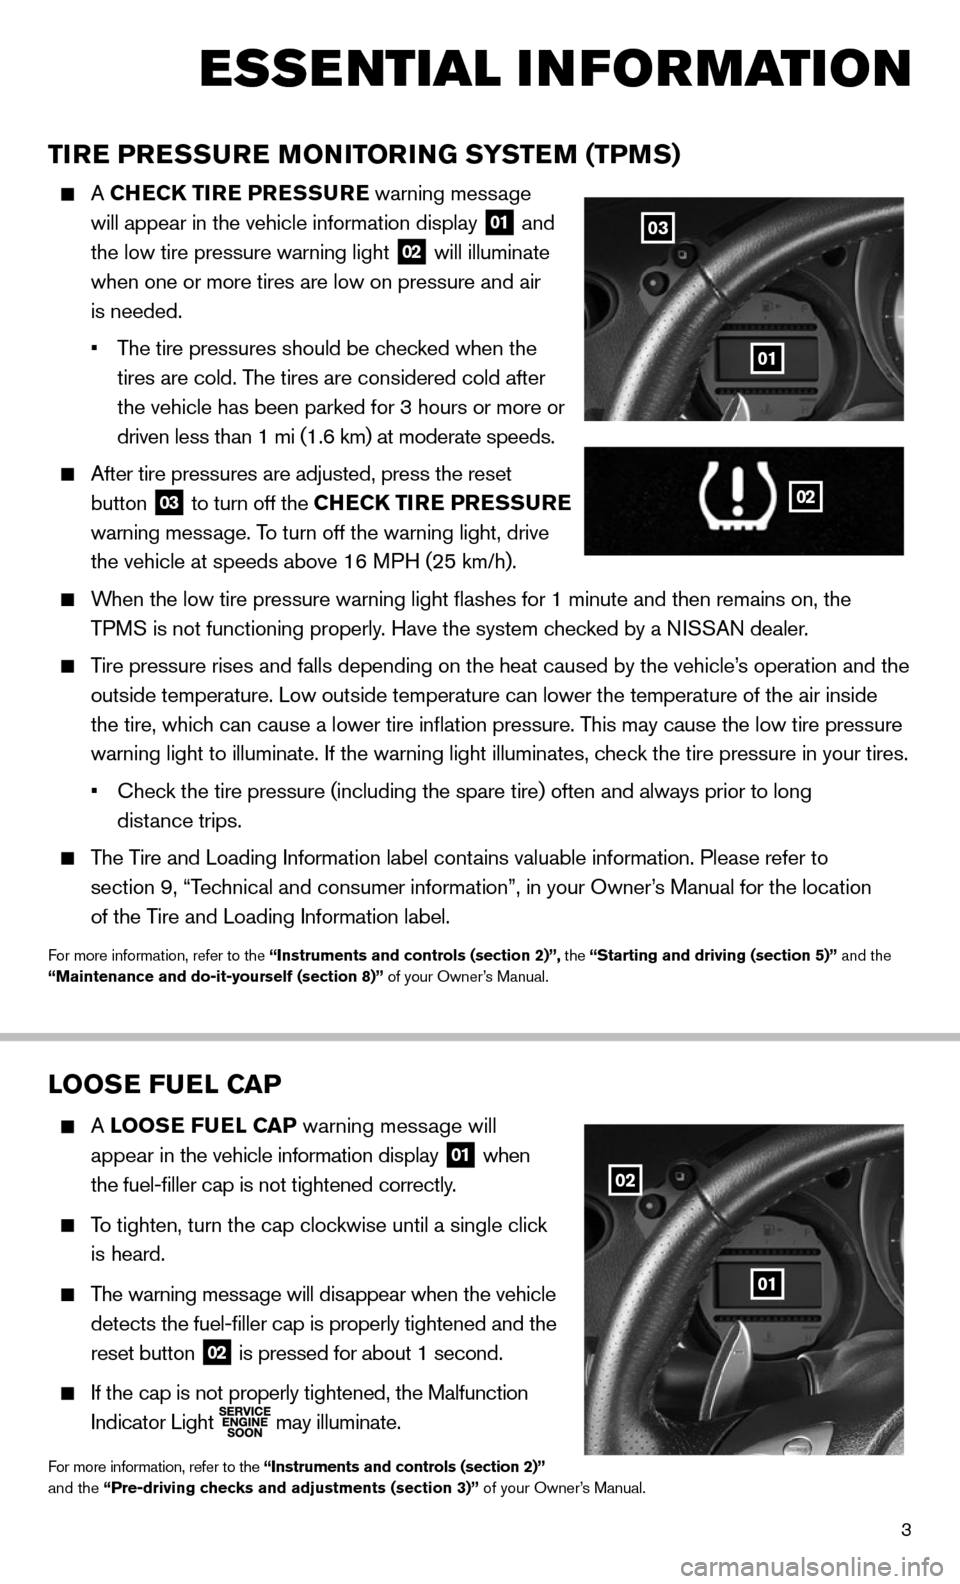
TIRE PRESSURE MONITORING SYSTEM (TPMS)
A
CHEC k TIRE PRESSURE warning message
will appear in the vehicle information display
01 and
the low tire pressure warning light 02 will illuminate
when one or more tires are low on pressure and air
is needed.
• The tire pressures should be checked when the
tires are cold. The tires are considered cold after
the vehicle has been parked for 3 hours or more or
driven less than 1 mi (1.6 km) at moderate speeds.
After tire pressures are adjusted, press the reset
button
03 to turn off the
CHEC k TIRE PRESSURE
warning message. To turn off the warning light, drive
the vehicle at speeds above 16 MPH (25 km/h).
When the low tire pressure warning light flashes for 1 minute and then \
remains on, the
TPMS is not functioning properly. Have the system checked by a NISSAN dealer.
Tire pressure rises and falls depending on the heat caused by the vehicle\
’s operation and the
outside temperature. Low outside temperature can lower the temperature o\
f the air inside
the tire, which can cause a lower tire inflation pressure. This may cause the low tire pressure
warning light to illuminate. If the warning light illuminates, check the tire pressure in your tires.
• check the tire pressure (including the spare tire) often and always prior \
to long
distance trips.
The Tire and Loading Information label contains valuable information. Please refer to
section 9, “Technical and consumer information”, in your Owner’s Manual for the location
of the Tire and Loading Information label.
For more information, refer to the “Instruments and controls (section 2)”, the “Starting and driving (section 5)” and the
“Maintenance and do-it-yourself (section 8)” of your Owner’s Manual.
03
01
02
esse ntial i n for mation
Page 6 of 24

4
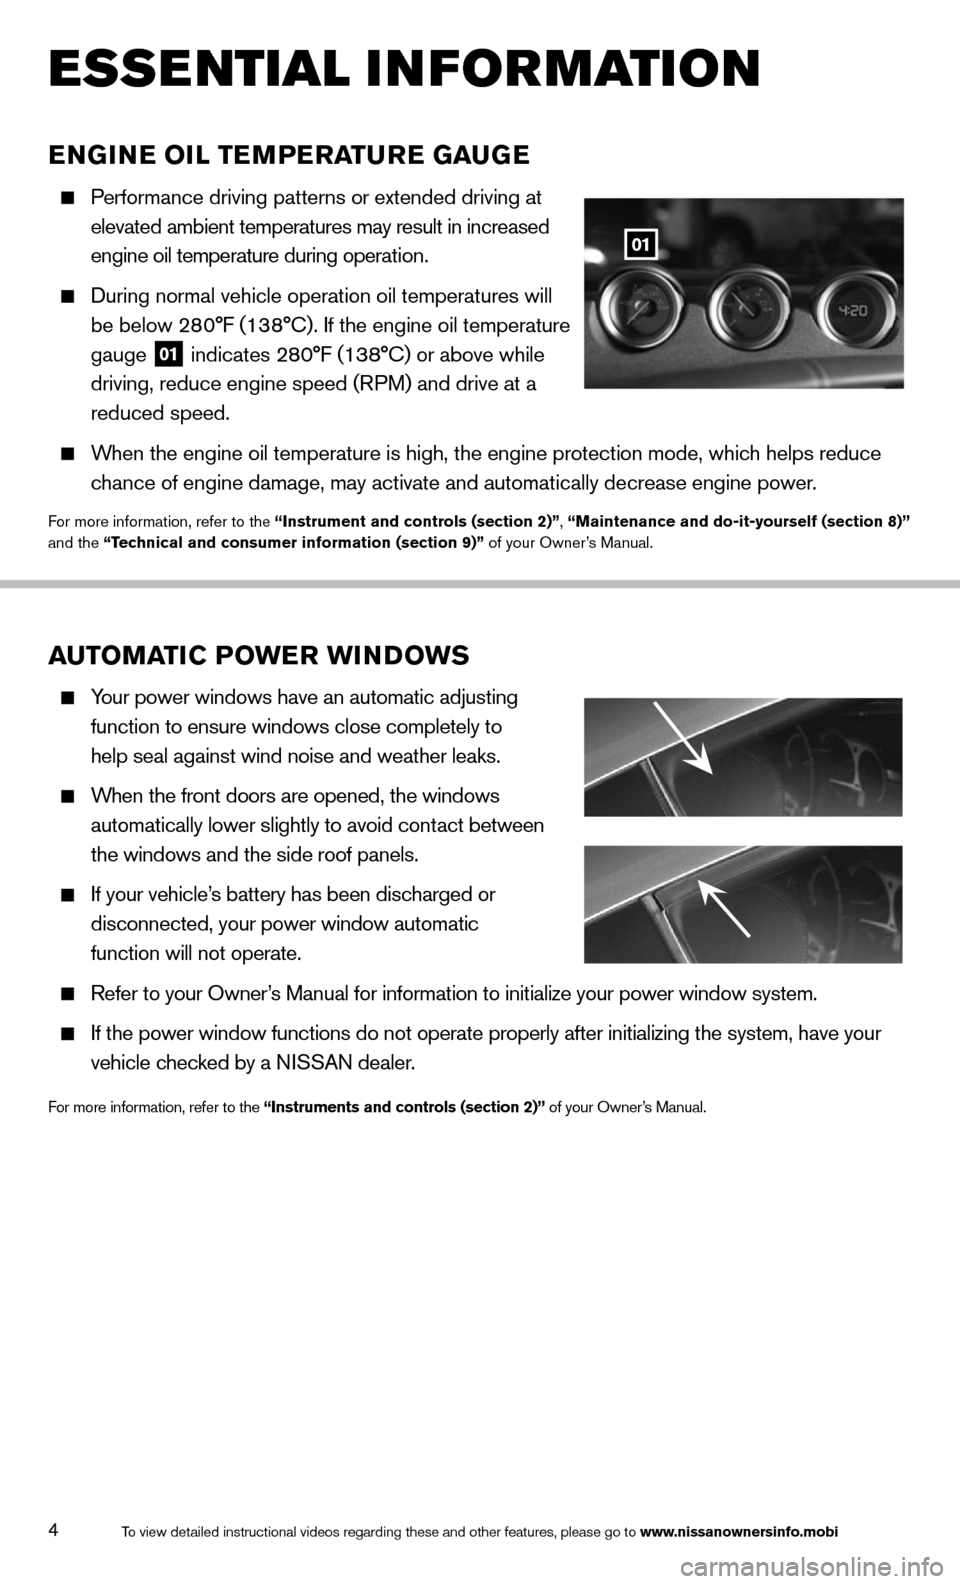
ENGINE OIL TEMPERATURE GAUGE
Performance driving patterns or extended driving at
elevated ambient temperatures may result in increased
engine oil temperature during operation.
During normal vehicle operation oil temperatures will
be below 280°F (138°c). If the engine oil temperature
gauge
01 indicates 280°F (138°c) or above while
driving, reduce engine speed (RPM) and drive at a
reduced speed.
When the engine oil temperature is high, the engine protection mode, whic\
h helps reduce
chance of engine damage, may activate and automatically decrease engine p\
ower.
For more information, refer to the “Instrument and controls (section 2)”, “Maintenance and do-it-yourself (section 8)”
and the “Technical and consumer information (section 9)” of your Owner’s Manual.
01
AUTOMATIC POWER WINDOWS
Your power windows have an automatic adjusting
function to ensure windows close completely to
help seal against wind noise and weather leaks.
When the front doors are opened, the windows
automatically lower slightly to avoid contact between
the windows and the side roof panels.
If your vehicle’s battery has been discharged or
disconnected, your power window automatic
function will not operate.
Refer to your Owner’s Manual for information to initialize your power window system.
If the power window functions do not operate properly after initializing\
the system, have your
vehicle checked by a NISSAN dealer.
For more information, refer to the “Instruments and controls (section 2)” of your Owner’s Manual.
esse ntial i n for mation
To view detailed instructional videos regarding these and other features, please go\
to www.nissanownersinfo.mobi
Page 7 of 24

5
NISSAN INTELLIGENT kEY® SYSTE M
The NISSAN Intelligent key® system allows you to lock
or unlock your vehicle, open your rear hatch/trunk lid and
start the engine. It is important to make sure the Intelligent
k ey is with you (that is, in your pocket or purse).
The operating range of the Intelligent k ey is within
31.5 in (80 cm) from each request switch.
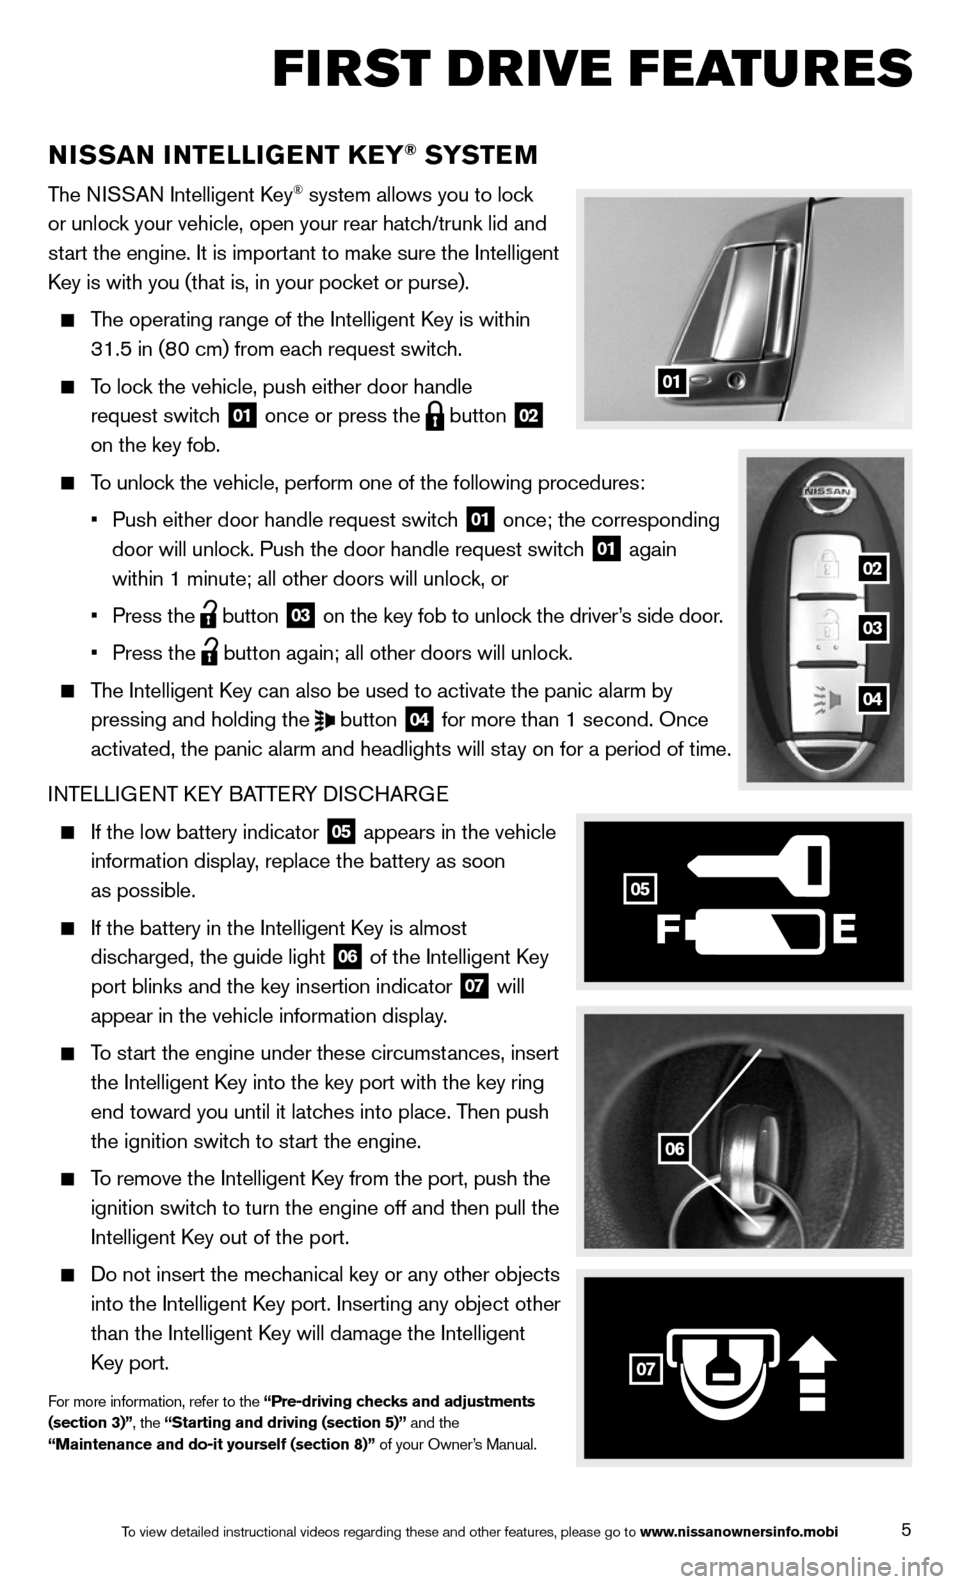
To lock the vehicle, push either door handle
request switch
01 once or press the
button
02
on the key fob.
To unlock the vehicle, perform one of the following procedures:
• Push either door handle request switch
01 once; the corresponding
door will unlock. Push the door handle request switch 01 again
within 1 minute; all other doors will unlock, or
• Press the
button
03 on the key fob to unlock the driver’s side door.
• Press the
button again; all other doors will unlock.
The Intelligent k ey can also be used to activate the panic alarm by
pressing and holding the
button
04 for more than 1 second. Once
activated, the panic alarm and headlights will stay on for a period of time.
INTELLIGENT k EY BATTERY DIS cHARGE
If the low battery indicator
05 appears in the vehicle
information display, replace the battery as soon
as possible.
If the battery in the Intelligent k ey is almost
discharged, the guide light
06 of the Intelligent k
ey
port blinks and the key insertion indicator 07 will
appear in the vehicle information display.
To start the engine under these circumstances, insert
the Intelligent k ey into the key port with the key ring
end toward you until it latches into place. Then push
the ignition switch to start the engine.
To remove the Intelligent k ey from the port, push the
ignition switch to turn the engine off and then pull the
Intelligent k ey out of the port.
Do not insert the mechanical key or any other objects
into the Intelligent k ey port. Inserting any object other
than the Intelligent k ey will damage the Intelligent
k ey port.
For more information, refer to the “Pre-driving checks and adjustments
(section 3)”, the “Starting and driving (section 5)” and the
“Maintenance and do-it yourself (section 8)” of your Owner’s Manual.
01
06
F
05
07
02
03
04
first drive features
To view detailed instructional videos regarding these and other features, please go\
to www.nissanownersinfo.mobi
Page 16 of 24

14
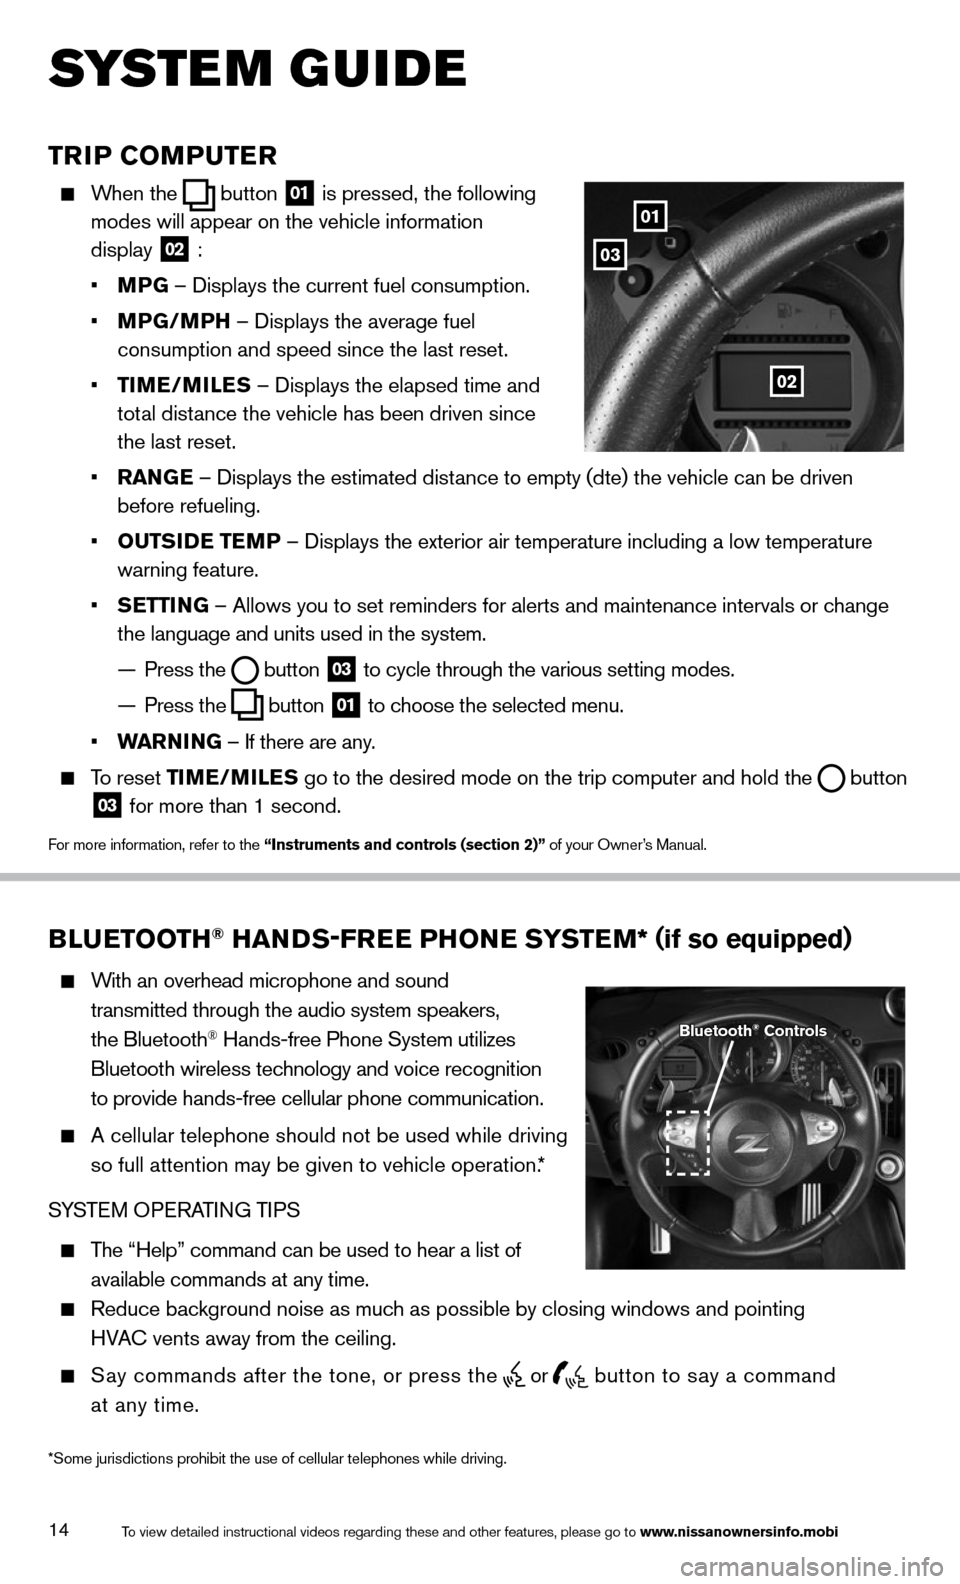
TRIP COMPUTER
When the button
01 is pressed, the following
modes will appear on the vehicle information
display
02 :
• MPG – Displays the current fuel consumption.
• MPG/MPH – Displays the average fuel
consumption and speed since the last reset.
• TIME/ MILES – Displays the elapsed time and
total distance the vehicle has been driven since
the last reset.
• RANGE – Displays the estimated distance to empty (dte) the vehicle can be driven
before refueling.
• OUTSIDE TEMP – Displays the exterior air temperature including a low temperature
warning feature.
• SETTING – Allows you to set reminders for alerts and maintenance intervals o\
r change
the language and units used in the system.
— Press the
button
03 to cycle through the various setting modes.
— Press the
button
01 to choose the selected menu.
• WARNING – If there are any.
To reset TIME/MILES go to the desired mode on the trip computer and hold the
button 03 for more than 1 second.
For more information, refer to the “Instruments and controls (section 2)” of your Owner’s Manual.
01
03
02
BLUETOOTH® HANDS-FREE PHONE SYSTEM* (
if so equipped)
With an overhead microphone and sound
transmitted through the audio system speakers,
the Bluetooth
® Hands-free Phone System utilizes
Bluetooth wireless technology and voice recognition
to provide hands-free cellular phone communication.
A cellular telephone should not be used while driving
so full attention may be given to vehicle operation.*
SYSTEM OPERATING TIPS
The “Help” command can be used to hear a list of
available commands at any time.
Reduce background noise as much as possible by closing windows and pointing
HVA c vents away from the ceiling.
Say commands after the tone, or press the
or
button to say a command
at any time.
Bluetooth® Controls
To view detailed instructional videos regarding these and other features, please go\
to www.nissanownersinfo.mobi
s ystem guide
*Some jurisdictions prohibit the use of cellular telephones while drivin\
g.
Page 24 of 24

This Quick Reference Guide is intended to provide an overview of some of the uniq\
ue features of your new vehicle. See your
Owner’s Manual, which contains important safety warnings and information about the operation and maintenance of your vehicle,
for complete details. Nissan North America, Inc. reserves the right to make changes, at any time, without prior notice, in prices, colors,
materials, equipment, specifications, and models and to discontinue models or equipment. Du\
e to continuous product development
and other pre- and post-production factors, actual vehicle, materials an\
d specifications may vary. Some vehicles are shown with
optional equipment. See the actual vehicle for complete accuracy. Specifications, options and accessories may differ in Hawaii, U.S.
territories and other countries. For additional information on availability, options or accessories, see your NISSAN dealer or contact
Nissan North America, Inc.
Nissan, the Nissan Brand Symbol, Z and Nissan
model names are Nissan trademarks.
©
2013 Nissan North America, Inc.QR14E 0Z34U0Printing: May 2013 (08)
To view detailed instructional videos,
go to www.nissanownersinfo.mobi/2014/370z
or snap this barcode with an appropriate barcode reader.