2014 NISSAN 370Z COUPE run flat
[x] Cancel search: run flatPage 13 of 428
0-4Illustrated table of contents
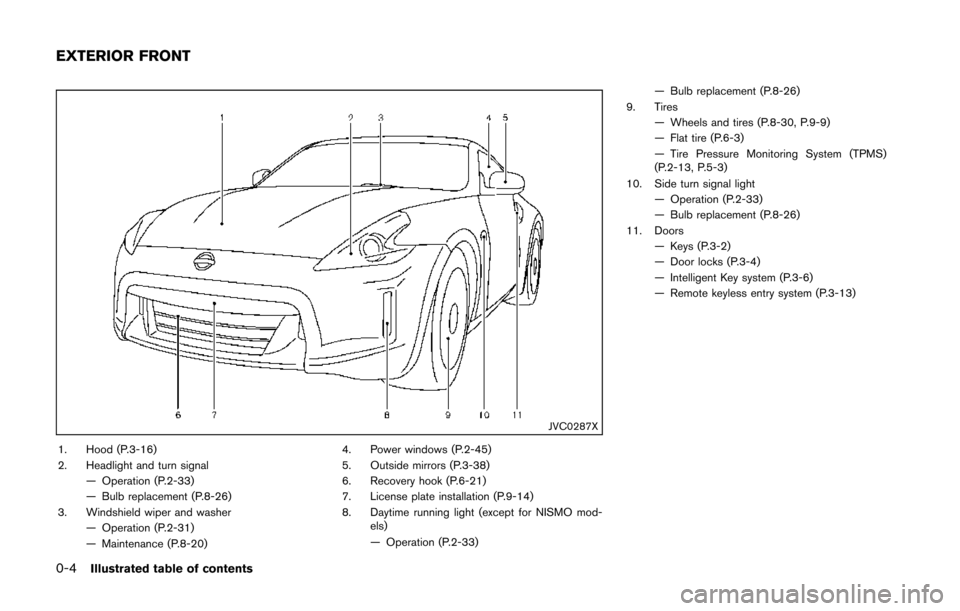
JVC0287X
1. Hood (P.3-16)
2. Headlight and turn signal— Operation (P.2-33)
— Bulb replacement (P.8-26)
3. Windshield wiper and washer — Operation (P.2-31)
— Maintenance (P.8-20) 4. Power windows (P.2-45)
5. Outside mirrors (P.3-38)
6. Recovery hook (P.6-21)
7. License plate installation (P.9-14)
8. Daytime running light (except for NISMO mod-
els)
— Operation (P.2-33) — Bulb replacement (P.8-26)
9. Tires — Wheels and tires (P.8-30, P.9-9)
— Flat tire (P.6-3)
— Tire Pressure Monitoring System (TPMS)
(P.2-13, P.5-3)
10. Side turn signal light — Operation (P.2-33)
— Bulb replacement (P.8-26)
11. Doors — Keys (P.3-2)
— Door locks (P.3-4)
— Intelligent Key system (P.3-6)
— Remote keyless entry system (P.3-13)
EXTERIOR FRONT
Page 290 of 428
THREE-WAY CATALYST
The three-way catalyst is an emission control
device installed in the exhaust system. Exhaust
gases in the three-way catalyst are burned at
high temperatures to help reduce pollutants.
WARNING
.The exhaust gas and the exhaust
system are very hot. Keep people,
animals or flammable materials
away from the exhaust system com-
ponents.
. Do not stop or park the vehicle over
flammable materials such as dry
grass, waste paper or rags. They
may ignite and cause a fire.
CAUTION
.Do not use leaded gasoline. Depos-
its from leaded gasoline seriously
reduce the three-way catalyst’s abil-
ity to help reduce exhaust pollu-
tants.
. Keep your engine tuned up. Mal-
functions in the ignition, fuel injec- tion, or electrical systems can cause
overrich fuel flow into the three-way
catalyst, causing it to overheat. Do
not keep driving if the engine mis-
fires, or if noticeable loss of perfor-
mance or other unusual operating
conditions are detected. Have the
vehicle inspected promptly by a
NISSAN dealer.
. Avoid driving with an extremely low
fuel level. Running out of fuel could
cause the engine to misfire, dama-
ging the three-way catalyst.
. Do not race the engine while warm-
ing it up.
. Do not push or tow your vehicle to
start the engine.
TIRE PRESSURE MONITORING SYS-
TEM (TPMS)
Each tire, including the spare (if provided) ,
should be checked monthly when cold and
inflated to the inflation pressure recommended
by the vehicle manufacturer on the vehicle
placard or tire inflation pressure label. (If your
vehicle has tires of a different size than the size
indicated on the vehicle placard or tire inflation
pressure label, you should determine the proper
tire inflation pressure for those tires.)
As an added safety feature, your vehicle has
been equipped with a Tire Pressure Monitoring
System (TPMS) that illuminates a low tire
pressure telltale when one or more of your tires
is significantly under-inflated. Accordingly, when
the low tire pressure telltale illuminates, you
should stop and check your tires as soon as
possible, and inflate them to the proper pres-
sure. Driving on a significantly under-inflated tire
causes the tire to overheat and can lead to tire
failure. Under-inflation also reduces fuel effi-
ciency and tire tread life, and may affect the
vehicle’s handling and stopping ability.
Please note that the TPMS is not a substitute for
proper tire maintenance, and it is the driver’s
responsibility to maintain correct tire pressure,
even if under-inflation has not reached the level
to trigger illumination of the TPMS low tire
Starting and driving5-3
Page 298 of 428
.Make sure the area around the vehicle is
clear.
. Check fluid levels such as engine oil, cool-
ant, brake fluid and window washer fluid as
frequently as possible, or at least whenever
you refuel.
. Check that all windows and lights are clean.
. Visually inspect tires for their appearance
and condition. Also check tires for proper
inflation.
. Lock all doors.
. Position seat and adjust head restraints.
. Adjust inside and outside mirrors.
. Fasten seat belts and ask all passengers to
do likewise.
. Check the operation of warning lights when
the ignition switch is pushed to the ON
position. (See “Warning/indicator lights and
audible reminders” (P.2-10) .) 1. Apply the parking brake.
2.
Automatic Transmission (AT) model:
Move the shift lever to the P (Park) or N
(Neutral) position. (P is recommended.)
The starter is designed not to operate unless
the shift lever is in either of the above
positions.
Manual Transmission (MT) model:
Move the shift lever to the N (Neutral)
position. Depress the clutch pedal fully to
the floor.
The starter is designed not to operate unless
the clutch pedal is fully depressed.
The Intelligent Key must be carried
when operating the ignition switch.
3. Push the ignition switch to the ON position. Depress the brake pedal (AT model) or the
clutch pedal (MT model) and push the
ignition switch to start the engine.
To start the engine immediately, push and
release the ignition switch while depressing
the brake pedal with the ignition switch in
any position.
.If the engine is very hard to start inextremely cold weather or when restart-
ing, depress the accelerator pedal a little
(approximately 1/3 to the floor) and while
holding, crank the engine. Release the accelerator pedal when the engine starts.
.If the engine is very hard to start because
it is flooded, depress the accelerator
pedal all the way to the floor and hold it.
Push the ignition switch to the ON
position to start cranking the engine.
After 5 or 6 seconds, stop cranking by
pushing the ignition switch to OFF. After
cranking the engine, release the accel-
erator pedal. Crank the engine with your
foot off the accelerator pedal by
depressing the brake pedal and pushing
the push-button ignition switch to start
the engine. If the engine starts, but fails
to run, repeat the above procedure.
CAUTION
Do not operate the starter for more
than 15 seconds at a time. If the engine
does not start, push the ignition switch
to OFF and wait 10 seconds before
cranking again, otherwise the starter
could be damaged.
4. Warm-up
Allow the engine to idle for at least 30
seconds after starting. Do not race the
engine while warming it up. Drive at
Starting and driving5-11
BEFORE STARTING THE ENGINE STARTING THE ENGINE
Page 310 of 428
CAUTION
During the first 1,200 miles (2,000 km) ,
follow these recommendations to ob-
tain maximum engine performance and
ensure the future reliability and econo-
my of your new vehicle.
Failure to follow these recommenda-
tions may result in shortened engine
life and reduced engine performance.
. Avoid driving for long periods at constant
speed, either fast or slow. Do not run the
engine over 4,000 rpm.
. Do not accelerate at full throttle in any gear.
. Avoid quick starts.
. Avoid hard braking as much as possible. Follow these easy-to-use Fuel Efficient Driving
Tips to help you achieve the most fuel economy
from your vehicle.
1. Use smooth accelerator and brake pedal
application.
.Avoid rapid starts and stops..Use smooth, gentle accelerator andbrake application whenever possible.
.Maintain constant speed while commut-
ing and coast whenever possible.
2. Maintain constant speed.
.Look ahead to try and anticipate and minimize stops.
.Synchronizing your speed with traffic
lights allows you to reduce your number
of stops.
.Maintaining a steady speed can minimize red light stops and improve fuel effi-
ciency.
3. Use air conditioning (A/C) at higher vehicle speeds.
.Below 40 MPH (64 km/h), it is moreefficient to open windows to cool the
vehicle due to reduced engine load.
.Above 40 MPH (64 km/h) , it is moreefficient to use A/C to cool the vehicle
due to increased aerodynamic drag.
.Recirculating the cool air in the cabinwhen the A/C is on reduces cooling load.
4. Drive at economical speeds and distances.
.Observing the speed limit and not ex- ceeding 60 MPH (97 km/h) (where
legally allowed) can improve fuel effi-
ciency due to reduced aerodynamic
drag.
.Maintaining a safe following distancebehind other vehicles reduces unneces-
sary braking.
.Safely monitoring traffic to anticipatechanges in speed permits reduced brak-
ing and smooth acceleration changes.
.Select a gear range suitable to road conditions.
5. Use cruise control.
.Using cruise control during highway driving helps maintain a steady speed.
.Cruise control is particularly effective in providing fuel savings when driving on
flat terrains.
6. Plan for the shortest route.
.Utilize a map or navigation system to determine the best route to save time.
7. Avoid idling.
.Shutting off your engine when safe for stops exceeding 30-60 seconds saves
Starting and driving5-23
BREAK-IN SCHEDULE FUEL EFFICIENT DRIVING TIPS
Page 326 of 428
SCE0844Without subwoofer
SCE0807With subwoofer
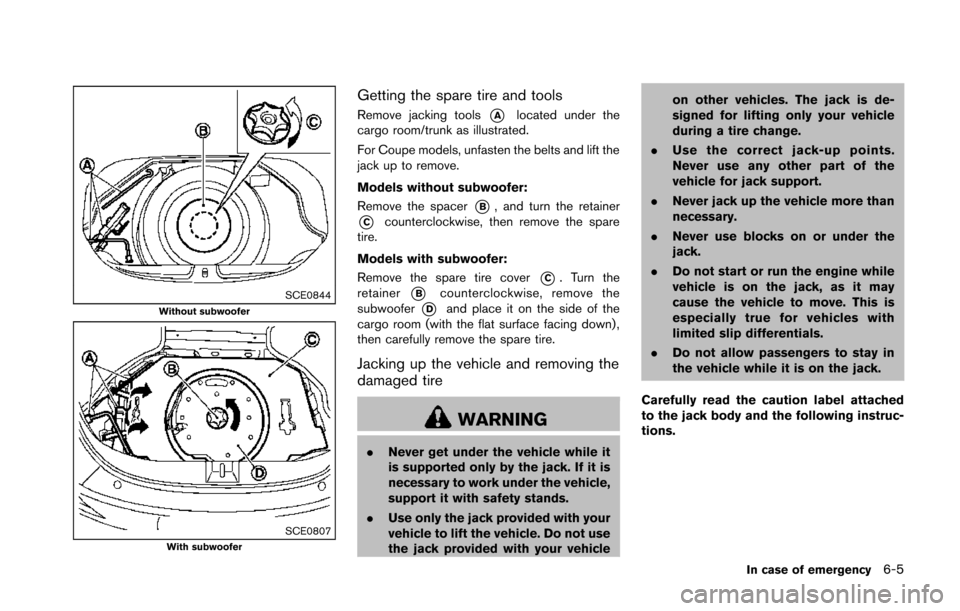
Getting the spare tire and tools
Remove jacking tools*Alocated under the
cargo room/trunk as illustrated.
For Coupe models, unfasten the belts and lift the
jack up to remove.
Models without subwoofer:
Remove the spacer
*B, and turn the retainer
*Ccounterclockwise, then remove the spare
tire.
Models with subwoofer:
Remove the spare tire cover
*C. Turn the
retainer
*Bcounterclockwise, remove the
subwoofer
*Dand place it on the side of the
cargo room (with the flat surface facing down) ,
then carefully remove the spare tire.
Jacking up the vehicle and removing the
damaged tire
WARNING
. Never get under the vehicle while it
is supported only by the jack. If it is
necessary to work under the vehicle,
support it with safety stands.
. Use only the jack provided with your
vehicle to lift the vehicle. Do not use
the jack provided with your vehicle on other vehicles. The jack is de-
signed for lifting only your vehicle
during a tire change.
. Use the correct jack-up points.
Never use any other part of the
vehicle for jack support.
. Never jack up the vehicle more than
necessary.
. Never use blocks on or under the
jack.
. Do not start or run the engine while
vehicle is on the jack, as it may
cause the vehicle to move. This is
especially true for vehicles with
limited slip differentials.
. Do not allow passengers to stay in
the vehicle while it is on the jack.
Carefully read the caution label attached
to the jack body and the following instruc-
tions.
In case of emergency6-5
Page 329 of 428
6-8In case of emergency
SCE0845
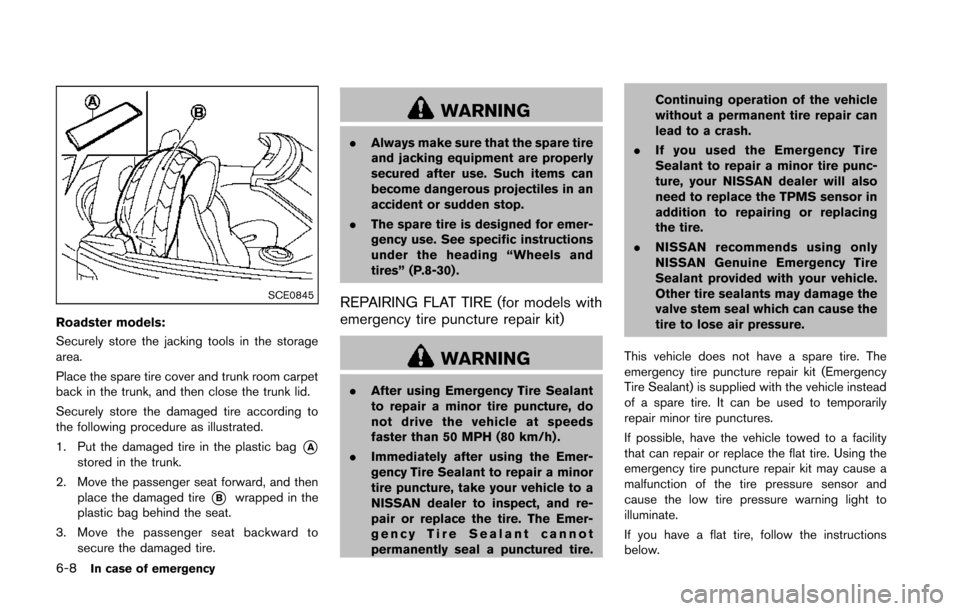
Roadster models:
Securely store the jacking tools in the storage
area.
Place the spare tire cover and trunk room carpet
back in the trunk, and then close the trunk lid.
Securely store the damaged tire according to
the following procedure as illustrated.
1. Put the damaged tire in the plastic bag
*Astored in the trunk.
2. Move the passenger seat forward, and then place the damaged tire
*Bwrapped in the
plastic bag behind the seat.
3. Move the passenger seat backward to secure the damaged tire.
WARNING
.Always make sure that the spare tire
and jacking equipment are properly
secured after use. Such items can
become dangerous projectiles in an
accident or sudden stop.
. The spare tire is designed for emer-
gency use. See specific instructions
under the heading “Wheels and
tires” (P.8-30) .
REPAIRING FLAT TIRE (for models with
emergency tire puncture repair kit)
WARNING
.After using Emergency Tire Sealant
to repair a minor tire puncture, do
not drive the vehicle at speeds
faster than 50 MPH (80 km/h) .
. Immediately after using the Emer-
gency Tire Sealant to repair a minor
tire puncture, take your vehicle to a
NISSAN dealer to inspect, and re-
pair or replace the tire. The Emer-
gency Tire Sealant cannot
permanently seal a punctured tire. Continuing operation of the vehicle
without a permanent tire repair can
lead to a crash.
. If you used the Emergency Tire
Sealant to repair a minor tire punc-
ture, your NISSAN dealer will also
need to replace the TPMS sensor in
addition to repairing or replacing
the tire.
. NISSAN recommends using only
NISSAN Genuine Emergency Tire
Sealant provided with your vehicle.
Other tire sealants may damage the
valve stem seal which can cause the
tire to lose air pressure.
This vehicle does not have a spare tire. The
emergency tire puncture repair kit (Emergency
Tire Sealant) is supplied with the vehicle instead
of a spare tire. It can be used to temporarily
repair minor tire punctures.
If possible, have the vehicle towed to a facility
that can repair or replace the flat tire. Using the
emergency tire puncture repair kit may cause a
malfunction of the tire pressure sensor and
cause the low tire pressure warning light to
illuminate.
If you have a flat tire, follow the instructions
below.
Page 331 of 428
6-10In case of emergency
JVE0122X
Getting emergency tire puncture repair
kit
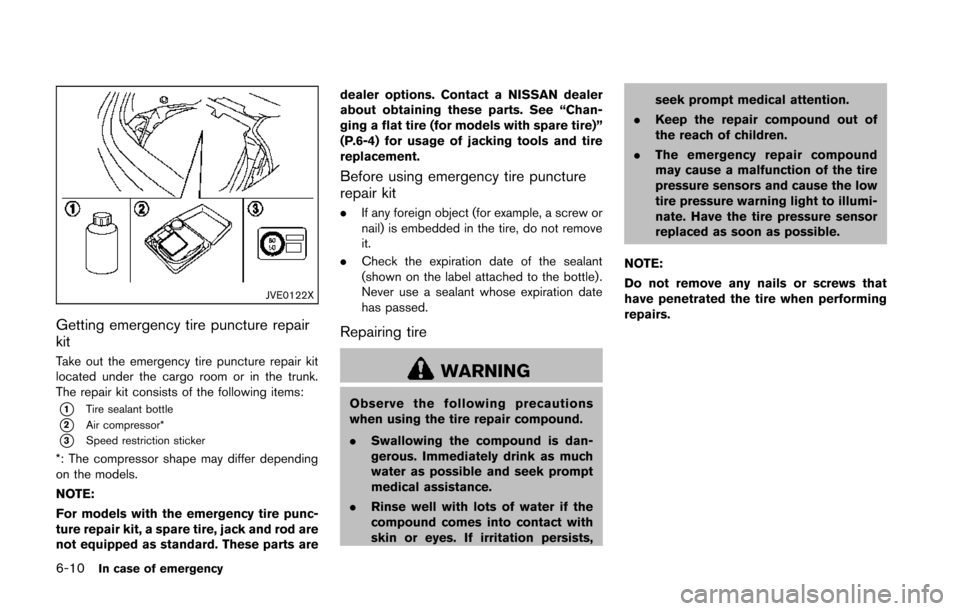
Take out the emergency tire puncture repair kit
located under the cargo room or in the trunk.
The repair kit consists of the following items:
*1Tire sealant bottle
*2Air compressor*
*3Speed restriction sticker
*: The compressor shape may differ depending
on the models.
NOTE:
For models with the emergency tire punc-
ture repair kit, a spare tire, jack and rod are
not equipped as standard. These parts aredealer options. Contact a NISSAN dealer
about obtaining these parts. See “Chan-
ging a flat tire (for models with spare tire)”
(P.6-4) for usage of jacking tools and tire
replacement.
Before using emergency tire puncture
repair kit
.
If any foreign object (for example, a screw or
nail) is embedded in the tire, do not remove
it.
. Check the expiration date of the sealant
(shown on the label attached to the bottle) .
Never use a sealant whose expiration date
has passed.
Repairing tire
WARNING
Observe the following precautions
when using the tire repair compound.
.Swallowing the compound is dan-
gerous. Immediately drink as much
water as possible and seek prompt
medical assistance.
. Rinse well with lots of water if the
compound comes into contact with
skin or eyes. If irritation persists, seek prompt medical attention.
. Keep the repair compound out of
the reach of children.
. The emergency repair compound
may cause a malfunction of the tire
pressure sensors and cause the low
tire pressure warning light to illumi-
nate. Have the tire pressure sensor
replaced as soon as possible.
NOTE:
Do not remove any nails or screws that
have penetrated the tire when performing
repairs.
Page 334 of 428
kPa (26 psi) within 10 minutes, the tire
may be seriously damaged andthe tire
cannot be repaired with this tire repair
kit. Contact a NISSAN dealer.
7. When the tire pressure is at the specified amount, turn the air compressor off. If the
pressure cannot be inflated to the specified
amount, the air compressor can be turned
off at the minimum of 180 kPa (26 psi) .
Remove the power plug from the power
outlet and quickly remove the hose from the
tire valve. Attach the protective cap and
valve cap. Properly stow the emergency tire
puncture repair kit in the trunk.
CAUTION
To avoid serious personal injury when
stowing the emergency tire puncture
repair kit:
.Keep the sealant bottle screwed
into the compressor. Failure to do
so can cause the sealant to spray
into the air and get into your eyes or
on the skin.
8. Immediately drive the vehicle for 10 minutes or 3 km (2 miles) at a speed of 80 km/h (50
MPH) or less. 9. After driving, make sure that the air com-
pressor switch is in the OFF position, then
screw the hose securely onto the tire valve.
Check the tire pressure with the pressure
gauge. The temporary repair is completed if
the tire pressure does not drop.
Make sure the pressure is adjusted to the
pressure that is specified on the tire and
loading information label before driving.
10. If the tire pressure drops, repeat the steps from 5 to 9. If the pressure drops again or
under 130 kPa (19 psi), the tire cannot be
repaired with this tire repair kit. Contact
a NISSAN dealer.
The sealant bottle and hose can not be
reused to repair another punctured tire.
Contact a NISSAN dealer to purchase
replacements.
After repairing tire
See a NISSAN dealer for tire repair/replacement
as soon as possible.
WARNING
. After using Emergency Tire Sealant
to repair a minor tire puncture, do
not drive the vehicle at speeds
faster than 50 MPH (80 km/h) . .
Immediately after using Emergency
Tire Sealant to repair a minor tire
puncture, take your vehicle to a
NISSAN dealer to inspect, and re-
pair or replace the tire. The Emer-
gency Tire Sealant cannot
permanently seal a punctured tire.
Continuing operation of the vehicle
without a permanent tire repair can
lead to a crash.
. If you used Emergency Tire Sealant
to repair a minor tire puncture, your
NISSAN dealer will also need to
replace the TPMS sensor in addition
to repairing or replacing the tire.
. NISSAN recommends using only
NISSAN Genuine Emergency Tire
Sealant provided with your vehicle.
Other tire sealants may damage the
valve stem seal which can cause the
tire to lose air pressure.
In case of emergency6-13