2014 NISSAN 370Z COUPE trunk
[x] Cancel search: trunkPage 289 of 428
5-2Starting and driving
WARNING
.Do not leave children or adults who
would normally require the support
of others alone in your vehicle. Pets
should not be left alone either. They
could accidentally injure themselves
or others through inadvertent op-
eration of the vehicle. Also, on hot,
sunny days, temperatures in a
closed vehicle could quickly become
high enough to cause severe or
possibly fatal injuries to people or
animals.
. Properly secure all cargo to help
prevent it from sliding or shifting.
Do not place cargo higher than the
seatbacks. In a sudden stop or
collision, unsecured cargo could
cause personal injury (Coupe mod-
els) .
. Closely supervise children when
they are around cars to prevent
them from playing and becoming
locked in the trunk where they could
be seriously injured. Keep the car
locked with the trunk closed when
not in use, and prevent children’s access to car keys (Roadster mod-
els) .
If the engine oil temperature is high, the
engine protection mode, which helps re-
duce the chance of engine damage, could
activate and automatically decrease en-
gine power. Driving while the engine oil
temperature is high may result in engine
damage.
EXHAUST GAS (carbon monoxide)
WARNING
. Do not breathe exhaust gases; they
contain colorless and odorless car-
bon monoxide. Carbon monoxide is
dangerous. It can cause uncon-
sciousness or death.
. If you suspect that exhaust fumes
are entering the vehicle, drive with
all windows fully open, and have the
vehicle inspected immediately.
. Do not run the engine in closed
spaces such as a garage.
. Do not park the vehicle with the
engine running for any extended
length of time. .
Keep the rear hatch/trunk lid closed
while driving, otherwise exhaust
gases could be drawn into the
passenger compartment. If you
must drive with the rear hatch/trunk
lid open, follow these precautions:
1) Open all the windows.
2) Set the
air recirculation to
off and the fan control to high to
circulate the air.
. The exhaust system and body
should be inspected by a qualified
mechanic whenever:
— The vehicle is raised for service.
— You suspect that exhaust fumes
are entering into the passenger
compartment.
— You notice a change in the sound of the exhaust system.
— You have had an accident invol- ving damage to the exhaust
system, underbody, or rear of
the vehicle.
PRECAUTIONS WHEN STARTING
AND DRIVING
Page 295 of 428
5-8Starting and driving
WARNING
Do not operate the push-button ignition
switch while driving the vehicle except
in an emergency. (The engine will stop
when the ignition switch is pushed 3
consecutive times or the ignition switch
is pushed and held for more than 2
seconds.) If the engine stops while the
vehicle is being driven, this could lead
to a crash and serious injury.
Before operating the push-button ignition
switch, be sure to move the shift lever to the P
(Park) position (for automatic transmission
model) or the shift lever to the N (Neutral)
position (for manual transmission model) .
SSD0825
OPERATING RANGE FOR ENGINE
START FUNCTION
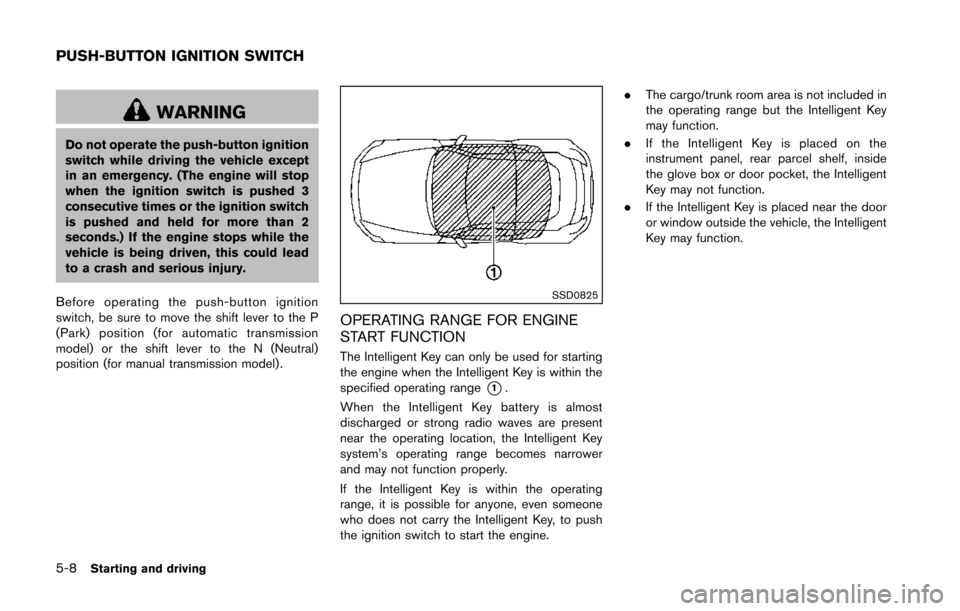
The Intelligent Key can only be used for starting
the engine when the Intelligent Key is within the
specified operating range
*1.
When the Intelligent Key battery is almost
discharged or strong radio waves are present
near the operating location, the Intelligent Key
system’s operating range becomes narrower
and may not function properly.
If the Intelligent Key is within the operating
range, it is possible for anyone, even someone
who does not carry the Intelligent Key, to push
the ignition switch to start the engine. .
The cargo/trunk room area is not included in
the operating range but the Intelligent Key
may function.
. If the Intelligent Key is placed on the
instrument panel, rear parcel shelf, inside
the glove box or door pocket, the Intelligent
Key may not function.
. If the Intelligent Key is placed near the door
or window outside the vehicle, the Intelligent
Key may function.
PUSH-BUTTON IGNITION SWITCH
Page 326 of 428
SCE0844Without subwoofer
SCE0807With subwoofer
Getting the spare tire and tools
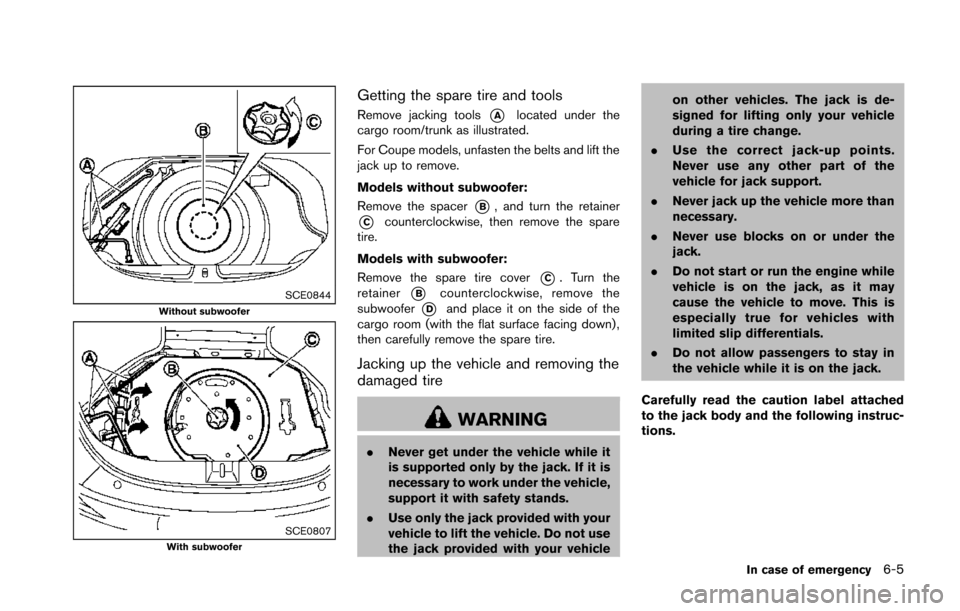
Remove jacking tools*Alocated under the
cargo room/trunk as illustrated.
For Coupe models, unfasten the belts and lift the
jack up to remove.
Models without subwoofer:
Remove the spacer
*B, and turn the retainer
*Ccounterclockwise, then remove the spare
tire.
Models with subwoofer:
Remove the spare tire cover
*C. Turn the
retainer
*Bcounterclockwise, remove the
subwoofer
*Dand place it on the side of the
cargo room (with the flat surface facing down) ,
then carefully remove the spare tire.
Jacking up the vehicle and removing the
damaged tire
WARNING
. Never get under the vehicle while it
is supported only by the jack. If it is
necessary to work under the vehicle,
support it with safety stands.
. Use only the jack provided with your
vehicle to lift the vehicle. Do not use
the jack provided with your vehicle on other vehicles. The jack is de-
signed for lifting only your vehicle
during a tire change.
. Use the correct jack-up points.
Never use any other part of the
vehicle for jack support.
. Never jack up the vehicle more than
necessary.
. Never use blocks on or under the
jack.
. Do not start or run the engine while
vehicle is on the jack, as it may
cause the vehicle to move. This is
especially true for vehicles with
limited slip differentials.
. Do not allow passengers to stay in
the vehicle while it is on the jack.
Carefully read the caution label attached
to the jack body and the following instruc-
tions.
In case of emergency6-5
Page 329 of 428
6-8In case of emergency
SCE0845
Roadster models:
Securely store the jacking tools in the storage
area.
Place the spare tire cover and trunk room carpet
back in the trunk, and then close the trunk lid.
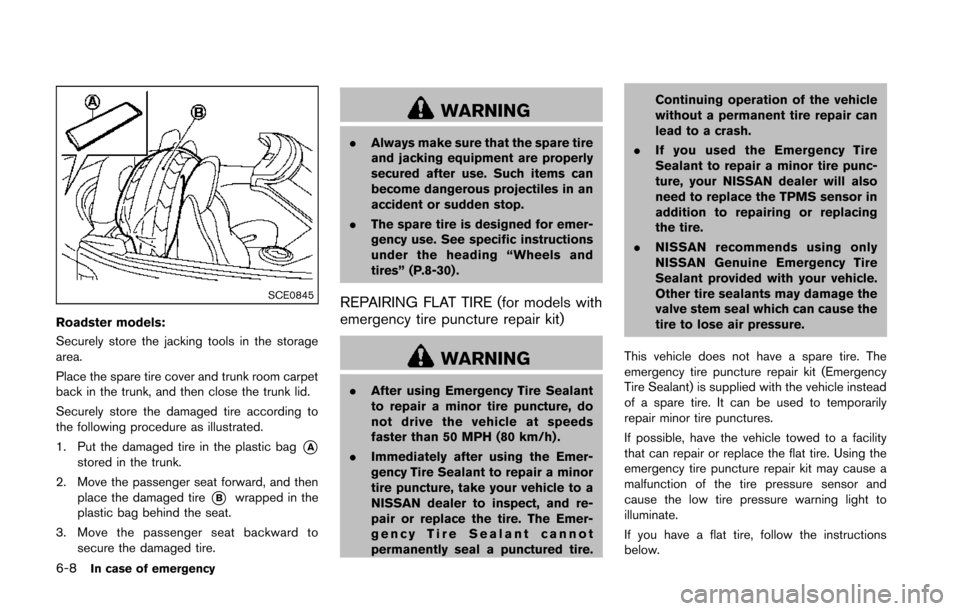
Securely store the damaged tire according to
the following procedure as illustrated.
1. Put the damaged tire in the plastic bag
*Astored in the trunk.
2. Move the passenger seat forward, and then place the damaged tire
*Bwrapped in the
plastic bag behind the seat.
3. Move the passenger seat backward to secure the damaged tire.
WARNING
.Always make sure that the spare tire
and jacking equipment are properly
secured after use. Such items can
become dangerous projectiles in an
accident or sudden stop.
. The spare tire is designed for emer-
gency use. See specific instructions
under the heading “Wheels and
tires” (P.8-30) .
REPAIRING FLAT TIRE (for models with
emergency tire puncture repair kit)
WARNING
.After using Emergency Tire Sealant
to repair a minor tire puncture, do
not drive the vehicle at speeds
faster than 50 MPH (80 km/h) .
. Immediately after using the Emer-
gency Tire Sealant to repair a minor
tire puncture, take your vehicle to a
NISSAN dealer to inspect, and re-
pair or replace the tire. The Emer-
gency Tire Sealant cannot
permanently seal a punctured tire. Continuing operation of the vehicle
without a permanent tire repair can
lead to a crash.
. If you used the Emergency Tire
Sealant to repair a minor tire punc-
ture, your NISSAN dealer will also
need to replace the TPMS sensor in
addition to repairing or replacing
the tire.
. NISSAN recommends using only
NISSAN Genuine Emergency Tire
Sealant provided with your vehicle.
Other tire sealants may damage the
valve stem seal which can cause the
tire to lose air pressure.
This vehicle does not have a spare tire. The
emergency tire puncture repair kit (Emergency
Tire Sealant) is supplied with the vehicle instead
of a spare tire. It can be used to temporarily
repair minor tire punctures.
If possible, have the vehicle towed to a facility
that can repair or replace the flat tire. Using the
emergency tire puncture repair kit may cause a
malfunction of the tire pressure sensor and
cause the low tire pressure warning light to
illuminate.
If you have a flat tire, follow the instructions
below.
Page 331 of 428
6-10In case of emergency
JVE0122X
Getting emergency tire puncture repair
kit
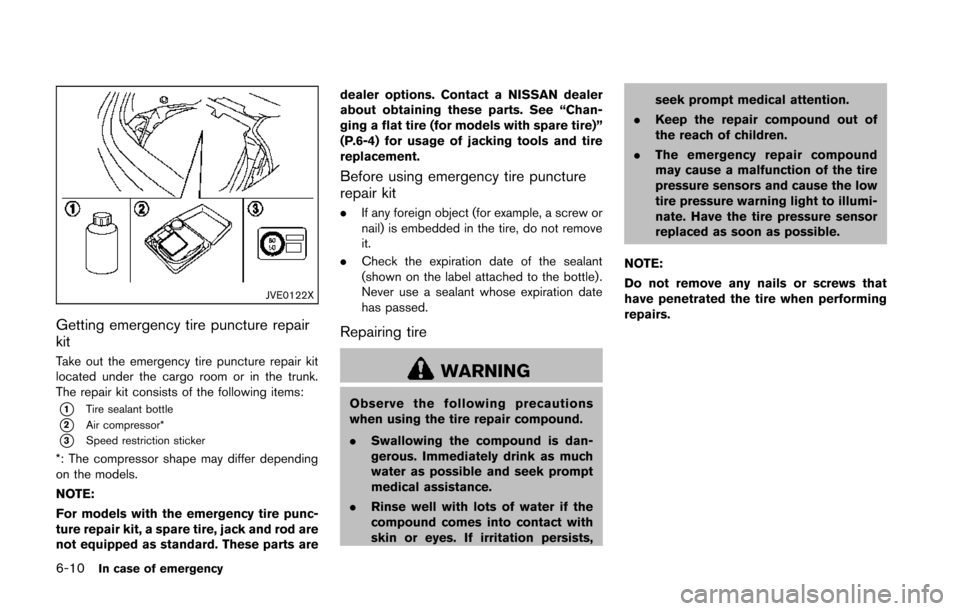
Take out the emergency tire puncture repair kit
located under the cargo room or in the trunk.
The repair kit consists of the following items:
*1Tire sealant bottle
*2Air compressor*
*3Speed restriction sticker
*: The compressor shape may differ depending
on the models.
NOTE:
For models with the emergency tire punc-
ture repair kit, a spare tire, jack and rod are
not equipped as standard. These parts aredealer options. Contact a NISSAN dealer
about obtaining these parts. See “Chan-
ging a flat tire (for models with spare tire)”
(P.6-4) for usage of jacking tools and tire
replacement.
Before using emergency tire puncture
repair kit
.
If any foreign object (for example, a screw or
nail) is embedded in the tire, do not remove
it.
. Check the expiration date of the sealant
(shown on the label attached to the bottle) .
Never use a sealant whose expiration date
has passed.
Repairing tire
WARNING
Observe the following precautions
when using the tire repair compound.
.Swallowing the compound is dan-
gerous. Immediately drink as much
water as possible and seek prompt
medical assistance.
. Rinse well with lots of water if the
compound comes into contact with
skin or eyes. If irritation persists, seek prompt medical attention.
. Keep the repair compound out of
the reach of children.
. The emergency repair compound
may cause a malfunction of the tire
pressure sensors and cause the low
tire pressure warning light to illumi-
nate. Have the tire pressure sensor
replaced as soon as possible.
NOTE:
Do not remove any nails or screws that
have penetrated the tire when performing
repairs.
Page 334 of 428
kPa (26 psi) within 10 minutes, the tire
may be seriously damaged andthe tire
cannot be repaired with this tire repair
kit. Contact a NISSAN dealer.
7. When the tire pressure is at the specified amount, turn the air compressor off. If the
pressure cannot be inflated to the specified
amount, the air compressor can be turned
off at the minimum of 180 kPa (26 psi) .
Remove the power plug from the power
outlet and quickly remove the hose from the
tire valve. Attach the protective cap and
valve cap. Properly stow the emergency tire
puncture repair kit in the trunk.
CAUTION
To avoid serious personal injury when
stowing the emergency tire puncture
repair kit:
.Keep the sealant bottle screwed
into the compressor. Failure to do
so can cause the sealant to spray
into the air and get into your eyes or
on the skin.
8. Immediately drive the vehicle for 10 minutes or 3 km (2 miles) at a speed of 80 km/h (50
MPH) or less. 9. After driving, make sure that the air com-
pressor switch is in the OFF position, then
screw the hose securely onto the tire valve.
Check the tire pressure with the pressure
gauge. The temporary repair is completed if
the tire pressure does not drop.
Make sure the pressure is adjusted to the
pressure that is specified on the tire and
loading information label before driving.
10. If the tire pressure drops, repeat the steps from 5 to 9. If the pressure drops again or
under 130 kPa (19 psi), the tire cannot be
repaired with this tire repair kit. Contact
a NISSAN dealer.
The sealant bottle and hose can not be
reused to repair another punctured tire.
Contact a NISSAN dealer to purchase
replacements.
After repairing tire
See a NISSAN dealer for tire repair/replacement
as soon as possible.
WARNING
. After using Emergency Tire Sealant
to repair a minor tire puncture, do
not drive the vehicle at speeds
faster than 50 MPH (80 km/h) . .
Immediately after using Emergency
Tire Sealant to repair a minor tire
puncture, take your vehicle to a
NISSAN dealer to inspect, and re-
pair or replace the tire. The Emer-
gency Tire Sealant cannot
permanently seal a punctured tire.
Continuing operation of the vehicle
without a permanent tire repair can
lead to a crash.
. If you used Emergency Tire Sealant
to repair a minor tire puncture, your
NISSAN dealer will also need to
replace the TPMS sensor in addition
to repairing or replacing the tire.
. NISSAN recommends using only
NISSAN Genuine Emergency Tire
Sealant provided with your vehicle.
Other tire sealants may damage the
valve stem seal which can cause the
tire to lose air pressure.
In case of emergency6-13
Page 380 of 428
JVM0140X
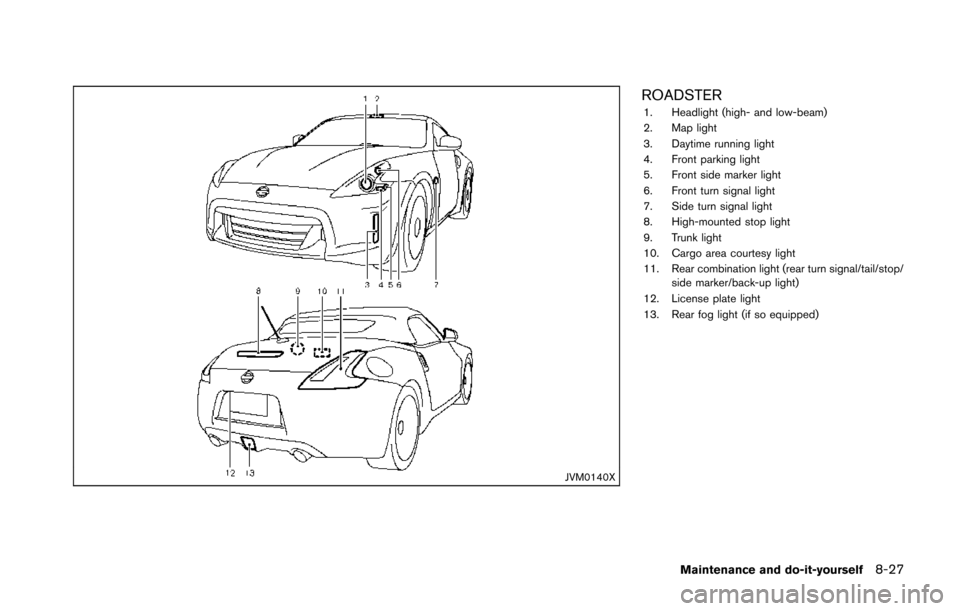
ROADSTER1. Headlight (high- and low-beam)
2. Map light
3. Daytime running light
4. Front parking light
5. Front side marker light
6. Front turn signal light
7. Side turn signal light
8. High-mounted stop light
9. Trunk light
10. Cargo area courtesy light
11. Rear combination light (rear turn signal/tail/stop/side marker/back-up light)
12. License plate light
13. Rear fog light (if so equipped)
Maintenance and do-it-yourself8-27
Page 381 of 428
8-28Maintenance and do-it-yourself
HEADLIGHTS
Fog may temporarily form inside the lens of the
exterior lights in the rain or in a car wash. A
temperature difference between the inside and
the outside of the lens causes the fog. This is
not a malfunction. If large drops of water collect
inside the lens, contact a NISSAN dealer.
Replacing
WARNING
HIGH VOLTAGE
When xenon headlights are on, they
produce a high voltage. To prevent an
electric shock, never attempt to modify
or disassemble. Always have your xe-
non headlights replaced at a NISSAN
dealer. For additional information, see
“Headlight and turn signal switch” (P.2-
33) .
Use the same number and wattage shown in the
following chart as originally installed.
If replacement is required, see a NISSAN dealer.
EXTERIOR AND INTERIOR LIGHTS
Item Wattage (W)Bulb No.
Headlight*
High/Low beams (Xenon) 35D2S
Front turn signal light* 28/87444NA
Front parking light* 5W5W
Front side marker light* LED—
Side turn signal light* LED—
Daytime running light (except for NISMO models)* LED—
Rear combination light*
back-up 16W16W
turn signal 21WY21W
stop/tail/side marker LED—
Rear fog light (if so equipped)* 21W21W
License plate light* 5W5W
Map light 8—
Vanity mirror light 2—
Cargo area courtesy light (Roadster)* 5—
Cargo light (Coupe)* 3.4—
Trunk light (Roadster)* 3.4—
High-mounted stop light* LED—
*: See a NISSAN dealer for replacement.
NOTE: Always check with the Parts Department at a NISSAN dealer for the latest information about parts.