2014 NISSAN 370Z COUPE stop start
[x] Cancel search: stop startPage 298 of 428
.Make sure the area around the vehicle is
clear.
. Check fluid levels such as engine oil, cool-
ant, brake fluid and window washer fluid as
frequently as possible, or at least whenever
you refuel.
. Check that all windows and lights are clean.
. Visually inspect tires for their appearance
and condition. Also check tires for proper
inflation.
. Lock all doors.
. Position seat and adjust head restraints.
. Adjust inside and outside mirrors.
. Fasten seat belts and ask all passengers to
do likewise.
. Check the operation of warning lights when
the ignition switch is pushed to the ON
position. (See “Warning/indicator lights and
audible reminders” (P.2-10) .) 1. Apply the parking brake.
2.
Automatic Transmission (AT) model:
Move the shift lever to the P (Park) or N
(Neutral) position. (P is recommended.)
The starter is designed not to operate unless
the shift lever is in either of the above
positions.
Manual Transmission (MT) model:
Move the shift lever to the N (Neutral)
position. Depress the clutch pedal fully to
the floor.
The starter is designed not to operate unless
the clutch pedal is fully depressed.
The Intelligent Key must be carried
when operating the ignition switch.
3. Push the ignition switch to the ON position. Depress the brake pedal (AT model) or the
clutch pedal (MT model) and push the
ignition switch to start the engine.
To start the engine immediately, push and
release the ignition switch while depressing
the brake pedal with the ignition switch in
any position.
.If the engine is very hard to start inextremely cold weather or when restart-
ing, depress the accelerator pedal a little
(approximately 1/3 to the floor) and while
holding, crank the engine. Release the accelerator pedal when the engine starts.
.If the engine is very hard to start because
it is flooded, depress the accelerator
pedal all the way to the floor and hold it.
Push the ignition switch to the ON
position to start cranking the engine.
After 5 or 6 seconds, stop cranking by
pushing the ignition switch to OFF. After
cranking the engine, release the accel-
erator pedal. Crank the engine with your
foot off the accelerator pedal by
depressing the brake pedal and pushing
the push-button ignition switch to start
the engine. If the engine starts, but fails
to run, repeat the above procedure.
CAUTION
Do not operate the starter for more
than 15 seconds at a time. If the engine
does not start, push the ignition switch
to OFF and wait 10 seconds before
cranking again, otherwise the starter
could be damaged.
4. Warm-up
Allow the engine to idle for at least 30
seconds after starting. Do not race the
engine while warming it up. Drive at
Starting and driving5-11
BEFORE STARTING THE ENGINE STARTING THE ENGINE
Page 299 of 428
5-12Starting and driving
moderate speed for a short distance first,
especially in cold weather. In cold weather,
keep the engine running for a minimum of 2 -
3 minutes before shutting it off. Starting and
stopping the engine over a short period of
time may make the vehicle more difficult to
start.
When racing the engine up to 4,500 rpm or
more under no load condition, the engine
will enter the fuel cut mode.
5. To stop the engine, shift the shift lever to the P (Park) position (AT model) or move the
shift lever to the N (Neutral) position (MT
model) , and push the ignition switch to the
OFF position.
NOTE:
Care should be taken to avoid situations
that can lead to potential battery discharge
and potential no-start conditions such as:
1. Installation or extended use of electro-
nic accessories that consume battery
power when the engine is not running
(Phone chargers, GPS, DVD players,
etc.)
2. Vehicle is not driven regularly and/or
only driven short distances.
In these cases, the battery may need to be
charged to maintain battery health.AUTOMATIC TRANSMISSION
7 speed automatic transmission
The automatic transmission in your vehicle is
electronically controlled by a transmission con-
trol module to produce maximum efficiency and
smooth operation.
Shown on the following pages are the recom-
mended operating procedures for this transmis-
sion. Follow these procedures for maximum
vehicle performance and driving enjoyment.
Starting the vehicle
After starting the engine, fully depress the foot
brake pedal and push the shift lever button
before shifting the shift lever to the R (Reverse) ,
N (Neutral) , D (Drive) or Manual shift mode
position. Be sure the vehicle is fully stopped
before attempting to shift the shift lever.
This automatic transmission model is de-
signed so that the foot brake pedal must
be depressed before shifting from P (Park)
to any drive position while the ignition
switch position is ON.
The shift lever cannot be moved out of the
P (Park) position and into any of the other
gear positions if the ignition switch is
pushed to the LOCK, OFF or ACC position. 1. Keep the foot brake pedal depressed and
push the shift lever button to shift into a
driving gear.
2. Release the parking brake and foot brake, then gradually start the vehicle in motion.
WARNING
.Do not depress the accelerator
pedal while shifting from P (Park)
or N (Neutral) to R (Reverse) D
(Drive) , or manual shift mode. Al-
ways depress the brake pedal until
shifting is completed. Failure to do
so could cause you to lose control
and have an accident.
. Cold engine idle speed is high, so
use caution when shifting into a
forward or reverse gear before the
engine has warmed up.
. Never shift to P (Park) or R (Re-
verse) while vehicle is moving for-
ward. Never shift to P (Park) or D
(Drive) while vehicle is moving rear-
ward. Failure to do so could cause
you to lose control and have an
accident.
DRIVING THE VEHICLE
Page 300 of 428
CAUTION
.Except in an emergency, do not shift
to the N (Neutral) position while
driving. Coasting with the transmis-
sion in the N (Neutral) position may
cause serious damage to the trans-
mission.
. When stopping the vehicle on an
uphill grade, do not hold the vehicle
by depressing the accelerator pedal.
The foot brake should be used for
this purpose.
. Do not downshift abruptly on slip-
pery roads. This may cause a loss of
control.
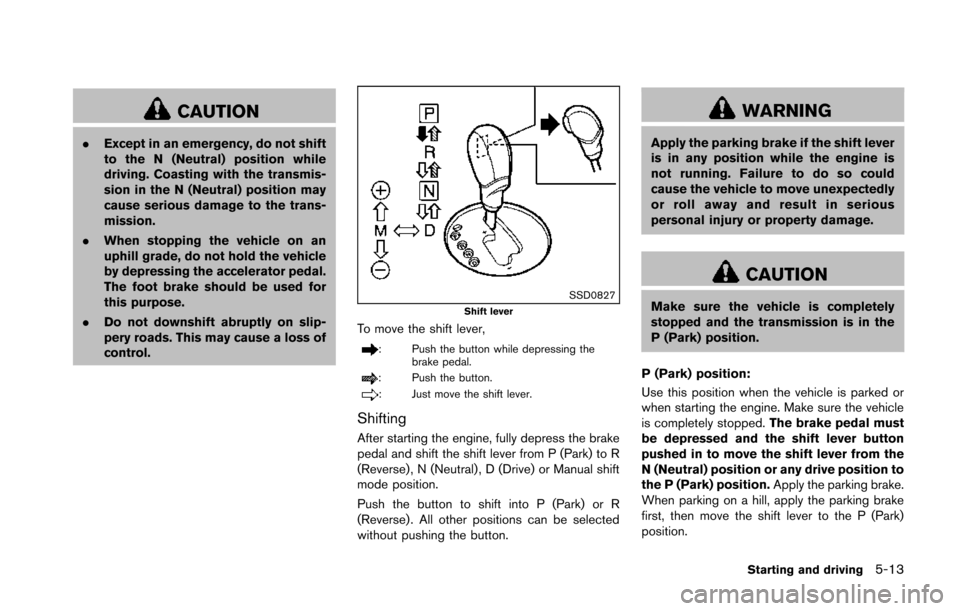
SSD0827Shift lever
To move the shift lever,
: Push the button while depressing the
brake pedal.
: Push the button.
: Just move the shift lever.
Shifting
After starting the engine, fully depress the brake
pedal and shift the shift lever from P (Park) to R
(Reverse), N (Neutral) , D (Drive) or Manual shift
mode position.
Push the button to shift into P (Park) or R
(Reverse). All other positions can be selected
without pushing the button.
WARNING
Apply the parking brake if the shift lever
is in any position while the engine is
not running. Failure to do so could
cause the vehicle to move unexpectedly
or roll away and result in serious
personal injury or property damage.
CAUTION
Make sure the vehicle is completely
stopped and the transmission is in the
P (Park) position.
P (Park) position:
Use this position when the vehicle is parked or
when starting the engine. Make sure the vehicle
is completely stopped. The brake pedal must
be depressed and the shift lever button
pushed in to move the shift lever from the
N (Neutral) position or any drive position to
the P (Park) position. Apply the parking brake.
When parking on a hill, apply the parking brake
first, then move the shift lever to the P (Park)
position.
Starting and driving5-13
Page 301 of 428
5-14Starting and driving
CAUTION
Use this position only when the vehicle
is completely stopped.
R (Reverse):
Use this position to back up. Always be sure the
vehicle is completely stopped before selecting
the R (Reverse) position. The brake pedal
must be depressed and the shift lever
button pushed in to move the shift lever
from the P (Park) position, the N (Neutral)
position or any drive position to the R
(Reverse) position.
N (Neutral):
Neither forward nor reverse gear is engaged.
The engine can be started in this position. You
may shift to the N (Neutral) position and restart a
stalled engine while the vehicle is moving.
D (Drive):
Use this position for all normal forward driving.
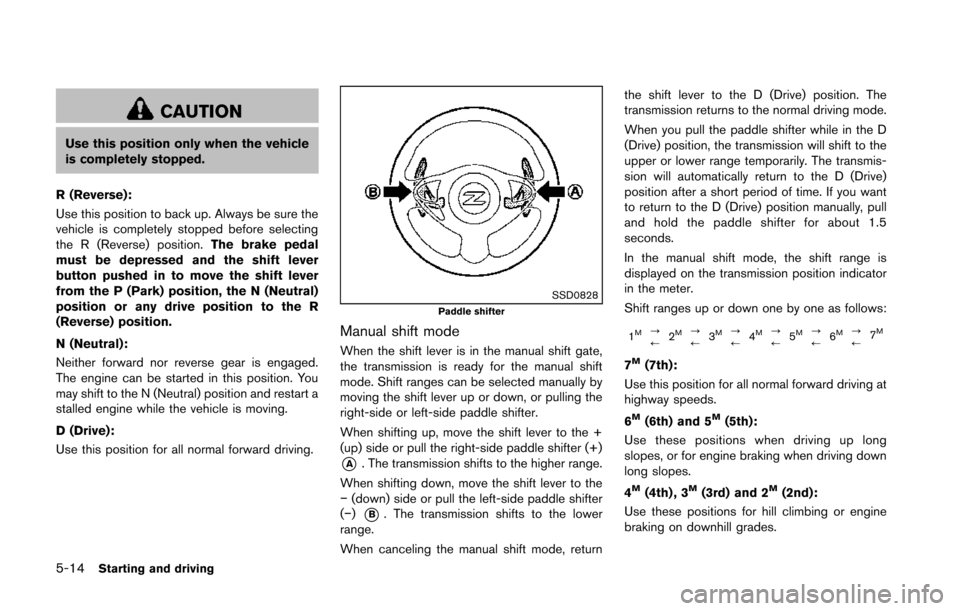
SSD0828Paddle shifter
Manual shift mode
When the shift lever is in the manual shift gate,
the transmission is ready for the manual shift
mode. Shift ranges can be selected manually by
moving the shift lever up or down, or pulling the
right-side or left-side paddle shifter.
When shifting up, move the shift lever to the +
(up) side or pull the right-side paddle shifter (+)
*A. The transmission shifts to the higher range.
When shifting down, move the shift lever to the
− (down) side or pull the left-side paddle shifter
(−)
*B. The transmission shifts to the lower
range.
When canceling the manual shift mode, return the shift lever to the D (Drive) position. The
transmission returns to the normal driving mode.
When you pull the paddle shifter while in the D
(Drive) position, the transmission will shift to the
upper or lower range temporarily. The transmis-
sion will automatically return to the D (Drive)
position after a short period of time. If you want
to return to the D (Drive) position manually, pull
and hold the paddle shifter for about 1.5
seconds.
In the manual shift mode, the shift range is
displayed on the transmission position indicator
in the meter.
Shift ranges up or down one by one as follows:
1M?
/
2M?
/3M?
/ 4M?
/5M?
/6M?
/ 7M
7M(7th):
Use this position for all normal forward driving at
highway speeds.
6
M(6th) and 5M(5th):
Use these positions when driving up long
slopes, or for engine braking when driving down
long slopes.
4
M(4th) , 3M(3rd) and 2M(2nd):
Use these positions for hill climbing or engine
braking on downhill grades.
Page 302 of 428
1M(1st):
Use this position when climbing steep hills
slowly or driving slowly through deep snow, or
for maximum engine braking on steep downhill
grades.
. Remember not to drive at high speeds for
extended periods of time in lower than 7th
gear. This reduces fuel economy.
. Moving the shift lever rapidly to the same
side twice will shift the ranges in succes-
sion.
. In the manual shift mode, the transmis-
sion may not shift to the selected gear
or may automatically shift to the other
gear. This helps maintain driving per-
formance and reduces the chance of
vehicle damage or loss of control.
. When the transmission does not shift
to the selected gear, the Automatic
Transmission (AT) position indicator
light (on the instrument panel) will
blink and the buzzer will sound.
. In the manual shift mode, the transmis-
sion automatically shifts down to 1st
gear before the vehicle comes to a
stop. When accelerating again, it is
necessary to shift up to the desired
range.
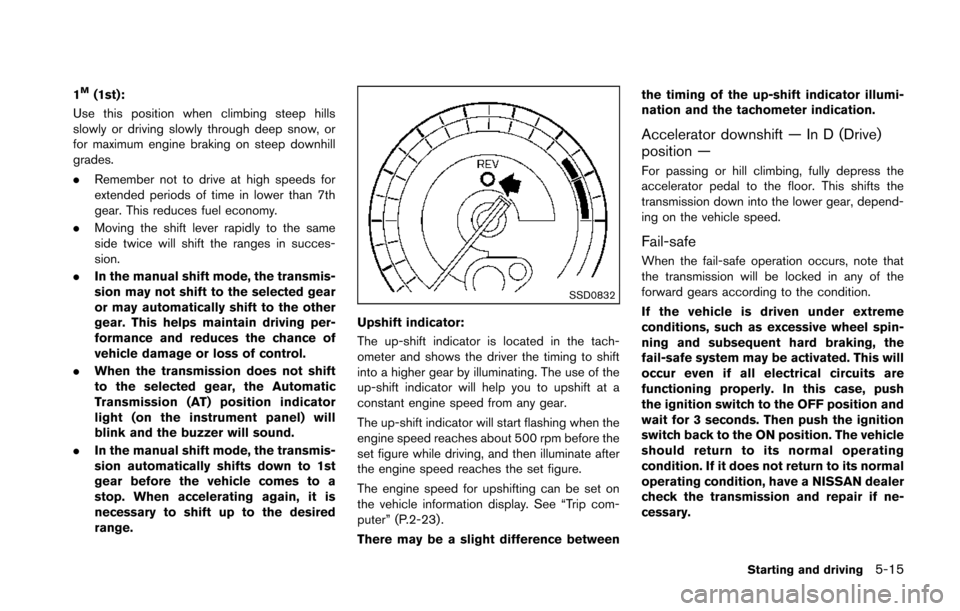
SSD0832
Upshift indicator:
The up-shift indicator is located in the tach-
ometer and shows the driver the timing to shift
into a higher gear by illuminating. The use of the
up-shift indicator will help you to upshift at a
constant engine speed from any gear.
The up-shift indicator will start flashing when the
engine speed reaches about 500 rpm before the
set figure while driving, and then illuminate after
the engine speed reaches the set figure.
The engine speed for upshifting can be set on
the vehicle information display. See “Trip com-
puter” (P.2-23) .
There may be a slight difference between the timing of the up-shift indicator illumi-
nation and the tachometer indication.
Accelerator downshift — In D (Drive)
position —
For passing or hill climbing, fully depress the
accelerator pedal to the floor. This shifts the
transmission down into the lower gear, depend-
ing on the vehicle speed.
Fail-safe
When the fail-safe operation occurs, note that
the transmission will be locked in any of the
forward gears according to the condition.
If the vehicle is driven under extreme
conditions, such as excessive wheel spin-
ning and subsequent hard braking, the
fail-safe system may be activated. This will
occur even if all electrical circuits are
functioning properly. In this case, push
the ignition switch to the OFF position and
wait for 3 seconds. Then push the ignition
switch back to the ON position. The vehicle
should return to its normal operating
condition. If it does not return to its normal
operating condition, have a NISSAN dealer
check the transmission and repair if ne-
cessary.
Starting and driving5-15
Page 303 of 428
5-16Starting and driving
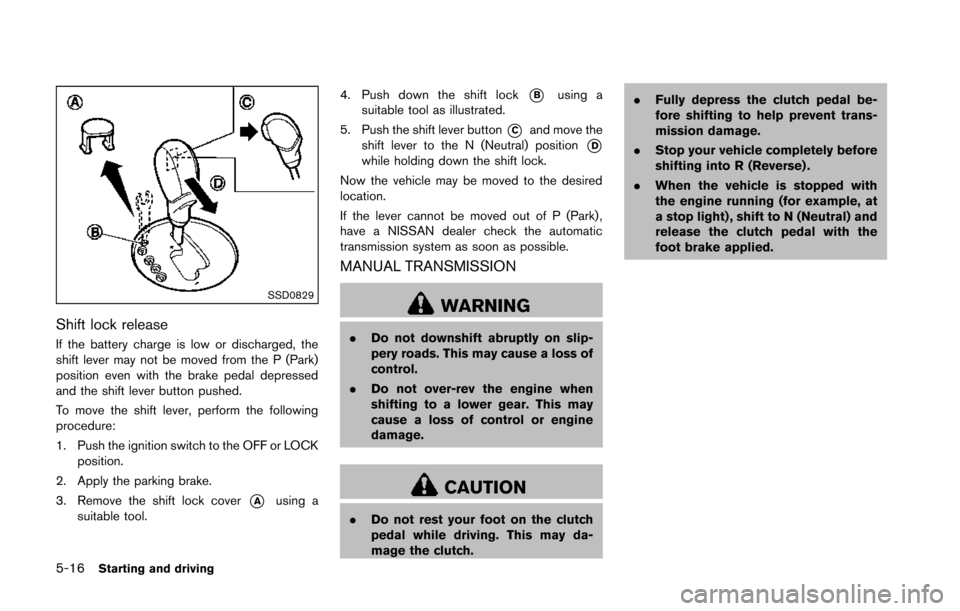
SSD0829
Shift lock release
If the battery charge is low or discharged, the
shift lever may not be moved from the P (Park)
position even with the brake pedal depressed
and the shift lever button pushed.
To move the shift lever, perform the following
procedure:
1. Push the ignition switch to the OFF or LOCKposition.
2. Apply the parking brake.
3. Remove the shift lock cover
*Ausing a
suitable tool. 4. Push down the shift lock
*Busing a
suitable tool as illustrated.
5. Push the shift lever button
*Cand move the
shift lever to the N (Neutral) position
*Dwhile holding down the shift lock.
Now the vehicle may be moved to the desired
location.
If the lever cannot be moved out of P (Park) ,
have a NISSAN dealer check the automatic
transmission system as soon as possible.
MANUAL TRANSMISSION
WARNING
. Do not downshift abruptly on slip-
pery roads. This may cause a loss of
control.
. Do not over-rev the engine when
shifting to a lower gear. This may
cause a loss of control or engine
damage.
CAUTION
.Do not rest your foot on the clutch
pedal while driving. This may da-
mage the clutch. .
Fully depress the clutch pedal be-
fore shifting to help prevent trans-
mission damage.
. Stop your vehicle completely before
shifting into R (Reverse) .
. When the vehicle is stopped with
the engine running (for example, at
a stop light) , shift to N (Neutral) and
release the clutch pedal with the
foot brake applied.
Page 304 of 428
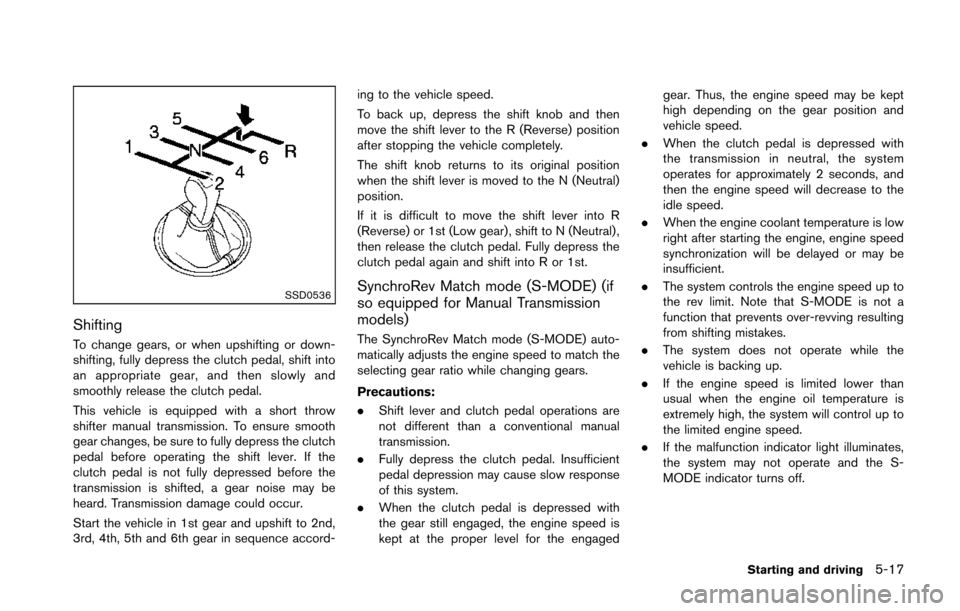
SSD0536
Shifting
To change gears, or when upshifting or down-
shifting, fully depress the clutch pedal, shift into
an appropriate gear, and then slowly and
smoothly release the clutch pedal.
This vehicle is equipped with a short throw
shifter manual transmission. To ensure smooth
gear changes, be sure to fully depress the clutch
pedal before operating the shift lever. If the
clutch pedal is not fully depressed before the
transmission is shifted, a gear noise may be
heard. Transmission damage could occur.
Start the vehicle in 1st gear and upshift to 2nd,
3rd, 4th, 5th and 6th gear in sequence accord-ing to the vehicle speed.
To back up, depress the shift knob and then
move the shift lever to the R (Reverse) position
after stopping the vehicle completely.
The shift knob returns to its original position
when the shift lever is moved to the N (Neutral)
position.
If it is difficult to move the shift lever into R
(Reverse) or 1st (Low gear), shift to N (Neutral) ,
then release the clutch pedal. Fully depress the
clutch pedal again and shift into R or 1st.
SynchroRev Match mode (S-MODE) (if
so equipped for Manual Transmission
models)
The SynchroRev Match mode (S-MODE) auto-
matically adjusts the engine speed to match the
selecting gear ratio while changing gears.
Precautions:
.
Shift lever and clutch pedal operations are
not different than a conventional manual
transmission.
. Fully depress the clutch pedal. Insufficient
pedal depression may cause slow response
of this system.
. When the clutch pedal is depressed with
the gear still engaged, the engine speed is
kept at the proper level for the engaged gear. Thus, the engine speed may be kept
high depending on the gear position and
vehicle speed.
. When the clutch pedal is depressed with
the transmission in neutral, the system
operates for approximately 2 seconds, and
then the engine speed will decrease to the
idle speed.
. When the engine coolant temperature is low
right after starting the engine, engine speed
synchronization will be delayed or may be
insufficient.
. The system controls the engine speed up to
the rev limit. Note that S-MODE is not a
function that prevents over-revving resulting
from shifting mistakes.
. The system does not operate while the
vehicle is backing up.
. If the engine speed is limited lower than
usual when the engine oil temperature is
extremely high, the system will control up to
the limited engine speed.
. If the malfunction indicator light illuminates,
the system may not operate and the S-
MODE indicator turns off.
Starting and driving5-17
Page 310 of 428
CAUTION
During the first 1,200 miles (2,000 km) ,
follow these recommendations to ob-
tain maximum engine performance and
ensure the future reliability and econo-
my of your new vehicle.
Failure to follow these recommenda-
tions may result in shortened engine
life and reduced engine performance.
. Avoid driving for long periods at constant
speed, either fast or slow. Do not run the
engine over 4,000 rpm.
. Do not accelerate at full throttle in any gear.
. Avoid quick starts.
. Avoid hard braking as much as possible. Follow these easy-to-use Fuel Efficient Driving
Tips to help you achieve the most fuel economy
from your vehicle.
1. Use smooth accelerator and brake pedal
application.
.Avoid rapid starts and stops..Use smooth, gentle accelerator andbrake application whenever possible.
.Maintain constant speed while commut-
ing and coast whenever possible.
2. Maintain constant speed.
.Look ahead to try and anticipate and minimize stops.
.Synchronizing your speed with traffic
lights allows you to reduce your number
of stops.
.Maintaining a steady speed can minimize red light stops and improve fuel effi-
ciency.
3. Use air conditioning (A/C) at higher vehicle speeds.
.Below 40 MPH (64 km/h), it is moreefficient to open windows to cool the
vehicle due to reduced engine load.
.Above 40 MPH (64 km/h) , it is moreefficient to use A/C to cool the vehicle
due to increased aerodynamic drag.
.Recirculating the cool air in the cabinwhen the A/C is on reduces cooling load.
4. Drive at economical speeds and distances.
.Observing the speed limit and not ex- ceeding 60 MPH (97 km/h) (where
legally allowed) can improve fuel effi-
ciency due to reduced aerodynamic
drag.
.Maintaining a safe following distancebehind other vehicles reduces unneces-
sary braking.
.Safely monitoring traffic to anticipatechanges in speed permits reduced brak-
ing and smooth acceleration changes.
.Select a gear range suitable to road conditions.
5. Use cruise control.
.Using cruise control during highway driving helps maintain a steady speed.
.Cruise control is particularly effective in providing fuel savings when driving on
flat terrains.
6. Plan for the shortest route.
.Utilize a map or navigation system to determine the best route to save time.
7. Avoid idling.
.Shutting off your engine when safe for stops exceeding 30-60 seconds saves
Starting and driving5-23
BREAK-IN SCHEDULE FUEL EFFICIENT DRIVING TIPS