2014 NISSAN 370Z COUPE ECO mode
[x] Cancel search: ECO modePage 42 of 428
— Keep seatbacks as upright aspossible after fitting the child
restraint.
— Infants and children should al- ways be placed in an appropri-
ate child restraint while in the
vehicle.
CAUTION
A child restraint in a closed vehicle can
become very hot. Check the seating
surface and buckles before placing a
child in the child restraint.
In general, child restraints are designed to be
installed with the lap portion of a lap/shoulder
seat belt.
Several manufacturers offer child restraints for
children of various sizes. When selecting any
child restraint, keep the following points in mind:
. Choose only a restraint with a label certifying
that it complies with Federal Motor Vehicle
Safety Standard 213 or Canadian Motor
Vehicle Safety Standard 213.
. Check the child restraint in your vehicle to
be sure it is compatible with the vehicle’s seat and seat belt system.
. If the child restraint is compatible with your
vehicle, place your child in the child restraint
and check the various adjustments to be
sure the child restraint is compatible with
your child. Choose a child restraint that is
designed for your child’s height and weight.
Always follow all recommended procedures.
The passenger seat is not suitable for use with a
rear-facing child restraint for infants. Therefore,
infants should not be transported in this vehicle.
All U.S. states and Canadian provinces or
territories require that infants and small
children be restrained in an approved child
restraint at all times while the vehicle is
being operated. Canadian law requires the
top tether strap on front-facing child
restraints to be secured to the designated
anchor point on the vehicle.
TOP TETHER STRAP CHILD RE-
STRAINT (for Coupe models)
If the manufacturer of your child restraint
requires the use of a top tether strap, it must
be secured to an anchor point.
WARNING
. Child restraint anchorages are de-
signed to withstand only those
loads imposed by correctly fitted
child restraints. Under no circum-
stances are they to be used to
attach adult seat belts or other
items or equipment to the vehicle.
Doing so could damage the child
restraint anchorages. The child re-
straint will not be properly installed
using the damaged anchorage, and
a child could be seriously injured or
killed in a collision.
. If the cargo cover (if so equipped)
contacts the top tether strap when it
is attached to the top tether anchor,
remove the cargo cover from the
vehicle or secure it on the cargo
floor below its attachment location.
If the cargo cover is not removed, it
may damage the top tether strap
Safety — Seats, seat belts and supplemental restraint system1-19
Page 51 of 428
1-28Safety — Seats, seat belts and supplemental restraint system
PRECAUTIONS ON SUPPLEMENTAL
RESTRAINT SYSTEM
This Supplemental Restraint System (SRS)
section contains important information concern-
ing the following systems.
.Driver and passenger supplemental front-
impact air bag (NISSAN Advanced Air Bag
System)
. Front seat-mounted side-impact supple-
mental air bag
. Roof-mounted (Coupe models) or door-
mounted (Roadster models) curtain side-
impact supplemental air bag
. Seat belt with pretensioner
Supplemental front-impact air bag system:
The NISSAN Advanced Air Bag System can
help cushion the impact force to the head and
chest of the driver and front passenger in certain
frontal collisions.
Front seat-mounted side-impact supple-
mental air bag system: This system can help
cushion the impact force to the chest and pelvis
area of the driver and front passenger in certain
side impact collisions. The front seat side-
impact supplemental air bags are designed to
inflate on the side where the vehicle is impacted.
Roof-mounted curtain side-impact supple-
mental air bag system (for Coupe models): This system can help cushion the impact force
to the head of the driver and front passenger in
certain side impact collisions. The curtain air
bags are designed to inflate on the side where
the vehicle is impacted.
Door-mounted curtain side-impact supple-
mental air bag system (for Roadster mod-
els):
This system can help cushion the impact
force to the heads of the driver and front
passenger in certain side impact collisions.
The curtain air bags are designed to inflate on
the side where the vehicle is impacted.
These supplemental restraint systems are de-
signed to supplement the crash protection
provided by the driver and passenger seat belts
and are not a substitute for them. Seat belts
should always be correctly worn and the
occupant seated a suitable distance away from
the steering wheel, instrument panel and door
finishers. (See “Seat belts” (P.1-9) for instruc-
tions and precautions on seat belt usage.)
The supplemental air bags operate only
when the ignition switch is in the ON
position.
After pushing the ignition switch to the ON
position, the supplemental air bag warning
light illuminates. The supplemental air bag
warning light will turn off after about 7
seconds if the systems are operational.
SUPPLEMENTAL RESTRAINT
SYSTEM
Page 59 of 428
1-36Safety — Seats, seat belts and supplemental restraint system
sensor to turn the air bag OFF. Always be sure
to be seated and wearing the seat belt properly
for the most effective protection by the seat belt
and supplemental air bag.
The occupant classification sensor is designed
to operate as described above to turn the front
passenger air bag OFF for specified child
restraints. Failing to properly secure child
restrains and to use the ALR mode (child
restraint mode) may allow the restraint to tip or
move in an accident or sudden stop. This can
also result in the passenger air bag inflating in a
crash instead of being OFF. (See “Child
restraints” (P.1-18) for proper use and installa-
tion.)
If the front passenger seat is not occupied, the
passenger air bag is designed not to inflate in a
crash. However, heavy objects placed on the
seat could result in air bag inflation, because of
the object being detected by the occupant
classification sensor. Other conditions could
also result in air bag inflation, such as if a child is
standing on the seat, or if two children are on the
seat, contrary to the instructions in this manual.
Always be sure that you and all vehicle
occupants are seated and restrained properly.
Using the passenger air bag status light, you can
monitor when the front passenger air bag is
automatically turned OFF with the seat occu-pied. The light will not illuminate when the front
passenger seat is unoccupied.
If an adult occupant is in the seat but the
passenger air bag status light is illuminated
(indicating that the air bag is OFF) , it could be
that the person is a small adult, or is not sitting
on the seat properly.
If a child restraint must be used in the front seat,
the passenger air bag status light may or may
not be illuminated, depending on the size of the
child and the type of child restraint being used. If
the passenger air bag status light is not
illuminated (indicating that the air bag might
inflate in a crash), it could be that the child
restraint or seat belt is not being used properly.
Make sure that the child restraint is installed
properly, the seat belt is used properly and the
occupant is positioned properly. If the passen-
ger air bag status light is still not illuminated, try
a different child restraint.
If the passenger air bag status light will not
illuminate even though you believe that the child
restraint, the seat belts and the occupant are
properly positioned, the system may be sensing
an unoccupied seat (in which case the air bag is
OFF). Your NISSAN dealer can check that the
system is OFF by using a special tool. However,
until you have confirmed with your dealer that
your air bag is working properly, do not transporta child in this vehicle.
The NISSAN Advanced Air Bag System and
passenger air bag status light will take a few
seconds to register a change in the passenger
seat status. However, if the seat becomes
unoccupied, the air bag status light will remain
off.
If a malfunction occurs in the front passenger air
bag system, the supplemental air bag warning
light
, located in the meter and gauges area
will blink. Have the system checked by a
NISSAN dealer.
Other supplemental front-impact air bag
precautions
WARNING
. Do not place any objects on the
steering wheel pad or on the instru-
ment panel. Also, do not place any
objects between any occupant and
the steering wheel or instrument
panel. Such objects may become
dangerous projectiles and cause
injury if the front air bag inflates.
. Do not place objects with sharp
edges on the seat. Also, do not
place heavy objects on the seat that
Page 81 of 428
2-16Instruments and controls
If this indicator light remains on for 20 seconds
and then blinks for 10 seconds when the engine
is not running, it indicates that the vehicle is not
ready for an emission control system inspection/
maintenance test. (See “Readiness for Inspec-
tion/Maintenance (I/M) test” (P.9-24) .)
Operation:
The malfunction indicator light will come on in
one of two ways:
.Malfunction indicator light on steady — An
emission control system malfunction has
been detected. Check the fuel-filler cap if
the LOOSE FUEL CAP warning appears in
the vehicle information display. If the fuel-
filler cap is loose or missing, tighten or install
the cap and continue to drive the vehicle.
The
light should turn off after a few
driving trips. If thelight does not turn off
after a few driving trips, have the vehicle
inspected by a NISSAN dealer. You do not
need to have your vehicle towed to the
dealer.
. Malfunction indicator light blinking — An
engine misfire has been detected which may
damage the emission control system.
To reduce or avoid emission control system
damage:
1) Do not drive at speeds above 45 MPH
(72 km/h). 2) Avoid hard acceleration or deceleration.
3) Avoid steep uphill grades.
4) If possible, reduce the amount of cargo
being hauled or towed.
The malfunction indicator light may stop
blinking and remain on.
Have the vehicle inspected by a NISSAN
dealer. You do not need to have your vehicle
towed to the dealer.
CAUTION
Continued vehicle operation without
having the emission control system
checked and repaired as necessary
could lead to poor driveability, reduced
fuel economy, and possible damage to
the emission control system.
Rear fog light indicator light (if so
equipped)
The rear fog light indicator light illuminates when
the rear fog light is on. (See “Fog light switch”
(P.2-36) .)
Security indicator light
The light blinks when the ignition switch is in the
ACC, OFF or LOCK position. This function
indicates the security system equipped on the
vehicle is operational.
If the security system is malfunctioning, this light
will remain on while the ignition switch is in the
ON position. For additional information, see
“Security systems” (P.2-28) .
Soft top indicator light (Roadster
models)
This light illuminates when the soft top is being
operated or it is stopped before reaching a full
open/close state. When the top is fully opened
or closed, the light will turn off.
The light blinks while the soft top is not fully
opened or closed under the following condi-
tions:
. When the vehicle is driven.
. When the shift lever is in the R (Reverse)
position.
Be sure to fully open or close the soft top when
driving the vehicle.
The soft top can be moved with the soft top
operating switch only under all of the following
conditions:
Page 82 of 428

.When the vehicle is stopped.
. When the ignition switch is ON.
. When the trunk is closed.
. When the shift lever is in a position other
than the R (Reverse) position.
CAUTION
Operate the soft top with the engine
running to prevent a discharged battery.
When the soft top is operating, if any of the
above conditions are discontinued or any of the
following conditions are met, the top will stop
operating.
. When the shift lever is in the R (Reverse)
position.
. When the vehicle moves at a speed of 3
MPH (5 km/h) or more.
. When the battery voltage is extremely low.
. When the temperature of the soft top
system becomes extremely high.
Release the operating switch, and push it again
under the above conditions until the top is fully
opened or closed. The soft top indicator light will
turn off when the top operation is completely
finished.
If the soft top indicator light illuminates with the ignition switch ON, it may indicate the electric
soft top control unit is not functioning properly.
Have your vehicle checked by a NISSAN dealer
as soon as possible.
For more details about the electric soft top
operation, see “Soft top (Roadster models)”
(P.3-21) .
SynchroRev Match mode (S-
MODE) indicator (if so equipped)
This indicator will illuminate when the
SynchroRev Match mode (S-MODE) is acti-
vated. (See “SynchroRev Match mode (S-
MODE) (if so equipped for Manual Transmission
models)” (P.5-17) .)
Transmission position indicator (if
so equipped)
When the ignition switch is pushed to the ON
position, the indicator shows the transmission
position.
For AT models:
In the manual shift mode, when the transmission
does not shift to the selected gear due to the
transmission protection mode, the AT position
indicator light will blink and a buzzer will sound.
(See “Driving the vehicle” (P.5-12) .)
Turn signal/hazard indicator lights
The light flashes when the turn signal switch
lever or hazard switch is turned on.
Vehicle Dynamic Control (VDC) off
indicator light
The light comes on when the vehicle dynamic
control off switch is pushed to OFF. This
indicates that the vehicle dynamic control
system and traction control system are not
operating.
AUDIBLE REMINDERS
Key reminder chime
A chime will sound if the driver side door is
opened while the ignition switch is pushed to
the ACC position or pushed to the OFF or
LOCK position with the Intelligent Key left in the
Intelligent Key port. Make sure the ignition
switch is pushed to the OFF position, and take
the Intelligent Key with you when leaving the
vehicle.
Light reminder chime
A chime will sound when the driver side door is
opened with the light switch in theorposition and the ignition switch in the ACC, OFF
or LOCK position.
Turn the light switch off when you leave the
vehicle.
Instruments and controls2-17
Page 84 of 428
JVI0351X
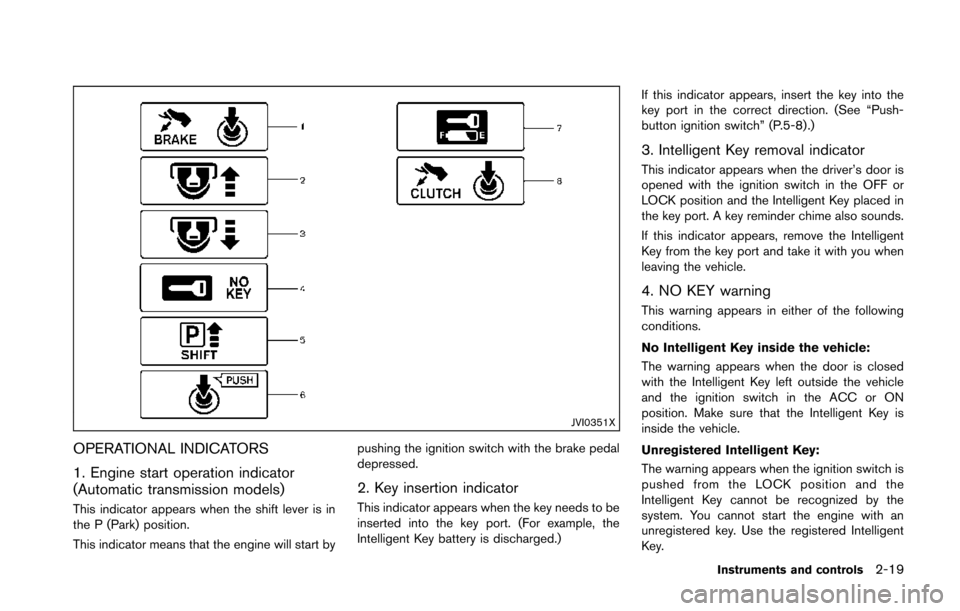
OPERATIONAL INDICATORS
1. Engine start operation indicator
(Automatic transmission models)
This indicator appears when the shift lever is in
the P (Park) position.
This indicator means that the engine will start bypushing the ignition switch with the brake pedal
depressed.
2. Key insertion indicator
This indicator appears when the key needs to be
inserted into the key port. (For example, the
Intelligent Key battery is discharged.)If this indicator appears, insert the key into the
key port in the correct direction. (See “Push-
button ignition switch” (P.5-8).)
3. Intelligent Key removal indicator
This indicator appears when the driver’s door is
opened with the ignition switch in the OFF or
LOCK position and the Intelligent Key placed in
the key port. A key reminder chime also sounds.
If this indicator appears, remove the Intelligent
Key from the key port and take it with you when
leaving the vehicle.
4. NO KEY warning
This warning appears in either of the following
conditions.
No Intelligent Key inside the vehicle:
The warning appears when the door is closed
with the Intelligent Key left outside the vehicle
and the ignition switch in the ACC or ON
position. Make sure that the Intelligent Key is
inside the vehicle.
Unregistered Intelligent Key:
The warning appears when the ignition switch is
pushed from the LOCK position and the
Intelligent Key cannot be recognized by the
system. You cannot start the engine with an
unregistered key. Use the registered Intelligent
Key.
Instruments and controls2-19
Page 89 of 428
2-24Instruments and controls
SIC3673
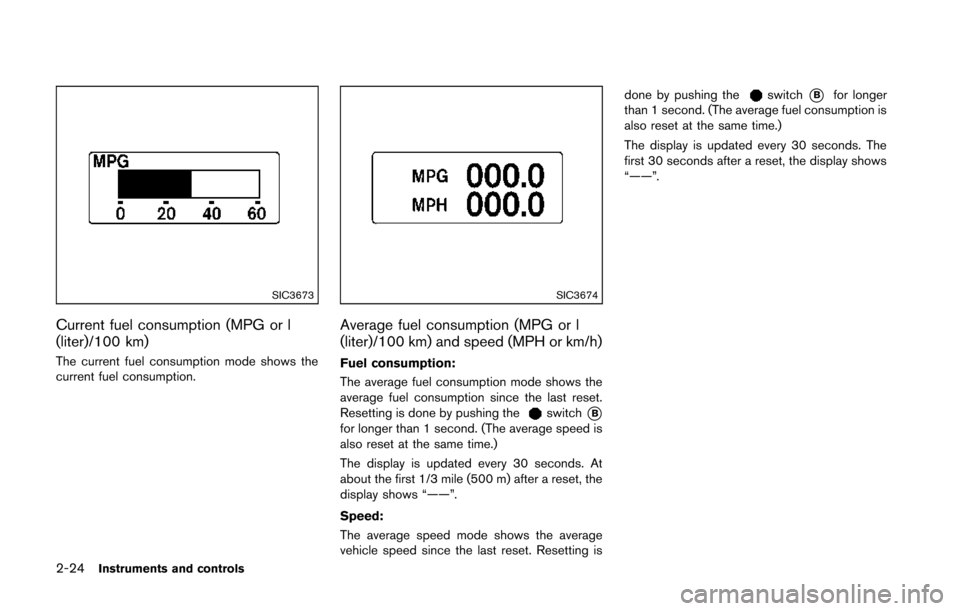
Current fuel consumption (MPG or l
(liter)/100 km)
The current fuel consumption mode shows the
current fuel consumption.
SIC3674
Average fuel consumption (MPG or l
(liter)/100 km) and speed (MPH or km/h)
Fuel consumption:
The average fuel consumption mode shows the
average fuel consumption since the last reset.
Resetting is done by pushing the
switch*Bfor longer than 1 second. (The average speed is
also reset at the same time.)
The display is updated every 30 seconds. At
about the first 1/3 mile (500 m) after a reset, the
display shows “——”.
Speed:
The average speed mode shows the average
vehicle speed since the last reset. Resetting isdone by pushing the
switch*Bfor longer
than 1 second. (The average fuel consumption is
also reset at the same time.)
The display is updated every 30 seconds. The
first 30 seconds after a reset, the display shows
“——”.
Page 90 of 428
SIC4226
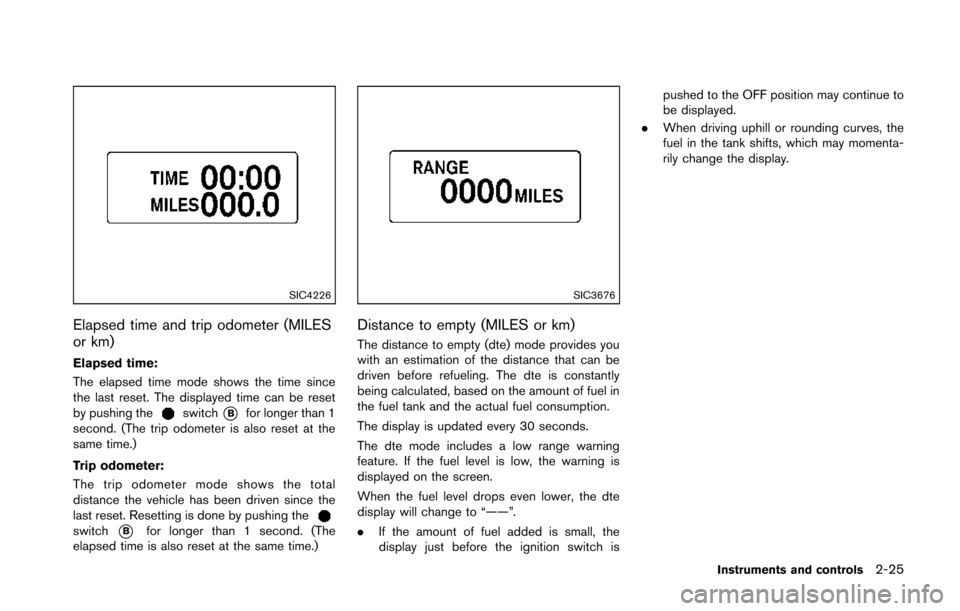
Elapsed time and trip odometer (MILES
or km)
Elapsed time:
The elapsed time mode shows the time since
the last reset. The displayed time can be reset
by pushing the
switch*Bfor longer than 1
second. (The trip odometer is also reset at the
same time.)
Trip odometer:
The trip odometer mode shows the total
distance the vehicle has been driven since the
last reset. Resetting is done by pushing the
switch*Bfor longer than 1 second. (The
elapsed time is also reset at the same time.)
SIC3676
Distance to empty (MILES or km)
The distance to empty (dte) mode provides you
with an estimation of the distance that can be
driven before refueling. The dte is constantly
being calculated, based on the amount of fuel in
the fuel tank and the actual fuel consumption.
The display is updated every 30 seconds.
The dte mode includes a low range warning
feature. If the fuel level is low, the warning is
displayed on the screen.
When the fuel level drops even lower, the dte
display will change to “——”.
. If the amount of fuel added is small, the
display just before the ignition switch is pushed to the OFF position may continue to
be displayed.
. When driving uphill or rounding curves, the
fuel in the tank shifts, which may momenta-
rily change the display.
Instruments and controls2-25