2014 NISSAN 370Z COUPE ECO mode
[x] Cancel search: ECO modePage 285 of 428
4-124Center display, heater, air conditioner, audio, phone and voice recognition systems
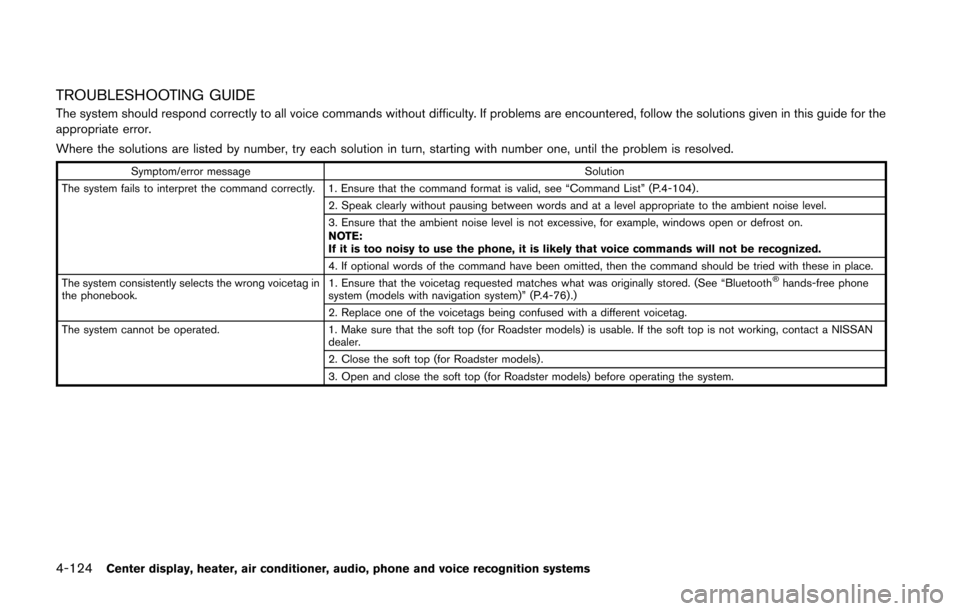
TROUBLESHOOTING GUIDE
The system should respond correctly to all voice commands without difficulty. If problems are encountered, follow the solutions given in this guide for the
appropriate error.
Where the solutions are listed by number, try each solution in turn, starting with number one, until the problem is resolved.
Symptom/error messageSolution
The system fails to interpret the command correctly. 1. Ensure that the command format is valid, see “Command List” (P.4-104) . 2. Speak clearly without pausing between words and at a level appropriate to the ambient noise level.
3. Ensure that the ambient noise level is not excessive, for example, windows open or defrost on.
NOTE:
If it is too noisy to use the phone, it is likely that voice commands will not be recognized.
4. If optional words of the command have been omitted, then the command should be tried with these in place.
The system consistently selects the wrong voicetag in
the phonebook. 1. Ensure that the voicetag requested matches what was originally stored. (See “Bluetooth
®hands-free phone
system (models with navigation system)” (P.4-76) .)
2. Replace one of the voicetags being confused with a different voicetag.
The system cannot be operated. 1. Make sure that the soft top (for Roadster models) is usable. If the soft top is not working, contact a NISSAN dealer.
2. Close the soft top (for Roadster models) .
3. Open and close the soft top (for Roadster models) before operating the system.
Page 288 of 428
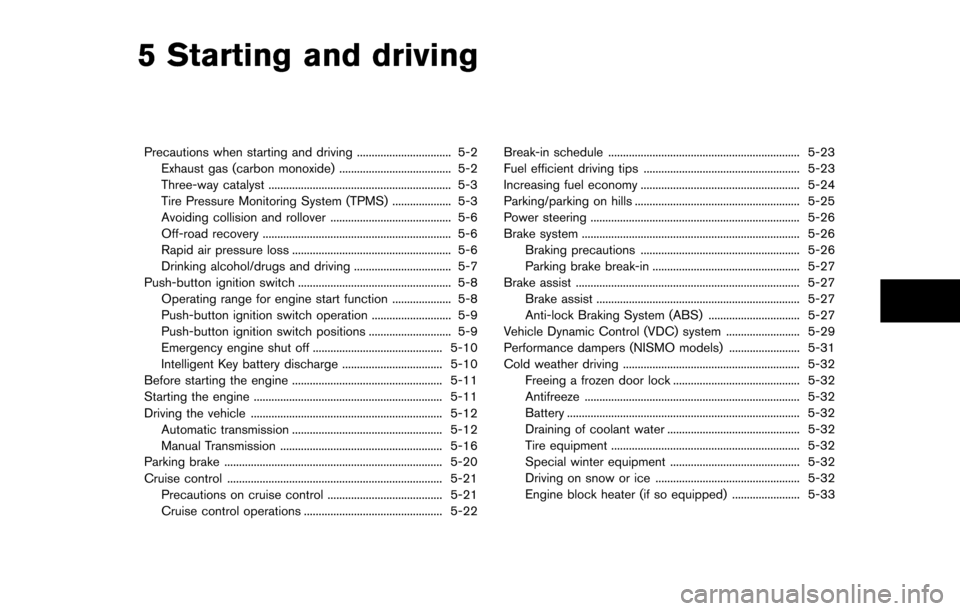
5 Starting and driving
Precautions when starting and driving ................................ 5-2Exhaust gas (carbon monoxide) ...................................... 5-2
Three-way catalyst .............................................................. 5-3
Tire Pressure Monitoring System (TPMS) .................... 5-3
Avoiding collision and rollover ......................................... 5-6
Off-road recovery ................................................................ 5-6
Rapid air pressure loss ...................................................... 5-6
Drinking alcohol/drugs and driving ................................. 5-7
Push-button ignition switch .................................................... 5-8 Operating range for engine start function .................... 5-8
Push-button ignition switch operation ........................... 5-9
Push-button ignition switch positions ............................ 5-9
Emergency engine shut off ............................................ 5-10
Intelligent Key battery discharge .................................. 5-10
Before starting the engine ................................................... 5-11
Starting the engine ................................................................ 5-11
Driving the vehicle ................................................................. 5-12 Automatic transmission ................................................... 5-12
Manual Transmission ....................................................... 5-16
Parking brake ........................................................................\
.. 5-20
Cruise control ........................................................................\
. 5-21 Precautions on cruise control ....................................... 5-21
Cruise control operations ............................................... 5-22 Break-in schedule ................................................................. 5-23
Fuel efficient driving tips ..................................................... 5-23
Increasing fuel economy ...................................................... 5-24
Parking/parking on hills ........................................................ 5-25
Power steering ....................................................................... 5-26
Brake system ........................................................................\
.. 5-26
Braking precautions ...................................................... 5-26
Parking brake break-in .................................................. 5-27
Brake assist ........................................................................\
.... 5-27 Brake assist ..................................................................... 5-27
Anti-lock Braking System (ABS) ............................... 5-27
Vehicle Dynamic Control (VDC) system ......................... 5-29
Performance dampers (NISMO models) ........................ 5-31
Cold weather driving ............................................................ 5-32 Freeing a frozen door lock ........................................... 5-32
Antifreeze ........................................................................\
. 5-32
Battery ........................................................................\
....... 5-32
Draining of coolant water ............................................. 5-32
Tire equipment ................................................................ 5-32
Special winter equipment ............................................ 5-32
Driving on snow or ice ................................................. 5-32
Engine block heater (if so equipped) ....................... 5-33
Page 289 of 428
5-2Starting and driving
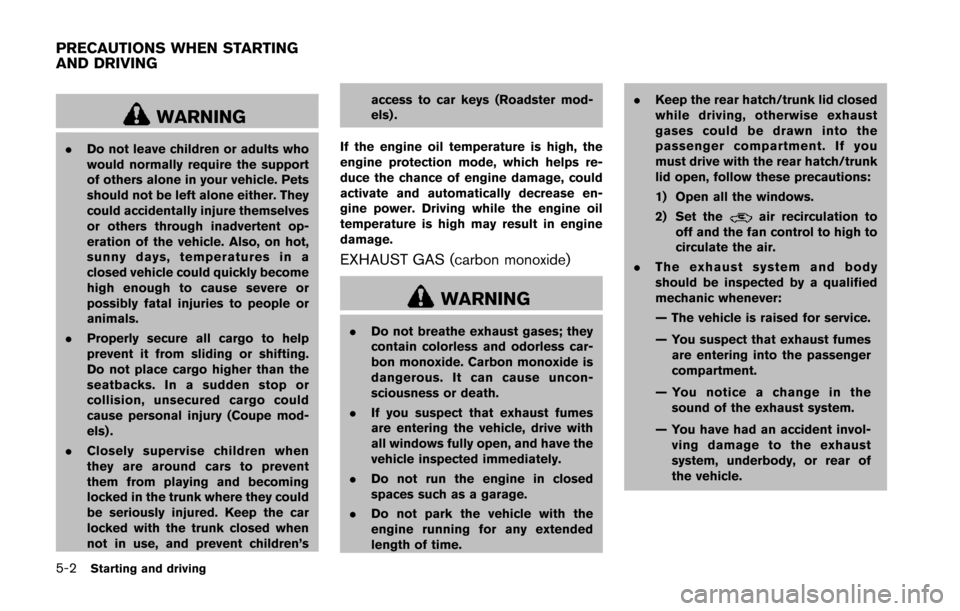
WARNING
.Do not leave children or adults who
would normally require the support
of others alone in your vehicle. Pets
should not be left alone either. They
could accidentally injure themselves
or others through inadvertent op-
eration of the vehicle. Also, on hot,
sunny days, temperatures in a
closed vehicle could quickly become
high enough to cause severe or
possibly fatal injuries to people or
animals.
. Properly secure all cargo to help
prevent it from sliding or shifting.
Do not place cargo higher than the
seatbacks. In a sudden stop or
collision, unsecured cargo could
cause personal injury (Coupe mod-
els) .
. Closely supervise children when
they are around cars to prevent
them from playing and becoming
locked in the trunk where they could
be seriously injured. Keep the car
locked with the trunk closed when
not in use, and prevent children’s access to car keys (Roadster mod-
els) .
If the engine oil temperature is high, the
engine protection mode, which helps re-
duce the chance of engine damage, could
activate and automatically decrease en-
gine power. Driving while the engine oil
temperature is high may result in engine
damage.
EXHAUST GAS (carbon monoxide)
WARNING
. Do not breathe exhaust gases; they
contain colorless and odorless car-
bon monoxide. Carbon monoxide is
dangerous. It can cause uncon-
sciousness or death.
. If you suspect that exhaust fumes
are entering the vehicle, drive with
all windows fully open, and have the
vehicle inspected immediately.
. Do not run the engine in closed
spaces such as a garage.
. Do not park the vehicle with the
engine running for any extended
length of time. .
Keep the rear hatch/trunk lid closed
while driving, otherwise exhaust
gases could be drawn into the
passenger compartment. If you
must drive with the rear hatch/trunk
lid open, follow these precautions:
1) Open all the windows.
2) Set the
air recirculation to
off and the fan control to high to
circulate the air.
. The exhaust system and body
should be inspected by a qualified
mechanic whenever:
— The vehicle is raised for service.
— You suspect that exhaust fumes
are entering into the passenger
compartment.
— You notice a change in the sound of the exhaust system.
— You have had an accident invol- ving damage to the exhaust
system, underbody, or rear of
the vehicle.
PRECAUTIONS WHEN STARTING
AND DRIVING
Page 292 of 428
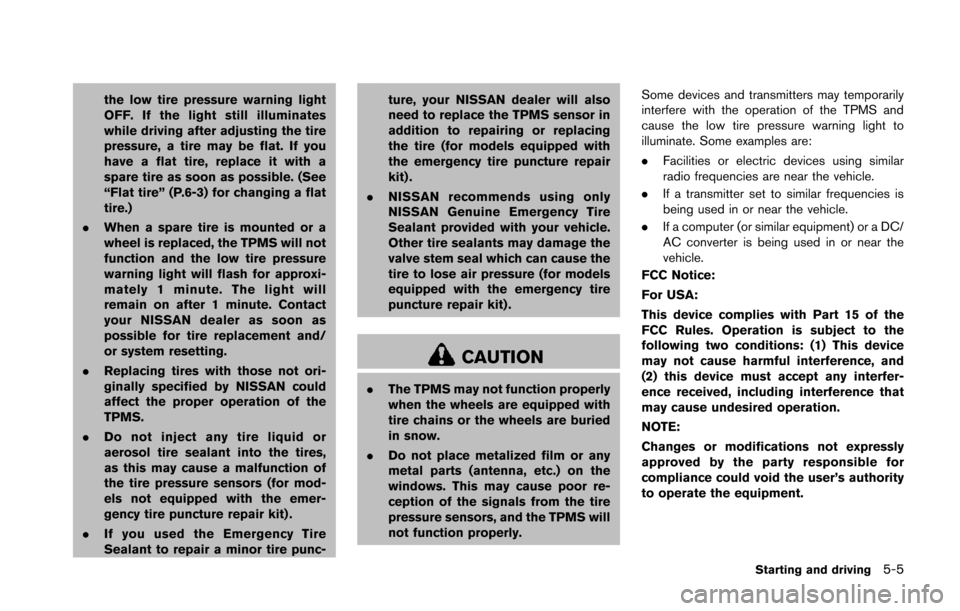
the low tire pressure warning light
OFF. If the light still illuminates
while driving after adjusting the tire
pressure, a tire may be flat. If you
have a flat tire, replace it with a
spare tire as soon as possible. (See
“Flat tire” (P.6-3) for changing a flat
tire.)
. When a spare tire is mounted or a
wheel is replaced, the TPMS will not
function and the low tire pressure
warning light will flash for approxi-
mately 1 minute. The light will
remain on after 1 minute. Contact
your NISSAN dealer as soon as
possible for tire replacement and/
or system resetting.
. Replacing tires with those not ori-
ginally specified by NISSAN could
affect the proper operation of the
TPMS.
. Do not inject any tire liquid or
aerosol tire sealant into the tires,
as this may cause a malfunction of
the tire pressure sensors (for mod-
els not equipped with the emer-
gency tire puncture repair kit) .
. If you used the Emergency Tire
Sealant to repair a minor tire punc- ture, your NISSAN dealer will also
need to replace the TPMS sensor in
addition to repairing or replacing
the tire (for models equipped with
the emergency tire puncture repair
kit) .
. NISSAN recommends using only
NISSAN Genuine Emergency Tire
Sealant provided with your vehicle.
Other tire sealants may damage the
valve stem seal which can cause the
tire to lose air pressure (for models
equipped with the emergency tire
puncture repair kit) .
CAUTION
.The TPMS may not function properly
when the wheels are equipped with
tire chains or the wheels are buried
in snow.
. Do not place metalized film or any
metal parts (antenna, etc.) on the
windows. This may cause poor re-
ception of the signals from the tire
pressure sensors, and the TPMS will
not function properly. Some devices and transmitters may temporarily
interfere with the operation of the TPMS and
cause the low tire pressure warning light to
illuminate. Some examples are:
.
Facilities or electric devices using similar
radio frequencies are near the vehicle.
. If a transmitter set to similar frequencies is
being used in or near the vehicle.
. If a computer (or similar equipment) or a DC/
AC converter is being used in or near the
vehicle.
FCC Notice:
For USA:
This device complies with Part 15 of the
FCC Rules. Operation is subject to the
following two conditions: (1) This device
may not cause harmful interference, and
(2) this device must accept any interfer-
ence received, including interference that
may cause undesired operation.
NOTE:
Changes or modifications not expressly
approved by the party responsible for
compliance could void the user’s authority
to operate the equipment.
Starting and driving5-5
Page 295 of 428
5-8Starting and driving
WARNING
Do not operate the push-button ignition
switch while driving the vehicle except
in an emergency. (The engine will stop
when the ignition switch is pushed 3
consecutive times or the ignition switch
is pushed and held for more than 2
seconds.) If the engine stops while the
vehicle is being driven, this could lead
to a crash and serious injury.
Before operating the push-button ignition
switch, be sure to move the shift lever to the P
(Park) position (for automatic transmission
model) or the shift lever to the N (Neutral)
position (for manual transmission model) .
SSD0825
OPERATING RANGE FOR ENGINE
START FUNCTION
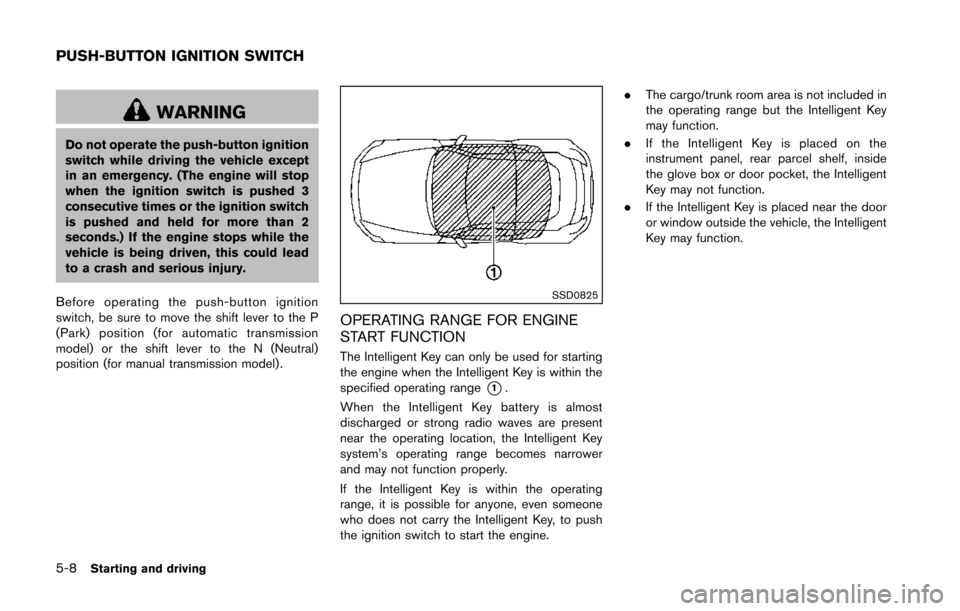
The Intelligent Key can only be used for starting
the engine when the Intelligent Key is within the
specified operating range
*1.
When the Intelligent Key battery is almost
discharged or strong radio waves are present
near the operating location, the Intelligent Key
system’s operating range becomes narrower
and may not function properly.
If the Intelligent Key is within the operating
range, it is possible for anyone, even someone
who does not carry the Intelligent Key, to push
the ignition switch to start the engine. .
The cargo/trunk room area is not included in
the operating range but the Intelligent Key
may function.
. If the Intelligent Key is placed on the
instrument panel, rear parcel shelf, inside
the glove box or door pocket, the Intelligent
Key may not function.
. If the Intelligent Key is placed near the door
or window outside the vehicle, the Intelligent
Key may function.
PUSH-BUTTON IGNITION SWITCH
Page 298 of 428
.Make sure the area around the vehicle is
clear.
. Check fluid levels such as engine oil, cool-
ant, brake fluid and window washer fluid as
frequently as possible, or at least whenever
you refuel.
. Check that all windows and lights are clean.
. Visually inspect tires for their appearance
and condition. Also check tires for proper
inflation.
. Lock all doors.
. Position seat and adjust head restraints.
. Adjust inside and outside mirrors.
. Fasten seat belts and ask all passengers to
do likewise.
. Check the operation of warning lights when
the ignition switch is pushed to the ON
position. (See “Warning/indicator lights and
audible reminders” (P.2-10) .) 1. Apply the parking brake.
2.
Automatic Transmission (AT) model:
Move the shift lever to the P (Park) or N
(Neutral) position. (P is recommended.)
The starter is designed not to operate unless
the shift lever is in either of the above
positions.
Manual Transmission (MT) model:
Move the shift lever to the N (Neutral)
position. Depress the clutch pedal fully to
the floor.
The starter is designed not to operate unless
the clutch pedal is fully depressed.
The Intelligent Key must be carried
when operating the ignition switch.
3. Push the ignition switch to the ON position. Depress the brake pedal (AT model) or the
clutch pedal (MT model) and push the
ignition switch to start the engine.
To start the engine immediately, push and
release the ignition switch while depressing
the brake pedal with the ignition switch in
any position.
.If the engine is very hard to start inextremely cold weather or when restart-
ing, depress the accelerator pedal a little
(approximately 1/3 to the floor) and while
holding, crank the engine. Release the accelerator pedal when the engine starts.
.If the engine is very hard to start because
it is flooded, depress the accelerator
pedal all the way to the floor and hold it.
Push the ignition switch to the ON
position to start cranking the engine.
After 5 or 6 seconds, stop cranking by
pushing the ignition switch to OFF. After
cranking the engine, release the accel-
erator pedal. Crank the engine with your
foot off the accelerator pedal by
depressing the brake pedal and pushing
the push-button ignition switch to start
the engine. If the engine starts, but fails
to run, repeat the above procedure.
CAUTION
Do not operate the starter for more
than 15 seconds at a time. If the engine
does not start, push the ignition switch
to OFF and wait 10 seconds before
cranking again, otherwise the starter
could be damaged.
4. Warm-up
Allow the engine to idle for at least 30
seconds after starting. Do not race the
engine while warming it up. Drive at
Starting and driving5-11
BEFORE STARTING THE ENGINE STARTING THE ENGINE
Page 299 of 428
5-12Starting and driving
moderate speed for a short distance first,
especially in cold weather. In cold weather,
keep the engine running for a minimum of 2 -
3 minutes before shutting it off. Starting and
stopping the engine over a short period of
time may make the vehicle more difficult to
start.
When racing the engine up to 4,500 rpm or
more under no load condition, the engine
will enter the fuel cut mode.
5. To stop the engine, shift the shift lever to the P (Park) position (AT model) or move the
shift lever to the N (Neutral) position (MT
model) , and push the ignition switch to the
OFF position.
NOTE:
Care should be taken to avoid situations
that can lead to potential battery discharge
and potential no-start conditions such as:
1. Installation or extended use of electro-
nic accessories that consume battery
power when the engine is not running
(Phone chargers, GPS, DVD players,
etc.)
2. Vehicle is not driven regularly and/or
only driven short distances.
In these cases, the battery may need to be
charged to maintain battery health.AUTOMATIC TRANSMISSION
7 speed automatic transmission
The automatic transmission in your vehicle is
electronically controlled by a transmission con-
trol module to produce maximum efficiency and
smooth operation.
Shown on the following pages are the recom-
mended operating procedures for this transmis-
sion. Follow these procedures for maximum
vehicle performance and driving enjoyment.
Starting the vehicle
After starting the engine, fully depress the foot
brake pedal and push the shift lever button
before shifting the shift lever to the R (Reverse) ,
N (Neutral) , D (Drive) or Manual shift mode
position. Be sure the vehicle is fully stopped
before attempting to shift the shift lever.
This automatic transmission model is de-
signed so that the foot brake pedal must
be depressed before shifting from P (Park)
to any drive position while the ignition
switch position is ON.
The shift lever cannot be moved out of the
P (Park) position and into any of the other
gear positions if the ignition switch is
pushed to the LOCK, OFF or ACC position. 1. Keep the foot brake pedal depressed and
push the shift lever button to shift into a
driving gear.
2. Release the parking brake and foot brake, then gradually start the vehicle in motion.
WARNING
.Do not depress the accelerator
pedal while shifting from P (Park)
or N (Neutral) to R (Reverse) D
(Drive) , or manual shift mode. Al-
ways depress the brake pedal until
shifting is completed. Failure to do
so could cause you to lose control
and have an accident.
. Cold engine idle speed is high, so
use caution when shifting into a
forward or reverse gear before the
engine has warmed up.
. Never shift to P (Park) or R (Re-
verse) while vehicle is moving for-
ward. Never shift to P (Park) or D
(Drive) while vehicle is moving rear-
ward. Failure to do so could cause
you to lose control and have an
accident.
DRIVING THE VEHICLE
Page 301 of 428
5-14Starting and driving
CAUTION
Use this position only when the vehicle
is completely stopped.
R (Reverse):
Use this position to back up. Always be sure the
vehicle is completely stopped before selecting
the R (Reverse) position. The brake pedal
must be depressed and the shift lever
button pushed in to move the shift lever
from the P (Park) position, the N (Neutral)
position or any drive position to the R
(Reverse) position.
N (Neutral):
Neither forward nor reverse gear is engaged.
The engine can be started in this position. You
may shift to the N (Neutral) position and restart a
stalled engine while the vehicle is moving.
D (Drive):
Use this position for all normal forward driving.
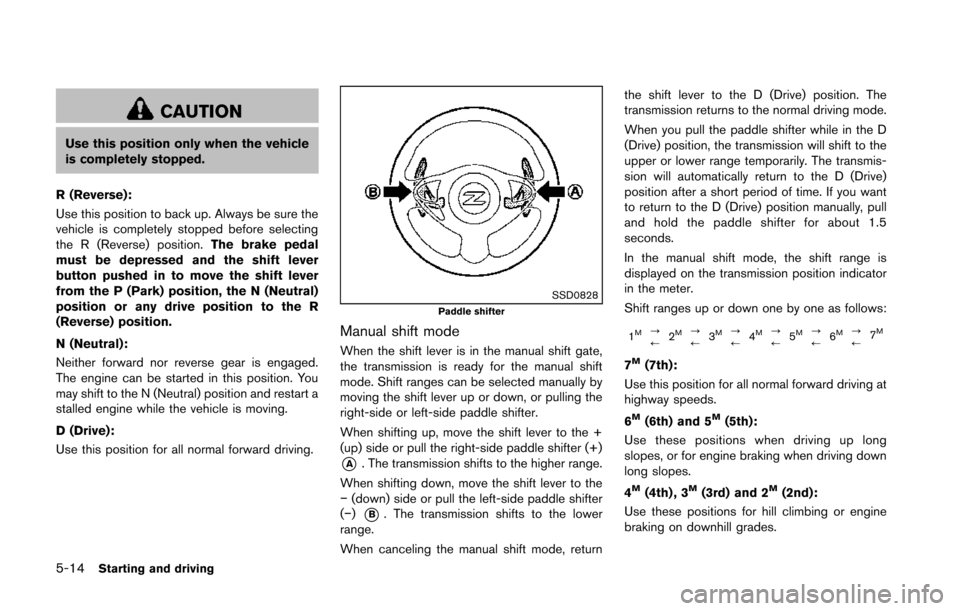
SSD0828Paddle shifter
Manual shift mode
When the shift lever is in the manual shift gate,
the transmission is ready for the manual shift
mode. Shift ranges can be selected manually by
moving the shift lever up or down, or pulling the
right-side or left-side paddle shifter.
When shifting up, move the shift lever to the +
(up) side or pull the right-side paddle shifter (+)
*A. The transmission shifts to the higher range.
When shifting down, move the shift lever to the
− (down) side or pull the left-side paddle shifter
(−)
*B. The transmission shifts to the lower
range.
When canceling the manual shift mode, return the shift lever to the D (Drive) position. The
transmission returns to the normal driving mode.
When you pull the paddle shifter while in the D
(Drive) position, the transmission will shift to the
upper or lower range temporarily. The transmis-
sion will automatically return to the D (Drive)
position after a short period of time. If you want
to return to the D (Drive) position manually, pull
and hold the paddle shifter for about 1.5
seconds.
In the manual shift mode, the shift range is
displayed on the transmission position indicator
in the meter.
Shift ranges up or down one by one as follows:
1M?
/
2M?
/3M?
/ 4M?
/5M?
/6M?
/ 7M
7M(7th):
Use this position for all normal forward driving at
highway speeds.
6
M(6th) and 5M(5th):
Use these positions when driving up long
slopes, or for engine braking when driving down
long slopes.
4
M(4th) , 3M(3rd) and 2M(2nd):
Use these positions for hill climbing or engine
braking on downhill grades.