Page 287 of 460
Comfort controls
5-15
5
Combination of unheated air and heated air
N00731300282
Set the mode selection dial to the positions shown in the illus-
tration and set the air selection lever to the outside air position.
The air flow will be directed to the leg area and the upper part
of the passenger compartment. Set the desired blower speed.
Warm air flows to the leg area and unheated or slightly warm
air (depending upon the position of the temperature control
lever) flows to the upper part of the passenger compartment.
Defrosting or defogging (windshield, door windows)
N00731400560
Set the mode selection dial (between “ ” and “ ”) to
remove frost or mist from the windshield and door window.
CAUTION
!�For safety, make sure you have a clear view through
all the windows.
BK0162600US.book 15 ページ 2013年3月22日 金曜日 午後2時41分
Page 293 of 460

Comfort controls
5-21
5
Defogger switch
N00703400015
When this switch is pressed, the mode changes to the “ ”
mode. The indicator light (A) will come on. The selected mode
is shown in the display (B). Refer to “Changing the mode
selection” on page 5-3.NOTE�When the defogger switch is pressed, the air conditioning
system automatically operates and outside air (as opposed
to recirculated air) is selected.
Refer to “Defrosting or defogging (windshield, door win-
dows)” on page 5-26.
Air selection switch
N00737200368
Normally, use the outside air position to keep the windshield
and side windows clear and to quickly remove fog or frost
from the windshield.
To change the air selection, simply press the air selection
switch.
The selected position will be shown in the display (A).
�Outside air: “ ” indicator is ON
Outside air is introduced into the passenger compartment.
�Recirculated air: “ ” indicator is ON
Air is recirculated inside the passenger compartment.
BK0162600US.book 21 ページ 2013年3月22日 金曜日 午後2時41分
Page 295 of 460
Comfort controls
5-23
5
NOTE�The factory setting is “Enable automatic air control”.
�When the defogger switch is pressed, the air selection will
automatically change to the outside air position, even if
the system is set to “Disable automatic air control”, in
order to prevent windows from fogging up.
Air conditioning switch
N00737300343
Push the switch, and the air conditioning compressor will turn
on. The “ ” indicator will be shown in the display (A).
Push the switch again and the air conditioning compressor will
stop and the indicator goes off.
CAUTION
!�Using the air conditioning slightly increases the
engine idle speed. Therefore, make sure your foot is
firmly on the brake pedal when shifting the
transaxle into drive.
BK0162600US.book 23 ページ 2013年3月22日 金曜日 午後2時41分
Page 301 of 460

Comfort controls
5-29
5
During a long period of disuseThe air conditioning should be operated for at least five min-
utes each week, even in cold weather. This includes the quick
defrosting mode. Operating the air condition system weekly
maintains lubrication of the compressor internal parts to keep
the air conditioning in the best operating condition.
Air purifier
(if so equipped)
N00733800180
The air conditioning system is equipped with an air filter to
remove pollen and dust.
The air filter’s ability to collect pollen and dirt is reduced as it
becomes dirty, so replace it periodically. For the maintenance
interval, refer to the “WARRANTY AND MAINTENANCE
MANUAL”.NOTE�Operation in certain conditions such as driving on a dusty
road and frequent use of the air conditioning can lead to
reduction of service life of the filter. When you feel that
the air flow is lower than normal or when the windshield
or windows start to fog up easily, replace the air filter.
Contact your Mitsubishi Motors dealer or a repair facility
of your choice for assistance.
CAUTION
!�The air conditioning system in your vehicle must be
charged with the refrigerant HFC-134a and the
lubricant ZXL 200PG.
Use of any other refrigerant or lubricant will cause
severe damage and may require replacing your vehi-
cle’s entire air conditioning system.
The release of refrigerant into the atmosphere is not
recommended.
The new refrigerant HFC-134a in your vehicle is
designed not to harm the earth’s ozone layer. How-
ever, it may contribute slightly to global warming.
It is recommended that the old refrigerant be saved
and recycled for future use.
BK0162600US.book 29 ページ 2013年3月22日 金曜日 午後2時41分
Page 412 of 460
7-38 Vehicle care and maintenance
7
�Some fuses may not be installed on your vehicle, depend-
ing on the vehicle model or specifications.
�The table above shows the main equipment corresponding
to each fuse.
Engine compartment fuse location table
10 Control unit 7.5 A
11 Rear fog light 10 A
12 Door lock 15 A
13 Interior light (Dome light) 15 A
14 Rear window wiper 15 A
15 Gauges 7.5 A
16 Relay 7.5 A
17 Heated seats 20 A
18 Option 10 A
19 Heated outside rearview mirrors 7.5 A
20 Windshield wiper 20 A
21 Back-up light 7.5 A
22 Defogger 30 A
23 Heater 30 A
24 — — —
25 Radio 10 A
26 Electronic controlled unit 15 ANo.
Symbol
Electrical system
Capacity
No.
Symbol
Electrical system
Capacity
SBF1 Radiator fan motor 40 A*
SBF2 Anti-lock braking system 30 A*
SBF3 Ignition switch 40 A*
SBF4 Power window control 40 A*
BF1 DC-DC (P/T) 30 ATy p e A
BK0162600US.book 38 ページ 2013年3月22日 金曜日 午後2時41分
Page 413 of 460

Vehicle care and maintenance
7-39
7
*: Fusible link
�Some fuses may not be installed on your vehicle, depend-
ing on the vehicle model or specifications.
�The table above shows the main equipment corresponding
to each fuse.
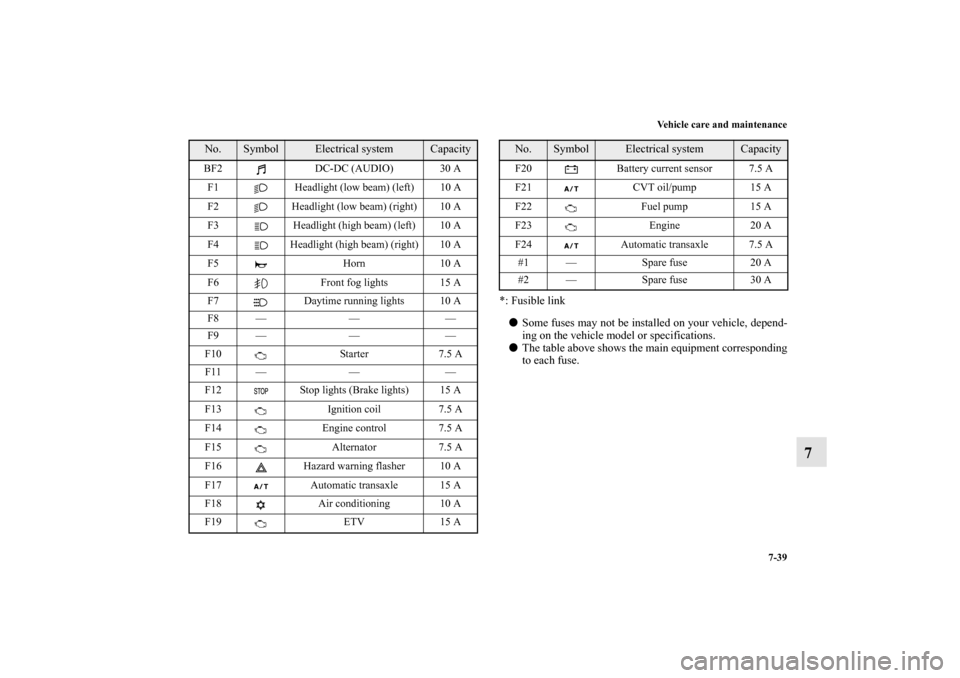
BF2 DC-DC (AUDIO) 30 A
F1 Headlight (low beam) (left) 10 A
F2 Headlight (low beam) (right) 10 A
F3 Headlight (high beam) (left) 10 A
F4 Headlight (high beam) (right) 10 A
F5 Horn 10 A
F6 Front fog lights 15 A
F7 Daytime running lights 10 A
F8 — — —
F9 — — —
F10 Starter 7.5 A
F11 — — —
F12 Stop lights (Brake lights) 15 A
F13 Ignition coil 7.5 A
F14 Engine control 7.5 A
F15 Alternator 7.5 A
F16 Hazard warning flasher 10 A
F17 Automatic transaxle 15 A
F18 Air conditioning 10 A
F19 ETV 15 ANo.
Symbol
Electrical system
Capacity
F20 Battery current sensor 7.5 A
F21 CVT oil/pump 15 A
F22 Fuel pump 15 A
F23 Engine 20 A
F24 Automatic transaxle 7.5 A
#1 — Spare fuse 20 A
#2 — Spare fuse 30 ANo.
Symbol
Electrical system
Capacity
BK0162600US.book 39 ページ 2013年3月22日 金曜日 午後2時41分
Page 417 of 460

Vehicle care and maintenance
7-43
7 Replacement of light bulbs
N00942900349
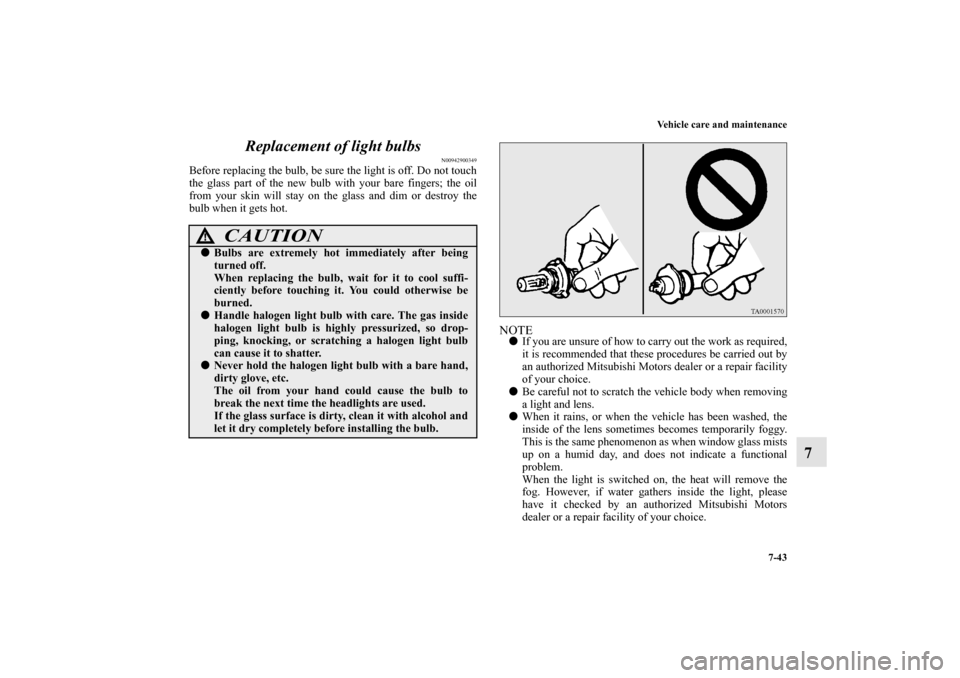
Before replacing the bulb, be sure the light is off. Do not touch
the glass part of the new bulb with your bare fingers; the oil
from your skin will stay on the glass and dim or destroy the
bulb when it gets hot.
NOTE�If you are unsure of how to carry out the work as required,
it is recommended that these procedures be carried out by
an authorized Mitsubishi Motors dealer or a repair facility
of your choice.
�Be careful not to scratch the vehicle body when removing
a light and lens.
�When it rains, or when the vehicle has been washed, the
inside of the lens sometimes becomes temporarily foggy.
This is the same phenomenon as when window glass mists
up on a humid day, and does not indicate a functional
problem.
When the light is switched on, the heat will remove the
fog. However, if water gathers inside the light, please
have it checked by an authorized Mitsubishi Motors
dealer or a repair facility of your choice.
CAUTION
!�Bulbs are extremely hot immediately after being
turned off.
When replacing the bulb, wait for it to cool suffi-
ciently before touching it. You could otherwise be
burned.�Handle halogen light bulb with care. The gas inside
halogen light bulb is highly pressurized, so drop-
ping, knocking, or scratching a halogen light bulb
can cause it to shatter.�Never hold the halogen light bulb with a bare hand,
dirty glove, etc.
The oil from your hand could cause the bulb to
break the next time the headlights are used.
If the glass surface is dirty, clean it with alcohol and
let it dry completely before installing the bulb.
BK0162600US.book 43 ページ 2013年3月22日 金曜日 午後2時41分
Page 418 of 460
7-44 Vehicle care and maintenance
7
Bulb capacity
N00943000132
The bulb should only be replaced with a new bulb with the
same rating and type. The type and rating are listed on the base
of the bulb.Outside
N00950300876
NOTE�It is not possible to repair or replace only the bulb for the
side turn signal light.
Check with an authorized Mitsubishi Motors dealer or a
repair facility of your choice when the light needs to be
repaired or replaced.
Front
Description
Wattage
ANSI Trade
No. or Bulb
type
1 Front turn signal light 27 W #1156NA
2 Headlight/Daytime running light
(if so equipped)60/55 W HB2
3 Parking light 5 W W5W
4 Front fog light (if so equipped) 55 W H11
5 Front side-marker light 5 W W5W
6 Side turn signal light 5 W —
BK0162600US.book 44 ページ 2013年3月22日 金曜日 午後2時41分