Page 126 of 226
126 Use Bluetooth Audio
Switch Playback Mode
Repeat playback, random playback, and scan
playback are possible.
* This function cannot be used when AVRCP
is v1.0.
1On the Bluetooth audio
playback information screen or
other screen, touch
▲ .
This displays the sub-menu.
2Touch the “mode” to change to.
3Touch ▼ .
▼
Playback in the selected mode starts.
Play Mode
* Depending on the type of Bluetooth-capable
audio devices, the details of playback modes
may differ.
Repeat Each time this is touched, the
mode switches in the order
“Repeat”, “Group repeat”, “All
repeat”, and “Cancel”.
Repeat: Repeat playback of the
track currently being played.
Group repeat: Repeat
playback of the tracks within the
group currently being played.
All repeat: Repeat playback
of all the tracks in the Bluetooth-
capable audio device.
Scan Each time this is touched, the
mode switches in the order
“Scan”, “Group scan”, and
“Cancel”.
Scan: Play the first 10 seconds
of each of the tracks in the group
currently being played in order.
Group scan: Play the first 10
seconds of the first track in all the
groups on the Bluetooth-capable
audio device.
Random Each time this is touched, the
mode switches in the order
“Random”, “Group random”, and
“Cancel”.
Random: Play tracks in the
group currently being played in a
random order.
Group random: Select all the
groups on the Bluetooth-capable
audio device in a random order
and play tracks within in group in
order.
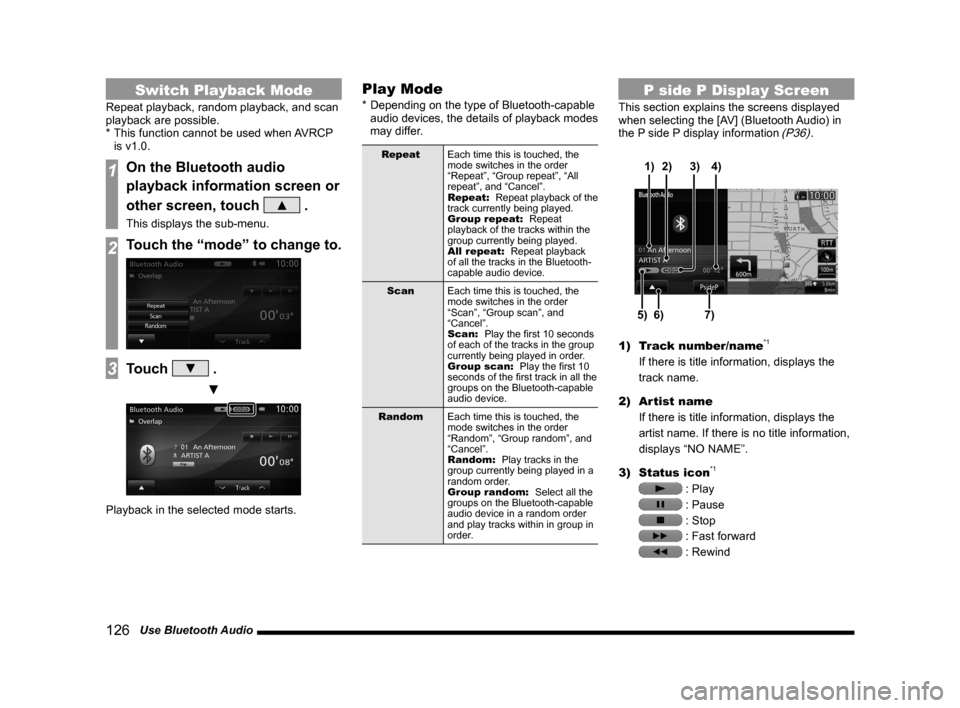
P side P Display Screen
This section explains the screens displayed
when selecting the [AV] (Bluetooth Audio) in
the P side P display information
(P36).
6)5)7)
3)
2)
4)
1)
1) Track number/name*1
If there is title information, displays the
track name.
2) Artist name
If there is title information, displays the
artist name. If there is no title information,
displays “NO NAME”.
3) Status icon
*1
: Play
: Pause
: Stop
: Fast forward
: Rewind
Page 128 of 226
128 Use AUX
Equipment by type
Use AUX
By connecting AUX devices to this product,
you can input audio from these devices to
the product and play it back.
CAUTION
• Video from AUX devices cannot be
viewed.
• If this is used with the engine stopped,
it may run down the battery and make it
impossible to start the engine.
ADVICE
• Please refer to your vehicle's user
manual regarding how to connect AUX
devices.
Outputting Audio
1Press the MODE key.
This displays the mode.
2Touch AUX .
▼
This outputs the audio from the AUX device.
Page 139 of 226
Trip 139
INFO/SETTINGS INFO
3Touch Lap .
▼
The current measurement results are
recorded in “A”.
4Touch Stop .
▼
The measurement is stopped and the
measurement results are recorded in the
totals list.
ADVICE
• In Step 3, if you touch [Lap] again, the
measurement results in “A” are recorded
in “B”, and the previous measurement
results are recorded in “A”. In this
way, each time you touch “Lap”, the
measurement results are moved down
“A”, “B”, “C”, and “D”.
• After stopping in Step 4, if you touch
[Start], measurement resumes.
NOTE
• During measurement, if you switch
the ignition key to OFF, measurement
is stopped. At this time, if you return
the ignition key to ON, measurement
resumes.
Delete Lap Times
This deletes the recorded measurement
results.
1On the lap time screen, touch
Reset .
▼
Deletion of the recorded measurement results
is complete.
Page 144 of 226
144 Mobile Phone
5Touch Back .
▼
Registration in the vehicle phonebook is
complete.
Registering from Mobile
Phone
You can register each entry in the phonebook
in your mobile phone into the vehicle
phonebook one by one. Also, you can view all
the entries in the phonebook in your mobile
phone from the mobile phonebook.
WARNING
• Stop your car in a safe location before
starting loading of the phonebook from
your mobile phone.
NOTE
• For details on how to operate your mobile
phone, please refer to the user manual
for your mobile phone.
• Normal data transfer may be impossible
with some types of mobile phones.
• The only data that can be transferred is
home, work, and mobile phone numbers.
• It takes about 3 minutes for the transfer to
complete. However, this depends on the
number of telephone numbers registered
in your mobile phone.
• If there is already a mobile phonebook
loaded in this product, loading a
phonebook overwrites it.
• Up to 32 entries can be registered in the
vehicle phonebook.
• Up to 1000 entries can be displayed in
the mobile phonebook.
• Telephone numbers in the mobile
phonebook cannot be registered, edited,
or deleted from this product.
• In order to load only 1 entry, your mobile
phone must support OPP (Object Push
Profiles).
• In order to load all the entries, your
mobile phone must support PBAP (Phone
Book Access Profiles).
Page 146 of 226
146 Mobile Phone
Deleting a Phonebook
You can delete a phonebook that has been
registered.
1Display the vehicle phonebook
screen.
→“Display the Phonebook”(P143)
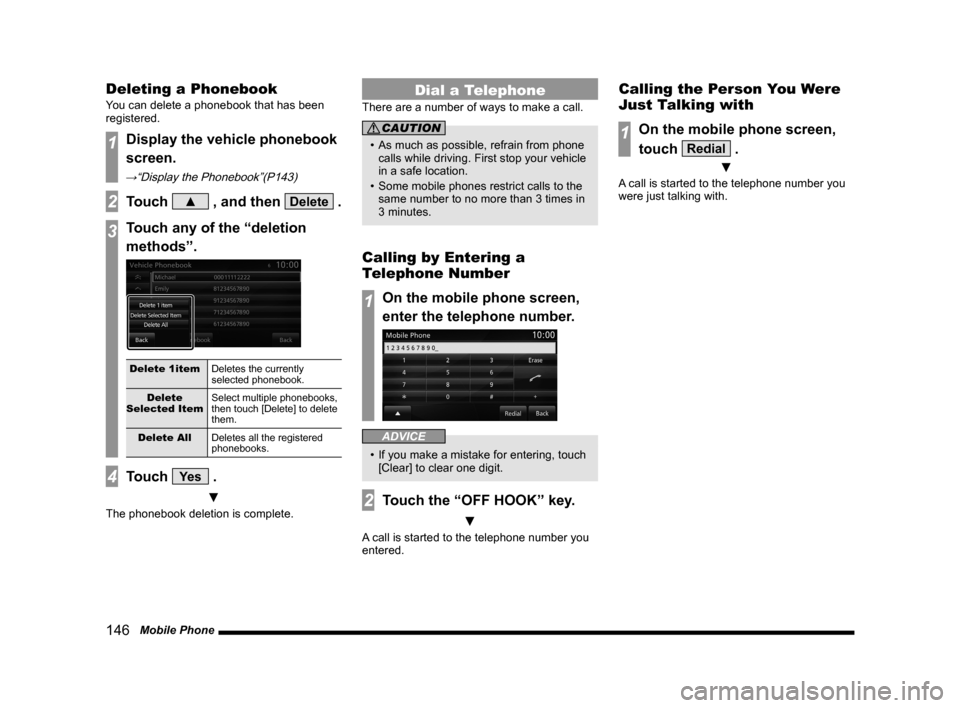
2Touch ▲ , and then Delete .
3Touch any of the “deletion
methods”.
Delete 1item Deletes the currently
selected phonebook.
Delete
Selected Item Select multiple phonebooks,
then touch [Delete] to delete
them.
Delete All Deletes all the registered
phonebooks.
4Touch Ye s .
▼
The phonebook deletion is complete.
Dial a Telephone
There are a number of ways to make a call.
CAUTION
• As much as possible, refrain from phone
calls while driving. First stop your vehicle
in a safe location.
• Some mobile phones restrict calls to the
same number to no more than 3 times in
3 minutes.
Calling by Entering a
Telephone Number
1On the mobile phone screen,
enter the telephone number.
ADVICE
• If you make a mistake for entering, touch
[Clear] to clear one digit.
2Touch the “OFF HOOK” key.
▼
A call is started to the telephone number you
entered.
Calling the Person You Were
Just Talking with
1On the mobile phone screen,
touch
Redial .
▼
A call is started to the telephone number you
were just talking with.
Page 166 of 226
166 Voice Control
About the Learning Function
The voice control system has a learning
function. (This function cannot be used by
voice control systems using a Bluetooth
®
2.0 interface.) This learning function inputs
the driver's voice and way of speaking, and
makes voice recognition easier.
Also, the learned data can be reset (deleted), so
reset the data if the user will change for a long
period of time.
→“Voice control settings” (P212)
Skip Audio Guide
During audio guide, press the “SPEECH” key
again to skip the guide.
End Voice Control
• To stop voice control after starting up,
execute one of the following procedures.
- Press and hold down “SPEECH” key.
- Press a key such as
MODE key.
• If you do not speak after starting up voice
control, the system will automatically be in
pause mode.
(Press the “SPEECH” key again to restart
voice control.) If there is no operation for
a while in pause mode, voice control will
automatically end.
• If voice control is forced to shut down such
as by pressing the
MODE key, the voice
control cannot restart from where you left off.
Page 181 of 226
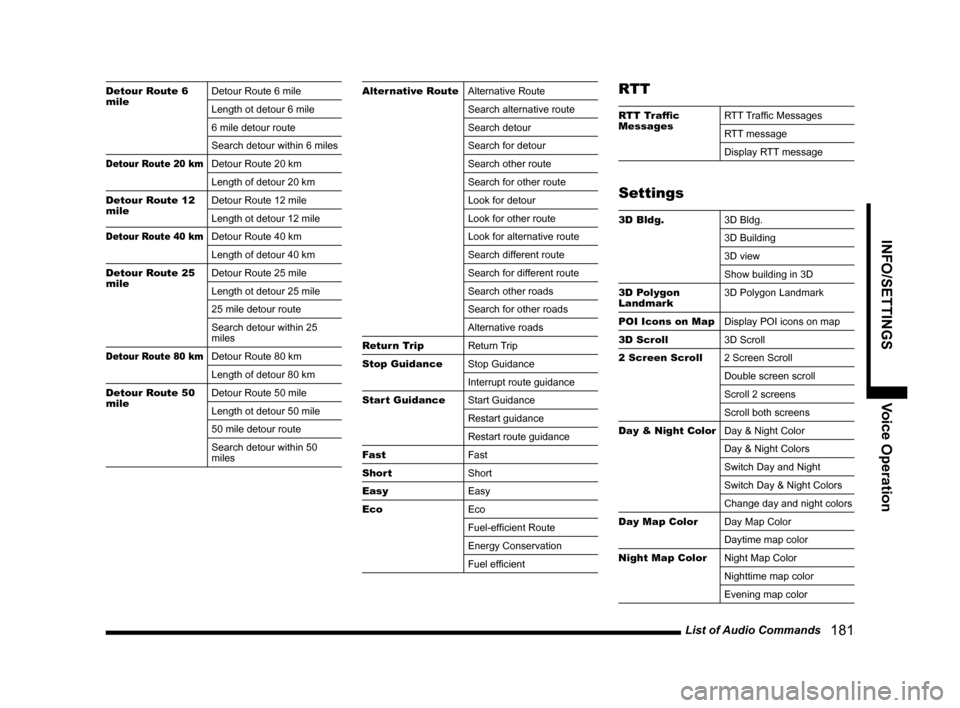
List of Audio Commands 181
INFO/SETTINGSVoice Operation
Detour Route 6
mileDetour Route 6 mile
Length ot detour 6 mile
6 mile detour route
Search detour within 6 miles
Detour Route 20 kmDetour Route 20 km
Length of detour 20 km
Detour Route 12
mile Detour Route 12 mile
Length ot detour 12 mile
Detour Route 40 kmDetour Route 40 km
Length of detour 40 km
Detour Route 25
mile Detour Route 25 mile
Length ot detour 25 mile
25 mile detour route
Search detour within 25
miles
Detour Route 80 kmDetour Route 80 km
Length of detour 80 km
Detour Route 50
mile Detour Route 50 mile
Length ot detour 50 mile
50 mile detour route
Search detour within 50
miles
Alternative Route
Alternative Route
Search alternative route
Search detour
Search for detour
Search other route
Search for other route
Look for detour
Look for other route
Look for alternative route
Search different route
Search for different route
Search other roads
Search for other roads
Alternative roads
Return Trip Return Trip
Stop Guidance Stop Guidance
Interrupt route guidance
Start Guidance Start Guidance
Restart guidance
Restart route guidance
Fast Fast
Short Short
Easy Easy
Eco Eco
Fuel-efficient Route
Energy Conservation
Fuel efficientRTT
RTT Traffic
MessagesRTT Traffic Messages
RTT message
Display RTT message
Settings
3D Bldg.
3D Bldg.
3D Building
3D view
Show building in 3D
3D Polygon
Landmark 3D Polygon Landmark
POI Icons on Map Display POI icons on map
3D Scroll 3D Scroll
2 Screen Scroll 2 Screen Scroll
Double screen scroll
Scroll 2 screens
Scroll both screens
Day & Night Color Day & Night Color
Day & Night Colors
Switch Day and Night
Switch Day & Night Colors
Change day and night colors
Day Map Color Day Map Color
Daytime map color
Night Map Color Night Map Color
Nighttime map color
Evening map color
Page 191 of 226
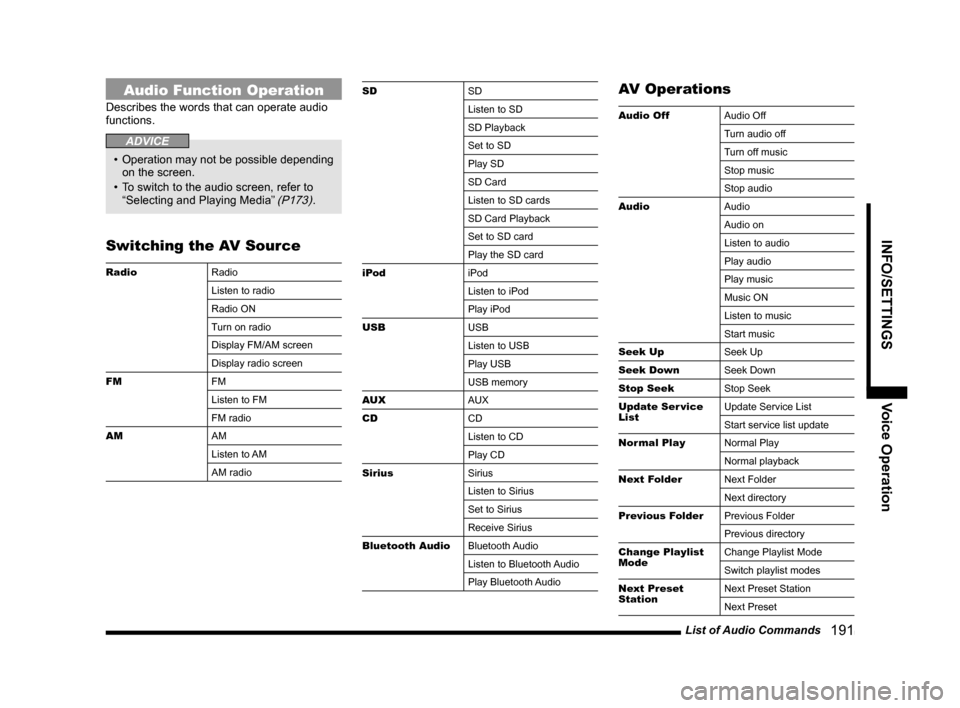
List of Audio Commands 191
INFO/SETTINGSVoice Operation
Audio Function Operation
Describes the words that can operate audio
functions.
ADVICE
• Operation may not be possible depending
on the screen.
• To switch to the audio screen, refer to
“Selecting and Playing Media”
(P173).
Switching the AV Source
Radio Radio
Listen to radio
Radio ON
Turn on radio
Display FM/AM screen
Display radio screen
FM FM
Listen to FM
FM radio
AM AM
Listen to AM
AM radio
SDSD
Listen to SD
SD Playback
Set to SD
Play SD
SD Card
Listen to SD cards
SD Card Playback
Set to SD card
Play the SD card
iPod iPod
Listen to iPod
Play iPod
USB USB
Listen to USB
Play USB
USB memory
AUX AUX
CD CD
Listen to CD
Play CD
Sirius Sirius
Listen to Sirius
Set to Sirius
Receive Sirius
Bluetooth Audio Bluetooth Audio
Listen to Bluetooth Audio
Play Bluetooth AudioAV Operations
Audio OffAudio Off
Turn audio off
Turn off music
Stop music
Stop audio
Audio Audio
Audio on
Listen to audio
Play audio
Play music
Music ON
Listen to music
Start music
Seek Up Seek Up
Seek Down Seek Down
Stop Seek Stop Seek
Update Ser vice
List Update Service List
Start service list update
Normal Play Normal Play
Normal playback
Next Folder Next Folder
Next directory
Previous Folder Previous Folder
Previous directory
Change Playlist
Mode Change Playlist Mode
Switch playlist modes
Next Preset
Station Next Preset Station
Next Preset