2014 MITSUBISHI LANCER lock
[x] Cancel search: lockPage 3 of 88

INFO/SETTINGS
INFO 66
Mobile Phone ................................... 66
Connect Your Mobile Phone ........................66
Display the Phonebook ................................ 67
Register in Phonebook ................................ 67
Edit a Phonebook ........................................ 68
Dial a Telephone .......................................... 69
Incoming Calls ............................................. 70
Setting Passcode ......................................... 71
Other Info ........................................ 72
Camera ........................................................ 72
Version Info .................................................. 72
SETTINGS 73
Adjust the Sound Quality ................73
Setting Items ................................................ 73
System Settings .............................. 75
Sound .......................................................... 75
Time Setting ................................................. 76
Language ..................................................... 76
AUX Setting ................................................. 77
Other Settings ................................. 78
Display Off ................................................... 78
Color Contrast ............................................. 78
Clock Screen ............................................... 79
Radio Setting ............................................... 80
Bluetooth Setting ......................................... 81
Other
Troubleshooting ..............................83
If This Message Appears... .......................... 83
If You Think Something Is Not Working Properly... .......85
13MY_AVC(NAS).indb 32013/02/14 10:57:16
Page 8 of 88

8 Important Points on Safety for the Customer
Important Points
on Safety for the
Customer
This product features a number of pictorial
indications as well as points concerning
handling so that you can use the product
correctly and in a safe manner, as well as
prevent injury or damage to yourself, other
users, or property.
WARNINGThis indicates details
regarding handling of the
product that if ignored, could
be expected to result in death
or serious injury.
CAUTIONThis indicates details
regarding handling of the
product that if ignored, could
be expected to result in
personal injury or property
loss.
WARNING
• The driver should not pay close attention to the images on the
screen while driving.
This may prevent the driver looking where
they are going, and cause an accident.
• The driver should not perform complicated operations while
driving.
Performing complicated operations while
driving may prevent the driver looking
where they are going, and cause an
accident.
Therefore stop the vehicle in a safe
location before performing such
operations.
• Do not use during malfunctions, such as when the screen does
not light up or no sound is
audible.
This may lead to accident, fire, or electric
shock.
• Ensure water or other foreign objects do not enter the product.
This may lead to smoking, fire, electric
shock, or malfunction.
• Do not insert foreign objects into the disc slot.
This may lead to fire, electric shock, or
malfunction.
WARNING
• In the event of abnormalities
occurring when foreign objects
or water enter the product,
resulting in smoke or a strange
smell, immediately stop using
the product, and consult an
authorized Mitsubishi Motors
dealer or a repair facility of your
choice.
Continuing to use the product may result
in accident, fire, or electric shock.
• Do not disassemble or modify the product.
This may lead to malfunction, fire, or
electric shock.
• During thunderstorms, do not touch the antenna or the front
panel.
This may lead to electrical shock from
lightning.
CAUTION
• Do not block ventilation holes or heat sinks on the product.
Blocking ventilation holes or heat sinks
may prevent heat from escaping from
within the product, leading to fire or
malfunction.
• Do not turn the volume up to the extent that you cannot hear
sounds from outside the vehicle
while driving.
Driving without being able to hear sounds
from outside the vehicle may result in an
accident.
• Do not insert your hand or fingers into the disc slot.
This may result in injury.
13MY_AVC(NAS).indb 82013/02/14 10:57:19
Page 12 of 88
![MITSUBISHI LANCER 2014 8.G Display Audio Manual 12 Top Menu
Top Menu
By pressing the [MENU] key to display the top menu, then selecting a sou\
rce from that menu,
you can use various functions.
Display Contents
TOP
5)6)7)9)8)
1)2) 3)4)
2nd TOP
1 MITSUBISHI LANCER 2014 8.G Display Audio Manual 12 Top Menu
Top Menu
By pressing the [MENU] key to display the top menu, then selecting a sou\
rce from that menu,
you can use various functions.
Display Contents
TOP
5)6)7)9)8)
1)2) 3)4)
2nd TOP
1](/manual-img/19/7457/w960_7457-11.png)
12 Top Menu
Top Menu
By pressing the [MENU] key to display the top menu, then selecting a sou\
rce from that menu,
you can use various functions.
Display Contents
TOP
5)6)7)9)8)
1)2) 3)4)
2nd TOP
10)11)12)13)
1) FM (P25)
Allows you to use the FM radio function.
2)
AM (P25)
Allows you to use the AM radio function.
3)
SIRIUS *7 (P32)
Allows you to use the satellite radio
function.
4) Clock
Displays the current time using 24-hour
time or 12-hour time.
5)
CD
Plays media inserted into this product.
Audio CD
(P41)
Audio files (MP3/WMA/AAC)
(P44)
6) USB/iPod *1
When an iPod is connected to this
product,
iPod is displayed and when you
touch this, the iPod screen is displayed.
(P52)
When a USB device is connected to this
product,
USB is displayed and when you
touch this, the USB screen is displayed.
(P57)
When nothing is connected to this product,
USB/iPod is displayed.
7)
BT Audio *2(P62)
When a Bluetooth-capable audio device
is connected to this product, the Bluetooth
audio function can be used. 8)
Next
Displays the top menu (2nd top).
9)
Voice *3(P17)
Allows you to use the voice control
function.
10)
AUX *1, *4, *5(P65)
When an external input device is connected to this product, the audio from
the external input device is played.
11)
Phone *6(P66)
Allows you to make and receive telephone
calls.
12)
Setting (P73)
Displays the settings screen, on which you
can make various settings for this product.
13)
Back
Displays the top menu (top).
*1) An iPod and external input cable (both available separately) are required.
*2) Requires a separately-purchased Bluetooth-
capable audio device in
Equipment by type (vehicles
with a Bluetooth® 2.0 interface).
*3) Can be used with Equipment by type (vehicles with a
Bluetooth® 2.0 interface).
*4) Equipment by type Even when no external input
cable or AUX device (both available separately)
is connected to this product, [AUX] is displayed,
but touching it does not output any audio.
*5)
Equipment by type Not displayed for vehicles that do
not support AUX devices.
*6) Requires a separately-purchased Bluetooth-
capable mobile phone in
Equipment by type (vehicles
with a Bluetooth® 2.0 interface).
*7) Equipment by type Requires a satellite tuner
connection.
13MY_AVC(NAS).indb 122013/02/14 10:57:23
Page 14 of 88

14 Basic Operation
AV
The following explains audio function operations.
Audio Functions
Basic Operation
NOTE
• The album names, titles, etc. in the title information in pictures used with the
audio functions and related functions
of this manual were prepared for these
explanations. They have no relationship
whatsoever with actual title information.
Switch Audio ON/OFF
You can switch the audio function ON/OFF.
ADVICE
• Hold down the steering [MODE] key to also turn the audio function ON/OFF.
1Press the PWR/VOL key.
▼
This switches the audio function OFF.
2Press the PWR/VOL key.
▼
The audio function is switched ON and the
audio source screen last used is displayed.
Adjust Volume
Adjust the audio function volume.
1During audio play, turn the
PWR/VOL key counter-
clockwise.
▼
The volume is lowered.
2Turn the PWR/VOL key
clockwise.
▼
The volume is raised.
13MY_AVC(NAS).indb 142013/02/14 10:57:25
Page 34 of 88

34 Listen to Satellite Radio
Display the Sub-menu
You can operate a scan and set Skip and
Lock.
1On the SIRIUS broadcast
information screen, touch
▲ .
▼
This displays the sub-menu.
ScanAllows you to search for channels
that can be received.
→“Begin Scanning All Channels” (P35)
Scan ListAllows you to search for channels
that can be received within a
category.
→“Begin Scanning Channels by
Category” (P36)
SIRIUS ID Allows you to confirm the SIRIUS
ID.
→“The SIRIUS ID is displayed.” (P40)
Sound Control Allows you to adjust the sound
quality.
→“Adjust the Sound Quality” (P73)
SkipAllows you to set Skip on a
channel being received.
→“Set the Channel Skip” (P39)
Lock Allows you to set Lock on a
channel being received.
→“Setting Listening Restrictions” (P37)
Direct Allows you to enter the channel
number and receive the channel
directly.
→“Selecting Channels Directly” (P35)
* The sub-menu items are different depending on
the screen displayed.
Search for Your Favorite
Channel.
Searching from a Channel List
1On the SIRIUS broadcast
information screen, touch
Channel List .
2Touch the “channel” you want.
▼
The selected channel is received.
13MY_AVC(NAS).indb 342013/02/14 10:57:36
Page 37 of 88

Listen to Satellite Radio 37
AVRadio
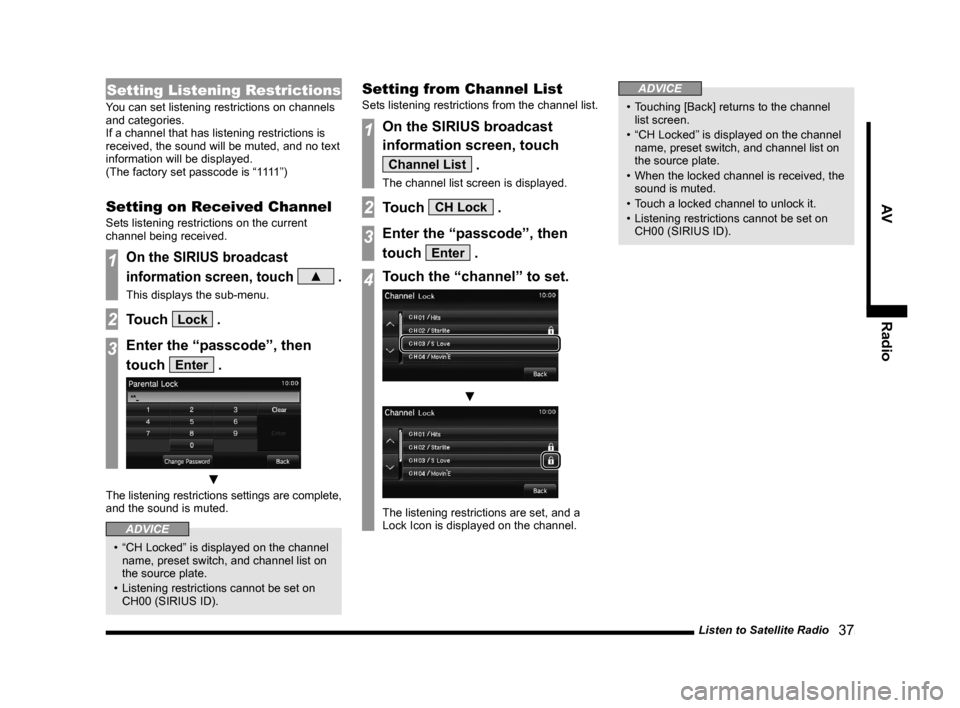
Setting Listening Restrictions
You can set listening restrictions on channels
and categories.
If a channel that has listening restrictions is
received, the sound will be muted, and no text
information will be displayed.
(The factory set passcode is “1111”)
Setting on Received Channel
Sets listening restrictions on the current
channel being received.
1On the SIRIUS broadcast
information screen, touch
▲ .
This displays the sub-menu.
2Touch Lock .
3Enter the “passcode”, then
touch
Enter .
▼
The listening restrictions settings are complete,
and the sound is muted.
ADVICE
• “CH Locked” is displayed on the channel
name, preset switch, and channel list on
the source plate.
• Listening restrictions cannot be set on CH00 (SIRIUS ID).
Setting from Channel List
Sets listening restrictions from the channel list.
1On the SIRIUS broadcast
information screen, touch
Channel List .
The channel list screen is displayed.
2Touch CH Lock .
3Enter the “passcode”, then
touch
Enter .
4Touch the “channel” to set.
▼
The listening restrictions are set, and a
Lock Icon is displayed on the channel.
ADVICE
• Touching [Back] returns to the channel list screen.
• “CH Locked” is displayed on the channel name, preset switch, and channel list on
the source plate.
• When the locked channel is received, the sound is muted.
• Touch a locked channel to unlock it.
• Listening restrictions cannot be set on CH00 (SIRIUS ID).
13MY_AVC(NAS).indb 372013/02/14 10:57:38
Page 38 of 88

38 Listen to Satellite Radio
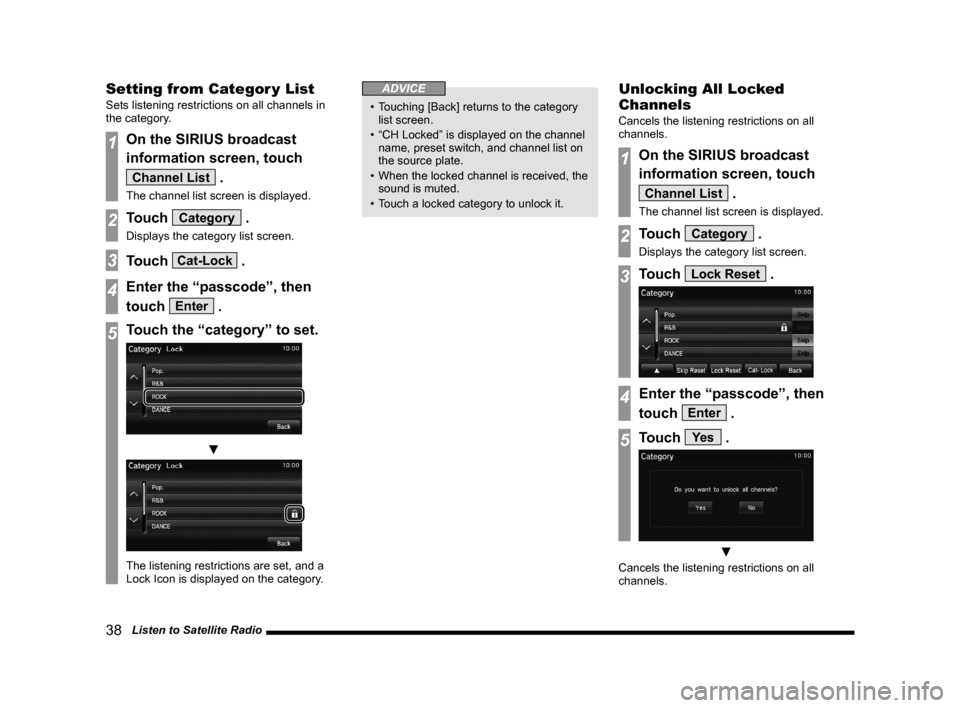
Setting from Categor y List
Sets listening restrictions on all channels in
the category.
1On the SIRIUS broadcast
information screen, touch
Channel List .
The channel list screen is displayed.
2Touch Category .
Displays the category list screen.
3Touch Cat-Lock .
4Enter the “passcode”, then
touch
Enter .
5Touch the “category” to set.
▼
The listening restrictions are set, and a
Lock Icon is displayed on the category.
ADVICE
• Touching [Back] returns to the category list screen.
• “CH Locked” is displayed on the channel name, preset switch, and channel list on
the source plate.
• When the locked channel is received, the sound is muted.
• Touch a locked category to unlock it.
Unlocking All Locked
Channels
Cancels the listening restrictions on all
channels.
1On the SIRIUS broadcast
information screen, touch
Channel List .
The channel list screen is displayed.
2Touch Category .
Displays the category list screen.
3Touch Lock Reset .
4Enter the “passcode”, then
touch
Enter .
5Touch Ye s .
▼
Cancels the listening restrictions on all
channels.
13MY_AVC(NAS).indb 382013/02/14 10:57:39
Page 39 of 88

Listen to Satellite Radio 39
AVRadio
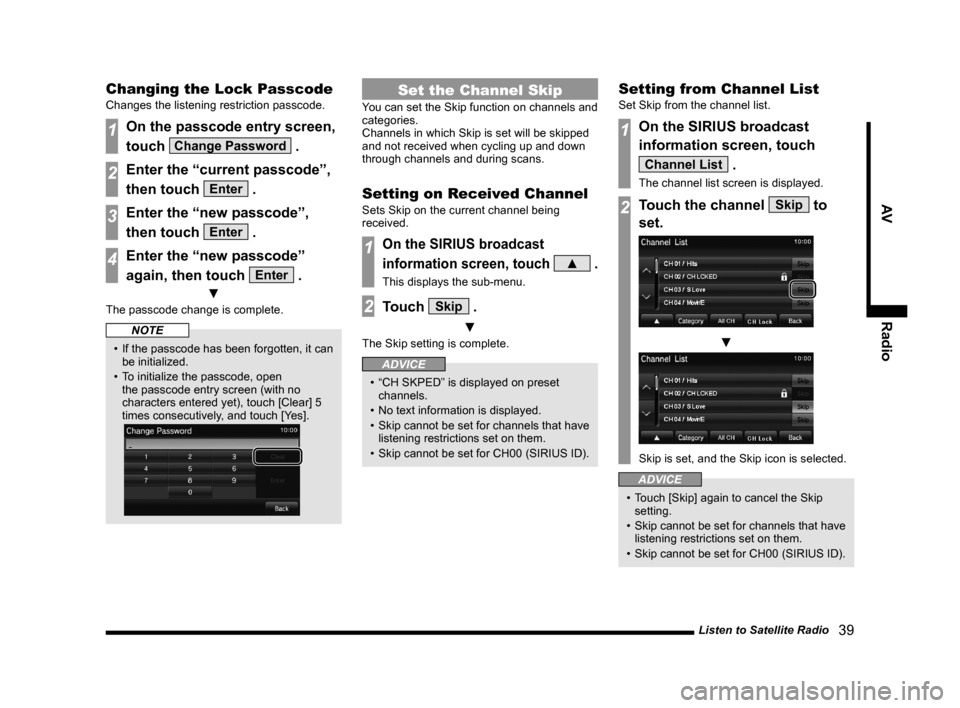
Changing the Lock Passcode
Changes the listening restriction passcode.
1On the passcode entry screen,
touch
Change Password .
2Enter the “current passcode”,
then touch
Enter .
3Enter the “new passcode”,
then touch
Enter .
4Enter the “new passcode”
again, then touch
Enter .
▼
The passcode change is complete.
NOTE
• If the passcode has been forgotten, it can
be initialized.
• To initialize the passcode, open the passcode entry screen (with no
characters entered yet), touch [Clear] 5
times consecutively, and touch [Yes].
Set the Channel Skip
You can set the Skip function on channels and
categories.
Channels in which Skip is set will be skipped
and not received when cycling up and down
through channels and during scans.
Setting on Received Channel
Sets Skip on the current channel being
received.
1On the SIRIUS broadcast
information screen, touch
▲ .
This displays the sub-menu.
2Touch Skip .
▼
The Skip setting is complete.
ADVICE
• “CH SKPED” is displayed on preset channels.
• No text information is displayed.
• Skip cannot be set for channels that have listening restrictions set on them.
• Skip cannot be set for CH00 (SIRIUS ID).
Setting from Channel List
Set Skip from the channel list.
1On the SIRIUS broadcast
information screen, touch
Channel List .
The channel list screen is displayed.
2Touch the channel Skip to
set.
▼
Skip is set, and the Skip icon is selected.
ADVICE
• Touch [Skip] again to cancel the Skip setting.
• Skip cannot be set for channels that have listening restrictions set on them.
• Skip cannot be set for CH00 (SIRIUS ID).
13MY_AVC(NAS).indb 392013/02/14 10:57:40