2014 MITSUBISHI LANCER key
[x] Cancel search: keyPage 65 of 88
Use AUX 65
AVExternal Input Devices
Equipment by type
Use AUX
By connecting external input cables and
AUX devices to this product, you can play
back tracks on these devices through the
product.
CAUTION
• Connect an audio device with external
sound input mode cancelled, or with the
sound turned down.
• Even when no device is connected, the product will switch to AUX, therefore take
care with volume levels when no device
is connected.
• Video from AUX devices cannot be
viewed.
• If this is used with the engine stopped, it may run down the battery and make it
impossible to start the engine.
NOTE
• Depending on the audio device to be connected, background noise may be
emitted.
• For power, use the battery power source included in the audio device. Using the
connected audio device while charging
through the cigarette lighter socket in the
vehicle may lead to background noise
being emitted through the speakers.
• If no audio devices are connected, then do not select the external sound input
mode. If external sound input mode is
selected while no audio devices are
connected, then sound may be emitted
through the speakers.
• Please refer to your vehicle's user manual regarding how to connect AUX
devices.
Displaying
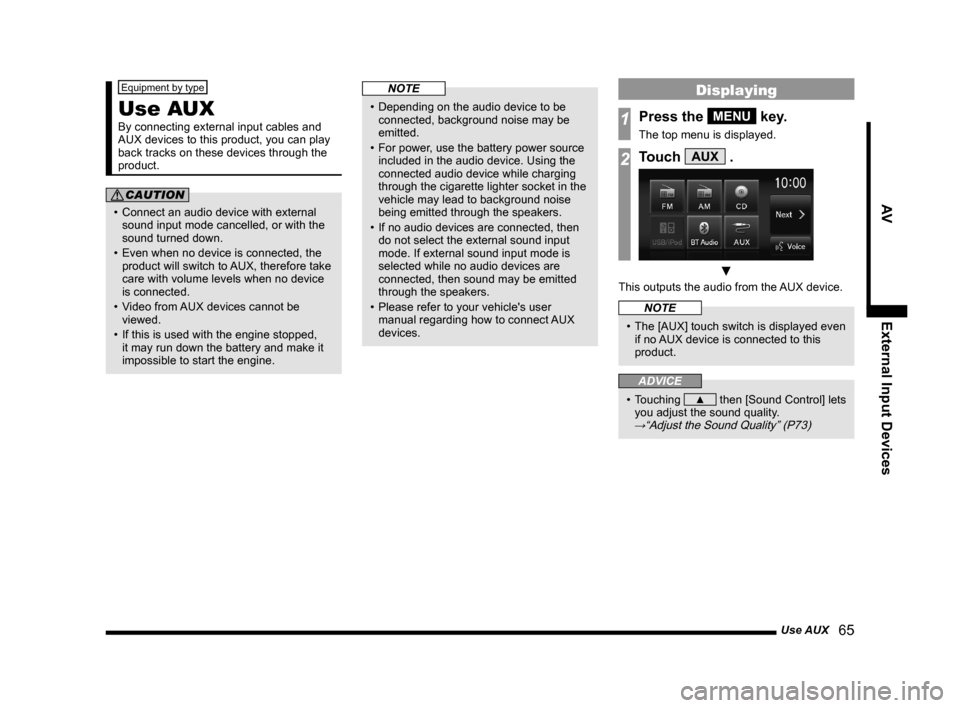
1Press the MENU key.
The top menu is displayed.
2Touch AUX .
▼
This outputs the audio from the AUX device.
NOTE
• The [AUX] touch switch is displayed even if no AUX device is connected to this
product.
ADVICE
• Touching ▲ then [Sound Control] lets
you adjust the sound quality.
→“Adjust the Sound Quality” (P73)
13MY_AVC(NAS).indb 652013/02/14 10:57:59
Page 67 of 88
Mobile Phone 67
INFO/SETTINGSINFO
Display the Phonebook
There is the vehicle phonebook registered in
this product and the mobile phonebook that
can receive the data in your mobile phone.
1Press the MENU key or touch
Phone .
The mobile phone screen is displayed.
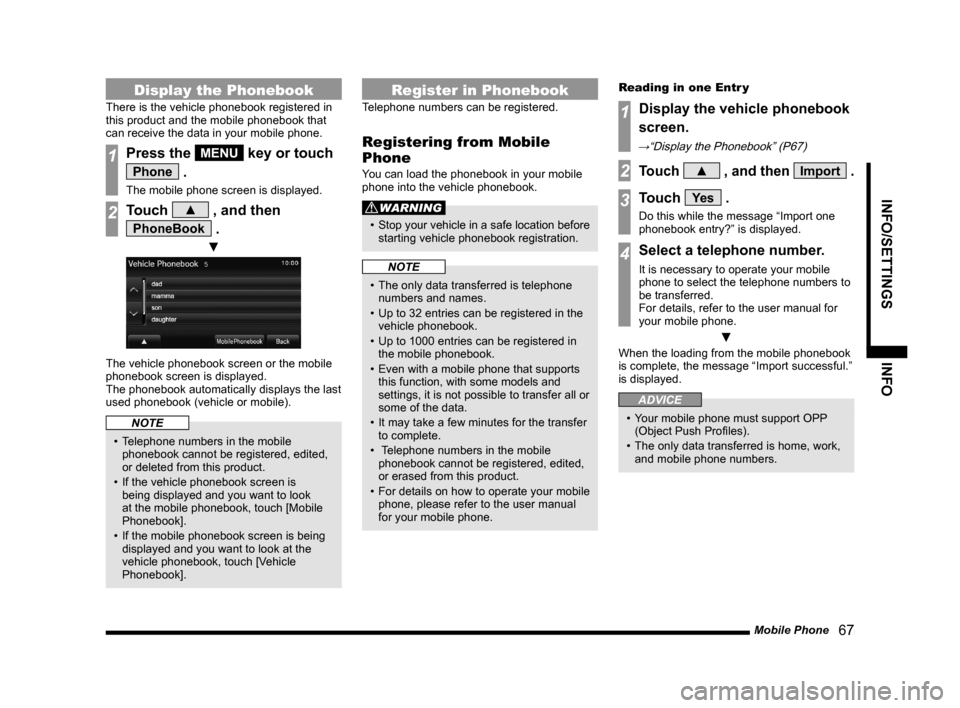
2Touch ▲ , and then
PhoneBook .
▼
The vehicle phonebook screen or the mobile
phonebook screen is displayed.
The phonebook automatically displays the last
used phonebook (vehicle or mobile).
NOTE
• Telephone numbers in the mobile
phonebook cannot be registered, edited,
or deleted from this product.
• If the vehicle phonebook screen is being displayed and you want to look
at the mobile phonebook, touch [Mobile
Phonebook].
• If the mobile phonebook screen is being displayed and you want to look at the
vehicle phonebook, touch [Vehicle
Phonebook].
Register in Phonebook
Telephone numbers can be registered.
Registering from Mobile
Phone
You can load the phonebook in your mobile
phone into the vehicle phonebook.
WARNING
• Stop your vehicle in a safe location before
starting vehicle phonebook registration.
NOTE
• The only data transferred is telephone numbers and names.
• Up to 32 entries can be registered in the vehicle phonebook.
• Up to 1000 entries can be registered in the mobile phonebook.
• Even with a mobile phone that supports this function, with some models and
settings, it is not possible to transfer all or
some of the data.
• It may take a few minutes for the transfer to complete.
• Telephone numbers in the mobile
phonebook cannot be registered, edited,
or erased from this product.
• For details on how to operate your mobile
phone, please refer to the user manual
for your mobile phone. Reading in one Entr y
1Display the vehicle phonebook
screen.
→“Display the Phonebook” (P67)
2Touch ▲ , and then Import .
3Touch Ye s .
Do this while the message “Import one
phonebook entry?” is displayed.
4Select a telephone number.
It is necessary to operate your mobile
phone to select the telephone numbers to
be transferred.
For details, refer to the user manual for
your mobile phone.
▼
When the loading from the mobile phonebook
is complete, the message “Import successful.”
is displayed.
ADVICE
• Your mobile phone must support OPP
(Object Push Profiles).
• The only data transferred is home, work, and mobile phone numbers.
13MY_AVC(NAS).indb 672013/02/14 10:58:00
Page 69 of 88
Mobile Phone 69
INFO/SETTINGSINFO
Deleting a Phonebook
You can delete a phonebook that has been
registered.
WARNING
• Stop your vehicle in a safe location
before deleting vehicle phonebook.
Deleting Only One Entr y
1Display the vehicle phonebook
screen.
→“Display the Phonebook” (P67)
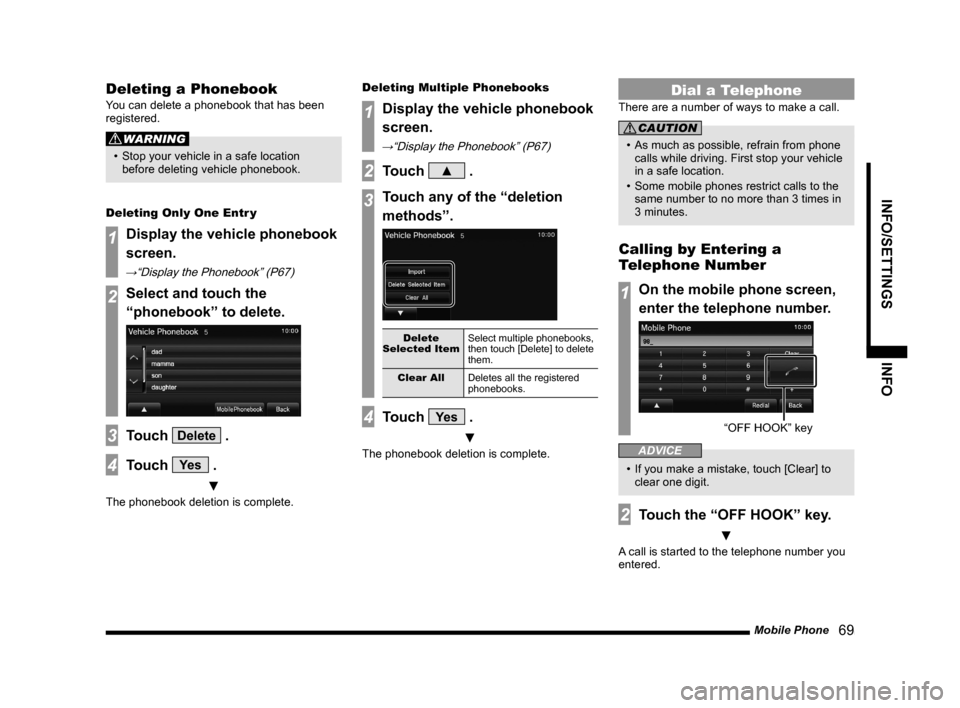
2Select and touch the
“phonebook” to delete.
3Touch Delete .
4Touch Ye s .
▼
The phonebook deletion is complete. Deleting Multiple Phonebooks
1Display the vehicle phonebook
screen.
→“Display the Phonebook” (P67)
2Touch ▲ .
3Touch any of the “deletion
methods”.
Delete
Selected Item Select multiple phonebooks,
then touch [Delete] to delete
them.
Clear All Deletes all the registered
phonebooks.
4Touch Ye s .
▼
The phonebook deletion is complete.
Dial a Telephone
There are a number of ways to make a call.
CAUTION
• As much as possible, refrain from phone
calls while driving. First stop your vehicle
in a safe location.
• Some mobile phones restrict calls to the same number to no more than 3 times in
3 minutes.
Calling by Entering a
Telephone Number
1On the mobile phone screen,
enter the telephone number.
“OFF HOOK” ke y
ADVICE
• If you make a mistake, touch [Clear] to
clear one digit.
2Touch the “OFF HOOK” key.
▼
A call is started to the telephone number you
entered.
13MY_AVC(NAS).indb 692013/02/14 10:58:01
Page 71 of 88
Mobile Phone 71
INFO/SETTINGSINFO
Answering an Incoming Call
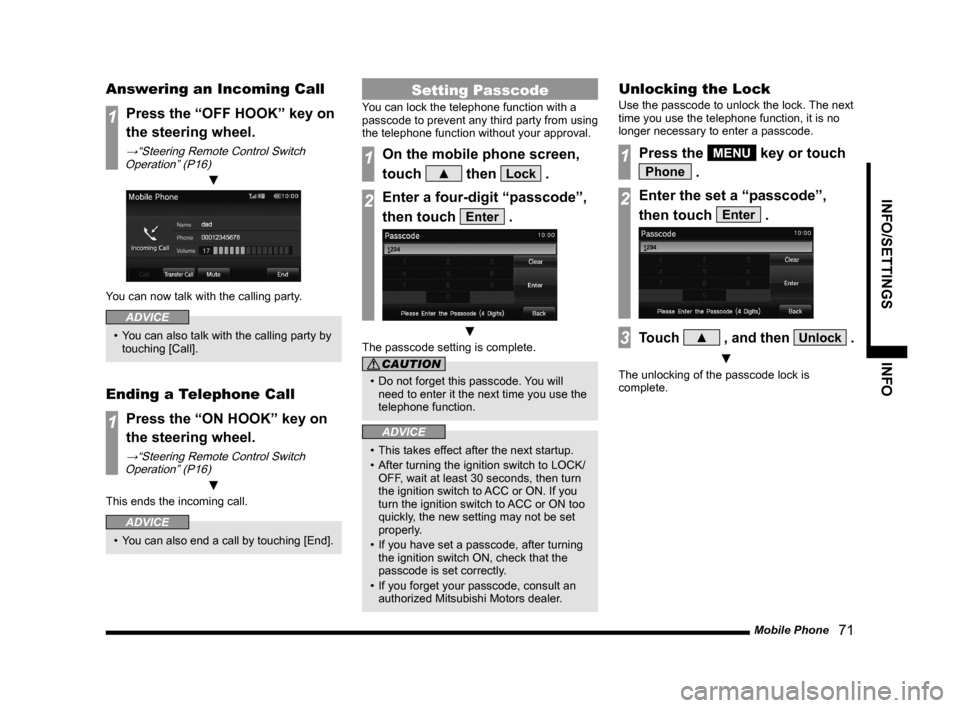
1Press the “OFF HOOK” key on
the steering wheel.
→“Steering Remote Control Switch
Operation” (P16)
▼
You can now talk with the calling party.
ADVICE
• You can also talk with the calling party by touching [Call].
Ending a Telephone Call
1Press the “ON HOOK” key on
the steering wheel.
→“Steering Remote Control Switch Operation” (P16)
▼
This ends the incoming call.
ADVICE
• You can also end a call by touching [End].
Setting Passcode
You can lock the telephone function with a
passcode to prevent any third party from using
the telephone function without your approval.
1On the mobile phone screen,
touch
▲ then Lock .
2Enter a four-digit “passcode”,
then touch
Enter .
▼
The passcode setting is complete.
CAUTION
• Do not forget this passcode. You will
need to enter it the next time you use the
telephone function.
ADVICE
• This takes effect after the next startup.
• After turning the ignition switch to LOCK/ OFF, wait at least 30 seconds, then turn
the ignition switch to ACC or ON. If you
turn the ignition switch to ACC or ON too
quickly, the new setting may not be set
properly.
• If you have set a passcode, after turning the ignition switch ON, check that the
passcode is set correctly.
• If you forget your passcode, consult an authorized Mitsubishi Motors dealer.
Unlocking the Lock
Use the passcode to unlock the lock. The next
time you use the telephone function, it is no
longer necessary to enter a passcode.
1Press the MENU key or touch
Phone .
2Enter the set a “passcode”,
then touch
Enter .
3Touch ▲ , and then Unlock .
▼
The unlocking of the passcode lock is
complete.
13MY_AVC(NAS).indb 712013/02/14 10:58:03
Page 72 of 88

72 Other Info
Other Info
Camera
When a rear view camera, available
separately, is connected, the picture from this
rear view camera can be displayed on the
display.
For details, refer to the user manual for the
vehicle.
1Move the gear shift position to
“R”.
▼
Displays the picture from the rear view
camera.
Version Info
Serial Number
You can check the serial number.
1Press the MENU key,
and touch
Setting
then
Version Info .
▼
Displays the Version Info screen.
Equipment by type
(Vehicles with a Bluetooth® 2.0 interface).
Gracenote Version
Allows you to check the Gracenote version.
1On the USB device playback
information screen or on the
list display, touch
▲ .
This displays the sub-menu.
2Touch Database .
▼
Displays the Gracenote Database version
screen.
13MY_AVC(NAS).indb 722013/02/14 10:58:03
Page 73 of 88
Adjust the Sound Quality 73
INFO/SETTINGSSETTINGS
SETTINGS
Adjust the Sound
Quality
Change audio quality settings.
NOTE
• You cannot adjust the sound quality when
the audio is OFF.
1Press the MENU key.
The top menu is displayed.
2Touch Setting .
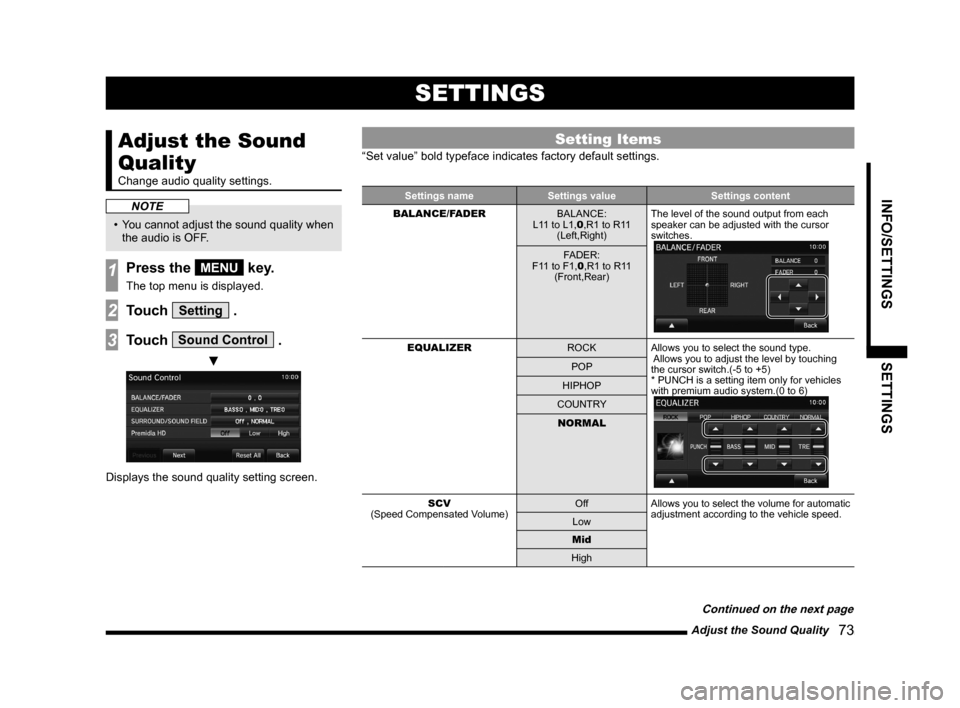
3Touch Sound Control .
▼
Displays the sound quality setting screen.
Setting Items
“Set value” bold typeface indicates factory default settings.
Settings name Settings value Settings content
BALANCE/FADER BALANCE:
L11 to L1,0 ,R1 to R11
(Left,Right) The level of the sound output from each
speaker can be adjusted with the cursor
switches.
FADER:
F11 to F1,0 ,R1 to R11
(Front,Rear)
EQUALIZER ROCKAllows you to select the sound type.
Allows you to adjust the level by touching
the cursor switch.(-5 to +5)
* PUNCH is a setting item only for vehicles
with premium audio system.(0 to 6)
POP
HIPHOP
COUNTRY NORMAL
SCV
(Speed Compensated Volume) Off
Allows you to select the volume for automatic
adjustment according to the vehicle speed.
Low
Mid
High
Continued on the next page
13MY_AVC(NAS).indb 732013/02/14 10:58:04
Page 75 of 88
System Settings 75
INFO/SETTINGSSETTINGS
System Settings
System related settings, such as the
operation sound and the time, can be made.
1Press the MENU key.
The top menu is displayed.
2Touch Setting , and then
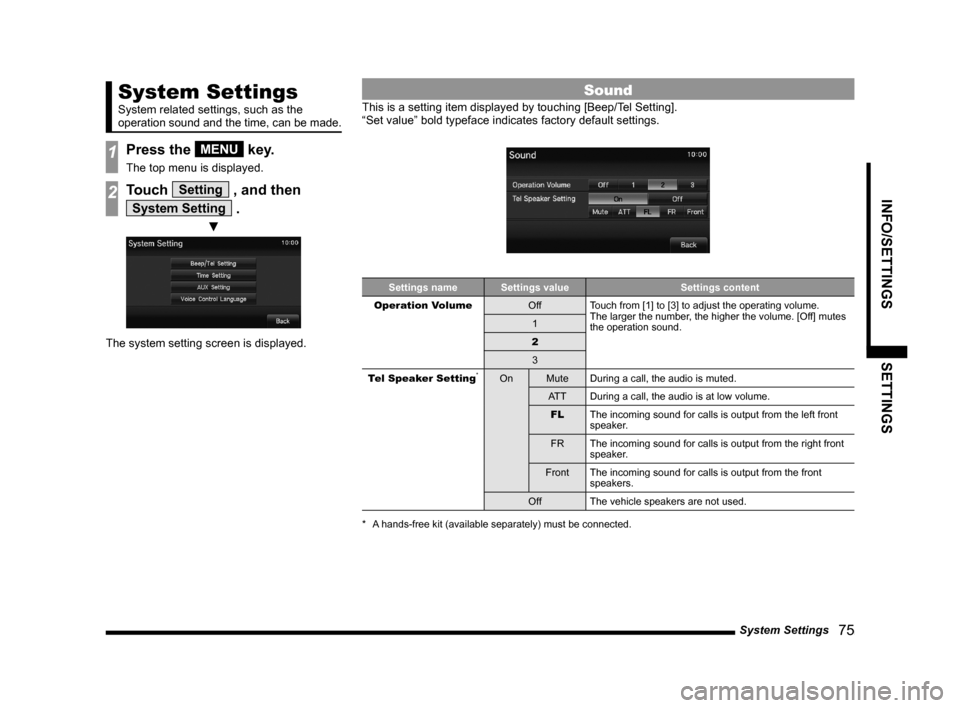
System Setting .
▼
The system setting screen is displayed.
Sound
This is a setting item displayed by touching [Beep/Tel Setting].
“Set value” bold typeface indicates factory default settings.
Settings nameSettings value Settings content
Operation Volume OffTouch from [1] to [3] to adjust the operating volume.
The larger the number, the higher the volume. [Off] mutes
the operation sound.
1
2 3
Tel Speaker Setting
*On MuteDuring a call, the audio is muted.
AT T During a call, the audio is at low volume.
FL The incoming sound for calls is output from the left front
speaker.
FR The incoming sound for calls is output from the right front
speaker.
Front The incoming sound for calls is output from the front
speakers.
Off The vehicle speakers are not used.
* A hands-free kit (available separately) must be connected.
13MY_AVC(NAS).indb 752013/02/14 10:58:04
Page 78 of 88
78 Other Settings
Other Settings
The setting can be made on the screen or
on the Bluetooth device.
Display Off
This turns off the screen display.
1Press the MENU key.
The top menu is displayed.
2Touch Setting , and then
Display Off .
▼
This turns off the screen display.
ADVICE
• To display it again, touch the screen or press the [MENU] key.
Color Contrast
You can adjust the color tone and brightness
for the menu screen and the rear view camera
picture.
1Press the MENU key.
The top menu is displayed.
2Touch Setting , and then
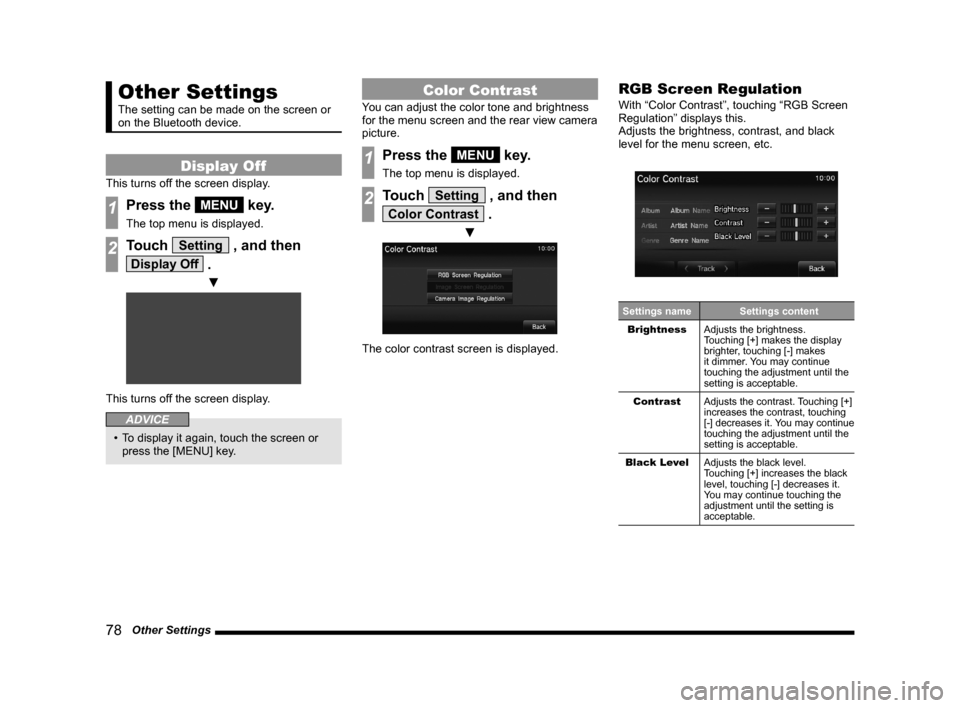
Color Contrast .
▼
The color contrast screen is displayed.
RGB Screen Regulation
With “Color Contrast”, touching “RGB Screen
Regulation” displays this.
Adjusts the brightness, contrast, and black
level for the menu screen, etc.
Settings name Settings content
Brightness Adjusts the brightness.
Touching [+] makes the display
brighter, touching [-] makes
it dimmer. You may continue
touching the adjustment until the
setting is acceptable.
Contrast Adjusts the contrast. Touching [+]
increases the contrast, touching
[-] decreases it. You may continue
touching the adjustment until the
setting is acceptable.
Black Level Adjusts the black level.
Touching [+] increases the black
level, touching [-] decreases it.
You may continue touching the
adjustment until the setting is
acceptable.
13MY_AVC(NAS).indb 782013/02/14 10:58:06