2014 MINI COOPER light
[x] Cancel search: lightPage 8 of 230

engine oil contains chemicals that have caused
cancer in laboratory animals. Always protect
your skin by washing thoroughly with soap and
water.
Service and warranty
We recommend that you read this publication
thoroughly. Your vehicle is covered by the fol‐
lowing warranties:▷New Vehicle Limited Warranty.▷Rust Perforation Limited Warranty.▷Federal Emissions System Defect Warranty.▷Federal Emissions Performance Warranty.▷California Emission Control System Limited
Warranty.
Detailed information about these warranties is
listed in the Service and Warranty Information
Booklet for US models or in the Warranty and
Service Guide Booklet for Canadian models.
Your vehicle has been specifically adapted and
designed to meet the particular operating con‐
ditions and homologation requirements in your
country and continental region in order to de‐
liver the full driving pleasure while the vehicle is
operated under those conditions. If you wish to
operate your vehicle in another country or re‐
gion, you may be required to adapt your vehi‐
cle to meet different prevailing operating con‐
ditions and homologation requirements. You
should also be aware of any applicable war‐
ranty limitations or exclusions for such country
or region. In such case, please contact Cus‐
tomer Relations for further information.
Maintenance
Maintain the vehicle regularly to sustain the
road safety, operational reliability and the New
Vehicle Limited Warranty.
Specifications for required maintenance meas‐
ures:
▷MINI Maintenance system▷Service and Warranty Information Booklet
for US models▷Warranty and Service Guide Booklet for
Canadian models
If the vehicle is not maintained according to
these specifications, this could result in serious
damage to the vehicle. Such damage is not
covered by the MINI New Vehicle Limited War‐
ranty.
Data memory
Many electronic components on your vehicle
are equipped with data memories that tempo‐
rarily or permanently store technical informa‐
tion about the condition of the vehicle, events
and faults. This technical information generally
documents the state of a component, a mod‐
ule, a system or the environment:
▷Operating states of system components, fill
levels for instance.▷Status messages for the vehicle and from its
individual components, e.g., wheel rotation
speed/ vehicle speed, deceleration, trans‐
verse acceleration.▷Malfunctions and faults in important system
components, e.g., lights and brakes.▷Responses by the vehicle to special situa‐
tions, e.g., deployment of an airbag, en‐
gagement of stability control systems.▷Ambient conditions, such as temperature.
This data is purely technical in nature and is
used to detect and correct faults and to opti‐
mize vehicle functions. Motion profiles over
routes traveled cannot be created from this
data. When service offerings are used, e.g., re‐
pair services, service processes, warranty
claims, quality assurance, this technical infor‐
mation can be read out from the event and
fault memories by the service personnel, in‐
cluding the manufacturer, using special diag‐
nostic tools. You can obtain further information
there if it is needed. After a fault is corrected,
the information in the fault memory is deleted
or overwritten on a continuous basis.
Seite 8Notes8
Online Edition for Part no. 01 40 2 927 905 - II/14
Page 14 of 230

CockpitVehicle equipment
All standard, country-specific and optional
equipment that is offered in the model series is
described in this chapter. Therefore, equipmentis also described that is not available in a vehi‐
cle, e. g., because of the selected optional
equipment or country variant. This also applies
for safety-related functions and systems.
All around the steering wheel
1Power windows 442Exterior mirror operation 523Central locking system 394LampsFront fog lamps 89Parking lamps 86Low beams 86Automatic headlamp con‐
trol 87
Daytime running lights 87Instrument lighting 895Steering wheel buttons, leftCruise control on/off, inter‐
rupt 110Cruise control on/off, inter‐
rupt 116Seite 14AT A GLANCECockpit14
Online Edition for Part no. 01 40 2 927 905 - II/14
Page 17 of 230

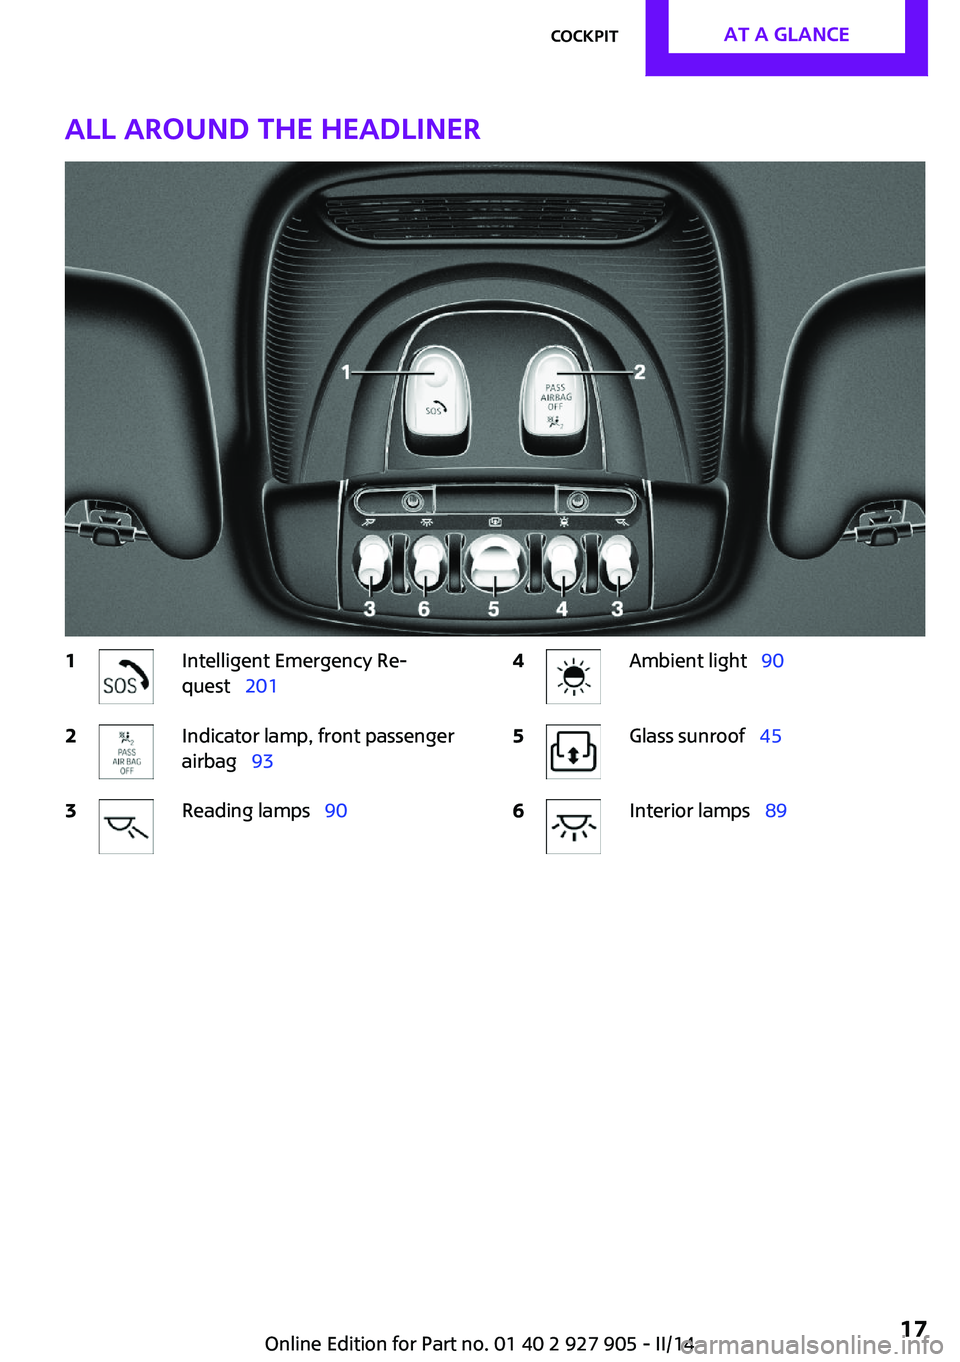
All around the headliner1Intelligent Emergency Re‐
quest 2012Indicator lamp, front passenger
airbag 933Reading lamps 904Ambient light 905Glass sunroof 456Interior lamps 89Seite 17CockpitAT A GLANCE17
Online Edition for Part no. 01 40 2 927 905 - II/14
Page 20 of 230

Buttons on controllerPress the buttonFunctionMENUOpen the main menu.AudioOpen audio menu last listened
to, switch between audio me‐
nus.TELOpens the Telephone menu.BACKOpen previous panel.OPTIONOpens the Options menu.
Operating concept
Opening the main menu Press the button.
The main menu is displayed.
All onboard monitor functions can be called up
via the main menu.
Selecting menu items
Highlighted menu items can be selected.1.Turn the controller until the desired menu
item is highlighted.2.Press the controller.
Menu items in the Owner's Manual
In the Owner's Manual, menu items that can be
selected are set in quotation marks, e.g.,
"Settings".
Changing between panels
After a menu item is selected, e.g., "Radio", a
new panel is displayed. Panels can overlap.
▷Move the controller to the left.
The current panel is closed and the previ‐
ous panel is displayed.
The previous panel is opened again by
pressing the BACK button. In this case, the
current panel is not closed.▷Move the controller to the right.
A new panel is opened on top of the previ‐
ous display.Seite 20AT A GLANCEOnboard monitor20
Online Edition for Part no. 01 40 2 927 905 - II/14
Page 22 of 230

▷For the input of upper/lower case letters
and numbers, it may be necessary to switch
via the controller to the corresponding In‐
put mode, refer to page 25, e.g. when the
spelling of upper and lower case letters is
identical.▷Enter characters as they are displayed on
the Control Display.▷Always enter accompanying signs, such as
accents or periods so that the letter can be
clearly recognized. The possibility of input
depends on the set language. Where nec‐
essary, enter special characters via the con‐
troller.▷To delete a character, slide to the left on
the touchpad.▷To enter a blank space, slide to the right in
the center of the touchpad.▷To enter a hyphen, slide to the right in the
upper area of the touchpad.▷To enter an underscore, slide to the right in
the lower area of the touchpad.
Operating the interactive map
The interactive map in the navigation system
can be moved via the touchpad.
FunctionControlsInteractive map.Slide in the corresponding
direction.Enlarge/shrink in‐
teractive map.Drag inwards or outwards
on the touchpad with the
fingers.Display menu.Tap once.
Changing settings
Settings on the control display, such as the vol‐
ume, can be made via the touchpad. To do this
slide to the left or right accordingly.
Example: setting the
clock
Setting the clock1. Press the button. The main menu is
displayed.2.Turn the controller until "Settings" is high‐
lighted, and then press the controller.3.If necessary, move the controller to the left
to display "Time/Date".4.Turn the controller until "Time/Date" is
highlighted, and then press the controller.5.Turn the controller until "Time:" is high‐
lighted, and then press the controller.6.Turn the controller to set the hours and
press the controller.7.Turn the controller to set the minutes and
press the controller.Seite 22AT A GLANCEOnboard monitor22
Online Edition for Part no. 01 40 2 927 905 - II/14
Page 24 of 230

4.Press the controller or select "Split screen
content".5.Select the desired menu item.
Programmable memory
buttons
General information
The onboard monitor functions can be stored
on the programmable memory buttons and
called up directly, e.g., radio stations, naviga‐
tion destinations, phone numbers and entry
points into the menu.
The settings are stored for the remote control
currently in use.
Saving a function
1.Highlight function via the onboard monitor.2. Press the desired button for more
than 2 seconds.
Running a function
Press the button.
The function will run immediately. This
means, for example, that the number is dialed
when a phone number is selected.
Displaying the button assignment Use a finger to touch the buttons. Do not wear
gloves or use objects.
The key assignment is displayed at the top
edge of the screen.▷To display short information: touch the but‐
ton.▷To display detailed information: touch the
button for an extended period.
Deleting the button assignments
1.Press buttons 1 and 6 simultaneously for
approx. five seconds.2."OK"
Entering letters and
numbers
General information
1.Turn the controller: select letters or num‐
bers.2.Select additional letters or numbers if
needed.3."OK": confirm the entry.SymbolFunction Press the controller: delete the letter
or number. Press the controller for an extended
period: delete all letters or numbers.Seite 24AT A GLANCEOnboard monitor24
Online Edition for Part no. 01 40 2 927 905 - II/14
Page 29 of 230

Integrated Owner's Manual in the
vehicleVehicle equipment All standard, country-specific and optional
equipment that is offered in the model series is
described in this chapter. Therefore, equipment
is also described that is not available in a vehi‐
cle, e. g., because of the selected optional
equipment or country variant. This also applies
for safety-related functions and systems.
Integrated Owner's
Manual in the vehicle
The Integrated Owner's Manual can be dis‐
played on the Control Display. The equipment
and functions that are in the vehicle are descri‐
bed therein.
Components of the Integrated Owner's
Manual
The Integrated Owner's Manual consists of
three parts, which offer various levels of infor‐
mation or access possibilities.
Quick Reference Guide Located in the Quick Reference is important in‐
formation for the operation of the vehicle, the
operation of basic vehicle functions or for what
to do in the event of a flat tire. This information
can also be displayed during driving.
Search by pictures
Information and descriptions based on illustra‐
tions can be searched via search by pictures.
This is helpful, for example, if the description of
an outfitting package that cannot be named is
needed.Owner's Manual
Information and descriptions can be searched
by direct entry of a search term via the index.
Select components1. Press the button.2.Turn the controller: open "Vehicle Info".3.Press the controller.4.Selecting desired range:▷"Quick reference"▷"Search by pictures"▷"Owner's Manual"
Leafing through the Owner's Manual Page by page with link access
Turn the controller until the next or previous
page is displayed.
Page by page without link access Leaf through the pages directly while skipping
the links.
Highlight the symbol once. Now simply press
the controller to leaf from page to page.
Leaf back.
Seite 29Integrated Owner's Manual in the vehicleAT A GLANCE29
Online Edition for Part no. 01 40 2 927 905 - II/14
Page 36 of 230

Adjusting
The following settings are stored in a profile.▷Radio: stored stations, station listened to
last.▷Assignment of the programmable memory
buttons.▷Tone settings.▷Audio source listened to last.▷Unlocking the vehicle: driver door or entire
vehicle.▷Locking the vehicle: if no door is open or af‐
ter starting off.▷Welcome lamps: on/off.▷Triple turn signal activation: on/off.▷Headlamp courtesy delay feature: time set‐
ting.▷Language on the Control Display.▷Daytime running lights: on/off.▷Air conditioner/Automatic climate control:
settings.▷Navigation: map views, route criteria, voice
output on/off.▷Park Distance Control PDC: signal tone vol‐
ume.▷Rearview camera: selection of functions
and type of display.▷Head-up Display: selection, brightness, po‐
sition and rotation of the display.▷Driving Dynamics Control: configuration.
Profile management
Opening the profiles A different profile can be called up than the one
associated with the remote control currently in
use.
1. "Settings"2."Profiles"3.Select a profile.Called up profile is assigned to the remote con‐
trol being used at the time.
Renaming profiles1. "Settings"2."Profiles"
The current profile is selected.3.Open "Options".4."Rename current profile"
Resetting profiles The settings of the active profile are reset to
their default values.
1. "Settings"2."Profiles"
The current profile is selected.3.Open "Options".4."Reset current profile"
Importing profiles
Profiles stored on a USB device can be im‐
ported via the USB interface.
Existing settings and contacts are overwritten
with the imported profile.
1. "Settings"2."Profiles"3."Import profile"4."USB device"
Exporting profiles
Most settings of the active profile and the
saved contacts can be exported.
This can be helpful for securing and retrieving
personal settings, before delivering the vehicle
to a workshop for example. The saved profiles
can be taken with you to another vehicle
equipped with the Personal Profile function.
1. "Settings"2."Profiles"Seite 36CONTROLSOpening and closing36
Online Edition for Part no. 01 40 2 927 905 - II/14