Page 135 of 292

The transmission remains in
Nif:
R the SmartKey is in the ignition lock and
R you use the E-SELECT lever to shift the
transmission to Nbefore switching the
engine off
This still applies if you open the driver's or
front-passenger door.
Further information on transmission
position Nwhen operating with a SmartKey
is available in the "Car wash" section
(Y page 223). Electric parking brake
General notes G
WARNING
If you leave children unsupervised in the
vehicle, they could set it in motion by, for
example:
R release the parking brake.
R shift the automatic transmission out of the
parking position P.
R start the engine.
In addition, they may operate vehicle
equipment and become trapped. There is a
risk of an accident and injury.
When leaving the vehicle, always take the
SmartKey with you and lock the vehicle. Never
leave children unsupervised in the vehicle. Applying/releasing manually
X
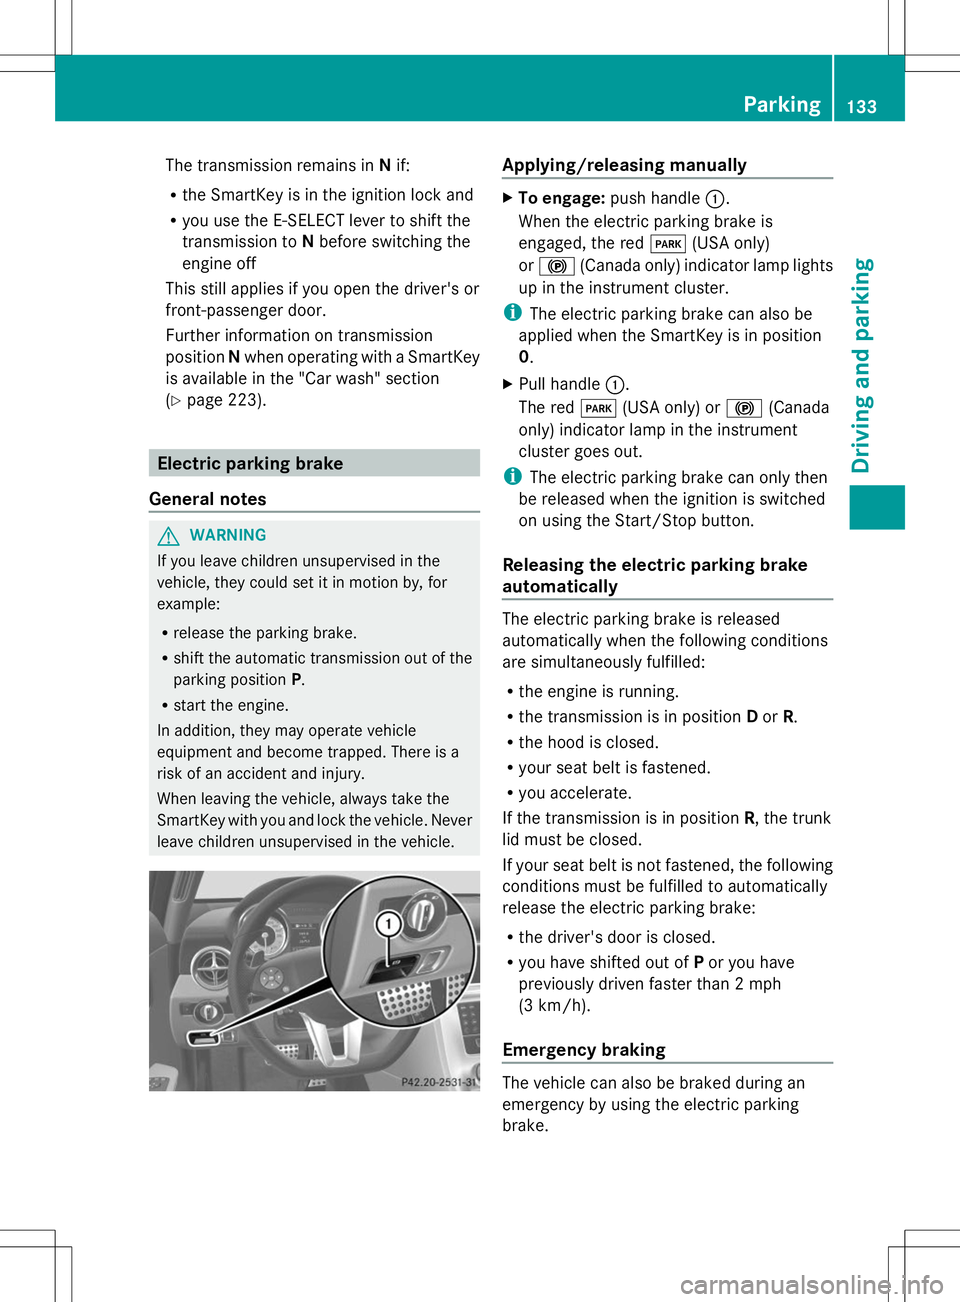
To engage: push handle :.
When the electric parking brake is
engaged, the red F(USA only)
or ! (Canada only) indicator lamp lights
up in the instrument cluster.
i The electric parking brake can also be
applied when the SmartKey is in position
0.
X Pull handle :.
The red F(USA only) or !(Canada
only) indicator lamp in the instrument
cluster goes out.
i The electric parking brake can only then
be released when the ignition is switched
on using the Start/Stop button.
Releasing the electric parking brake
automatically The electric parking brake is released
automatically when the following conditions
are simultaneously fulfilled:
R
the engine is running.
R the transmission is in position Dor R.
R the hood is closed.
R your seat belt is fastened.
R you accelerate.
If the transmission is in position R, the trunk
lid must be closed.
If your seat belt is not fastened, the following
conditions must be fulfilled to automatically
release the electric parking brake:
R the driver's door is closed.
R you have shifted out of Por you have
previously driven faster than 2 mph
(3 km/h).
Emergency braking The vehicle can also be braked during an
emergency by using the electric parking
brake. Parking
133Driving and parking Z
Page 203 of 292

iPod
®
or USB device (see the separate
COMAND operating instructions).
i There is a 12 V power socket located in
the glove box.
Stowage compartment in the center
console X
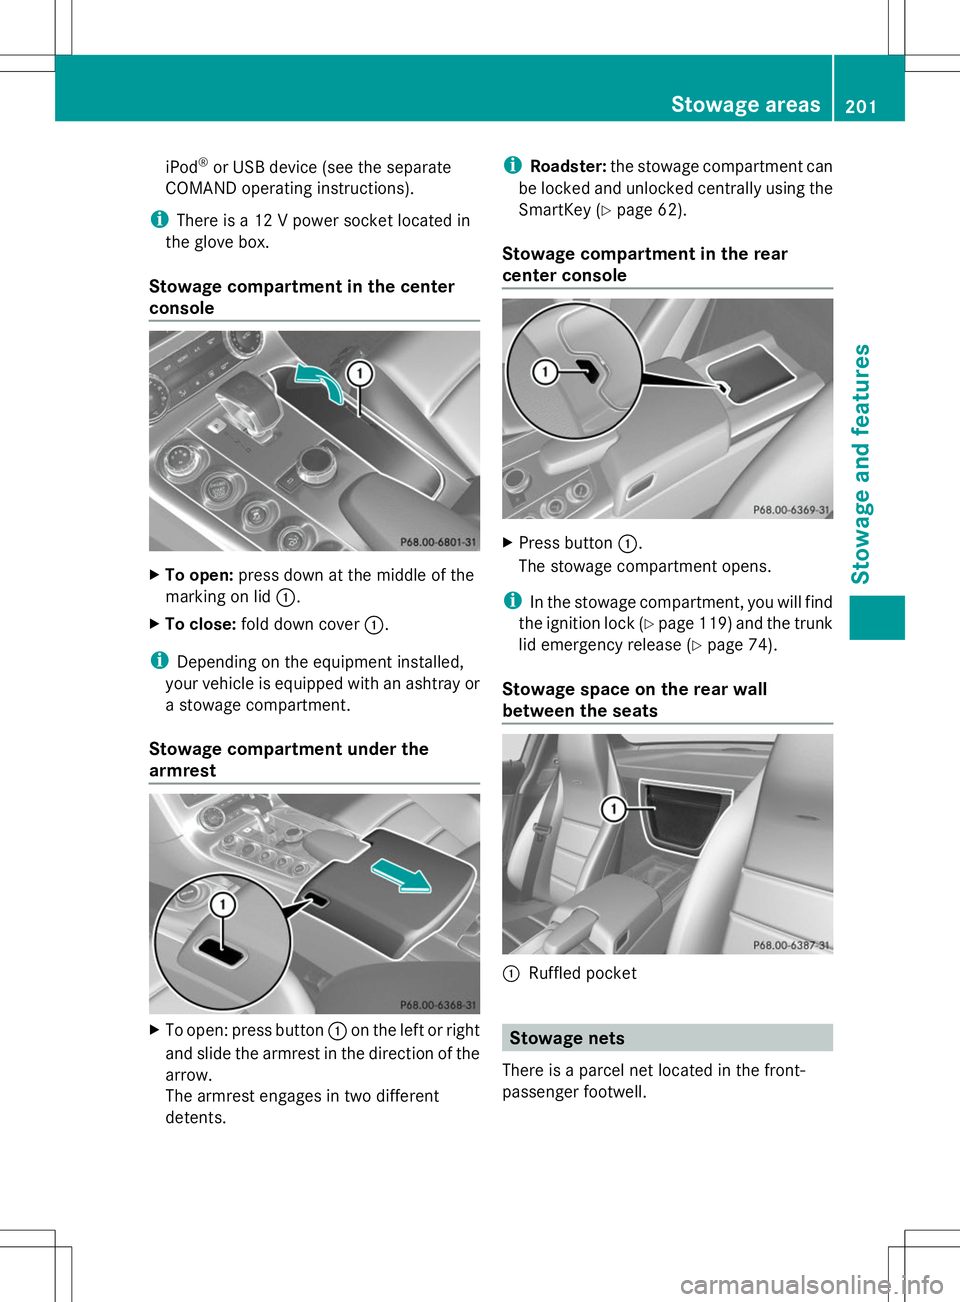
To open: press down at the middle of the
marking on lid :.
X To close: fold down cover :.
i Depending on the equipment installed,
your vehicle is equipped with an ashtray or
a stowage compartment.
Stowage compartment under the
armrest X
To open: press button :on the left or right
and slide the armrest in the direction of the
arrow.
The armrest engages in two different
detents. i
Roadster: the stowage compartment can
be locked and unlocked centrally using the
SmartKey (Y page 62).
Stowage compartment in the rear
center console X
Press button :.
The stowage compartment opens.
i In the stowage compartment, you will find
the ignition lock (Y page 119)and the trunk
lid emergency release (Y page 74).
Stowage space on the rear wall
between the seats :
Ruffled pocket Stowage nets
There is a parcel net located in the front-
passenger footwell. Stowage areas
201Stowage an d features Z
Page 212 of 292

enforcement agency is informed of the
location of the vehicle.
i If the anti-theft alarm system is active for
longer than 30 seconds, mbrace
automatically informs the Mercedes-Benz
Customer Assistance Center. Rear spoiler
The rear spoiler improves the handling of the
vehicle. It adapts the vehicle's aerodynamics
to the operating conditions, dependent on the
speed of the vehicle. Example: Coupe
i
If the vehicle is equipped with AMG
adaptive sport suspension system, the
button is in the switch strip above the air
conditioning control panel.
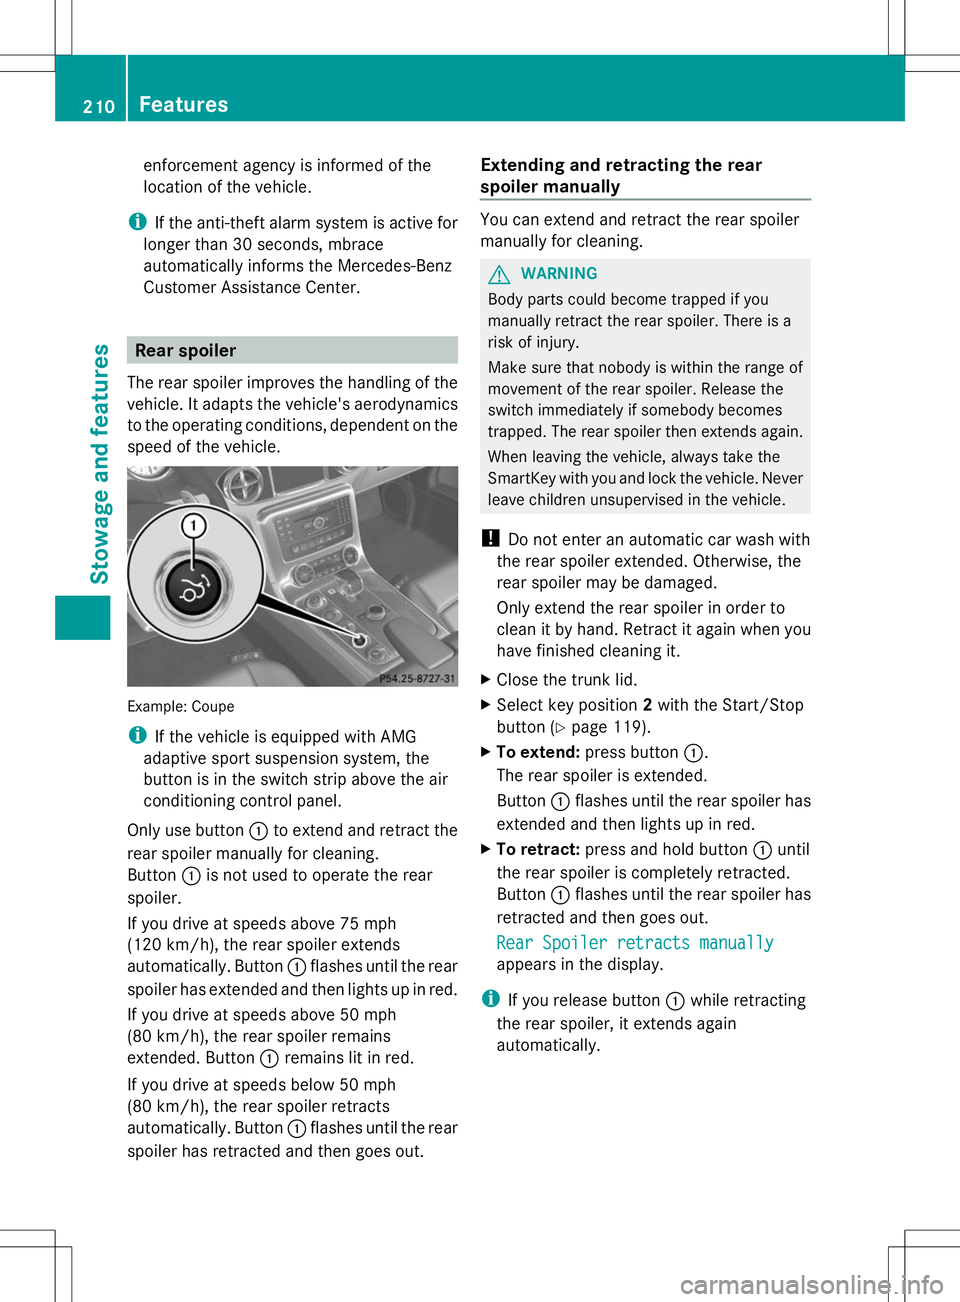
Only use button :to extend and retract the
rear spoiler manually for cleaning.
Button :is not used to operate the rear
spoiler.
If you drive at speeds above 75 mph
(120 km/h), the rear spoiler extends
automatically. Button :flashes until the rear
spoiler has extended and then lights up in red.
If you drive at speeds above 50 mph
(80 km/h), the rear spoiler remains
extended. Button :remains lit in red.
If you drive at speeds below 50 mph
(80 km/h), the rear spoiler retracts
automatically. Button :flashes until the rear
spoiler has retracted and then goes out. Extending and retracting the rear
spoiler manually You can extend and retract the rear spoiler
manually for cleaning.
G
WARNING
Body parts could become trapped if you
manually retract the rear spoiler. There is a
risk of injury.
Make sure that nobody is within the range of
movement of the rear spoiler. Release the
switch immediately if somebody becomes
trapped. The rear spoiler then extends again.
When leaving the vehicle, always take the
SmartKey with you and lock the vehicle. Never
leave children unsupervised in the vehicle.
! Do not enter an automatic car wash with
the rear spoiler extended. Otherwise, the
rear spoiler may be damaged.
Only extend the rear spoiler in order to
clean it by hand. Retract it again when you
have finished cleaning it.
X Close the trunk lid.
X Select key position 2with the Start/Stop
button (Y page 119).
X To extend: press button :.
The rear spoiler is extended.
Button :flashes until the rear spoiler has
extended and then lights up in red.
X To retract: press and hold button :until
the rear spoiler is completely retracted.
Button :flashes until the rear spoiler has
retracted and then goes out.
Rear Spoiler retracts manually Rear Spoiler retracts manually
appears in the display.
i If you release button :while retracting
the rear spoiler, it extends again
automatically. 210
FeaturesStowage and features
Page 236 of 292

X
Do not remove any foreign objects which
have penetrated the tire, e.g. screws or
nails.
X Take the TIREFIT kit out of the trunk
(Y page 232). X
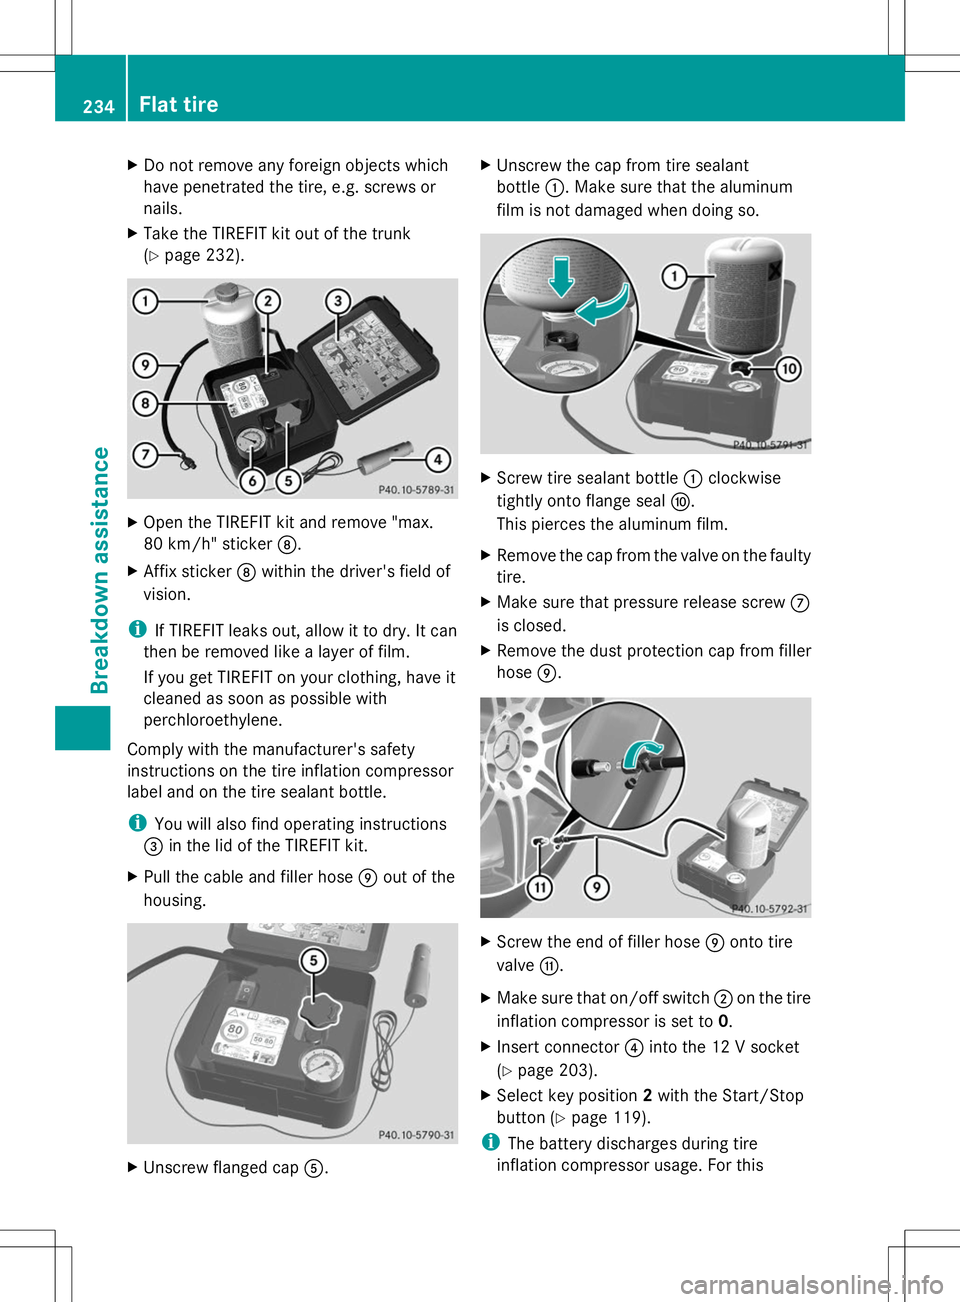
Open the TIREFIT kit and remove "max.
80 km/h" sticker D.
X Affix sticker Dwithin the driver's field of
vision.
i If TIREFIT leaks out, allow it to dry. It can
then be removed like a layer of film.
If you get TIREFIT on your clothing, have it
cleaned as soon as possible with
perchloroethylene.
Comply with the manufacturer's safety
instructions on the tire inflation compressor
label and on the tire sealant bottle.
i You will also find operating instructions
= in the lid of the TIREFIT kit.
X Pull the cable and filler hose Eout of the
housing. X
Unscrew flanged cap A. X
Unscrew the cap from tire sealant
bottle :. Make sure that the aluminum
film is not damaged when doing so. X
Screw tire sealant bottle :clockwise
tightly onto flange seal F.
This pierces the aluminum film.
X Remove the cap from the valve on the faulty
tire.
X Make sure that pressure release screw C
is closed.
X Remove the dust protection cap from filler
hose E. X
Screw the end of filler hose Eonto tire
valve G.
X Make sure that on/off switch ;on the tire
inflation compressor is set to 0.
X Insert connector ?into the 12 V socket
(Y page 203).
X Select key position 2with the Start/Stop
button ( Ypage 119).
i The battery discharges during tire
inflation compressor usage. For this 234
Flat tireBreakdown assistance