2014 MERCEDES-BENZ SLS AMG COUPE park assist
[x] Cancel search: park assistPage 5 of 292
Index
....................................................... 4Introduction
......................................... 18 At a glance
........................................... 25 Safety
................................................... 35 Opening and closing
...........................61 Seats, steering wheel and mirrors
....83 Lights and windshield wipers
............95 Climate control
................................. 105 Driving and parking
..........................117 On-board computer and displays
....149 Stowage and features
......................199 Maintenance and care
......................217 Breakdown assistance
.....................231 Wheels and tires
............................... 247 Technical data
................................... 277 Contents
3
Page 9 of 292
Distance recorder
............................. 152
see Odometer
see Trip odometer
Door control panel
Overview .......................................... 33
Doors
Automatic locking (on-board
computer) ...................................... 159
Automatic locking (switch) .............. .70
Central locking/unlocking
(SmartKey) ...................................... .62
Display message .................... 184, 186
Emergency locking ........................... 71
Emergency unlocking .......................71
Important safety notes ....................68
Opening (from inside) ......................69
Draft stop ............................................. 80
Drinking and driving .........................135
Drinks holder see Cup holder
Drive program
Automatic ...................................... 126
Manual .......................................... .127
SETUP (on-board computer) ..........161
Drive program display ......................123
Driver's door see Doors
Driving abroad
Mercedes-Benz Service .................223
Symmetrical low bea m.................... 96
Driving lamps
see Daytime running lamps
Driving on flooded roads ..................137
Driving safety systems ABS (Anti-lock Braking System) .......54
ADAPTIVE BRAKE ............................. 58
BAS (Brake Assist System) ..............55
EBD (electronic brake force
distribution) ..................................... 57
ESP ®
(Electronic Stability Program) .56
ETS (Electronic Traction System) .....55
Important safety information ...........54
Overview .......................................... 54
Driving systems
AMG adaptive sport suspension
system ........................................... 140
Blind Spot Assist ............................ 145 Cruise control
................................ 138
Display message ............................ 180
PARKTRONIC ................................. 141
Rear view camera .......................... 144
Driving tips
AMG ceramic high-performance
compound brake system ...............137
Brakes ........................................... 135
Break-in period .............................. 118
Downhill gradient ........................... 135
Drinking and driving .......................135
Driving abroad ................................. 96
Driving in winter ............................ .137
Driving on wet roads ......................137
Exhaust check ............................... 135
Fuel ................................................ 134
General .......................................... 134
Hydroplaning ................................. 137
Icy road surfaces ........................... 137
Limited braking efficiency on
salted road s................................... 136
Snow chains .................................. 251
Symmetrical low bea m.................... 96
Wet road surface ........................... 136
DVD audio (on-board computer) ......155
DVD video (on-board computer) ......155 E
EASY-ENTRY feature Activating/deactivating .................160
Function/notes ................................ 89
EASY-EXIT feature
Crash-responsive ............................. 90
Function/notes ................................ 89
Switching on/off ........................... 160
EBD (electronic brake force
distribution)
Display message ............................ 166
Function/notes ................................ 57
Electronic Stability Program
see ESP ®
(Electronic Stability Program)
Electronic traction control system
see ETS ............................................ 55
Emergency release
Driver's door .................................... 71
Trunk ............................................... 74
Vehicle ............................................. 71 Index
7
Page 12 of 292

Automatic headlamp mod
e.............. 96
Display message ............................ 173
Driving abroad ................................. 96
Hazard warning lamps .....................98
High beam flasher ............................ 98
High-beam headlamps .....................98
Low-beam headlamps ......................97
Parking lamps .................................. 97
Standing lamps ................................ 97
Switching the daytime running
lamps on/off (on-board computer) 158
Switching the daytime running
lamps on/off (switch) ......................96
Switching the exterior lighting
delayed switch-off on/off (on-
board computer) ............................ 159
Switching the surround lighting
on/off (on-board computer) ..........159
Turn signals ..................................... 98
see Replacing bulbs
LIM indicator lamp
Cruise control ................................ 139
Locking
see Central locking
Locking (doors)
Automatic ........................................ 70
Emergency locking ........................... 71
From inside (central locking
button) ............................................. 70
Locking centrally
see Central locking
Low-beam headlamps
Display message ............................ 174
Setting for driving abroad
(symmetrical) ................................... 96
Switching on/off .............................. 97 M
M+S tires ............................................ 250
Malfunction message see Display messages
Manual drive program ......................127
Matte finish (cleaning instructions) 226
mbrace Call priority .................................... 208
Display message ............................ 173Downloading destinations
(COMAND)
..................................... 208
Emergency call .............................. 205
General notes ................................ 204
Locating a stolen vehicle ...............209
MB info call button ........................207
Remote vehicle locking ..................209
Roadside Assistance button ..........207
Search & Send ............................... 209
Self-test ......................................... 205
System .......................................... 205
Mechanical key
Function/notes ................................ 64
Locking vehicle ................................ 71
Unlocking the driver's door ..............71
Memory card (audio) .........................155
Memory function ................................. 92
Message memory (on-board
computer) .......................................... 164
Messages see Display messages
Mirrors
see Exterior mirrors
see Rear-view mirror
see Vanity mirror
Mobile phone
Menu (on-board computer) ............155
Modifying the programming
(SmartKey) ........................................... 63
MP3 Operation ....................................... 155
see separate operating instructions
Multifunction display
Function/notes ............................. 152
Permanent displa y......................... 158
Multifunction steering wheel
Operating the on-board computer .151
Overview .......................................... 29 N
Navigation Menu (on-board computer) ............153
On-board computer .......................153
see separate operating instructions
Notes on breaking-in a new vehicle 11810
Index
Page 61 of 292
or
X
Insert the SmartKey into the ignition lock.
The alarm is switched off.
i If the alarm stays on for more than
30 seconds, the mbrace emergency call
system (USA only) or Tele Aid system
(Canada only) initiates a call to the
Customer Assistance Center
automatically. The mbrace emergency call
system initiates the call if:
R you have subscribed to the Tele Aid
service.
R the Tele Aid service has been activated
properly.
R the required mobile phone, power supply
and GPS are available. Tow-away alarm
Function An audible and visual alarm is triggered if your
vehicle's angle of inclination is altered while
the tow-away alarm is armed. This can occur
if the vehicle is jacked up on one side, for
example.
Arming X
Make sure that:
R
the doors are closed.
R the trunk lid is closed.
Only then is the tow-away alarm armed.
X Lock the vehicle with the SmartKey.
The tow-away alarm is armed after
approximately 30 seconds.
Deactivating X
Unlock the vehicle with the SmartKey.
The tow-away alarm is deactivated
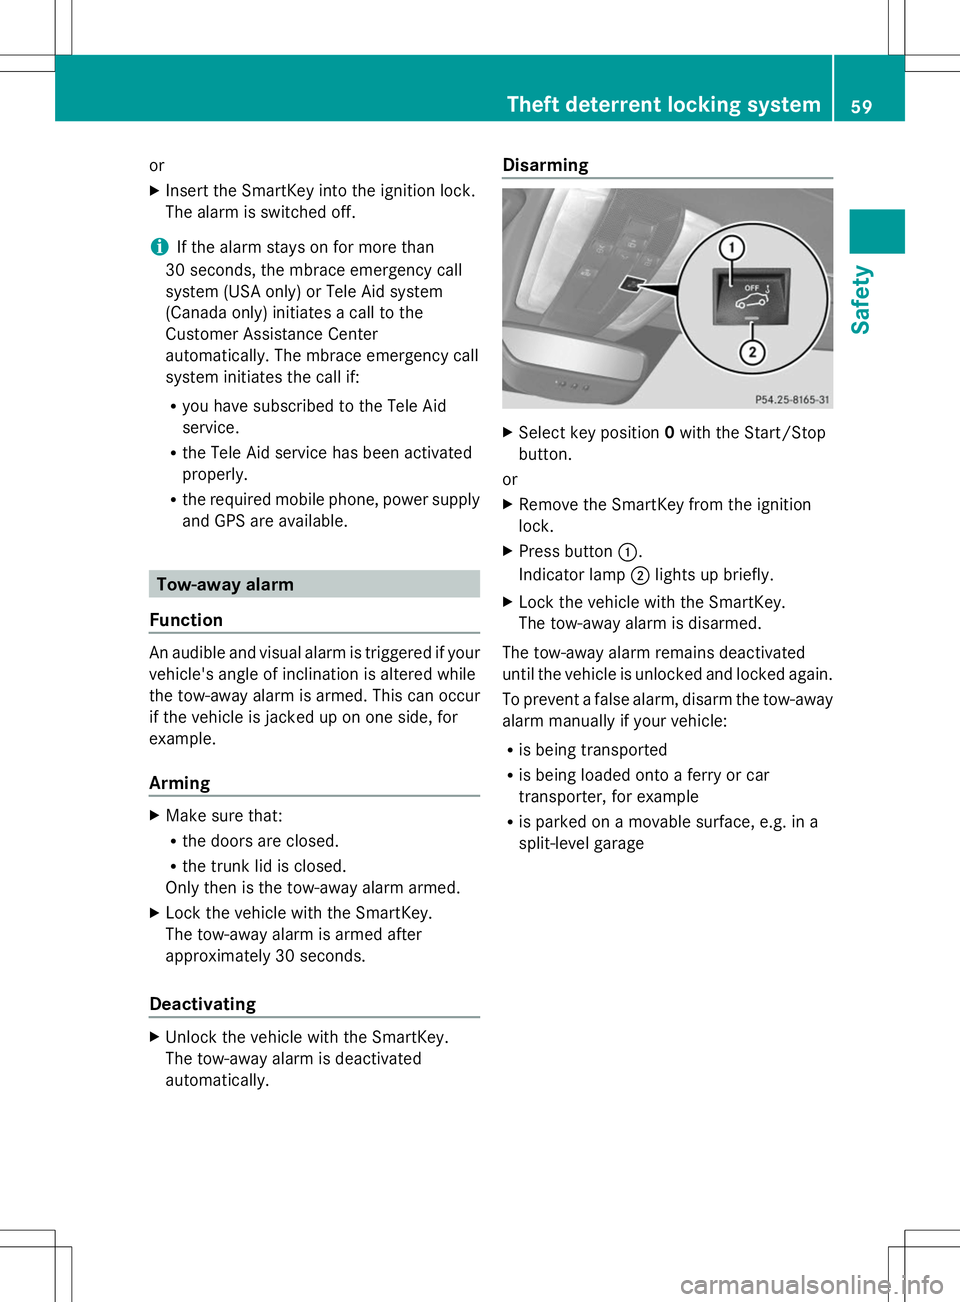
automatically. Disarming
X
Select key position 0with the Start/Stop
button.
or
X Remove the SmartKey from the ignition
lock.
X Press button :.
Indicator lamp ;lights up briefly.
X Lock the vehicle with the SmartKey.
The tow-away alarm is disarmed.
The tow-away alarm remains deactivated
until the vehicle is unlocked and locked again.
To prevent a false alarm, disarm the tow-away
alarm manually if your vehicle:
R is being transported
R is being loaded onto a ferry or car
transporter, for example
R is parked on a movable surface, e.g. in a
split-level garage Theft deterrent locking system
59Safety Z
Page 123 of 292
lever can still be moved but the parking lock
remains engaged.
X Depress the brake pedal and keep it
depressed.
X Use the E-SELECT lever to shift the
transmission to position Dor R.
X Release the brake pedal.
X Carefully depress the accelerator pedal.
The electric parking brake is automatically
released (Y page 133).
i The vehicle locks centrally once you have
pulled away. The locking knobs in the doors
drop down. The automatic door lock can
also be deactivated (Roadster only).
Hill start assist Hill start assist will aid you when pulling away
on a hill. It holds the vehicle for a short time
after you have removed your foot from the
brake pedal. This gives you enough time to
move your foot from the brake pedal to the
accelerator pedal and depress it before the
vehicle begins to roll. G
WARNING
After a short time, hill start assist will no
longer brake your vehicle and it could roll
away. There is a risk of an accident and injury.
Therefore, quickly move your foot from the
brake pedal to the accelerator pedal. Never
leave the vehicle when it is held by hill start
assist.
X Take your foot off the brake pedal.
i Once you have taken your foot off the
brake pedal, the vehicle is held for around
one second.
X Pull away.
Hill start assist is not active if:
R you are pulling away on a level road or on
a downhill gradient.
R the transmission is in position N.R
the vehicle is secured with the electric
parking brake.
R ESP ®
is malfunctioning. AMG SPEEDSHIFT DCT 7-speed sports
transmission
Important safety notes
G
WARNING
If the engine speed is above the idling speed
and you engage transmission position Dor
R, the vehicle could pull away suddenly. There
is a risk of an accident.
When engaging transmission position Dor R,
always firmly depress the brake pedal and do
not simultaneously accelerate.
Observe the "Important safety notes" section
on activating/deactivating ESP ®
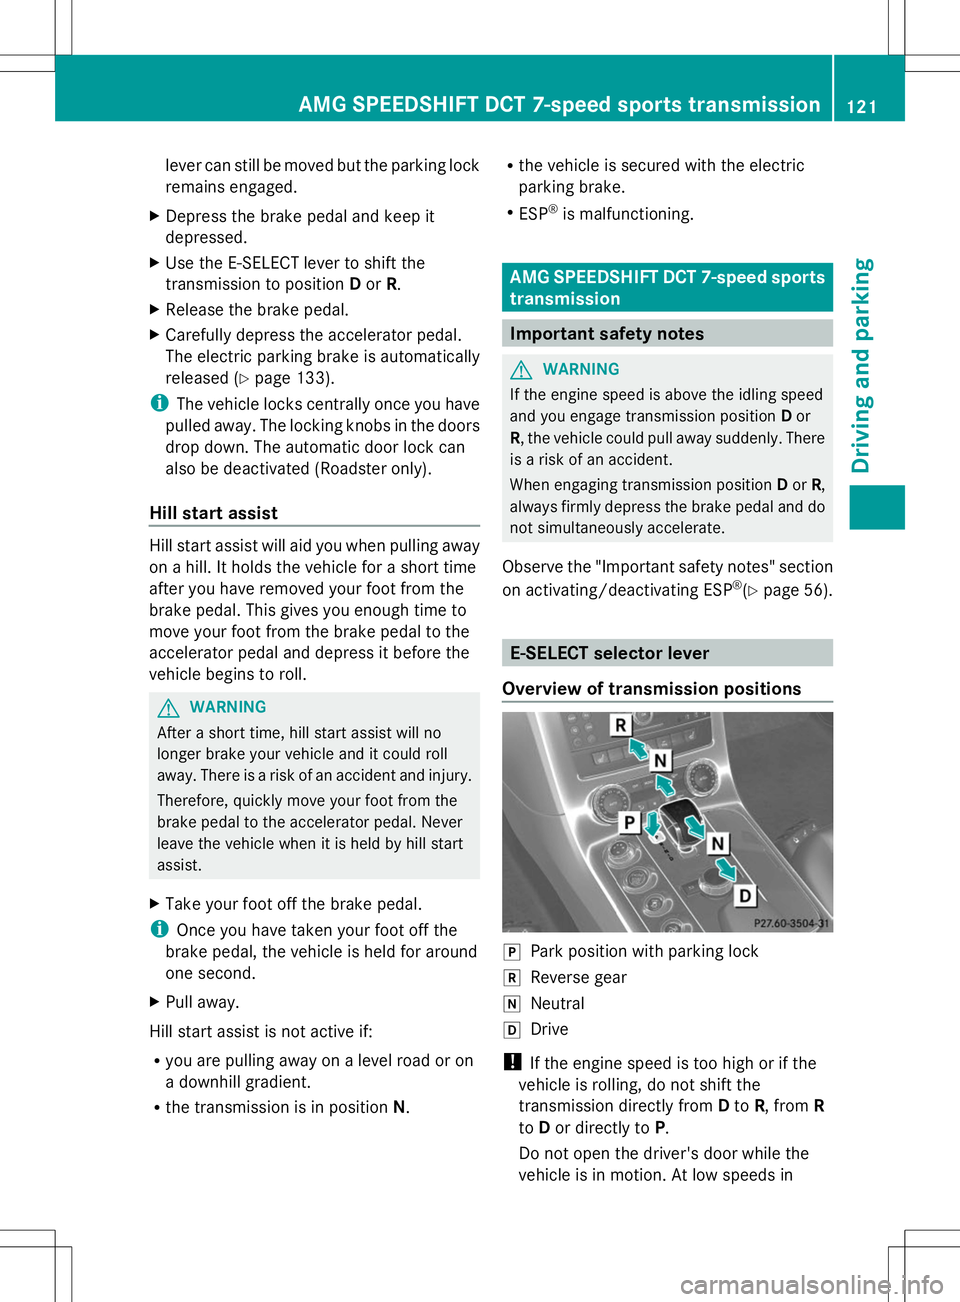
(Y page 56). E-SELECT selector lever
Overview of transmission positions j
Park position with parking lock
k Reverse gear
i Neutral
h Drive
! If the engine speed is too high or if the
vehicle is rolling, do not shift the
transmission directly from Dto R, from R
to Dor directly to P.
Do not open the driver's door while the
vehicle is in motion. At low speeds in AMG SPEEDSHIFT DCT 7-speed sports transmission
121Driving and parking Z
Page 130 of 292
significantly shorter with sportier and more
aggressive gear changes.
In manual drive program M, you need to
change gear yourself using the steering wheel
paddle shifters (Y page 125). The
transmission only shifts down automatically
at low engine speeds depending on the
respective gear.
! In manual drive program M, the
transmission does not shift up
automatically even when the engine
limiting speed for the current gear is
reached. When the engine limiting speed is
reached, the fuel supply is cut to prevent
the engine from overrevving. Always make
sure that the engine speed does not reach
the red area of the tachometer and observe
the upshift indicator. There is otherwise a
risk of engine damage.
X To activate the manual drive program:
turn the drive program selector switch until
M appears in the instrument cluster's
multifunction display.
M lights up in red on the drive program
selector switch.
X To deactivate the manual drive
program: turn the drive program selector
switch and select another drive program.
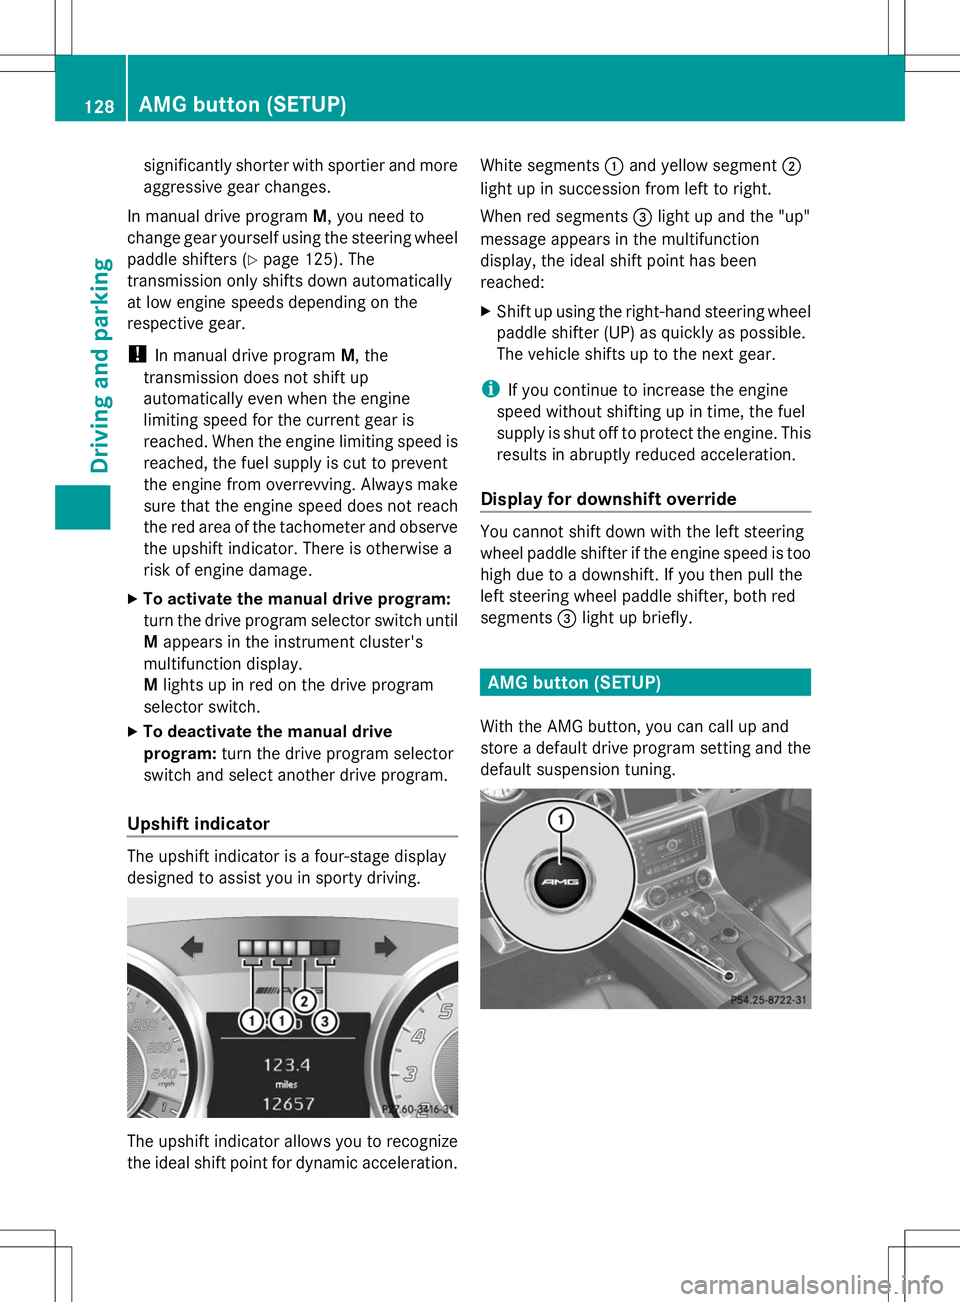
Upshift indicator The upshift indicator is a four-stage display
designed to assist you in sporty driving. The upshift indicator allows you to recognize
the ideal shift point for dynamic acceleration. White segments
:and yellow segment ;
light up in succession from left to right.
When red segments =light up and the "up"
message appears in the multifunction
display, the ideal shift point has been
reached:
X Shift up using the right-hand steering wheel
paddle shifter (UP) as quickly as possible.
The vehicle shifts up to the next gear.
i If you continue to increase the engine
speed without shifting up in time, the fuel
supply is shut off to protect the engine. This
results in abruptly reduced acceleration.
Display for downshift override You cannot shift down with the left steering
wheel paddle shifter if the engine speed is too
high due to a downshift. If you then pull the
left steering wheel paddle shifter, both red
segments
=light up briefly. AMG button (SETUP)
With the AMG button, you can call up and
store a default drive program setting and the
default suspension tuning. 128
AMG button (SETUP)Driving and parking
Page 131 of 292
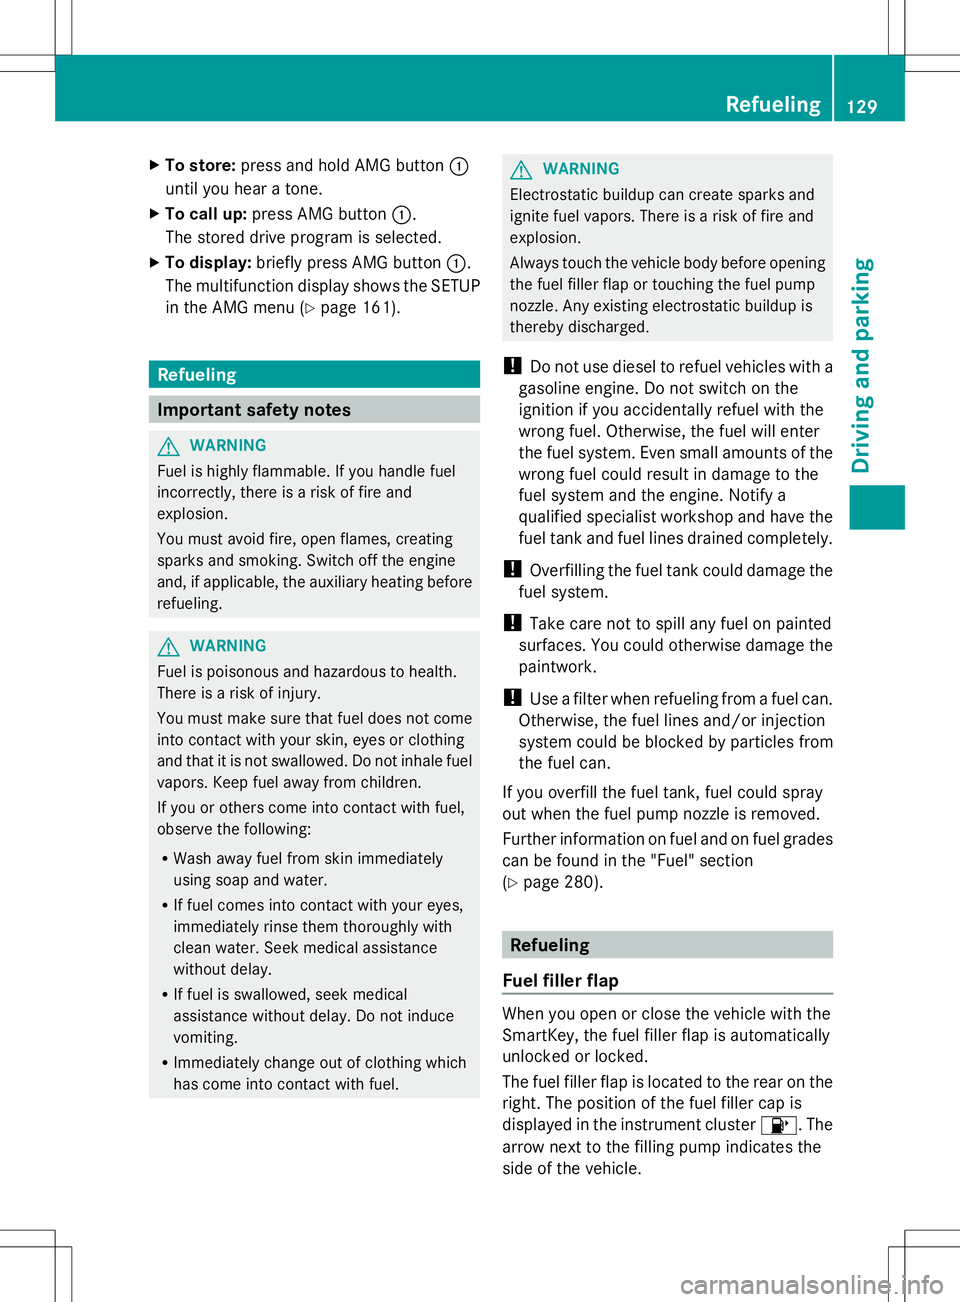
X
To store: press and hold AMG button :
until you hear a tone.
X To call up: press AMG button :.
The stored drive program is selected.
X To display: briefly press AMG button :.
The multifunction display shows the SETUP
in the AMG menu (Y page 161). Refueling
Important safety notes
G
WARNING
Fuel is highly flammable. If you handle fuel
incorrectly, there is a risk of fire and
explosion.
You must avoid fire, open flames, creating
sparks and smoking. Switch off the engine
and, if applicable, the auxiliary heating before
refueling. G
WARNING
Fuel is poisonous and hazardous to health.
There is a risk of injury.
You must make sure that fuel does not come
into contact with your skin, eyes or clothing
and that it is not swallowed. Do not inhale fuel
vapors. Keep fuel away from children.
If you or others come into contact with fuel,
observe the following:
R Wash away fuel from skin immediately
using soap and water.
R If fuel comes into contact with your eyes,
immediately rinse them thoroughly with
clean water. Seek medical assistance
without delay.
R If fuel is swallowed, seek medical
assistance without delay. Do not induce
vomiting.
R Immediately change out of clothing which
has come into contact with fuel. G
WARNING
Electrostatic buildup can create sparks and
ignite fuel vapors. There is a risk of fire and
explosion.
Always touch the vehicle body before opening
the fuel filler flap or touching the fuel pump
nozzle. Any existing electrostatic buildup is
thereby discharged.
! Do not use diesel to refuel vehicles with a
gasoline engine. Do not switch on the
ignition if you accidentally refuel with the
wrong fuel. Otherwise, the fuel will enter
the fuel system. Even small amounts of the
wrong fuel could result in damage to the
fuel system and the engine. Notify a
qualified specialist workshop and have the
fuel tank and fuel lines drained completely.
! Overfilling the fuel tank could damage the
fuel system.
! Take care not to spill any fuel on painted
surfaces. You could otherwise damage the
paintwork.
! Use a filter when refueling from a fuel can.
Otherwise, the fuel lines and/or injection
system could be blocked by particles from
the fuel can.
If you overfill the fuel tank, fuel could spray
out when the fuel pump nozzle is removed.
Further information on fuel and on fuel grades
can be found in the "Fuel" section
(Y page 280). Refueling
Fuel filler flap When you open or close the vehicle with the
SmartKey, the fuel filler flap is automatically
unlocked or locked.
The fuel filler flap is located to the rear on the
right. The position of the fuel filler cap is
displayed in the instrument cluster
8. The
arrow next to the filling pump indicates the
side of the vehicle. Refueling
129Driving and parking Z
Page 138 of 292
Wet roads
If you have driven for a long time in heavy rain
without braking, there may be a delayed
reaction from the brakes when braking for the
first time. This may also occur after the
vehicle has been washed or driven through
deep water.
You have to depress the brake pedal more
firmly. Maintain a greater distance from the
vehicle in front.
After driving on a wet road or having the
vehicle washed, brake firmly while paying
attention to the traffic conditions. This will
warm up the brake discs, thereby drying them
more quickly and protecting them against
corrosion.
Limited braking performance on salt-
treated roads If you drive on salted roads, a layer of salt
residue may form on the brake discs and
brake pads. This can result in a significantly
longer braking distance.
R Brake occasionally to remove any possible
salt residue. Make sure that you do not
endanger other road users when doing so.
R Carefully depress the brake pedal and the
beginning and end of a journey.
R Maintain a greater distance to the vehicle
ahead.
Servicing the brakes !
If the red brake warning lamp lights up in
the instrument cluster and you hear a
warning tone while the engine is running,
the brake fluid level may be too low.
Observe additional warning messages in
the multifunction display.
The brake fluid level may be too low due to
brake pad wear or leaking brake lines.
Have the brake system checked
immediately. This work should be carried
out at a qualified specialist workshop. !
As the ESP ®
system operates
automatically, the engine and the ignition
must be switched off (the SmartKey must
be in position 0or 1in the ignition lock or
the Start/Stop button must be in position
0 or 1) if:
R the electric parking brake is tested using
a brake dynamometer.
R the vehicle is towed with one axle raised.
Braking triggered automatically by ESP ®
may seriously damage the brake system.
All checks and maintenance work on the
brake system must be carried out at a
qualified specialist workshop. Have this work
carried out at an authorized Mercedes-Benz
Center.
Have the brake pads replaced and the brake
fluid renewed at a qualified specialist
workshop, e.g. an authorized Mercedes-Benz
Center.
If the brake system has only been subject to
moderate loads, you should test the
functionality of your brakes at regular
intervals. To do so, press firmly on the brake
pedal when driving at a high speed. This
improves the grip of the brake pads.
You can find a description of Brake Assist
(BAS) on ( Ypage 55).
Mercedes-Benz recommends that you only
have brake pads/linings installed on your
vehicle which have been approved for
Mercedes-Benz vehicles or which correspond
to an equivalent quality standard. Brake
pads/linings which have not been approved
for Mercedes-Benz vehicles or which are not
of an equivalent quality could affect your
vehicle's operating safety.
Mercedes-Benz recommends that you only
use brake fluid that has been specially
approved for your vehicle by Mercedes-Benz,
or which corresponds to an equivalent quality
standard. Brake fluid which has not been
approved for Mercedes-Benz vehicles or
which is not of an equivalent quality could
affect your vehicle's operating safety. 136
Driving tipsDriving and parking