2014 MERCEDES-BENZ SLS AMG COUPE window
[x] Cancel search: windowPage 82 of 292
Opening and closing using the
SmartKey
Important safety notes G
WARNING
When opening or closing the soft top, there is
a risk that parts of the body could become
trapped by moving parts such as the roof
mechanism, the trunk lid, or the side
windows. There is a risk of injury.
When opening or closing the roof, make sure
that no parts of the body are in the vicinity of
moving parts. Release the switch if somebody
becomes trapped.
Opening and closing i
The SmartKey must be close to the
driver's door handle.
X Point the tip of the SmartKey at the driver's
door handle.
X To open: press and hold the %button
on the SmartKey until the soft top is fully
opened.
The Convertible Top in Operation Convertible Top in Operation
message appears in the multifunction
display.
X To close: press and hold the &button
on the SmartKey until the soft top is fully
closed.
The Convertible Top in Operation Convertible Top in Operation
message appears in the multifunction
display. The soft top and the side windows
close. Relocking the soft top
G
WARNING
If you do not lock the closed soft top, it may
open during a journey. This could cause you
to lose control of the vehicle. There is a risk
of an accident.
Only drive with the soft top fully open or
locked closed. The soft top is not locked if:
R
the Convertible Top in Operation
Convertible Top in Operation
message appears in the multifunction
display.
R you hear a warning tone for up to ten
seconds when pulling away or while driving.
You can lock the soft top again if it is not
locked fully.
X Pull over and stop the vehicle safely as soon
as possible, paying attention to road and
traffic conditions.
X Select key position 2with the Start/Stop
button (Y page 119).
X Press the soft-top switch. Installing/removing the wind screen
G
WARNING
If the wind screen is incorrectly installed, it
could detach itself during a journey and
endanger other road users. There is a risk of
an accident and injury.
Install the wind screen as described. Do not
place any objects on top of the installed wind
screen.
! Install or remove the wind screen only
when the soft top is open. You could
otherwise damage the wind screen or the
vehicle interior.
! Mercedes-Benz recommends that you
only use wind screens which have been
tested and approved for Mercedes-Benz
vehicles. This helps to prevent damage to
the vehicle.
The wind screen protects against wind when
driving with the soft top open. It is secured
between the roll bars.
The wind screen is in a bag on the tank
partition wall in the trunk.
X Open the trunk. 80
Soft top (Roadster)Opening and closing
Page 89 of 292
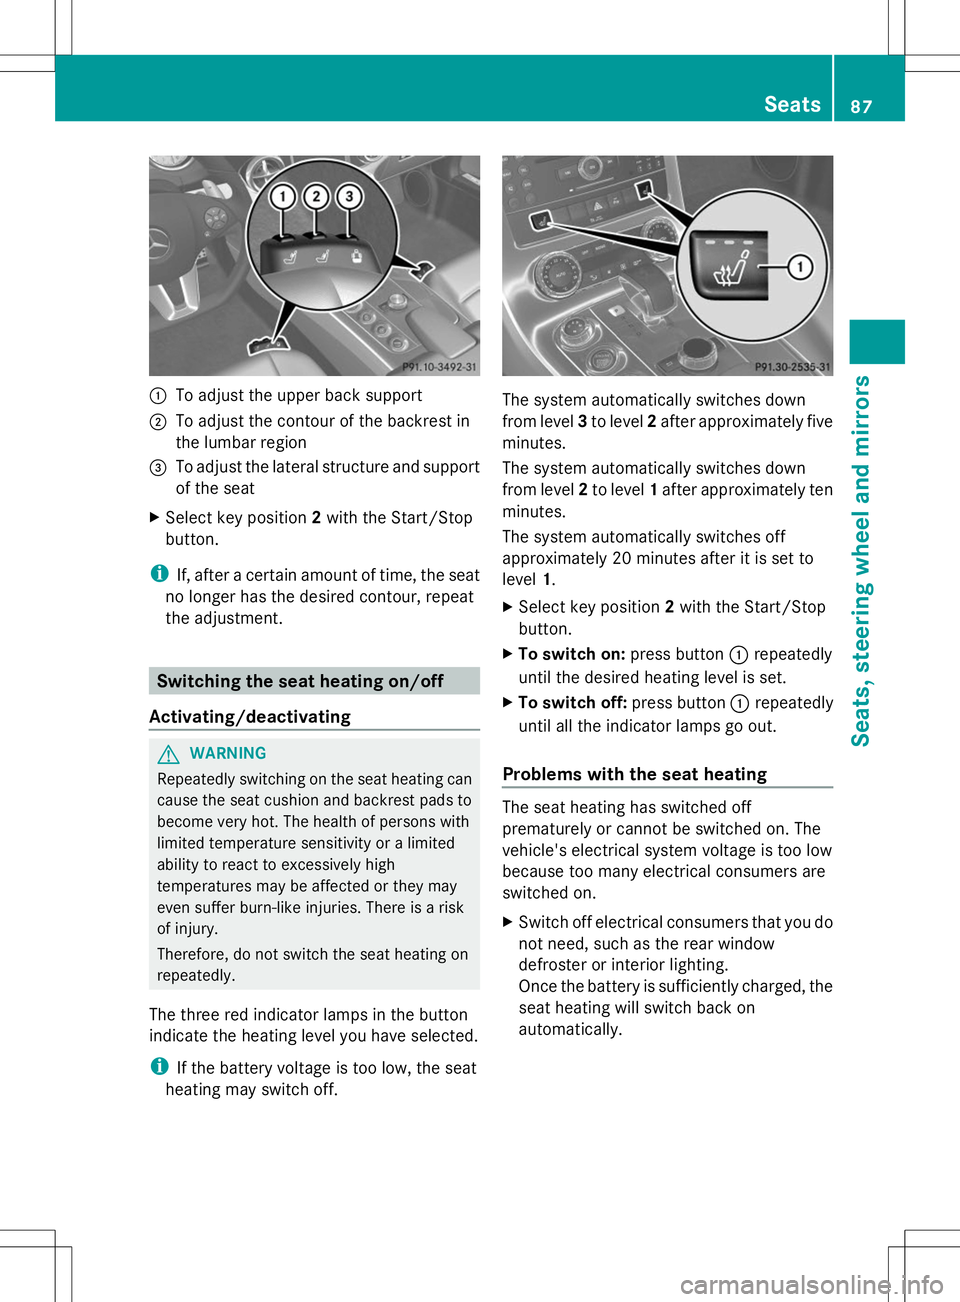
:
To adjust the upper back support
; To adjust the contour of the backrest in
the lumbar region
= To adjust the lateral structure and support
of the seat
X Select key position 2with the Start/Stop
button.
i If, after a certain amount of time, the seat
no longer has the desired contour, repeat
the adjustment. Switching the seat heating on/off
Activating/deactivating G
WARNING
Repeatedly switching on the seat heating can
cause the seat cushion and backrest pads to
become very hot. The health of persons with
limited temperature sensitivity or a limited
ability to react to excessively high
temperatures may be affected or they may
even suffer burn-like injuries. There is a risk
of injury.
Therefore, do not switch the seat heating on
repeatedly.
The three red indicator lamps in the button
indicate the heating level you have selected.
i If the battery voltage is too low, the seat
heating may switch off. The system automatically switches down
from level
3to level 2after approximately five
minutes.
The system automatically switches down
from level 2to level 1after approximately ten
minutes.
The system automatically switches off
approximately 20 minutes after it is set to
level 1.
X Select key position 2with the Start/Stop
button.
X To switch on: press button:repeatedly
until the desired heating level is set.
X To switch off: press button:repeatedly
until all the indicator lamps go out.
Problems with the seat heating The seat heating has switched off
prematurely or cannot be switched on. The
vehicle's electrical system voltage is too low
because too many electrical consumers are
switched on.
X
Switch off electrical consumers that you do
not need, such as the rear window
defroster or interior lighting.
Once the battery is sufficiently charged, the
seat heating will switch back on
automatically. Seats
87Seats, steering wheel and mirrors Z
Page 92 of 292
store the setting with the memory function
(Y page 92).
Crash-responsive EASY-EXIT feature If the crash-responsive EASY-EXIT feature is
triggered in an accident, the steering column
will move upwards when the driver's door is
opened. This occurs irrespective of the
position of the SmartKey in the ignition lock.
This makes it easier to exit the vehicle and
rescue the occupants.
The crash-responsive EASY-EXIT feature is
only operational if the EASY-EXIT/ENTRY
feature is activated in the on-board computer. Mirrors
Rear-view mirror
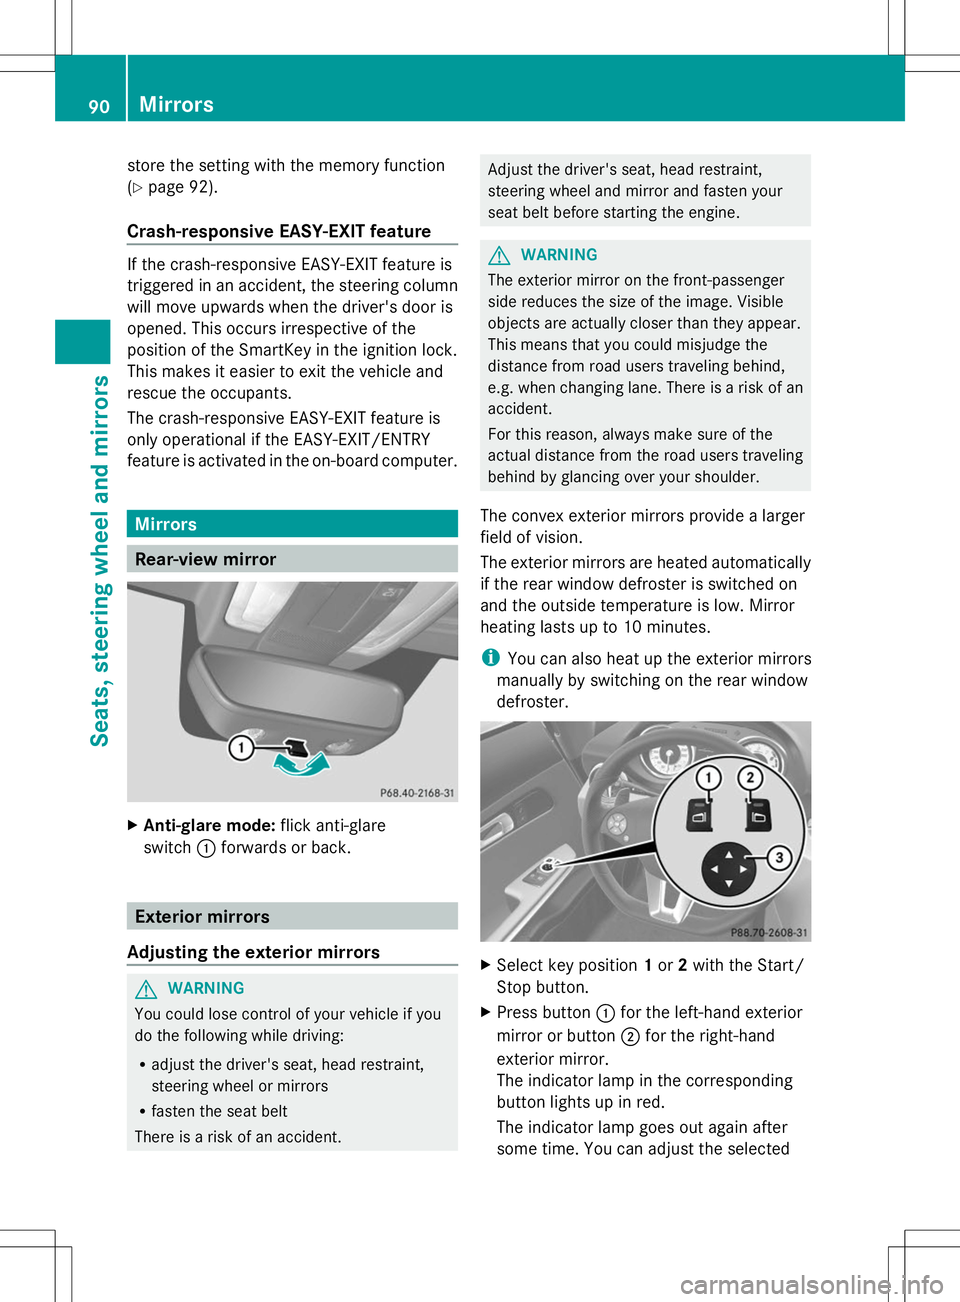
X
Anti-glare mode: flick anti-glare
switch :forwards or back. Exterior mirrors
Adjusting the exterior mirrors G
WARNING
You could lose control of your vehicle if you
do the following while driving:
R adjust the driver's seat, head restraint,
steering wheel or mirrors
R fasten the seat belt
There is a risk of an accident. Adjust the driver's seat, head restraint,
steering wheel and mirror and fasten your
seat belt before starting the engine.
G
WARNING
The exterior mirror on the front-passenger
side reduces the size of the image. Visible
objects are actually closer than they appear.
This means that you could misjudge the
distance from road users traveling behind,
e.g. when changing lane. There is a risk of an
accident.
For this reason, always make sure of the
actual distance from the road users traveling
behind by glancing over your shoulder.
The convex exterior mirrors provide a larger
field of vision.
The exterior mirrors are heated automatically
if the rear window defroster is switched on
and the outside temperature is low. Mirror
heating lasts up to 10 minutes.
i You can also heat up the exterior mirrors
manually by switching on the rear window
defroster. X
Select key position 1or 2with the Start/
Stop button.
X Press button :for the left-hand exterior
mirror or button ;for the right-hand
exterior mirror.
The indicator lamp in the corresponding
button lights up in red.
The indicator lamp goes out again after
some time. You can adjust the selected 90
MirrorsSeats, steering wheel and mirrors
Page 108 of 292
Useful information
i This Operator's Manual describes all
models and all standard and optional
equipment of your vehicle available at the
time of publication of the Operator's
Manual. Country-specific differences are
possible. Please note that your vehicle may
not be equipped with all features
described. This also applies to safety-
related systems and functions.
i Please read the information on qualified
specialist workshops (Y page 22).Overview of climate control systems
Important safety notes
Observe the settings recommended on the
following pages. The windows could
otherwise fog up.
To prevent the windows from fogging up:
R switch off climate control only briefly
R switch on air-recirculation mode only
briefly
R switch on the cooling with air
dehumidification function
R switch on the defrost windshield function
briefly, if required
The automatic climate control regulates the
temperature and the humidity in the vehicle
interior and filters undesirable substances
out of the air.
Coupe: dual-zone automatic climate control
is only operational when the engine is
running. Optimum operation is only achieved
with the side windows closed.
Roadster: dual-zone automatic climate
control is only operational when the engine is
running. Optimum operation is only achieved
with the side windows and roof closed.
i When the weather is warm, ventilate the
vehicle for a brief period. This will speed up
the cooling process and the desired vehicle interior temperature will be reached more
quickly.
i The integrated filter can filter out most
particles of dust, and completely filters out
pollen. A clogged filter reduces the amount
of air supplied to the vehicle interior. For
this reason, you should always observe the
interval for replacing the filter, which is
specified in the Maintenance Booklet. As it
depends on environmental conditions, e.g.
heavy air pollution, the interval may be
shorter than stated in the Maintenance
Booklet. 106
Overview of climate control systemsClimate control
Page 109 of 292
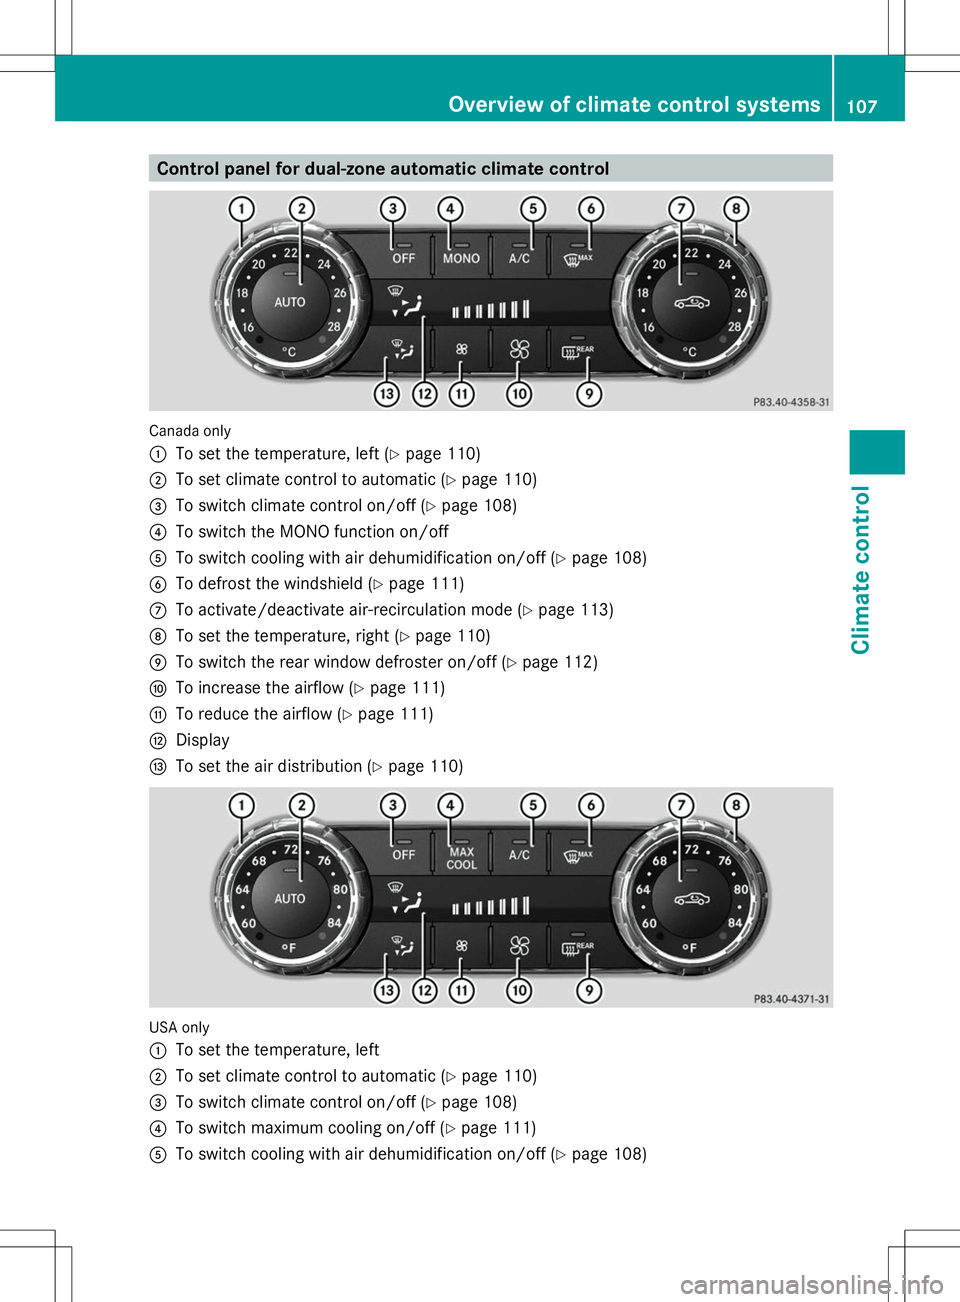
Control panel for dual-zone automatic climate control
Canada only
:
To set the temperature, left (Y page 110)
; To set climate control to automatic (Y page 110)
= To switch climate control on/off (Y page 108)
? To switch the MONO function on/off
A To switch cooling with air dehumidification on/off (Y page 108)
B To defrost the windshield (Y page 111)
C To activate/deactivate air-recirculation mode (Y page 113)
D To set the temperature, right (Y page 110)
E To switch the rear window defroster on/off (Y page 112)
F To increase the airflow (Y page 111)
G To reduce the airflow (Y page 111)
H Display
I To set the air distribution (Y page 110)USA only
:
To set the temperature, left
; To set climate control to automatic (Y page 110)
= To switch climate control on/off (Y page 108)
? To switch maximum cooling on/off (Y page 111)
A To switch cooling with air dehumidification on/off (Y page 108) Overview of climate control systems
107Climate control
Page 110 of 292
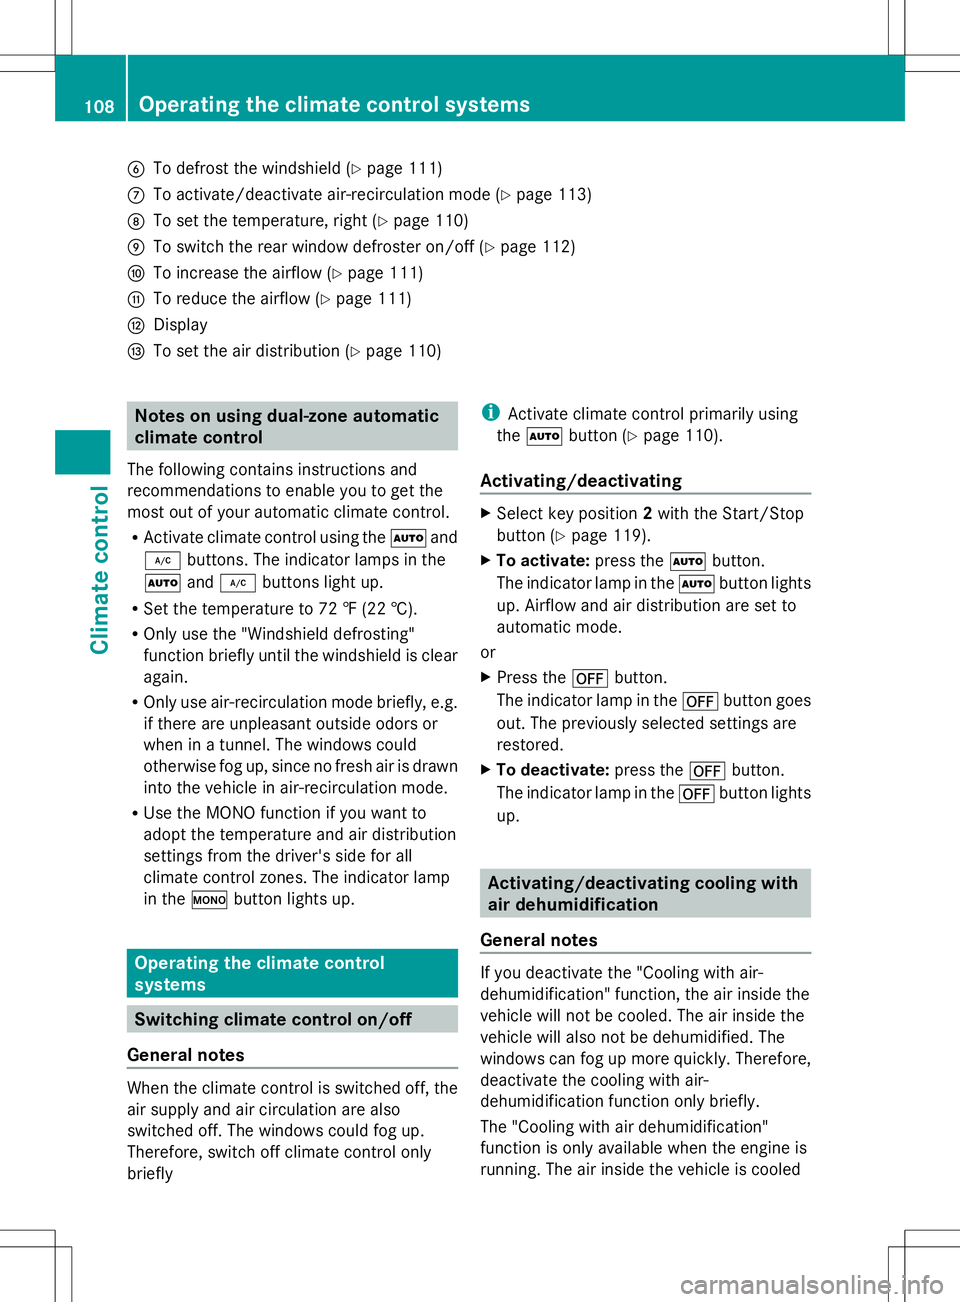
B
To defrost the windshield (Y page 111)
C To activate/deactivate air-recirculation mode (Y page 113)
D To set the temperature, right (Y page 110)
E To switch the rear window defroster on/off (Y page 112)
F To increase the airflow (Y page 111)
G To reduce the airflow (Y page 111)
H Display
I To set the air distribution (Y page 110)Notes on using dual-zone automatic
climate control
The following contains instructions and
recommendations to enable you to get the
most out of your automatic climate control.
R Activate climate control using the Ãand
¿ buttons. The indicator lamps in the
à and¿ buttons light up.
R Set the temperature to 72 ‡ (22 †).
R Only use the "Windshield defrosting"
function briefly until the windshield is clear
again.
R Only use air-recirculation mode briefly, e.g.
if there are unpleasant outside odors or
when in a tunnel. The windows could
otherwise fog up, since no fresh air is drawn
into the vehicle in air-recirculation mode.
R Use the MONO function if you want to
adopt the temperature and air distribution
settings from the driver's side for all
climate control zones. The indicator lamp
in the ºbutton lights up. Operating the climate control
systems
Switching climate control on/off
General notes When the climate control is switched off, the
air supply and air circulation are also
switched off. The windows could fog up.
Therefore, switch off climate control only
briefly i
Activate climate control primarily using
the à button (Y page 110).
Activating/deactivating X
Select key position 2with the Start/Stop
button (Y page 119).
X To activate: press theÃbutton.
The indicator lamp in the Ãbutton lights
up. Airflow and air distribution are set to
automatic mode.
or
X Press the ^button.
The indicator lamp in the ^button goes
out. The previously selected settings are
restored.
X To deactivate: press the^button.
The indicator lamp in the ^button lights
up. Activating/deactivating cooling with
air dehumidification
General notes If you deactivate the "Cooling with air-
dehumidification" function, the air inside the
vehicle will not be cooled. The air inside the
vehicle will also not be dehumidified. The
windows can fog up more quickly. Therefore,
deactivate the cooling with air-
dehumidification function only briefly.
The "Cooling with air dehumidification"
function is only available when the engine is
running. The air inside the vehicle is cooled108
Operating the climate control systemsClimate control
Page 112 of 292
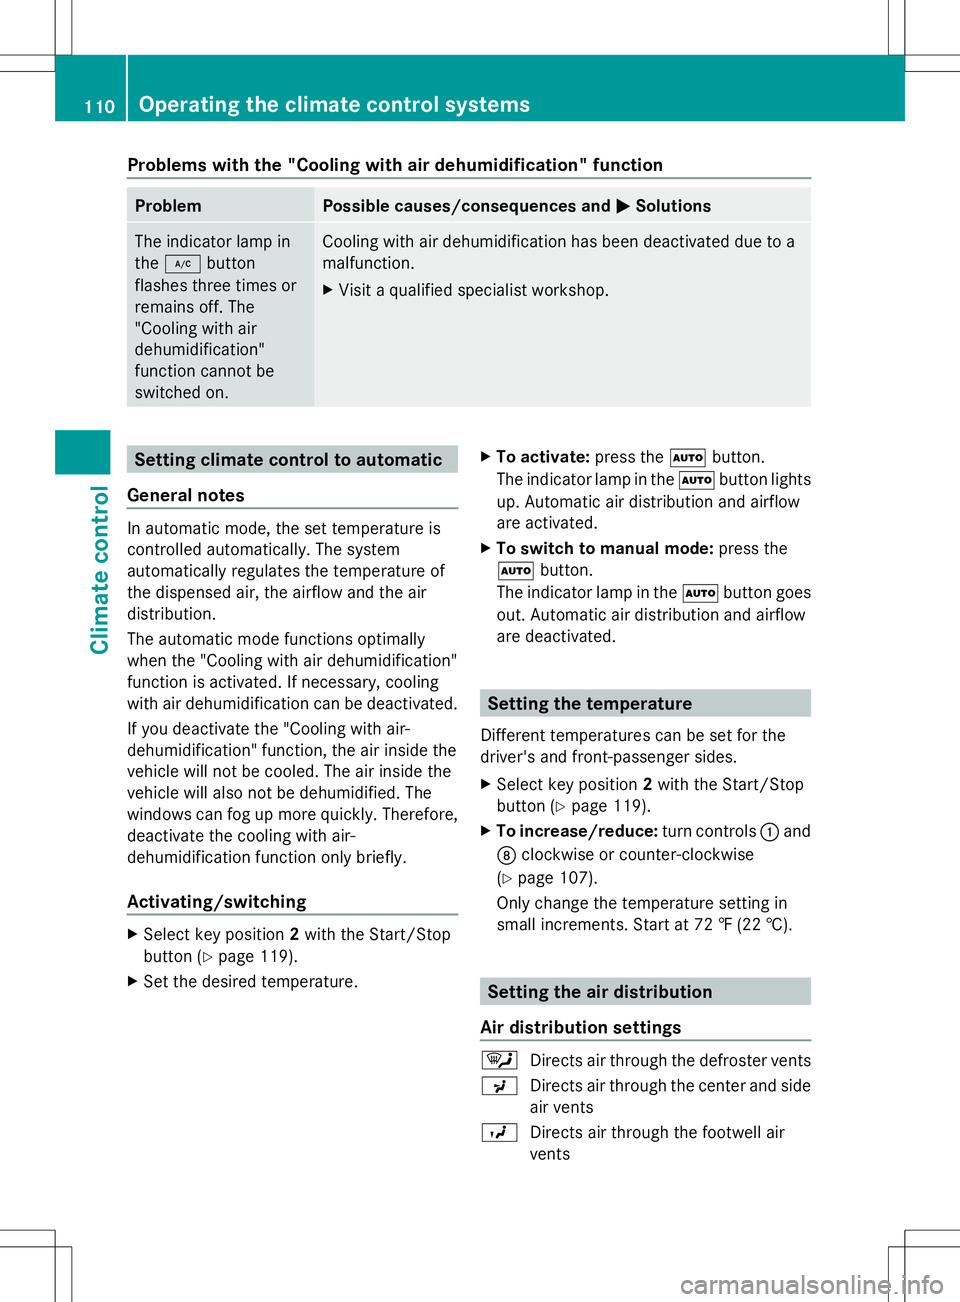
Problems with the "Cooling with air dehumidification" function
Problem Possible causes/consequences and
M
MSolutions The indicator lamp in
the
¿ button
flashes three times or
remains off. The
"Cooling with air
dehumidification"
function cannot be
switched on. Cooling with air dehumidification has been deactivated due to a
malfunction.
X
Visit a qualified specialist workshop. Setting climate control to automatic
General notes In automatic mode, the set temperature is
controlled automatically. The system
automatically regulates the temperature of
the dispensed air, the airflow and the air
distribution.
The automatic mode functions optimally
when the "Cooling with air dehumidification"
function is activated. If necessary, cooling
with air dehumidification can be deactivated.
If you deactivate the "Cooling with air-
dehumidification" function, the air inside the
vehicle will not be cooled. The air inside the
vehicle will also not be dehumidified. The
windows can fog up more quickly. Therefore,
deactivate the cooling with air-
dehumidification function only briefly.
Activating/switching X
Select key position 2with the Start/Stop
button (Y page 119).
X Set the desired temperature. X
To activate: press theÃbutton.
The indicator lamp in the Ãbutton lights
up. Automatic air distribution and airflow
are activated.
X To switch to manual mode: press the
à button.
The indicator lamp in the Ãbutton goes
out. Automatic air distribution and airflow
are deactivated. Setting the temperature
Different temperatures can be set for the
driver's and front-passenger sides.
X Select key position 2with the Start/Stop
button (Y page 119).
X To increase/reduce: turn controls:and
D clockwise or counter-clockwise
(Y page 107).
Only change the temperature setting in
small increments. Start at 72 ‡ (22 †). Setting the air distribution
Air distribution settings ¯
Directs air through the defroster vents
P Directs air through the center and side
air vents
O Directs air through the footwell air
vents 110
Operating the climate control systemsClimate control
Page 113 of 292
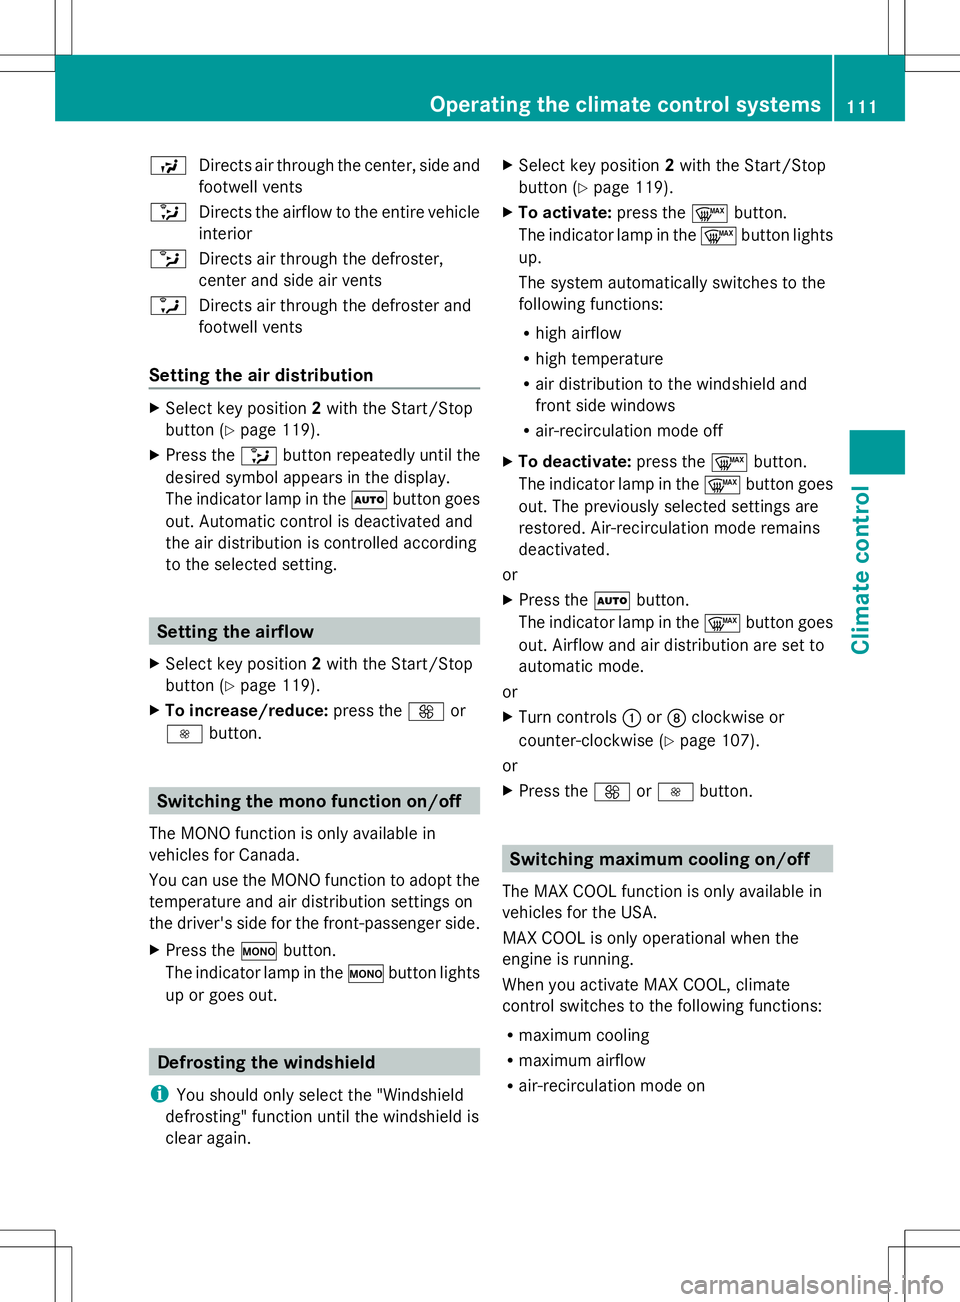
S
Directs air through the center, side and
footwell vents
_ Directs the airflow to the entire vehicle
interior
b Directs air through the defroster,
center and side air vents
a Directs air through the defroster and
footwell vents
Setting the air distribution X
Select key position 2with the Start/Stop
button ( Ypage 119).
X Press the _button repeatedly until the
desired symbol appears in the display.
The indicator lamp in the Ãbutton goes
out. Automatic control is deactivated and
the air distribution is controlled according
to the selected setting. Setting the airflow
X Select key position 2with the Start/Stop
button ( Ypage 119).
X To increase/reduce: press theKor
I button. Switching the mono function on/off
The MONO function is only available in
vehicles for Canada.
You can use the MONO function to adopt the
temperature and air distribution settings on
the driver's side for the front-passenger side.
X Press the ºbutton.
The indicator lamp in the ºbutton lights
up or goes out. Defrosting the windshield
i You should only select the "Windshield
defrosting" function until the windshield is
clear again. X
Select key position 2with the Start/Stop
button ( Ypage 119).
X To activate: press the¬button.
The indicator lamp in the ¬button lights
up.
The system automatically switches to the
following functions:
R high airflow
R high temperature
R air distribution to the windshield and
front side windows
R air-recirculation mode off
X To deactivate: press the¬button.
The indicator lamp in the ¬button goes
out. The previously selected settings are
restored. Air-recirculation mode remains
deactivated.
or
X Press the Ãbutton.
The indicator lamp in the ¬button goes
out. Airflow and air distribution are set to
automatic mode.
or
X Turn controls :orD clockwise or
counter-clockwise ( Ypage 107).
or
X Press the KorI button. Switching maximum cooling on/off
The MAX COOL function is only available in
vehicles for the USA.
MAX COOL is only operational when the
engine is running.
When you activate MAX COOL, climate
control switches to the following functions:
R maximum cooling
R maximum airflow
R air-recirculation mode on Operating the climate control systems
111Climate control