2014 MERCEDES-BENZ SLK ROADSTER dimensions
[x] Cancel search: dimensionsPage 8 of 357
ATTENTION ASSIST
Activating/deactivating ................ .212
Display message ............................ 237
Function/notes ............................ .191
ATTENTION ASSIST
see ATTENTION ASSIST
Audio menu (on-board computer) .... 207
Authorised workshop
see Qualified specialist workshop
AUTO lights
Display message ............................ 233
see Lights
Automatic engine start (ECO start/
stop function) ................................... .147
Automatic engine switch-off (ECO
start/stop function) .......................... 146
Automatic headlamp mode .............. 111
Automatic transmission
Accelerator pedal position ............. 153
Automatic drive program .............. .155
Changing gear ............................... 153
Display message ............................ 245
Driving tips ................................... .153
Emergency running mode .............. 158
Kickdown ....................................... 153
Manual drive program .................... 155
Manual drive program (vehicles
with Sports package AMG) ............ 156
Overview ........................................ 152
Problem (fault) ............................... 158
Program selector button ................ 154
Pulling away ................................... 144
Releasing the parking lock man-
ually ............................................... 158
Selector lever ................................ 152
Starting the engine ........................ 144
Steering wheel gearshift paddle s... 154
Transmission position display ........ 152
Transmission positions .................. 153
Automatic transmission emer-
gency running mode ......................... 158B
BAS (Brake Assist System) ................. 61
BAS PLUS (Brake Assist System
PLUS) .................................................... 61 Battery (key)
Checking .......................................... 75
Important safety notes .................... 75
Replacing ......................................... 75
Battery (vehicle)
Charging ........................................ 303
Display message ............................ 235
Important safety notes .................. 300
Jump starting ................................. 304
Overview ........................................ 300
Belt
see Seat belts
Belt tensioner
Activation ......................................... 47
Blind Spot Assist
Activating/deactivating ................. 212
Display message ............................ 239
Notes/function .............................. 194
Bonnet
Active bonnet (pedestrian protec-tion) ............................................... 280
Closing ........................................... 281
Display message ............................ 247
Important safety notes .................. 280
Opening ......................................... 281
Boot
Emergency release .......................... 83
Important safety notes .................... 81
Opening (automatically from out-
side) ................................................. 82
Opening/closing (manually from
outside) ............................................ 82
Overview .......................................... 81
Boot lid
Display message ............................ 247
Opening dimensions ...................... 349
Opening/closing .............................. 81
Boot load (maximum) ........................ 349
Boot separator
Display message ............................ 248
General notes .................................. 89
Opening/closing .............................. 90
Bottle holders .................................... 267
Brake
EBD .................................................. 66
Brake Assist
see BAS (Brake Assist System) Index
5
Page 22 of 357
Leaving parked up .........................1
64
Locking (in an emergency) .............. .80
Locking (key) ................................... 73
Lowering ........................................ 328
Pulling away ................................... 144
Raising ........................................... 325
Registration ..................................... 24
Securing from rolling away ............ 325
Tow-starting ................................... 306
Towing away .................................. 306
Transporting .................................. 308
Unlocking (in an emergency) ........... 80
Unlocking (key) ................................ 73
Vehicle data ................................... 349
Vehicle battery
see Battery (vehicle)
Vehicle data ....................................... 349
Vehicle dimensions ........................... 349
Vehicle emergency locking ................ 80
Vehicle identification number
see VIN
Vehicle identification plate .............. 342
Vehicle tool kit .................................. 295
Video
Operating the DVD ......................... 207
VIN ...................................................... 342 W
Warning and indicator lamps ABS ................................................ 252
Brakes ........................................... 252
Distance warning signal ................. 260
ESP® ............................................. 254
ESP® OFF ...................................... 255
LIM (cruise control) ........................ 169
LIM (DISTRONIC PLUS) .................. 173
LIM (variable SPEEDTRONIC) ......... 181
Overview .......................................... 32
PASSENGER AIR BAG OFF ............... 41
Reserve fuel ................................... 258
Seat belt ........................................ 251
Tyre pressure monitor ................... 261
Warning triangle ................................ 294
Washer fluid
Display message ............................ 249
Wheel and tyre combinations
see Tyres Wheel bolt tightening torque
........... 328
Wheel chock ...................................... 325
Wheeled draught stop
see AIRGUIDE
Wheels
Changing a whee l.......................... 323
Changing/replacing ....................... 323
Checking ........................................ 315
Cleaning ......................................... 288
Cleaning (warning) ......................... 324
Emergency spare wheel ................. 334
Fitting a new wheel ........................ 327
Fitting a wheel ............................... 324
Important safety notes .................. 314
Overview ........................................ 314
Removing a whee l.......................... 327
Storing ........................................... 324
Tightening torque ........................... 328
Wheel size/tyre size ...................... 328
Windows
Cleaning ......................................... 289
see Side windows
Windscreen
Demisting ...................................... 133
Windscreen washer fluid
see Windscreen washer system
Windscreen washer system
Note s............................................. 349
Topping up ..................................... 284
Windscreen wipers
Display message ............................ 249
Problem (malfunction) ................... 123
Replacing the wiper blades ............ 121
Switching on/of f........................... 120
Winter operation
Important safety notes .................. 316
Overview ........................................ 316
Radiator cover ............................... 281
Slippery road surfaces ................... 168
Snow chains .................................. 317
Winter tyres
Limiting the speed (on-board com-
puter) ............................................. 216
M+S tyre s...................................... 316
Wiper blades
Cleaning ......................................... 289
Important safety notes .................. 121
Replacing ....................................... 121 Index
19
Page 66 of 357
ESP
®
monitors driving stability and traction,
i.e. power transmission between the tyres
and the road surface.
If ESP ®
detects that the vehicle is deviating
from the direction desired by the driver, one
or more wheels are braked to stabilise the
vehicle. The engine output is also modified to keep the vehicle on the desired course within
physical limits. ESP ®
assists the driver when
pulling away on wet or slippery roads. ESP ®
can also stabilise the vehicle during braking.
ETS (Electronic Traction System) i
Observe the "Important safety notes" sec-
tion (Y page 60).
ETS traction control is part of ESP ®
.
ETS brakes the drive wheels individually if
they spin. This enables you to pull away and
accelerate on slippery surfaces, for example
if the road surface is slippery on one side. In
addition, more drive torque is transferred to
the wheel or wheels with traction.
ETS remains active when you deactivate
ESP ®
.
i AMG vehicles:
your vehicle may be
equipped with 20-inch tyres on the rear
axle. If replaced with a 19-inch tyre, ETS
may intervene noticeably sooner for the
first few kilometres. After approximately
10 km ETS will function as usual again.
Information on the dimensions and types of
wheels and tyres for your vehicle can be
found under "Wheel/tyre combinations"
(Y page 328).
Important safety notes G
WARNING
If ESP ®
is malfunctioning, ESP ®
is unable to
stabilise the vehicle. In addition, other driving
safety systems are switched off. This increa-
ses the risk of skidding and an accident.
Drive on carefully. Have ESP ®
checked at a
qualified specialist workshop. !
When testing the electric parking brake
on a braking dynamometer, switch off the
ignition. Application of the brakes by ESP ®
may otherwise destroy the brake system.
When towing your vehicle with the rear axle
raised, observe the notes on
ESP ®
(Y page 308).
ESP ®
is deactivated if the åwarning lamp
in the instrument cluster lights up continu-
ously when the engine is running.
If the ÷ warning lamp and the åwarn-
ing lamp are lit continuously, ESP ®
is not
available due to a malfunction.
Observe the information on warning lamps
(Y page 254) and display messages which
may be shown in the instrument cluster
(Y page 223).
i Only use wheels with the recommended
tyre sizes. Only then will ESP ®
function
properly.
Characteristics of ESP ® General notes
If the
÷ ESP warning lamp goes out before
beginning the journey, ESP ®
is automatically
active.
If ESP ®
intervenes, the ÷ESP®
warning
lamp flashes in the instrument cluster.
If ESP ®
intervenes:
X Do not deactivate ESP ®
under any circum-
stances.
X When pulling away, only depress the accel-
erator pedal as far as is necessary.
X Adapt your driving style to suit the prevail-
ing road and weather conditions.
ECO start/stop function
The ECO start/stop function switches the
engine off automatically if the vehicle stops
moving. When pulling away again, the engine
starts automatically. ESP ®
remains in its pre-
viously selected status. Example:if ESP®
was deactivated before the engine was Driving safety systems
63Safety Z
Page 84 of 357
X
Open the driver's door.
X Close the front-passenger door and the
boot lid.
X Press the locking button (Y page 79).
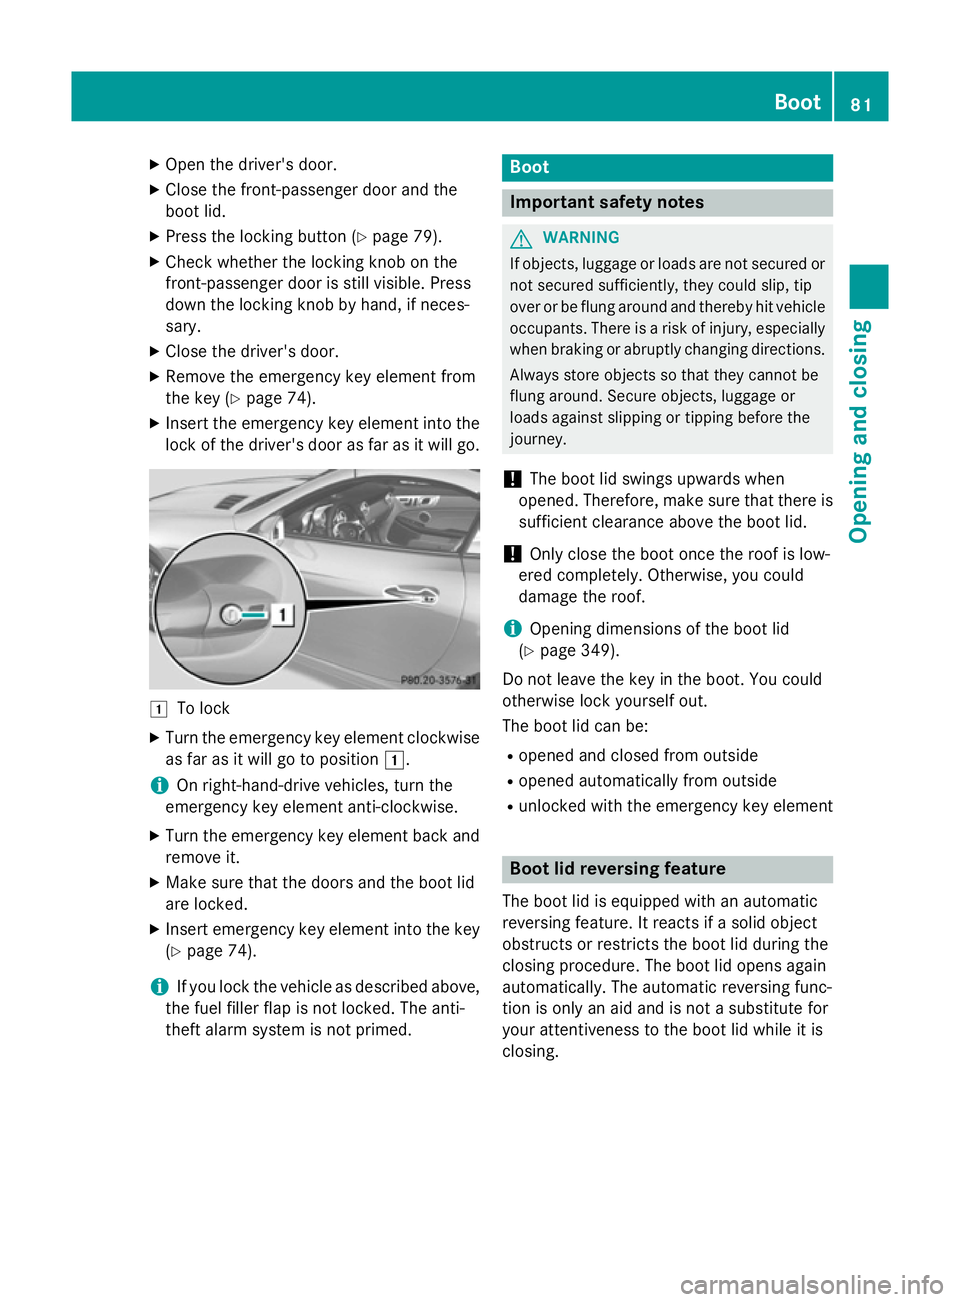
X Check whether the locking knob on the
front-passenger door is still visible. Press
down the locking knob by hand, if neces-
sary.
X Close the driver's door.
X Remove the emergency key element from
the key (Y page 74).
X Insert the emergency key element into the
lock of the driver's door as far as it will go. 1
To lock
X Turn the emergency key element clockwise
as far as it will go to position 1.
i On right-hand-drive vehicles, turn the
emergency key element anti-clockwise.
X Turn the emergency key element back and
remove it.
X Make sure that the doors and the boot lid
are locked.
X Insert emergency key element into the key
(Y page 74).
i If you lock the vehicle as described above,
the fuel filler flap is not locked. The anti-
theft alarm system is not primed. Boot
Important safety notes
G
WARNING
If objects, luggage or loads are not secured or not secured sufficiently, they could slip, tip
over or be flung around and thereby hit vehicle
occupants. There is a risk of injury, especially when braking or abruptly changing directions.
Always store objects so that they cannot be
flung around. Secure objects, luggage or
loads against slipping or tipping before the
journey.
! The boot lid swings upwards when
opened. Therefore, make sure that there is sufficient clearance above the boot lid.
! Only close the boot once the roof is low-
ered completely. Otherwise, you could
damage the roof.
i Opening dimensions of the boot lid
(Y page 349).
Do not leave the key in the boot. You could
otherwise lock yourself out.
The boot lid can be:
R opened and closed from outside
R opened automatically from outside
R unlocked with the emergency key element Boot lid reversing feature
The boot lid is equipped with an automatic
reversing feature. It reacts if a solid object
obstructs or restricts the boot lid during the
closing procedure. The boot lid opens again
automatically. The automatic reversing func-
tion is only an aid and is not a substitute for
your attentiveness to the boot lid while it is
closing. Boot
81Opening and closing Z
Page 85 of 357
G
WARNING
The reversing function does not react:
R to soft, light and thin objects, e.g. small fin-
gers
R over the last 8 mm of the closing path
This means that the reversing feature cannot
prevent someone being trapped in these sit-
uations. There is a risk of injury.
When closing make sure that no parts of the
body are in the closing area.
If someone is trapped:
R press the Fbutton on the key, or
R press the remote operating switch on the
driver's door, or
R press the closing or locking button on the
boot lid, or
R pull the boot lid handle Opening/closing from the outside
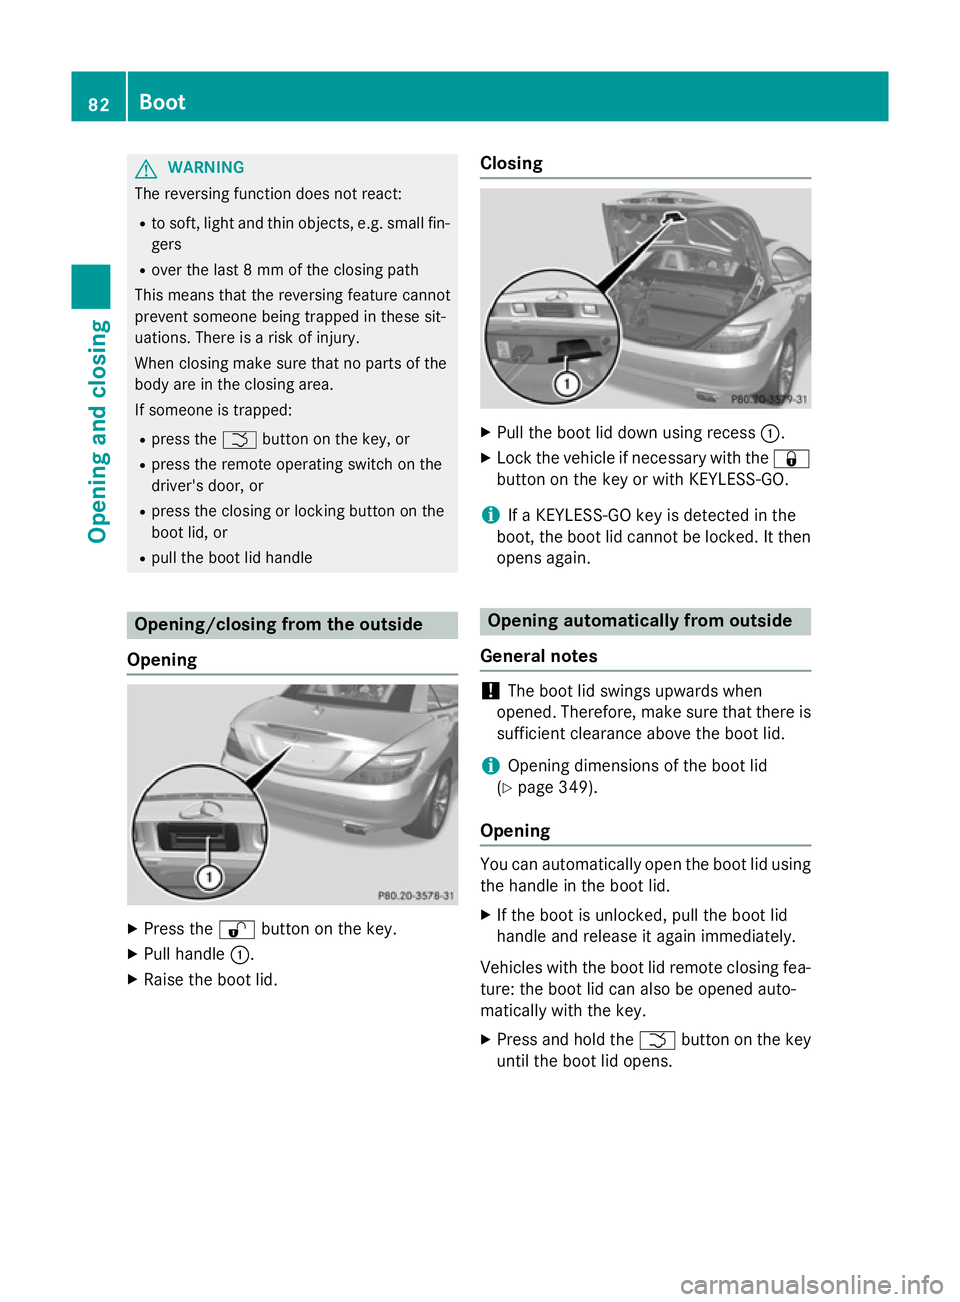
Opening X
Press the %button on the key.
X Pull handle :.
X Raise the boot lid. Closing X
Pull the boot lid down using recess :.
X Lock the vehicle if necessary with the &
button on the key or with KEYLESS-GO.
i If a KEYLESS-GO key is detected in the
boot, the boot lid cannot be locked. It then
opens again. Opening automatically from outside
General notes !
The boot lid swings upwards when
opened. Therefore, make sure that there is sufficient clearance above the boot lid.
i Opening dimensions of the boot lid
(Y page 349).
Opening You can automatically open the boot lid using
the handle in the boot lid.
X If the boot is unlocked, pull the boot lid
handle and release it again immediately.
Vehicles with the boot lid remote closing fea-
ture: the boot lid can also be opened auto-
matically with the key.
X Press and hold the Fbutton on the key
until the boot lid opens. 82
BootOpening and closing
Page 91 of 357
R
there is sufficient upward clearance, as
the roof swings upwards.
R there is sufficient clearance behind the
vehicle, as the boot lid swings backwards beyond the bumper.
R the boot is only loaded to below the boot
separator.
R the boot separator is not pushed up by
the load.
R the boot separator is closed.
R the boot lid is closed.
R the outside temperature is above Ò15 †.
You could otherwise damage the roof, boot
and other parts of the vehicle.
i The vehicle's dimensions when opening/
closing the roof (Y page 349).
i Make sure that the roof and rear window
are dry and clean before opening the roof.
Otherwise, water or dirt could enter the
vehicle interior or boot. Opening and closing using the roof
switch
Important safety notes G
WARNING
When opening or closing the roof, body parts could be trapped by, for example, the roof
mechanism, boot lid or side windows. There is a risk of injury.
When raising or lowering the roof, make sure
that no body parts are in the vicinity of moving
components. If someone becomes trapped,
release the button. Opening and closing X
Secure the vehicle against rolling away
(Y page 162).
X Close the boot separator (Y page 90).
X Close the boot lid.
X Turn the key to position 2in the ignition
lock.
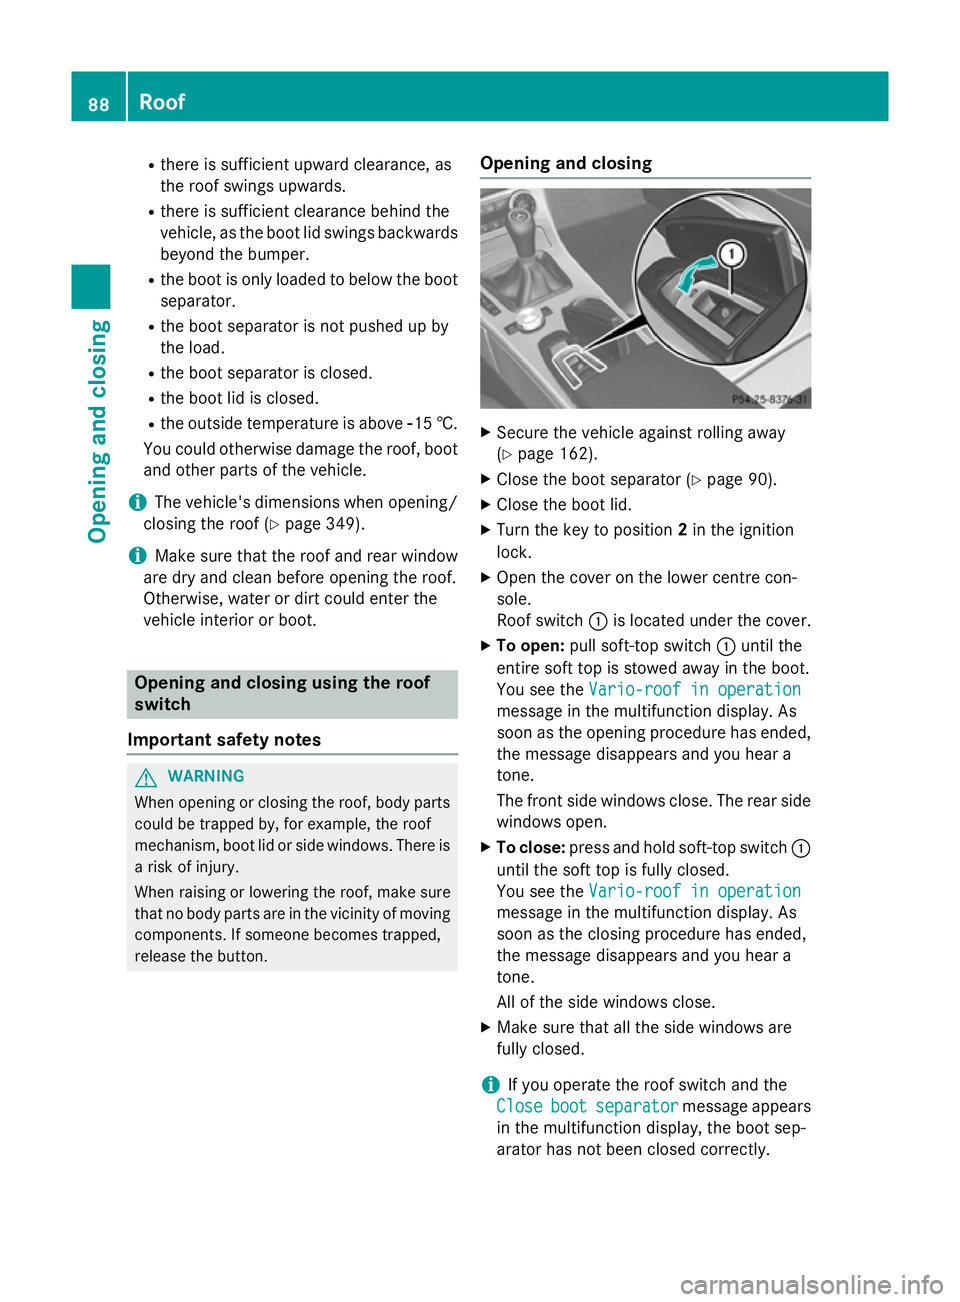
X Open the cover on the lower centre con-
sole.
Roof switch :is located under the cover.
X To open: pull soft-top switch :until the
entire soft top is stowed away in the boot.
You see the Vario-roof in operation
Vario-roof in operation
message in the multifunction display. As
soon as the opening procedure has ended,
the message disappears and you hear a
tone.
The front side windows close. The rear side windows open.
X To close: press and hold soft-top switch :
until the soft top is fully closed.
You see the Vario-roof in operation Vario-roof in operation
message in the multifunction display. As
soon as the closing procedure has ended,
the message disappears and you hear a
tone.
All of the side windows close.
X Make sure that all the side windows are
fully closed.
i If you operate the roof switch and the
Close Close boot bootseparator
separator message appears
in the multifunction display, the boot sep-
arator has not been closed correctly. 88
RoofOpening and closing
Page 317 of 357
Useful information
i This Owner's Manual describes all mod-
els, series and optional equipment for your
vehicle that were available at the time of
going to press. National variations are pos- sible. Note that your vehicle may not be
equipped with all of the functions descri-
bed. This is also the case for systems and
functions relevant to safety.
i Read the information on qualified special-
ist workshops: (Y page 24). Important safety notes
G
WARNING
If wheels and tyres of the wrong size are used, the wheel brakes or suspension components
may be damaged. There is a risk of an acci-
dent.
Always replace wheels and tyres with those
that fulfil the specifications of the original
part.
When replacing wheels, make sure to fit the
correct:
R designation
R type
When replacing tyres, make sure to fit the
correct:
R designation
R manufacturer
R type G
WARNING
A flat tyre severely impairs the driving, steer-
ing and braking characteristics of the vehicle.
There is a risk of accident.
Tyres without run-flat characteristics:
R do not drive with a flat tyre.
R immediately replace the flat tyre with your
emergency spare wheel or spare wheel, or
consult a qualified specialist workshop. Tyres with run-flat characteristics:
R pay attention to the information and warn-
ing notices on MOExtended tyres (tyres
with run-flat characteristics).
Accessories that are not approved for your
vehicle by Mercedes-Benz or that are not
being used correctly can impair the operating
safety.
Before purchasing and using non-approved
accessories, visit a qualified specialist work-
shop and enquire about:
R suitability
R legal stipulations
R factory recommendations
Information on dimensions and types of
wheels and tyres for your vehicle can be
found (Y page 328).
Information on air pressure for the tyres on
your vehicle can be found:
R on the tyre pressure label on the fuel filler
flap (Y page 160)
R in the "Tyre pressure" section
Modification work on the brake system and
wheels is not permitted. The use of wheel
spacers or brake dust shields is not permit-
ted. This invalidates the general operating
permit for the vehicle.
i Further information on wheels and tyres
can be obtained at any qualified specialist
workshop. Operation
Information on driving
Check the tyre pressures when the vehicle is
heavily laden and, if necessary, adjust.
While driving, pay attention to vibrations,
noises and unusual handling characteristics,
e.g. pulling to one side. This may indicate that the wheels or tyres are damaged. If you sus-
pect that a tyre is defective, reduce your
speed immediately. Stop the vehicle as soon
as possible to check the wheels and tyres for 314
OperationWheels and tyres
Page 326 of 357
Radio type approval for the tyre pres-
sure monitor Country Radio type approval number
Brazil 2770-12-8001
Model: MW2433A
0381-13-8001
Model: GG4
Dubai TRA, Registered NO
ER0092100/12
TRA, Registered NO
ER0099792/12
TRA, Registered NO
ER0076990/11
Dealer-NO: DA0047074/10
Jordan Model: Gen Alpha Wal 2 TPMS
transmitter
Type Approval Number:
TRC/LPD/2012/114
Model: Gen Gamma Gen 4
433.92 Mhz.
Type Approval Number:
TRC/LPD/2012/190
Model: Corax 3 MRXMC34MA4
Type Approval Number:
TRC/LPD/2011/158
Type Number: LPD Morocco MR7319 ANRT 2012/
11/07/2012
MR7672 ANRT 2012/
23/11/2012
MR6706 ANRT 2011
Moldova 1024
Philip-
pines No: ESD-1206394C
No: ESD-1306995C
Serbia И 011 12 Country Radio type approval number
Singa-
pore Compliance with IDA Standard
DA- 103365
South
Africa TA-2012/719
TA-2012/1540
TA-2011/1370
Changing a wheel
Flat tyre
You can find information on what to do in the event of a flat tyre in the "Breakdown assis-
tance" section (Y page 296). Information on
driving with MOExtended tyres in the event of a flat tyre can be found under "Breakdown
assistance" (Y page 296). Interchanging the wheels
G
WARNING
Interchanging the front and rear wheels may
severely impair the driving characteristics if
the wheels or tyres have different dimensions. The wheel brakes or suspension components may also be damaged. There is a risk of acci-
dent.
Interchange front and rear wheels only if the
wheels and tyres are of the same dimensions.
! On vehicles fitted with a tyre pressure
monitor, electronic components are loca-
ted in the wheel.
Tyre-fitting tools should not be applied in
the area of the valve, as this could damage
the electronic components.
Only have tyres changed at a qualified spe- cialist workshop.
Interchanging front and rear wheels of differ- ing dimensions can render the general oper-
ating permit invalid.
Always pay attention to the instructions and
safety notes when changing a wheel
(Y page 324). Changing a wheel
323Wheels and tyres Z